IOAA-783 / 8057867
(06.2016/1)
(EN) INSTRUCTION MANUAL
..........................................
2
(NL) GEBRUIKERSHANDLEIDING
...............................
34
KMI*
PG4VI515FTB4P3
PG4VI515AFTB4P3
Page 1: ...IOAA 783 8057867 06 2016 1 EN INSTRUCTION MANUAL 2 NL GEBRUIKERSHANDLEIDING 34 KMI PG4VI515FTB4P3 PG4VI515AFTB4P3 ...
Page 2: ...u have read and understood this manual thoroughly The appliance is designed solely for cooking Any other use eg heating a room is incompatible with the appliance s intended purpose and can pose a risk to the user The manufacturer reserves the right to introduce changes which do not affect the operation of the appliance EN Certificate of compliance CE The Manufacturer hereby declares that this prod...
Page 3: ...3 CONTENTS Basic Information 2 Safety instructions 4 Description of the appliance 9 Installation 11 Operation 18 Cleaning and maintenance 29 Troubleshooting 31 Specification 33 ...
Page 4: ...ck of experience and knowledge if they have been given supervision or instruction concerning use of the appliance in a safe way and understand the hazards involved Children shall not play with the appliance Cleaning and user maintenance shall not be made by children without supervision Warning Unattended cooking on a hob with fat or oil can be dangerous and may result in fire NEVER try to extingui...
Page 5: ...nives forks spoons and lids should not be placed on the hob surface since they can get hot After use switch off the hob element by its control and do not rely on the pan detector The appliance is not intended to be operated by me ans of an external timer or separate remote control system You should not use steam cleaning devices to clean the appliance ...
Page 6: ...nsory handicaps or by those who are inexperienced or unfamiliar with the appliance unless under supervision or in accordance with the instructions as communicated to them by persons responsible for their safety Persons with implanted devices which support vital functions eg pacemaker in sulin pump or hearing aids must ensure that these devices are not affected by the induction hob the frequency of...
Page 7: ...racked switch off power to avoid the risk of electric shock Do not use the cooking surface as a cutting board or work table Do not place metal objects such as knives forks spoons lids and aluminium foil on the cooking surface as they could become hot Do not install the hob over a heater without a fan over a dishwasher refrigerator freezer or washing machine If the hob has been built in the kitchen...
Page 8: ...ron mental and health hazards resulting from the presence of dangerous components and the inappropriate storage and processing of such goods In accordance with European Directive 2002 96 EC and Polish legislation regarding used electrical and electronic goods this appliance is marked with the symbol of the crossed out waste container HOW TO SAVE ELECTRICITY Using the electricity in a re sponsible ...
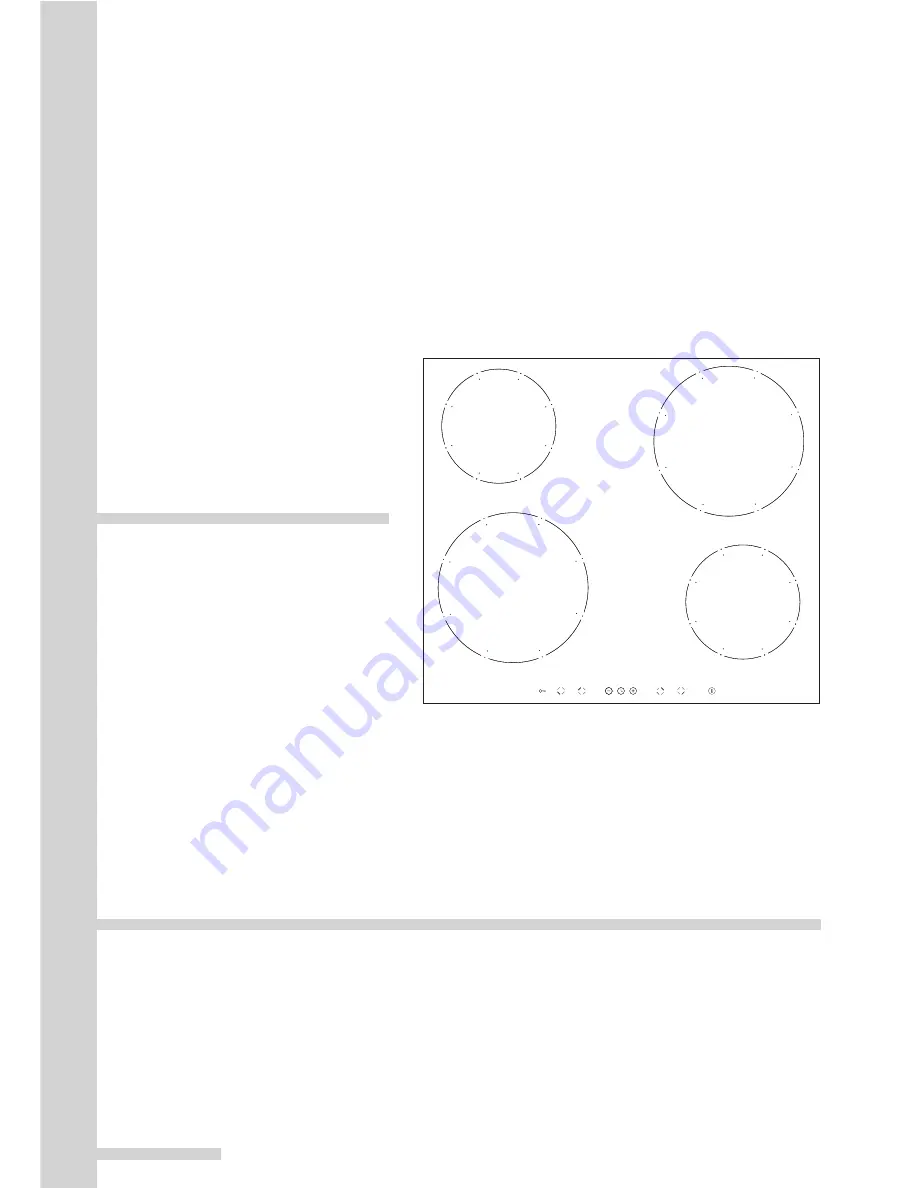
Page 9: ...Lower heat setting selector 5 Cooking zone selection sensor 6 Timer sensor 7 Child lock sensor 8 Timer indicator light 9 Child lock indicator light 10 Timer display Booster induction cooking zone rear left Booster induction cooking zone rear right Booster induction cooking zone front left Booster induction cooking zone front right 2 3 1 6 4 3 9 5 7 5 8 8 10 ...
Page 10: ... Lower heat setting selector 5 Cooking zone selection sensor 6 Timer sensor 7 Child lock sensor 8 Timer indicator light 9 Child lock indicator light 10 Timer display Booster induction cooking zone rear left Booster induction cooking zone rear right Booster induction cooking zone front left Booster induction cooking zone front right 2 3 1 6 4 3 9 5 7 5 8 8 10 ...
Page 11: ...nt edge of worktop l The distance between the edge of the opening and the side wall of the furniture should be minimum 55 mm l Worktop must be made of materials including veneer and adhesives resistant to a tem perature of 100 C Otherwise veneer could come off or surface of the worktop become deformed l Edge of the opening should be sealed with suitable materials to prevent ingress of wa ter l Wor...
Page 12: ...nt edge of worktop l The distance between the edge of the opening and the side wall of the furniture should be minimum 55 mm l Worktop must be made of materials including veneer and adhesives resistant to a tem perature of 100 C Otherwise veneer could come off or surface of the worktop become deformed l Edge of the opening should be sealed with suitable materials to prevent ingress of wa ter l Wor...
Page 13: ...stall the hob above the oven without ventilation Fig 2 Installing hob in kitchen cabinet worktop Installing hob in kitchen worktop above oven with ventilation INSTALLATION 5 10mm 5 10mm 500x10mm 25mm 30mm 500x20mm ...
Page 14: ...e gasket must be applied on the appliance as follows Before fitting the appliance in the kitchen worktop apply self adhesive foam gasket provided underneath the rim before applying remove the protective film from the self adhesive foam gasket apply the self adhesive foam gasket underneath the appliance rim Figure ...
Page 15: ...MI hob Using an electrical cord connect the hob according to electrical diagram provided Remove dust from the worktop insert hob into the opening and press in firmly Figure 3 Fig 3 1 Worktop 2 Hob flange gasket 3 Ceramic hob 3 2 1 ...
Page 16: ...de Remember to match the power cord to the type of connection and the hob s power rating Important Remember to connect the neutral lead to correct terminal block clamp marked with The electrical system supplying the hob must be protected by a properly selected tripping device or a circuit breaker allowing to disconnect the power supply in an emergency Before connecting the appliance to power pleas...
Page 17: ... to terminal N and the protective conductor to 1N HO5VV FG 3X 4 mm2 min 30 A 2 For a 230 400 V two phase con nection with a neutral lead neutral leadisconnectedtoterminalN and the protective conductor to 2N HO5VV FG 4X2 5mm2 min 16 A L1 R L2 S L3 T N neutral lead connection protective lead terminal For domestic 3 phase 230 400 V electrical system connect the remaining wire to the terminal L3 which...
Page 18: ... no thermal inertia since the cooking starts immediately when the pot is placed on the hob and ends once it is removed Certain sounds can be heard during normal use of the induction hob which do not affect its correct operation Low frequency humming This noise arises when the cookware is empty and stops when water is poured or food is placed in the cookware High frequency whizz This noise arises i...
Page 19: ...a finger Each time a sensor field is touched an acoustic signal can be heard If a pan is not placed on a cooking zone or the pan is unsuitable the symbol is displayed The cooking zone will not operate If a pan is not detected within 10 minutes the cooking zone will be switched off Switch off the cooking zone using the touch control sensor field rather than by remo ving the pan The protective devic...
Page 20: ...y the induction module The concave base or deep embossed logo of the manufacturer interfere with the temperature induction control module and can cause overheating of the pot or pan Do not use damaged cookware such as cookware with deformed base due to exces sive heat When you use large ferromagnetic base cookware whose diameter is less than the total diameter of the cookware only the ferromagneti...
Page 21: ...gh efficiency Cookware with a flat thick and smooth base is re commended Glass Cookware is not detected Porcelain Cookware is not detected Cookware with copper base Cookware is not detected For induction cooking us only ferromagnetic base materials such as enamelled steel cast iron special stainless steel cookware designed for induction cooking Cookware size Energy is transferred best when cookwar...
Page 22: ... sensor field Switch on the cooking zone Once the appliance is switched on using the on off touch sensor 1 select a cooking zone 5 within the next 10 seconds 1 When a cooking zone selection sensor field 5 is touched 0 on the corresponding heat setting indicator display will pulsate 2 Set the desired heat setting using the 2 or 4 sensor fields Switch on the appliance To switch on the appliance touc...
Page 23: ...ing to 9 and then touch the 2 sensor field again The letter P will be shown on the display To deactivate the Booster function touch the 4 sensor field to reduce the heat setting or lift the cookware from the cooking zone For 210 mm and 160 mm cooking zone operation of the Booster function is lim ited to 10 minutes Once the Booster function is automatically deactivated the cooking zone continues to...
Page 24: ...on is on During failure of power supply H residual heat indicator is not dis played However cooking zones may still be hot Residual heat indicator Heat energy that remains accumulated in the cooking zone after cooking is called the re sidual heat The appliance displays two different levels of residual heat When a cooking zone temperature is above 60 C and the cooking zone or the appliance is switc...
Page 25: ...sensor 5 to activate the selected cooking zone Then touch 2 or 4 to set the desired heat setting in the 1 8 range and then touch sensor 5 again The display will alternate between the letter A and the heat setting After a certain time of operation at boosted power the cooking zone switches back to the heat setting set which will be shown on the display If a pot is lifted from the cook ing zone and ...
Page 26: ... fields within 10 seconds Touch 2 or 4 sensor field to set the desired cooking time 01 to 99 minutes Timer indicator light 8 of a relevant cooking zone will be on If more than one timer is set the shortest duration is displayed Timer indicator light 8 of a relevant cooking zone will flash Change Timer Duration Timer Duration setting can be changed at any time Touch cooking zone selection sensor fi...
Page 27: ...ction can be used as a regular Kitchen Timer Set Kitchen Timer When the appliance is off Switch on the appliance by touching the on off sensor 1 Then touch sensor 6 to activate kitchen timer Use 2 or 4 sensor field to adjust the Kitchen Timer setting Stop Kitchen Timer When the set Duration has elapsed an acoustic signal is sounded which can be muted by touching any sensor field If no sensor field...
Page 28: ...rrectly use a flat base pot or frying pan so that base temperature is accurately measured by the temperature sensor fitted in the cooking zone The Keep Warm function can be activated for any cooking zone Due to a risk of the growth of microorganisms it is not recommended to keep food warm for a long time so the Keep Warm function is switched off after 2 hours Keep warm setting is an additional hea...
Page 29: ...owders or pads Do not use steam or pressure cleaners Removing stains Bright stains of pearl colour residual aluminium can be removed from the cool hob using a special cleaning agent Limestone residue eg after evaporated water can be removed by vinegar or a special cleaning agent Do not turn off the cooking zone when removing sugar food containing sugar plastic and aluminium foil Immediately and th...
Page 30: ...nd contact customer service Important In the event of breakage or chipping of the hob cooking surface turn off and unplug the appliance To do this disconnect the fuse or unplug the appliance Then refer the repair to professional service Periodic inspections In addition to normal cleaning and maintenance carry out periodic checks of touch controls and other elements After the warranty expires have ...
Page 31: ... multiple sensors touched at the same time always touch only one sensor field except when a cooking zone is switched off 3 The appliance does not respond and emits and extended beep improper use wrong sensor fields touched or sensors touched too briefly reconnect the hob sensor fields covered or dirty uncover or clean the sen sor fields 4 The appliance switches itself off no sensor field is touche...
Page 32: ...entre Important You are responsible for operating the appliance correctly and maintaining its good condition If you call service as a result of operating the appliance incorrectly you will be responsible for the costs incurred even under warranty The manufacturer shall not be held liable for damage caused by failure to follow this manual 9 Induction hob makes buzzing sound This is normal Cooling f...
Page 33: ...ion cooking zone Ø 160 mm 1200 W 1200 W induction cooking zone Ø 210 mm 2000 W 2000 W Booster induction cooking zone Ø 210 mm 2000 3000 W 2000 3000 W Booster induction cooking zone Ø 160 mm 1200 1400 W 1200 1400 W Dimensions 576 x 518 x 50 770 x 518 x 50 Weight ca 10 5 kg ca 15 kg Meets the requirements of European standards EN 60335 1 EN 60335 2 6 ...
Page 34: ...e voorkomen Attentie Het apparaat alleen gebruiken nadat u deze gebruiksaanwijzing hebt doorgelezen Het apparaat is uitsluitend bestemd om te koken Iedere andere toepassing van het apparaat bijv om ruimtes te verwarmen is oneigenlijk en kan gevaarlijk zijn De producent behoudt zich het recht voor om wijzigingen aan te brengen die het gebruik van het apparaat niet beïnvloeden NL Verklaring van de p...
Page 35: ...NHOUDSOPGAVE Basisinformatie 34 Aanwijzingen voor veilig gebruik 36 Beschrijving van het product 41 Installatie 43 Bediening 50 Reiniging en onderhoud 61 Handelwijze bij storingen 63 Technische gegevens 65 ...
Page 36: ...n of personen zonder ervaring met of kennis van het apparaat als dit gebruik plaat svindt onder toezicht of in overeenstemming met de gebruiksaanwijzing van het apparaat door personen die verantwoordelijk zijn voor hun veiligheid Zorg ervoor dat kinderen niet met het apparaat kunnen spelen Kinderen mogen de kookplaat niet zonder toezicht schoonmaken of onderhoudswerkzaamhe den verrichten Attentie ...
Page 37: ...en metalen voorwerpen als messen vorken lepels deksels en aluminiumfolie op de oppervlakte van de kookplaat zij kunnen heet worden Schakel de kookplaat na afloop van het gebruik uit met de regelaar vertrouw niet op de pandetectie Het apparaat is niet bedoeld voor aansturing met een externe tijdschakelaar of een apart systeem voor afstandsbesturing Gebruik geen stoomreinigers voor het schoonmaken v...
Page 38: ...met lichame lijke of geestelijke beperkingen of personen zonder ervaring met of kennis van het apparaat tenzij dit gebruik plaatsvindt onder toezicht of overeenkomstig de gebruiksaanwijzing van het apparaat door personen die verantwoordelijk zijn voor hun veiligheid Personen met implantaten die helpen bij de lichaamsfuncties bv pacemaker insuli nepompje of gehoorapparaten moeten controleren of de ...
Page 39: ...at Schakel de stroom uit als de oppervlakte is gebarsten om elektrische schokken te voor komen Gebruik de oppervlakte van de kookplaat niet als snijplank of werkvlak Leg geen metalen voorwerpen als messen vorken lepels deksel en aluminiumfolie op de oppervlakte van de kookplaat zij kunnen heet worden Bouw de kookplaat niet in boven een oven zonder ventilator of boven een afwasmachine koelvrieskast...
Page 40: ...ver mijden van consequenties die schadelijk zijn voor de menselijke gezondheid en de natu urlijke omgeving en die voortkomen uit de aanwezigheid van gevaarlijke bestanddelen en verkeerde opslag en verwerking van der gelijke apparatuur Dit product is in overeenstemming met de Europese richtlijn 2002 96 EG en de Poolse wet op gebruikte elektrische en elektroni sche apparatuur gemerkt met het symbool...
Page 41: ...ts 3 Kookzone indicatie 4 Min tiptoets 5 Keuzetoetsen voor de kookzones 6 Tiptoets timer 7 Tiptoets sleutel 8 Signaaldiode klok 9 Signaaldiode tiptoets kinderslot 10 Aanduiding klok Inductiekookzone booster linksachter Inductiekookzone booster rechtsachter Inductiekookzone booster linksvoor Inductiekookzone booster rechtsvoor 2 3 1 6 4 3 9 5 7 5 8 8 10 ...
Page 42: ...ts 3 Kookzone indicatie 4 Min tiptoets 5 Keuzetoetsen voor de kookzones 6 Tiptoets timer 7 Tiptoets sleutel 8 Signaaldiode klok 9 Signaaldiode tiptoets kinderslot 10 Aanduiding klok Inductiekookzone booster linksachter Inductiekookzone booster rechtsachter Inductiekookzone booster linksvoor Inductiekookzone booster rechtsvoor 2 3 1 6 4 3 9 5 7 5 8 8 10 ...
Page 43: ...al 50 mm l De afstand tussen de rand van de opening en de zijkant van het keukenkastje moet mi nimaal 55 mm bedragen l De bekleding van de inbouwmeubelen en de lijm waarmee deze is vastgelijmd moeten bestand zijn tegen temperaturen van 100 C Als niet aan deze voorwaarde wordt voldaan kan het oppervlak vervormen of de bekleding loslaten l Bescherm de randen van de opening met materiaal dat bestand ...
Page 44: ...aal 50 mm l De afstand tussen de rand van de opening en de zijkant van het keukenkastje moet mi nimaal 55 mm bedragen l De bekleding van de inbouwmeubelen en de lijm waarmee deze is vastgelijmd moeten bestand zijn tegen temperaturen van 100 C Als niet aan deze voorwaarde wordt voldaan kan het oppervlak vervormen of de bekleding loslaten l Bescherm de randen van de opening met materiaal dat bestand...
Page 45: ...om de kookplaat in te bouwen boven een oven zonder ventilatie Afb 2 Inbouw in het werkblad van een dragend kastje Inbouw in het werkblad boven een oven met ventilatie INSTALLATIE 5 10mm 5 10mm 500x10mm 25mm 30mm 500x20mm ...
Page 46: ...boden Breng de dichting als volgt op het apparaat aan Plak de meegeleverde schuimrubber dichting op de onderkant van het frame van de kookplaat voordat u het apparaat in het werkblad inbouwt verwijder de beschermende folie van de dichting plak de dichting vervolgens op de onderkant van het frame afb ...
Page 47: ...e kookplaat aan met een elektrische kabel volgens het meegeleverde aansluit schema maak het werkblad stofvrij leg de kookplaat in de opening en druk hem stevig tegen het werkblad Afb 3 Afb 3 1 werkblad 2 dichting van de kookplaat 3 keramische plaat 3 2 1 ...
Page 48: ...luitblok Vergeet niet om de juiste aansluitkabel te kiezen die overeenstemt met het soort aansluiting en het nominale vermogen van de kookplaat Attentie Vergeet niet om de aardleiding te bevestigen aan de met het symbool gelabelde klem op het aansluitblok De elektrische installatie die de kookplaat van stroom voorziet moet voorzien zijn van een juist gekozen zekering of een veiligheidsschakelaar o...
Page 49: ...L1 L2 de nulleiding aan N de aardleiding aan 1N HO5VV FG 3X 4 mm2 min 30 A 2 Voor het 230 400 V lichtnet een tweefasige aansluiting met nul leiding de nulleiding aan N de aardleiding aan 2N HO5VV FGL 4X2 5mm2 min 16 A L1 R L2 S L3 T N klem van de nulleiding klem van de aardleiding Bij een driefasige 230 400 V huishoudelijke installatie de overgebleven leiding aansluiten op klem L3 die niet is verb...
Page 50: ...plaat wordt afgehaald Bij normaal gebruik van de inductiekookplaat kunt u verschillende geluiden horen die geen invloed hebben op de werking van de kookplaat Fluittoon met een lage frequentie Dit geluid hoort u wanneer het kookgerei leeg is Zodra u het gerei vult met water of een gerecht stopt het Fluittoon met een hoge frequentie Dit geluid ontstaat bij maximaal vermogen in kookgerei dat is opgeb...
Page 51: ...ingevoerde besturingssignalen Bij langdurig aanraken klinkt het foutsignaal Schakel de kookzones na afloop van het gebruik uit met de regelaar vertrouw niet op de pandetectie De inductiekookplaat is uitgerust met sensors die worden geactiveerd door met de vinger een gemerkt oppervlak aan te raken tiptoetsen Elke aanraking van een tiptoets gaat gepaard met een geluidssignaal BEDIENING Veiligheidsin...
Page 52: ...okgerei vlak zijn Een holle bodem of een diep ingeslagen logo van de producent hebben een negatieve invloed op de temperatuurcontrole door de inductiemodule en kunnen oververhit ting van het kookgerei veroorzaken Gebruik geen beschadigd kookgerei bv met een bodem die door te hoge temperaturen is gedeformeerd Bij toepassing van groot kookgerei met een ferromagnetische bodem waarvan de diameter klei...
Page 53: ...akke en gladde bodem Glas Aanwezigheid pan niet ontdekt Porselein Aanwezigheid pan niet ontdekt Pannen met een kope ren bodem Aanwezigheid pan niet ontdekt Gebruik voor inductiekoken uitsluitend ferromagnetisch kookgerei van materialen als geëmailleerd staal gietijzer kookgerei van roestvrij staal dat geschikt is voor inductiekoken Afmetingen kookgerei De energie wordt het beste overgedragen als d...
Page 54: ...2 en 4 Inschakelen van de kookzone Schakel de gewenste kookzone 5 in binnen 10 seconden na het aanzetten van de kookplaat met de tiptoets 1 1 Na aanraking van de tiptoets van de gewenste kookzone 5 knippert op de bijbehorende indicator voor het vermogensniveau het verlichte cijfer 0 2 U kunt nu het gewenste verwarmingsniveau instellen met de tiptoetsen 2 of 4 Inschakelen van de kookplaat Raak de t...
Page 55: ...olgens raakt u de tiptoets 2 aan waardoor de letter P op de display verschijnt U schakelt de boosterfunctie uit door de tiptoets 4 aan te raken bij een actieve inductie kookzone of nadat u de pan van de inductiekookzone heeft gehaald Voor de kookzones Ø 210 en Ø 160 is de werkingsduur van de boosterfunctie door het bedieningspaneel beperkt tot 10 minuten Na de automatische uitscha keling van de bo...
Page 56: ...drukt te houden Het inschakelen van de kinderslotfunctie wordt gesignaleerd doordat de diode 9 gaat branden Bij stroomonderbreking wordt de restwarmteindicator H niet getoond Ondanks dat kan de kookzone nog steeds heet zijn Restwarmte indicator Na afloop van het koken blijft in het keramische glas warmte energie achter die restwarmte wordt genoemd Het tonen van de restwarmte vindt plaats in twee e...
Page 57: ... 5 Stel vervolgens met de tiptoetsen 2 en 4 het vermogensniveau in binnen het bereik van 1 8 en druk opnieuw op tiptoets 5 Op de display worden afwisselend het cij fer van het ingestelde vermogensniveau en de letter A getoond Na verloop van de tijd dat extra vermogen wordt geleverd schakelt de kookzone automatisch over op het door u gekozen vermogensniveau dat zichtbaar is op de indicator Wanneer ...
Page 58: ...p van tiptoetsen 2 of 4 de gewenste kooktijd in 01 tot 99 minu ten Bij de display van de timer brandt de diode 8 die overeenkomt met de kookzone Wanneer er meer dan één tijd is ingesteld op de display van de timer dan wordt de kortste ingestelde tijd getoond Dit wordt extra aangeduid met een knippe rende diode 8 Wijziging van de ingestelde kooktijd Op ieder moment van het kookproces kunt u de inge...
Page 59: ...rd Aanzetten kookwekker Wanneer de kookplaat is uitgeschakeld Schakel de kookplaat in door de tiptoets in uitschakelen van de kookplaat 1 aan te raken Activeer vervolgens met de tiptoets 6 de kookwekker Stel met behulp van de tiptoetsen 2 of 4 de tijd van de kookwekker in Uitschakelen kookwekker Na afloop van de ingeprogrammeerde tijd klinkt een doorlopend geluidssignaal U kunt het uitschakelen do...
Page 60: ...ssing van deze functie is het gebruik van een geschikte pan met een vlakke bodem zodat de temperatuur van de pan exact gemeten kan worden door de voeler die zich in de kookzone bevindt U kunt de warmhoudfunctie op iedere kookzone gebruiken Uit microbiologische overwegingen bevelen wij aan om de geruchten niet te lang warm te hou den Het bedieningspaneel schakelt deze functie dan ook na 2 uur uit D...
Page 61: ... schoonmaakmiddelen schuurpoeders of schuursponsjes met een ruw oppervlak Gebruik ook geen stoomcleaners Vlekken verwijderen Lichte parelmoerkleurige vlekken aluminiumresten kunt u verwijderen van de afgekoelde kookplaat met behulp van een speciaal reinigingsmiddel Kalkresten van overgekookt water verwijdert u met azijn of speciale reinigingsmiddelen Schakel de kookzone niet uit als u suiker suike...
Page 62: ...ef de zekering los en neem vervolgens contact op met de klantenservice Attentie Mochten er barsten of breuken in uw keramische glasplaat verschijnen schakel dan onmiddellijk de kook plaat uit en verbreek de aansluiting met het lichtnet Draai hiertoe de zekering los of haal de stekker uit het stopcontact Neem vervolgens contact op met de klantenservice Periodieke onderhoudsbeurten Naast de normale ...
Page 63: ... tegelijkertijd meerdere tiptoetsen aangeraakt raak altijd maar één tipto ets tegelijk gaan uitgezon derd het inschakelen van de kookzone 3 Het apparaat reageert niet en laat een kort geluidssi gnaal horen onjuiste bediening de ver keerde tiptoetsen aangera akt of te snel aangeraakt schakel de kookplaat opnieuw in de tiptoets en is zijn bedekt of verontreinigd de tiptoetsen vrijmaken of schoonmake...
Page 64: ...et juiste gebruik ervan in de huishouding Als u op basis van onjuist gebruik van het apparaat contact opneemt met de klantenservice dan zijn ook binnen de garantieperiode de kosten van zo n bezoek voor u Voor schade die is ontstaan door het niet in acht nemen van deze gebruiksaanwijzing kunnen wij helaas niet aansprakelijk gesteld worden 9 De inductiekookplaat ma akt een schurend geluid Dat is een...
Page 65: ...ductiekookzone inductiekookzone Ø 160 mm 1200 W 1200 W inductiekookzone Ø 210 mm 2000 W 2000 W inductiekookzone booster Ø 210 mm 2000 3000 W 2000 3000 W inductiekookzone booster Ø 160 mm 1200 1400 W 1200 1400 W Afmetingen 576 x 518 x 50 770 x 518 x 50 Gewicht ca 10 5 kg ca 15 kg Voldoet aan de normen EN 60335 1 EN 60335 2 6 die gelden in de Europese Unie ...
Page 66: ...66 ...
Page 67: ...67 ...
Page 68: ...68 ...