IO-HOB-1252 / 8509047
(01.2020 / v1)
(EN) OPERATING MANUAL.........................................2
(NL) GEBRUIKERSHANDLEIDING.............................24
PG2VQ203FTN (KMC 13381 E)
Page 1: ...IO HOB 1252 8509047 01 2020 v1 EN OPERATING MANUAL 2 NL GEBRUIKERSHANDLEIDING 24 PG2VQ203FTN KMC 13381 E ...
Page 2: ... the instruction manual carefully By following these instructions carefully you will be able to avoid any problems in using the appliance It is important to keep the instruction manual and store it in a safe place so that it can be consulted at any time It is necessary to follow the instructions in the manual carefully in order to avoid possible accidents Certificate of compliance CE The Manufactu...
Page 3: ...3 TABLE OF CONTENTS Basic information 2 Safety instructions 4 Description of the appliance 9 Installation 10 Operation 14 Cleaning and maintenance 20 Emergency procedures 22 Technical specification 23 ...
Page 4: ...ck of experience and knowledge if they have been given supervision or instruction concerning use of the appliance in a safe way and understand the hazards involved Children shall not play with the appliance Cleaning and user maintenance shall not be made by children without supervision Warning Unattended cooking on a hob with fat or oil can be dangerous and may result in fire NEVER try to extingui...
Page 5: ...tric appliances can be repaired only by qualified specialists Unprofessional repairs may compromise the safety of the appliance The appliance is disconnected from the mains only when the mains plug is pulled out from the socket or when the fuse has been switched off Never allow children to remain unattended near the cooktop nor to play with the control panel When switched on the hotplates quickly ...
Page 6: ... Boiled over residuals of food may penetrate damaged places and get to the live components of the ceramic plate Should cracks or splits appear on the surface of your ceramic plate immediately disconnect it from the mains In order to do so switch off the fuse or pull out the mains plug from the socket Call the Customer Service Please observe the maintenance and cleaning guidelines Should you fail t...
Page 7: ...t the lid as otherwise the consumption of energy quadruples Matching cookware to the size of the hotplate A cooking pot should neither be smaller nor bigger than the used hotplate Maintaining hotplates and pot bottoms clean Dirt obstructs the transfer of heat heavily burnt food residuals often can be cleaned only with chemicals harmful to the envi ronment Avoiding necessary peeping into pots Not u...
Page 8: ...yrene etc should be kept away from children during unpacking UNPACKING DISPOSING OF THE DEVICE When disposing of the device do not bring it to regu lar municipal waste con tainers Instead bring it to elec trical and electronic waste recycling and reuse cen ter A relevant label has been put on the device its in structions manual or on the package The device has been manufactured of recy clable mate...
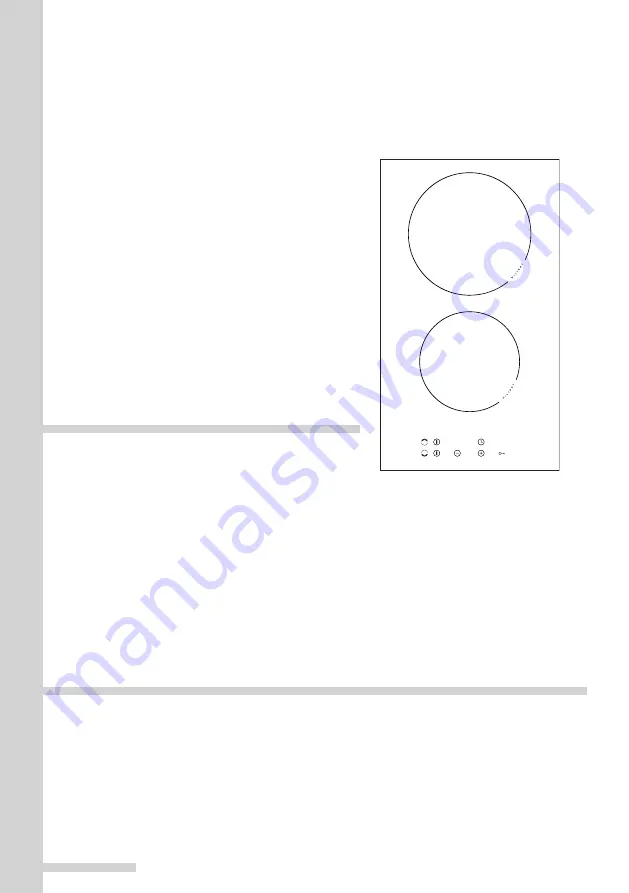
Page 9: ...CE Description of hob Control panel 1 Main sensor 2 Hotplate indicators 3 Minus sensor 4 Plus sensor 5 Keysensorwiththelockfunction 6 Clock indicator 7 Sensor of the clock Back hotplate Ø 180 Front hotplate Ø 145 7 6 5 4 3 2 1 2 1 ...
Page 10: ...the front edge of worktop The distance between the edge of the opening and the side wall of the furniture should be at least 55 mm Worktop must be made of materials including veneer and adhesives resistant to a tem perature of 100 C Otherwise veneer could come off or surface of the worktop become deformed Edge of the opening should be sealed with suitable materials to prevent ingress of water Work...
Page 11: ...itchen cabinet worktop above oven Note When installing the hob in the kit chen worktop install a partition panel as shown on the picture If the hob is to be installed above a built in oven installa tion of the partition panel is not required If the hob was installed in the kitchen worktop above the drawer the bottom cover of the hob must be covered with a wooden panel or protective board for ceram...
Page 12: ...n the appliance as follows Before fitting the appliance in the kitchen worktop apply self adhesive foam gasket provided underneath the rim before applying remove the protective film from the self adhesive foam gasket apply the self adhesive foam gasket underneath the appliance rim Figure some models come with the sealing glued to the board ...
Page 13: ...ttom of the hob Remove dust from the worktop insert hob into the opening and press in firmly Position fixing brackets perpendicularly to the hob s edge and tighten firmly 1 worktop 2 screw 3 fixing bracket 4 hob 5 seal 1 worktop 2 screw 3 fixing bracket 4 hob 5 seal 6 wooden block 3 4 5 Installing hob bracket 2 The hob has a fixed mounted cable with a neutral contact and may only be connected to a...
Page 14: ...ey absorb the heat from the heating plate in an optimum way Before first use OPERATION Connect the hob using the fixed mounted cable approx 1 5 long with a neutral contact Carefully clean the ceramic plate treating it as a glass surface When used for the first time the plate can give off a bit of a smell so switch on the venti lation system or open the window Operate the plate observing the safety...
Page 15: ...itself off If child lock function is activated the appliance cannot be switched on see Release the child lock Touch to turn on the hob and a se lected cooking zone Active cooking zone display will show 0 Now set the desired heat setting using the and touch sensors see Set the heating power Important The hob is on when you activate a cooking zone Set the heat setting When the power is set to 0 you ...
Page 16: ...ing the method described above in the Set the heat setting section Automatic warm up function Each cooking zone is equipped with an automatic warm up function When this is activated then the given cooking zone is switched on at full power for a time depending on the heat setting selected and is then switched back to the heat setting originally set Activate the automatic warm up function by setting...
Page 17: ...o release the lock The Child Lock function The child lock function which is activated by touching the child lock sensor field protects the appliance from being unintentionally operated or switched on by children or pets Setting the child lock function when all cooking zones are switched off protects the cooking surface from inadvertent operation The appliance can be operated once the child lock fu...
Page 18: ...cator is not displayed during a power outage However cooking zones may still be hot Limit the operating time In order to increase efficiency the cooking surface is fitted with a operating time limiter for each of the cooking zones The maximum operating time is set according to the last heat setting selected If you do not change the heat setting for a long time see table then the associated cooking...
Page 19: ...he time from 0 to 99 When you touch or the letter t will be shown on the relevant cooking zone display When both cooking zones operate briefly touch by the cooking zone for which you wish to set the timer Continue as de scribed above When timer is counting down the letter t will alternate with the heat setting on the display When timer counts down to zero the cooking zone will turn off automatical...
Page 20: ...s scrubbing powders or scratching sponges Also do not use steam cleaning devices Removal of stains Li ght pearly stains aluminium re si du es can be removed from cooled plate using special cleaning agents Cal ca re ous re si du es i e boiled over wa ter can be re mo ved with vinegar or spe cial cle aning agents Do not switch off the hotplate when re mo ving sugar sugar containing di shes pla stic ...
Page 21: ...ld cracks or splits appear on the surface of your ceramic plate immediately disconnect the plate from the mains by switching off the fuse or unplugging the plug and call the Customer Service Periodic inspections In addition to current maintenance and care the following shall be arranged for Periodic inspections of control elements and units of the cooktop Upon expiration of the warranty service de...
Page 22: ...or sen sors uncover or clean the sen sors 5 The whole appliance swit ches off no settings have been en te red within 10 seconds from swit ching the plate on again switch on the control panel and im me dia te ly enter the settings covered or dirty sensor sen sors uncover or clean the sen sors 6 One heating zone switches off and H is on the display limited time of operation again switch on the hot p...
Page 23: ...age 230V 1N 50 Hz Rated power 3 0 kW Model PG2VQ203FTN KMC 13381 E hotplate 1 x Ø 145 mm 1200 W hotplate 1 x Ø 180 mm 1800 W Dimensions 520 x 300 x 48 Weight ca 4 2 kg Complies with EU regulations EN 60335 1 EN 60335 2 6 standards ...
Page 24: ...24 NL ...
Page 25: ... toestel mag pas gebruikt worden nadat u deze gebruikershandleiding volledig doorgelezen en begrepen heeft Het toestel is uitsluitend ontworpen voor kookdoeleinden Het gebruik van het toestel voor andere doeleinden bv de verwarming van ruimtes is in tegenstrijd met zijn bestemming en kan gevaar veroorzaken De producent behoudt zich het recht voor om wijzigingen aan te brengen die geen invloed hebb...
Page 26: ...INHOUDSTAFEL Basisinformatie 25 Veiligheidsinstructies 27 Beschrijving van het toestel 32 Installatie 33 Bediening 37 Reiniging en onderhoud 43 Handelswijze bij probleemsituaties 47 Technische gegevens 48 ...
Page 27: ...personen zonder ervaring met of kennis van het apparaat als dit gebruik plaat svindt onder toezicht of in overeenstemming met de gebruiksaanwijzing van het apparaat door personen die verantwoordelijk zijn voor hun veiligheid Zorg ervoor dat kinderen niet met het apparaat kunnen spelen Kinderen mogen de kookplaat niet zonder toezicht schoonmaken of onderhoudswerkzaamhe den verrichten Attentie Het k...
Page 28: ...at ingebouwd wordt moeten bestand zijn tegen een tempera tuur tot 100ºC Dit geldt voor de bekleding randen oppervlakken uit kunststof lijmen en lakken De plaat mag enkel gebruikt worden als ze ingebouwd is Op die manier vermijdt u aan raking met de delen die onder stroom staan Elektrische toestellen mogen enkel door specialisten hersteld worden Onvakkundige herstelling kan de gebruiker ernstig in ...
Page 29: ...e suiker of de kunststof af met een scherpe schraper Bescherm u handen tegen verbranden Gebruik op de kookplaat enkel potten en pannen met een platte bodem die geen scher pe randen of uitsteeksels hebben Anders kunnen er onherstelbare krassen op de plaat ontstaan Het verwarmingsoppervlak van de keramische plaats is bestand tegen thermische schok ken Ze is niet gevoelig voor koude of warmte Laat ge...
Page 30: ...n deksels om het kookproces te controleren Door op verantwoorde wij ze energie te gebruiken bespaart u niet alleen op de kosten van het huishouden maar draagt u ook bewust bij aan de bescherming van het milieu Laten we daarom ons steentje bijdragen aan energiebesparing Dat kan op volgende manier Gebruik van goede kookpotten en pannen Potten met een vlakke en dikke bodem laten toe om tot 1 3 te bes...
Page 31: ...ECYCLAGE VAN GEBRUIKTE TOESTELLEN Op het einde van de gebruik speriode mag dit product niet bij het gewoon huisvuil ge plaatst worden maar moet het afgegeven worden bij een ver zamelpunt voor recyclage van elektrische en elektronische toestellen Dit wordt aangegeven door het gepaste symbool op het product in de ge bruikershandleiding of op de verpakking De materialen die gebruikt zijn bij de pro d...
Page 32: ...jving van kookplaat Bedieningspaneel 1 Hoofdtiptoets 2 Indicatoren kookzones 3 Min tiptoets 4 Plus tiptoets 5 Tiptoets met sleutel en aanduiding kinderslot 6 Aanduiding klok 7 Timer Kookzone achter Ø 180 Kookzone voor Ø 145 7 6 5 4 3 2 1 2 1 ...
Page 33: ...rkant minimaal 50 mm De afstand tussen de rand van de opening en de zijkant van het keukenkastje moet mi nimaal 55 mm bedragen De bekleding van de inbouwmeubelen en de lijm waarmee deze is vastgelijmd moeten bestand zijn tegen temperaturen van 100 C Als niet aan deze voorwaarde wordt voldaan kan het oppervlak vervormen of de bekleding loslaten Bescherm de randen van de opening met materiaal dat be...
Page 34: ... onderkant van het apparaat niet raakt min 25 Attentie Monteer bij de installatie van de kookplaat in het keukenkastje een isola tieplaat volgens de afbeelding hiernaast Wanneer u de kookplaat boven een oven monteert is montage van de isolatieplaat niet nodig Wanneer u de kookplaat installeert in het werkblad boven een lade dan moet u het onderscherm van de kookplaat bedek ken met een houten plaat...
Page 35: ...gt op het apparaat aan Plak de meegeleverde schuimrubber dichting op de onderkant van het frame van de kookplaat voordat u het apparaat in het werkblad inbouwt verwijder de beschermende folie van de dichting plak de dichting vervolgens op de onderkant van het frame afb In sommige modellen is de afdichting aan de plaat vastgelijmd ...
Page 36: ... schoon leg de kookplaat in de opening en druk hem op het blad Plaats de klemmen loodrecht op de rand van de kookplaat en draai ze goed vast 1 Meubelblad 2 Schroef 3 Bevestigingsklem 4 Kookplaat 5 Dichting van de kookplaat 1 Meubelblad 2 Schroef 3 Bevestigingsklem 4 Kookplaat 5 Dichting van de kookplaat 6 Houten blokje 3 4 5 Installatie van kookplaat klem 2 De kookplaat heeft een vaste kabel met e...
Page 37: ...Wees bijzonder voorzichtig met geëmailleerde kookpotten die bij het per ongeluk uitkoken van de inhoud onherstelbare schade kunnen veroorzaken Om een optimaal energieverbruik en optimale kooktijden te bereiken en om te voorkomen dat kokende gerechten op de kookplaat aanbranden moet u volgende richtlijnen naleven Bodem van de pot Potten en pannen voor koken braden moeten een stabiele vlakke bodem h...
Page 38: ...ookplaat en de gekozen kookzone in Op de indicator van de actie ve kookzone wordt gedurende 10 secon den 0 getoond U kunt nu het gewenste vermogensniveau instellen met behulp van tiptoets en tiptoets zie Instelling vermogensniveau Attentie Het inschakelen van de kookplaat staat gelijk aan het inschakelen van de koopzone Instelling vermogensniveau Zolang 0 getoond wordt kunt u het gewens te vermoge...
Page 39: ... voor restwarmte Systeem voor automatische vermindering van het vermogen Elke kookzone is uitgerust met een systeem voor automatische vermindering van het vermo gen Wanneer u dit systeem activeert werkt de kookzone op maximaal vermogen gedurende een bepaalde tijd die afhankelijk is van het gekozen vermogensniveau Na verloop van die tijd schakelt hij terug naar dat niveau U activeert het systeem vo...
Page 40: ... kunt u deblokkeren door de tiptoets gedurende 3 seconden aan te raken Kinderslot Het kinderslot dat wordt ingeschakeld met tiptoets beschermt de ingeschakelde kook zones tegen het onbedoeld uitschakelen door kinderen huisdieren etc Als u de kookplaat blokkeert wanneer alle kookzones zijn uitgeschakeld dan is de kookplaat beschermd tegen het onbedoeld inschakelen Inschakelen is alleen mogelijk nad...
Page 41: ...toond Ondanks dat kan de kookzone nog steeds heet zijn Beperking van de werkingsduur Om de feilloze werking van de kookplaat te vergroten is hij uitgerust met een beperking van de werkingsduur voor elk van de kook zones De maximale werkingsduur wordt vastgesteld op grond van het laatste gekozen vermogensniveau Als u het vermogensniveau gedurende langere tijd zie tabel niet verandert wordt de bijbe...
Page 42: ...en Nadat u de tiptoets of heeft aangeraakt verschijnt op de display van de ingestelde kookzone de letter t Indien beide kookzones zijn ingeschakeld raakt u kort de tiptoets aan van de zone waarvoor u de timer wilt instellen Verder handelt u als hierboven weergegeven Tijdens de werking van de timer verschijnt het vermogensniveau afgewisseld met de letter t op de display Na het verstrijken van de in...
Page 43: ...onzen met een ruw op pervlak gebruikt worden Er mogen ook geen reiniging stoestellen met damp gebruikt worden Verwijderen van vlekken Heldere vlekken met een parelkleur aluminiumresten kunnen met behulp van een speciaal reinigingsmiddel van de afgekoelde plaat verwijderd worden Kalkresten bv na overkoken van water kunnen met azijn of een speciaal reini gingsmiddel verwijderd worden Bij het verwijd...
Page 44: ...n de kookplaat verkeerd behandeld wordt neemt de producent geen verantwoordeli jkheid op zich op basis van de garantie Opgelet Als de besturing om één of an dere reden niet werkt als de plaat al aangeschakeld is moet u de hoofdschakelaar of de zekering uitschakelen en de onderhoudsdi enst contacteren Opgelet Als er barsten of breuken in de keramische plaat ontstaan moet de kookplaat onmiddellijk u...
Page 45: ...nsors vrij of reinig ze 5 Het toestel schakelt zichzelf uit na het aanschakelen werd er geduren de meer dan 10 s geen enkele waarde ingevoerd schakel het bedieningspaneel opnieuw aan en voer onmiddellijk de gegevens in de sensor s is zijn bedekt of vuil maak de sensors vrij of reinig ze 6 Eén van de kookvelden schakelt zichzelf uit beperking van de werkduur schakel het kookveld opnieuw aan de sens...
Page 46: ...0V 1N 50 Hz Nominaal vermogen 3 0 kW Model PG2VQ203FTN KMC 13381 E Kookzone 1 x Ø 145 mm 1200 W Kookzone 1 x Ø 180 mm 1800 W Afmetingen 520 x 300 x 48 Gewicht ca 4 2 kg Voldoet aan de vereisten van de Europese EN 60335 1 EN 60335 2 6 Unie normen ...
Page 47: ...47 ...
Page 48: ......