


15312
200 Series 36V
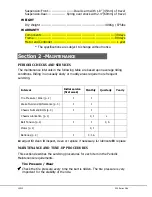
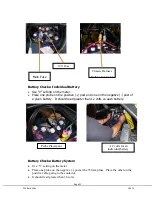
cycle. The indicator is meant to provide the condition of the “typically” lowest
charged battery in the group.
Typically, the indicator will show empty (alternating red lights) well before the
vehicle cannot fully operate. It is okay to operate the vehicle until it slows due
to low voltage, but is recommended to be charged whenever the gauge shows
empty. This will provide the best life of the batteries.
It is normal for the discharge meter to not show an increase in voltage level
until charging has completed. Battery voltage must be greater than 14.1V for a
minimum of 7 minutes for the gauge to reset. All digital battery indicators have
this characteristic to prevent the gauge from indicating a voltage that is not
relevant. As batteries sit unused, the voltage may creep up, but the useable
potential of the batteries is not there. If the discharge meter is not resetting to
full, the charger should also be indicating a problem on the respective battery.
Section 7 -
C
HASSIS
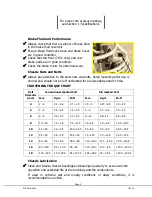
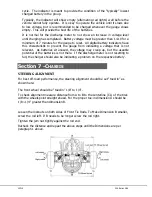
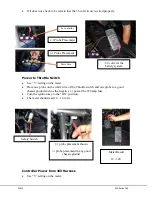
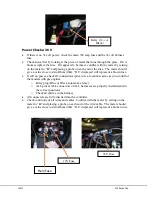
STEERING ALIGNMENT
For best off-road performance, the steering alignment should be set “toed-in” as
shown here:
The front wheel should be “toed-in” 1/8” to 1/4".
To check alignment measure distance from A to B to the centerline (CL) of the tires
with the wheels point straight ahead. For the proper toe-in dimension A should be
1/8 ~1/4" greater than dimension B.
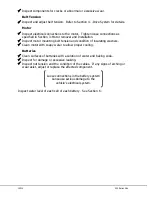
Loosen the locknuts on both sides of Front Tie Rods. To Make Dimension B smaller,
screw the rod left. If B needs to be longer screw the rod right.
Tighten the jam nut tightly against the rod end.
Recheck the distance and repeat the above steps until the Dimensions are per
paragraph 1 above.
Summary of Contents for 36V 200 Series
Page 1: ...15312 Service Manual 200 Series 36V...
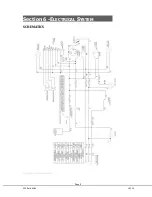
Page 12: ...Page 9 200 Series 36V 15312 Section 6 ELECTRICAL SYSTEM SCHEMATICS Figure 1 Vehicle Schematic...
Page 13: ...15312 200 Series 36V Figure 2 Motor Controller Schematic...
Page 18: ...Page 15 200 Series 36V 15312 Section 8 BRAKES BRAKE SYSTEM REPLACEMENT...


