

Camera Adjustments and Programming
With the exception of the focus and the field of view adjustments (made using levers
C1
and
C2
) all settings for the ADCPW /
ADCPBW series camera are made using its on screen menu display.
Depending upon the application, it may be required to
set the unit for the proper video standard. Please refer to Menu Description, Video Standard section for required
adjustment.
A working video monitor is required to properly view and select options.
1. With power applied to the camera and a video monitor connected, press and hold the
MENU
key on the programming board
(D)
for three seconds to access the top level menu. A map of the menu options are shown below.
2. To navigate through the menus, use the arrow keys on the control board and use the
MENU
key the “
SAVE SETTINGS
” option in
the “
SAVE/RESTORE
” menu. Otherwise any changes made will be lost when the camera is next reset or has its power cycled.
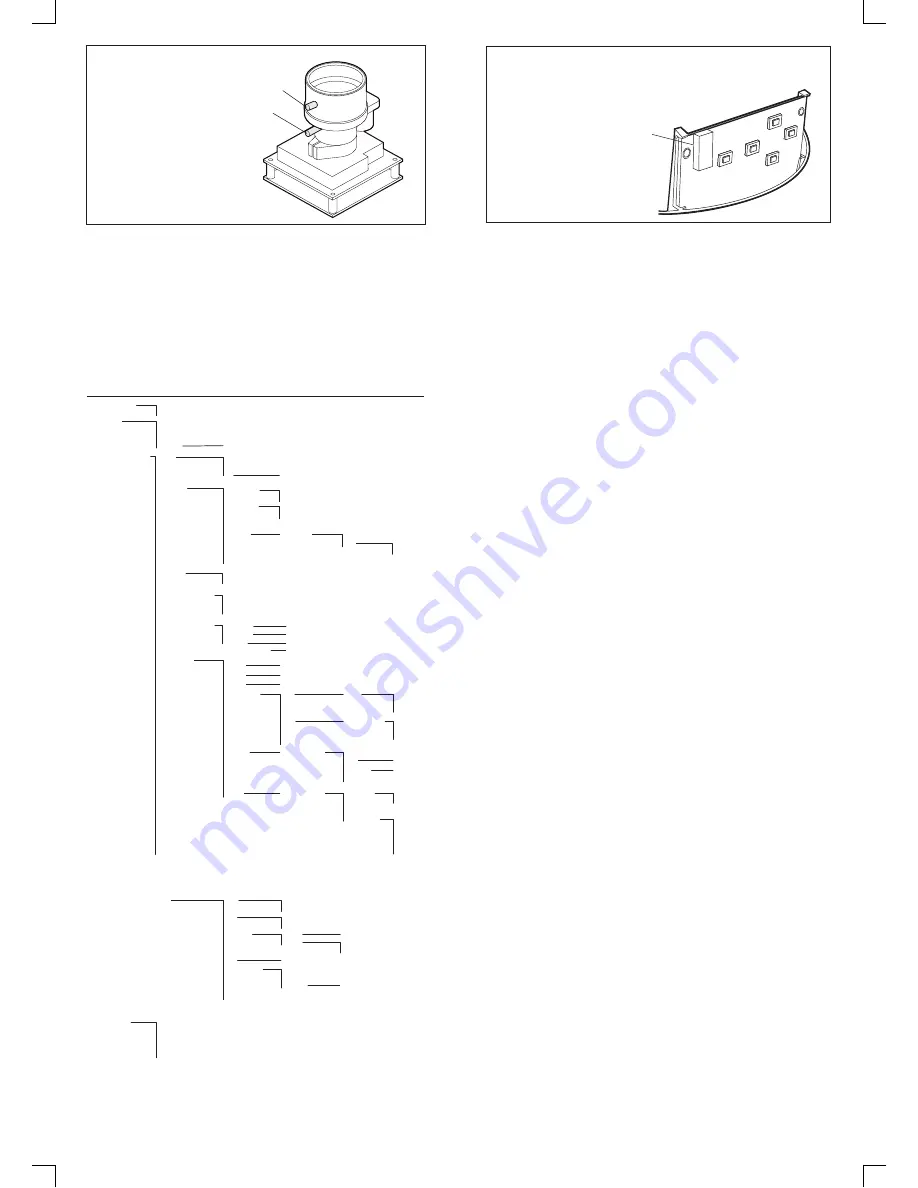
F:
Focus adjuster
G:
Field of view adjuster
C2
C1
LEFT
UP
RIGHT
DOWN
MENU
ADCPWW / ADCPBW
Service / Programming Board
(ADCPWW / ADCPBW WDR only)
C
D
VIDEO STANDARD :
Select the video standard the camera should use - NTSC or PAL (Note- Verify at set up the standard to
what the camera is defaulted to: NTSC or PAL, as this is a dual standard camera and either selection may be made.)
Note: To change the default when a monitor is not available follow the steps below.
1. Power up the camera
2. Press and hold the
MENU
button for 3-5 seconds to access the menu.
3. Press the
RIGHT
button twice (once to select video mode and again to change the default value from NTSC to PAL or
PAL to NTSC).
4. Press and hold the
MENU
button for 3-5 seconds to save the changes.
WDR PRESETS:
These are “factory set” general configurations. Select the preconfigured WDR mode for the camera to give
the best performance for the specified environment. Pressing the
MENU
key on the selected option will display the
pre-configured set-up parameters. If adjustment is necessary, please go to the “WDR METERING ADJUST” zone in the
“GLOBAL CAM SETTINGS” menu.
NORMAL - This should provide the most versatile settings for general purpose applications.
INDOOR or OUTDOOR - These settings are optimized for indoor / outdoor lighting conditions.
CUSTOM - Please refer to ADVANCED CAMERA SETTING.
GLOBAL CAM SETTINGS:
This page contains the standard adjustments needed for camera operation and applies to all
WDR preset modes.
SYNC - Select Synchronization mode
INT - Internally generated sync
INT FL - Internal Flickerless - Internally generated sync that can reduce flicker under florescent lighting.
LL - Line Lock - Sync is locked to the AC supply cycle and pemits adjustment of V-phase to correct for vertical sync picture
roll. (Applicable for 24VAC supply only. If a 12 volt DC power supply is used the camera will run in INT or INT FL modes
only.)
WB MODE -
ATW Normal - Selects a normal Auto White Balance range, for gereral operation. If necessary the range is configu-
rable with low limit (to help with reds)
ATW DESAT - When the camera is operating outside its pre-programmed white balance range, the chroma content is
reduced, to give the resultant image a more natural look, If necessary, the range is configurable with low limit (to
help with reds) and high limit (to help with blues) adjustments.
1 TOUCH - Pressing the
MENU
key sets & fixes the white balance according to current image content. Once set the
white balance will not auto adjust anymore. This is good for static environment applications where lighting conditions
never change, like indoor hallways.
MANUAL - ADJ MODE - Allows manual setting of the colour temperature of the image. This can be achieved by using
the Kelvin or Red/Blue option and permits two methods of setting color balance, by which ever method the installer is
familiar with. This setting is also good for static environment applications where the lighting conditions never change,
like indoor hallways.
ATW Xtnd - Extended Auto White Balance - use this setting for scenes that may have an extremely wide range of
color temperature.
DVR SAVER - When On, The DVR-Saver mode feature may be used to reduce storage requirements when connected to a
digital video recorder. This feature can also be used to reduce bandwidth requirements when connected to a digital
network via an encoder. Note the images may appear slightly “softer” but this will have negligible effect once
compressed in the DVR. When Off-Normal operation.
NIGHT SAVER CONTROL - Day/Night (Color/Monochrome) operation. This feature may be used to improve low
performance by reducing noise from the video signal.
OFF - Forces the camera into Day (Color) only mode regardless of lighting conditions.
ON - Forces the camera into Night (BW) only mode regardless of lighting conditions.
AUTO - In reduced lighting camera switches automatically to Night (black and white) mode and back to Color once
the ambient lighting comes back to normal levels.
WDR METERING ADJ - This feature is used to configure the area used for WDR light metering - Tapping the
MENU
key
reveals a box which is the WDR zone. Repeatedly tapping the
MENU
key changes the color of the zone.
White - Move entire zone’s positon.
Green - Used to increase the size of the zone.
Red - Used to reduce the size of the zone.
Use the arrow keys to adjust the zone position or size. Holding the
MENU
key for 3 seconds returns you to the previous
menu. The default setting will provide good general preformance. If adjustment is necessary, size according to the area of
interest making sure to include all areas of interest. This will dictate how the overall wide dynamic range features
operate. Example: An internal scene viewing a doorway and polished floor. Daylight often streams though the doorway.
It is required to see people entering the doorway and follow them to the left hand side of the picture. The door way is
central to the image. The box should be sized and positioned to cover the doorway and the area to the left where people
walk.
PICTURE ADJ -
COLOR SATURATION - Adjusts overall color content of the image.
BRIGHTNESS - Adjusts overall image brightness.
SHARPNESS - Adjusts overall image sharpness.
FLICKERLESS - Used to help reduce flicker or color rolling under florescent lighting.
FL1 - Standard Setting - *Line Lock sync recommended* (To use Line Lock with FL1 a 24VAC power
supply must be used.)
FL2 - NTSC/50Hz Setting - Select to overcome flicker in a 50Hz NTSC Environment. Must turn on or off via
sub-menu.
GAMMA - GAMMA MODE - Select appropriate gamma mode for type of display. Gamma Correction compensates for
a non linear grayscale in a display device or to make non standard luminance.
CRT - Standard for a CRT based monitor.
LCD - Optimized for LCD monitors. Also has adjustment sub-menu for fine manual control which will display
“manual” if set and saved.
MANUAL - Manual Gamma may be used to enhance detail in low light areas of an image which would normally
not be visible with highlights present in the image.
TITLE - Used to set up camera Id and position on screen.
ADVANED CAMERA SETTINGS:
AGC - Auto Gain Control Setting.
DSS - Digital Slow Shutter Setting.
VIEWING - ZOOM - Digital Zoom 1x to 2X
H FLIP - Video horizontal changed.
FLIP - Mirror Image.
IRIS - IRIS Lens level adjusts.
MGNTA CTRL - Determines range of extended black body color correction.
SAVE/RESTORE:
RESTORE SETTINGS - This will undo any changes made since the last “Save Settings”.
SAVE SETTINGS - Save any programming changes to ensure they are retained after power loss or reset. If changes are not
saved, the camera will revert to the previous settings on power-up.
RESTORE FACTORY SETTINGS - Restore camera settings to factory default - full reset, all previous programming will be
lost including video standard which will default to NTSC.
RESET CAMERA - This is a soft reset and has the same effect as cycling the camera power.
SYSTEM INFO - Displays the camera firmware version - This may be required during any call to American Dynamics
Technical Support.
VIDEO STANDARD
NTSC
PAL
WDR PRESTS
NORMAL
INDOOR
OUTDOOR
CUSTOM
[Same as Advanced Cam Settings]
GLOBAL CAM SETTINGS
SYNC
INT
INT FL
LL
V PHASE
WB MODE
ATW DESAT
1 TOUCH
LOWLIMIT
HIGHLIMIT
MANUAL
ADJ MODE
KELVIN
R/B
RED
BLUE
ATW Xtnd
ATW Normal
LOWLIMIT
HIGHLIMIT
DVR SAVE
OFF
ON
NIGHT SVR CONTROL
OFF
ON
AUTO
WDR METERING ADJ
PICTURE ADJ
BRIGHT
SHARP
FLICKERLESS
FL 1
SYNC
INT
INT FL
LL
FL 2
NTSC JP 50 Hz
OFF
ON
CUSTOM
OFF
GAMMA
GAMMA MODE
CRT
LCD
GAMMA
MANUAL
GAMMA
OFF
COLOR
COLOR SATURATION
SAVE / RESTORE
ADVANCED CAMERA SETTINGS
SAVE / RESTORE
SAVE / RESTORE
RESTORE SETTINGS
SAVE SETTINGS
RESTORE FACTORY SETTINGS
RESET CAMERA
SYSTEM INFO
EXIT MENU
TITLE
CAMERA TITLE
ID DISPLAY
CAMERA ID : ...............
OFF
ON
ID POSITION
UP-LEFT
UP-CENTER
UP-RIGHT
DOWN-LEFT
DOWN-RIGHT
SHARPNESS
BRIGHTNESS
ADCPWW / ADCPBW Menu Map
Press the
MENU
button on the control board for three seconds to view the menu.
AGC
DSS
IRIS
VIEWING
MGNTA CTRL
OFF
ON
OFF
ON
H FLIP
ZOOM
1x - 2x
OFF
ON
DC LENS LEV ADJ
OFF
ON
CUSTOM
MGNTA CTRL ADJ
White Box
Position
Green Box
Increment size
Red Box
Reduce size
ENTER - HOLD 3s
return to menu
Menu Description
Only the WDR version will have the programming buttons all other versions will only have the service
jack on the service board.
Service Jack


