INSTRUCTION MANUAL
Model Number EA-1295
Induction Cooker
AFTER SALES SUPPORT
MODEL: EA-1295 PRODUCT CODE: 53816 06/2016
Version: 5
1800 898 750
AUS
[email protected]
Professional
Page 1: ...INSTRUCTION MANUAL Model Number EA 1295 Induction Cooker INSTRUCTION MANUAL AFTER SALES SUPPORT MODEL EA 1295 PRODUCT CODE 53816 06 2016 Version 5 1800 898 750 AUS service wkfe com hk Professional...
Page 2: ...2016 1800 898 750 AUS service wkfe com hk Contents 1 Warranty Details 2 Welcome 3 General Safety Instructions 5 Product Overview 6 Product Operating Instructions 10 Maintenance Disposal 11 Troubleshoo...
Page 3: ...t of the product that the consumer has under the Competition and Consumer Act 2010 and similar state and territory laws Our goods come with guarantees that cannot be excluded under the Australian Cons...
Page 4: ...g to buy a Ambiano product All products brought to you by Ambiano are manufactured to the highest standards of performance and safety and as part of our philosophy of customer service and satisfaction...
Page 5: ...cated electrical circuit The rated electrical current should not be less than 16A 3 Place the unit on a level surface allowing a 10cm space between the cooktop and the wall 4 To protect against an ele...
Page 6: ...ives forks spoons and lids should not be placed on the hot surface since they can get hot 20 The appliance is not intended for use by persons including children under 8 years old with reduced physical...
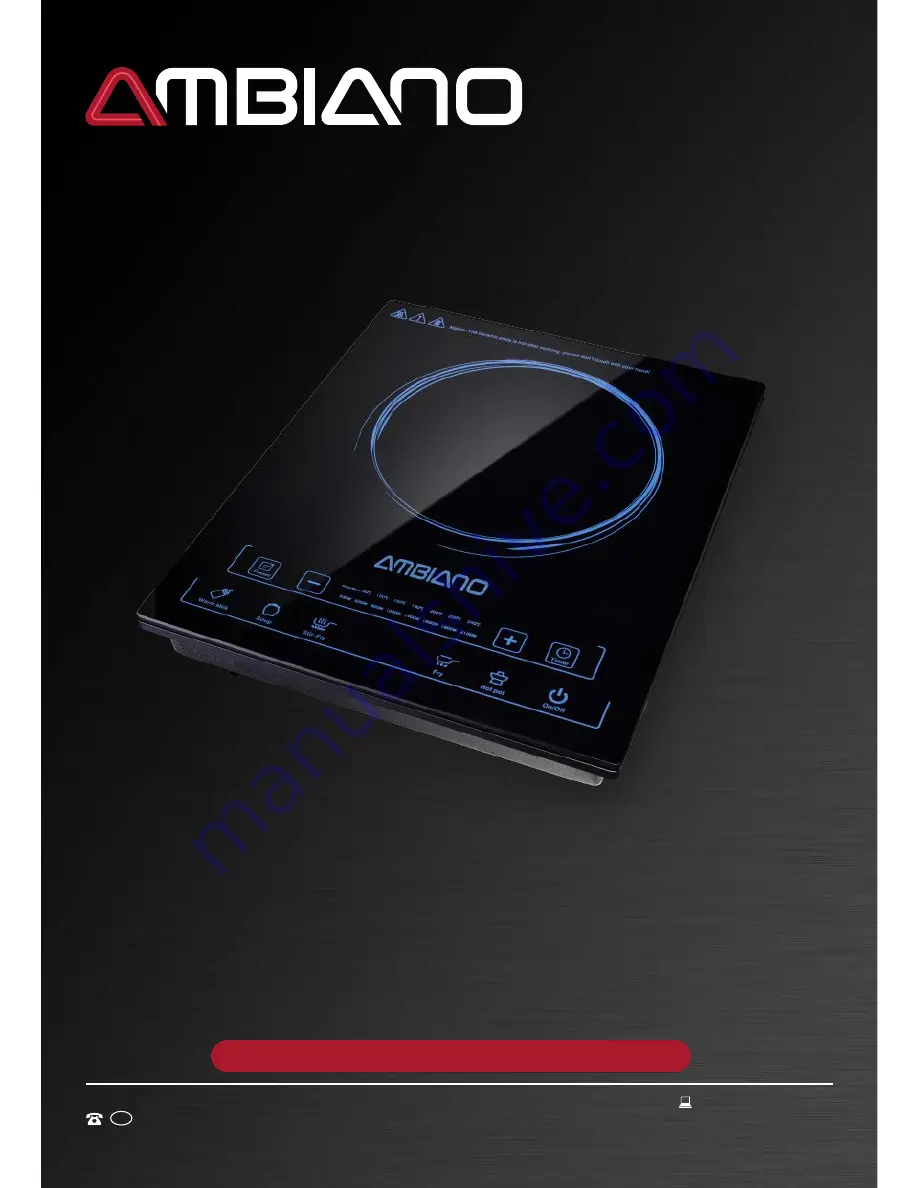
Page 7: ...C 220 C and 240 C 4 Increase power temperature time 5 Timer set switch off time 6 Warm milk 7 Soup 8 Stir Fry 9 Display 10 Fry 11 Hot pot 12 On Off 13 Cooking zone 14 Glass plate 15 Exhaust vent Not s...
Page 8: ...Since there are no elements heating the glass spill overs are less likely to get baked onto the surface Finally because the cooktop is not heated directly induction cooking is much safer to use Befor...
Page 9: ...ops working 6 Do not remove cookware during cooking Note During cooking you can change the power level by pressing the increase or decrease button For Soup and Milk modes the power adjusts automatical...
Page 10: ...the Timer button to decide how much time you want to set for the different cooking modes not applicable for Warm Milk and Soup modes 1 Follow the steps in Before first use 2 Press the On Off button th...
Page 11: ...n The On Off indicator lights up 2 Choose the desired cooking mode 3 Press the Preset button once or more times until the preset indicator lights up 4 Press the Increase or the Decrease button to choo...
Page 12: ...ree 7 When using transportation to move your hotplate to another location we recommend that it is safely packed in its original carton or similar packaging materials to avoid damage Maintenance 10 CAU...
Page 13: ...ce do not attempt to disassemble or repair it yourself Problem Solution The On Off button does not respond There is a connection problem Check if the induction cooker is connected to the mains and if...
Page 14: ...ed Voltage 220 240V 50 60Hz Power 2100W Temperature Range 60 240 C Unit Dimensions 298 376 60mm Net Weight 2 565kg Product Specifications 12 IM Version No V5 Issue Date 04 2016 You may contact us at s...
Page 15: ...on a USB memory stick during the process of repair some or all of your stored data may be lost We recommend you save this data elsewhere prior to sending the product for repair You should also be awa...