Cleaning, maintenance and repair
12.13.5 Checking and replacing piston diaphragms (workshop work)
•
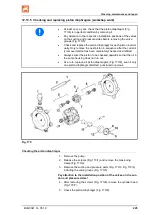
At least once a year, check that the piston diaphragm (Fig.
173/8) is in perfect condition by removing it.
•
Pay attention to the respective installation positions of the valves
on the suction and pressure sides before removing the valve
groups (Fig. 173/5).
•
Check and replace the piston diaphragm for each piston individ-
ually. Only remove the next piston in sequence after the current-
ly removed piston has been completely checked and refitted.
•
Always swivel the piston to be checked upwards so that the oil in
the pump housing does not run out.
•
As a rule, replace all piston diaphragms (Fig. 173/8), even if only
one piston diaphragm distorted, punctured or porous.
Fig. 175
Checking the piston diaphragm
1. Remove the pump.
2. Release the screws (Fig. 173/1) and remove the tensioning
clamp (Fig. 173/2).
3. Remove the suction and pressure ports (Fig. 173/3, Fig. 173/4)
including the valve groups (Fig. 173/5).
Pay attention to the installation position of the valves on the suc-
tion and pressure sides!
4. After removing the screws (Fig. 173/6), remove the cylinder head
(Fig. 173/7).
5. Check the piston diaphragm (Fig. 173/8).
BAG0021.14 05.19
225
Summary of Contents for UG 2200 Special
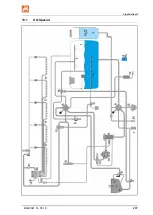
Page 237: ...Liquid circuit 13 1 UG Special BAG0021 14 05 19 237 ...
Page 238: ...Liquid circuit 13 2 UG Super 238 BAG0021 14 05 19 ...
Page 242: ...Spray table Fig 182 242 BAG0021 14 05 19 ...
Page 251: ...Spray table BAG0021 14 05 19 251 ...
Page 252: ......


