background image

- 17 -

INSTALLATION

STEP 4: PREPARE THE WALL AND UPPER CABINET FOR INSTALLATION

MEASURE AND TACK / TAPE UP THE TEMPLATES

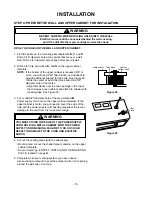
1. Using a plumb line and (metal) measuring tape, find and mark the

vertical center line on the back wall, as in Figure 22.

2. Find and mark one or two points where the studs are on the wall.

(Studs are normally 16 inches apart) 
Then measure and mark the stud locations. 
If you cannot find any wall stud, consult a local building contractor.

3. Line up the plumb line on the wall with the center line on the

mounting plate.

NOTE: Be sure the minimum width is 30 inches and the

distance from the top of the wall template to the
range or counter top is at least 30 inches. 
See Figure 22.

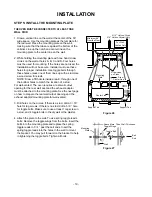
4. Securely tape or tack the wall template to the wall. 

See Figure 23.
NOTE: If the cabinets are not plumb, adjust the mounting plate to

the cabinets. 
If the front edge of the cabinet is lower than the back edge,
adjust the mounting plate to be level with the cabinet front.

5. Measure the bottom of the upper cabinet frame. Trim the edges 

A, B and on the upper cabinet template so that the template will
fit on the bottom of the upper cabinet. If upper cabinet has a
recessed frame, trim the template so it fits inside the recessed
area. Align the centerline of the upper cabinet template with the
centerline of the mounting plate, then securely tape or tack the
upper cabinet template in place. 
See Figure 23.

Figure  22

Figure 23

upper cabinet template

mounting plate

DO NOT ATTEMPT TO INSTALL THE MICROWAVE OVEN 
IF YOU CANNOT FIND A WALL STUD. 

CAUTION

Summary of Contents for ACO1840AB

Page 1: ...Installation Instructions ACO1840AB ACO1840AW ACO1840AC ACO1860AB ACO1860AW ACO1860AC ACO1860AS ...

Page 2: ...er residue to accumulate on sealing surfaces C DO NOT operate the oven if it is damaged It is particularly important that the oven door closes properly and that there is no damage to the 1 Door bent 2 Hinges and latches broken or loosened 3 Door seals and sealing surfaces D The oven should not be adjusted or repaired by anyone except properly qualified service personnel PRECAUTIONS TO AVOID POSSIB...

Page 3: ... purchased items for wire twist ties and remove them before placing the item in the oven If a fire should start Keep the oven door closed Turn the oven off Disconnect the power cord or shut off the power at the fuse or circuit breaker panel To avoid electric shock This appliance must be grounded Connect it only to a properly grounded outlet See the electrical GROUNDING INSTRUCTIONS on page 6 Do no...

Page 4: ...rference to radio or television reception which can be determined by turning the equipment off and on the user is encouraged to try to correct the interference by one or more of the following Reorient the receiving antenna of the radio or television Relocate the Microwave Oven with respect to the receiver Move the microwave oven away from the receiver Plug the microwave oven into a different outle...

Page 5: ...ents in door or inside oven cavity Report any dents or breakage to source of purchase immediately Do not attempt to use oven if damaged Remove all materials from oven interior If oven has been stored in extremely cold area wait a few hours before connecting power C RADIO INTERFERENCE 1 Microwave oven operation may interfere with TV or radio reception 2 When there is interference it may be reduced ...

Page 6: ...le to install this oven It is heavy and could cause personal injury if not handled properly Avoid Electrical Shock Before you drill into the wall note where electrical outlets are and where electrical wires might be concealed behind the wall YOU COULD GET AN ELECTRIC SHOCK if you contact electrical wires with your drill bit Locate and disconnect the power to any electrical circuits that could be a...

Page 7: ... try to operate the microwave oven with the door open DO NOT tamper with or defeat the safety interlocks DO NOT place objects between the microwave oven front face and the door DO NOT allow soil or cleaner residue to build up on the flat surfaces around the microwave oven door DO NOT operate the microwave oven if it is damaged The microwave oven door must close properly to operate safely DO NOT US...

Page 8: ...s and strong heating vents BE SURE you have enough space See Figure 3 below for minimum vertical and horizontal clearance This microwave oven can be installed over gas or electric cooking products no more than 36 inches wide Figure 3 30 min cabinet opening width 30 min clearance from bottom of cabinet to cooking surface or countertop Use templates included with installation instructions Grounded O...

Page 9: ... One power cord clamp and One dark colored mounting screw to hold the power cord Actual Size Four 1 4 x 2 lag screws Actual Size for wall stud holes Two 1 4 x 2 or 3 bolts Actual Size for securing to the upper cabinet Four spring toggle heads Actual Size for the toggle bolts Two washers Actual Size for the two upper cabinet bolts Four 1 4 x 3 toggle bolts Actual Size for drywall holes One power co...

Page 10: ...wdriver for the screws Pencil Flat blade screwdriver for the toggle bolts Measuring tape metal preferred Small side cutters or tin snips Caulking gun Plumb line Duct Tape YOU WILL NEED THE FOLLOWING TOOLS AND MATERIALS FOR THE INSTALLATION Carton or other heavy material for covering the counter top If you have brick or masonry walls you will need special hardware and tools The ductwork you need fo...

Page 11: ...0A fused electrical supply IMPORTANT If you do not have the proper wall outlet you MUST have one installed by a qualified electrician 2 You will cut the power supply cord hole shown in Figure 4 later when you prepare the wall and upper cabinet in Step 4 NOTE Do not use an extension cord Keep the power cord dry and do not pinch or crush it Grounded Outlet Inside Cabinet Upper Cabinet Power Supply C...

Page 12: ...ear exhaust method roof or wall venting be sure there is enough clearance within the wall for the exhaust duct REMEMBER AS YOU INSTALL THE VENTING Keep the length of the ductwork and the number of elbows to a minimum to ventilate your oven efficiently See examples on next page Keep the size of the ductwork the same Do not install two elbows together Use duct tape to seal all joints in the duct sys...

Page 13: ...ree 90 degree elbows and keep length as short as possible Below are the standard fittings and their equivalent length in feet To calculate the equivalent length of each ductpiece used see the examples below Figure 9 1 4 5 6 7 2 3 3 1 4 x10 to 6 5ft 90 elbow 10ft 45 elbow 5ft 3 1 4 x10 wall cap 40ft 3 1 4 x10 flat elbow 10ft 3 1 4 x10 roof cap 24ft 3 1 4 x10 90 elbow 25ft Examples For 3 1 4 x10 SYS...

Page 14: ...late will be used as the rear mounting plate It will be used to locate and mark the mounting holes on the rear wall 5 Locate exhaust adaptor grease filters and hardware packet 6 At this point remove any adhesive tape if there is any on the exhaust adaptor the grease filters and the power supply cord ROOF VENTED INSTALLATION This oven is shipped assembled for roof vented You will need to install th...

Page 15: ...ION 1 Remove one blower unit mounting screw and one blower plate screw Remove the blower plate from cabinet See Figure 19 2 Carefully lift the blower unit out of the microwave oven 3 Rotate blower unit 90 so the exhaust ports face the front of the cabinet See Figure 20 4 Place blower unit back into microwave oven 5 Reattach blower plate to microwave oven Attach with the one blower unit mounting sc...

Page 16: ...0 inches See Figure 22 4 Securely tape or tack the wall template to the wall See Figure 23 NOTE If the cabinets are not plumb adjust the mounting plate to the cabinets If the front edge of the cabinet is lower than the back edge adjust the mounting plate to be level with the cabinet front 5 Measure the bottom of the upper cabinet frame Trim the edges A B and C on the upper cabinet template so that...

Page 17: ...wer supply cord hole on the upper cabinet template If the upper cabinet is metal you will need to cover the edge of the hole with the power supply cord bushing supplied to prevent damage to the cord from the rough metal edge 4 Cut out the venting areas with the saber saw Roof Vented cut out the shaded area marked L on the upper cabinet template Room Vented go to STEP 5 INSTALLING THE MOUNTING PLAT...

Page 18: ...utout opening for the rear wall duct and the exhaust adaptor must be attached to the mounting plate See the next page on how to prepare the rear wall cutout opening and the exhaust adaptor mounting plate for wall vented 3 Drill holes on the circles If there is a stud drill a 3 16 hole for lag screws If there is no stud drill a 5 8 hole for toggle bolts Make sure to use at least 1 lag screw in a st...

Page 19: ...the plate on the wall side Push in securely until it is past the top locking tabs and in the lower locking tabs Take care to assure the damper hinge is installed so that it is at the top and that the damper swings freely Carefully guide the exhaust adaptor now attached to the mounting plate into the house duct before using the screws to attach the plate to the wall This will assure proper alignmen...

Page 20: ...he lock pin and washer assembly into hole N left side hole and push the pin down as far as it will go See Figure 31 4 Place washers over two 1 4 x3 bolts Then insert a bolt down through each hole in the upper cabinet bottom Tighten the bolts until the gap between the upper cabinet and microwave oven is closed See Figure 32 5 Remove the lock pin and washer If wall vented or room vented installation...

Page 21: ... cord clamp using a screw as shown in Figure 34 to inside of the cabinet 8 Grasp filter screen with one hand holding the ring and the other hand holding the opposite end Insert the end of the filter screen without ring into the opening and slide towards the side of the microwave oven Insert ring end of filter screen into the opening and slide entire screen towards the center of the microwave until...

Reviews: