


Chapter 3: Getting Started with the Avalon-MM Stratix V Hard IP for PCI Express
3–3
Creating a Quartus II Project
June 2012
Altera Corporation
Stratix V Hard IP for PCI Express
User Guide
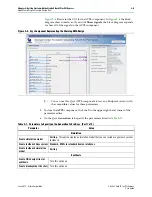
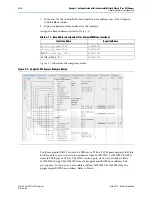
Creating a Quartus II Project
You can create a new Quartus II project with the New Project Wizard, which helps
you specify the working directory for the project, assign the project name, and
designate the name of the top-level design entity. To create a new project follow these
steps:
1. Choose
Programs > Altera > Quartus II>
<version_number>
(Windows Start
menu) to run the Quartus II software. Alternatively, you can also use the
Quartus II Web Edition software.
2. On the Quartus II File menu, click
New Project Wizard
.
3. Click
Next
in the
New Project Wizard: Introduction
(The introduction is not
displayed if you turned it off previously.)
4. In the
Directory, Name, Top-Level Entity
page, enter the following information:
a. Specify the working directory for your project. This design example uses the
directory
\qsys_pcie
.
b. Specify the name of the project. This design example uses
pcie_top
. You must
specify the same name for both the project and the top-level design entity.
1
The Quartus II software specifies a top-level design entity that has the same name as
the project automatically. Do not change this name.
1
Click
Yes
, if prompted, to create a new directory.
5. Click
Next
to display the
Add Files
page.
6. If you have any non-default libraries, add them by following these steps:
a. Click
User Libraries
.
b. Type
<path>
\ip
in the
Project library name
box, where
<path>
is the directory
in which you installed the Hard IP for PCI Express IP core.
c. Click
Add
to add the path to the Quartus II project.
d. Click
OK
to save the library path in the project.
7. Click
Next
to display the
Family & Device Settings
page.
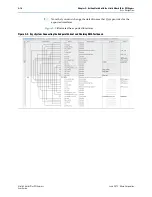
8. On the
Family & Device Settings
page, choose the following target device family
and options:
a. In the
Family
list, select
Stratix V (GS/GT/GX)
.
b. In the
Devices
list, select
Stratix V GX PCIe
.
c. In the
Target device
box, select
Specific device selected in ‘Available devices’
list
.
d. In the
Available devices
list, select
5SGXEA7K2F40C2
.
9. Click
Next
to close this page and display the
EDA Tool Settings
page.
10. Click
Next
to display the
Summary
page.
11. Check the
Summary
page to ensure that you have entered all the information
correctly.