background image


12 

+31(0)78 - 615 20 33 
[email protected] 
www.altec.nl 


+32(0)2 - 270 34 88 
[email protected] 
www.altec.be 


NL 

BE 

3


Setup 

3.1


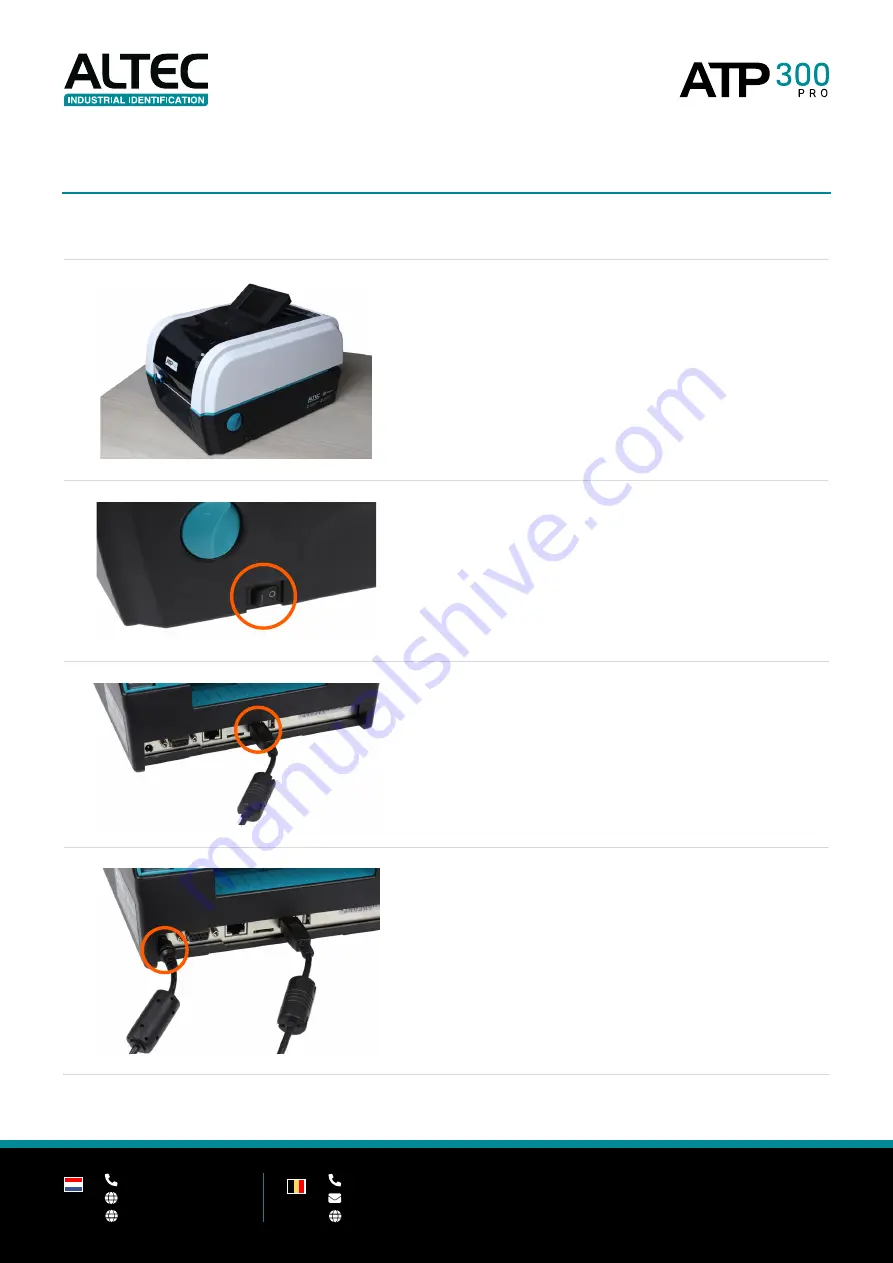
Printer setup 


1.


Place the printer on a flat and secure surface 


2.


Make sure the 

power switch

 is turned off 


3.


Connect the printer to the computer with the 
provided 

USB cable

 (or an 

ethernet cable

). 


4.


Plug the power cord into the 

power cord socket

 at 

the rear of the printer.  


Then plug the power cord into a properly grounded 
power outlet.


Summary of Contents for ATP 300 PRO

Page 1: ...Version 1 0 User manual...

Page 2: ...2 1 Unpacking the printer 8 2 2 Printer overview 9 2 2 1 Front view 9 2 2 2 Interior view 10 2 2 3 Rear view 11 3 Setup 12 3 1 Printer setup 12 3 2 Installing the ink ribbon 13 3 3 Loading media 17 3...

Page 3: ...ct details 37 4 7 Errors and messages 38 5 Web interface 39 5 1 Accessing the web interface 39 5 2 Configuration 40 5 3 Tools 43 6 Printer management tool TPM 45 6 1 TPM overview 45 6 2 Printer settin...

Page 4: ...in this manual the software and firmware in the printer are owned by ALTEC industrial identification B V All rights reserved Windows is a registered trademark of Microsoft Corporation All other trade...

Page 5: ...the equipment off and on the user is encouraged to try to correct the interference by one or more of the following measures Reorient or relocate the receiving antenna Increase the separation between t...

Page 6: ...mory Micro SD card reader for memory expansion up to SDHC 32GB RS 232 interface Max 115 200 bps USB 2 0 interface Hi speed mode Internal Ethernet print server 10 100 Mbps interface USB host Real time...

Page 7: ...Barcode scanner External label roll mount 1 2 General specifications Physical dimensions 226 mm W x 200 mm H x 332 mm D Weight 4 08 KG 8 99 lbs Mechanism Clamshell with double walled plastic Power Ext...

Page 8: ...int length 2 540 mm 100 1 4 Ribbon specifications Ribbon outside diameter Max 67 mm OD Ribbon length 300 meter Ribbon core inside diameter 25 4 mm 1 ID core Ribbon width 40 mm 110 mm Wind direction Co...

Page 9: ...d damage during shipping Please carefully inspect the packaging and printer upon receiving the ATP 300 Pro printer Please retain the packaging materials in case you need to reship the printer Please c...

Page 10: ...33 info altec nl www altec nl 32 0 2 270 34 88 info altec be www altec be NL BE 2 2 Printer overview 2 2 1 Front view 1 LCD display 2 Menu buttons 3 Metal tear off bar 4 Top cover open lever 5 Power...

Page 11: ...supply hub 2 Media holder 3 Ribbon access cover 4 Platen roller 5 Metal tear off bar 6 Ribbon waste hub 7 Print head 8 Media holder locking switch 9 Media guide bar 10 Black mark sensor 11 Black medi...

Page 12: ...www altec be NL BE 2 2 3 Rear view 1 Power jack socket 2 Serial port RS 232 3 Ethernet interface 4 Micro SD card socket 5 USB interface connect to a PC 6 USB host connect to a keyboard barcode scanne...

Page 13: ...up 1 Place the printer on a flat and secure surface 2 Make sure the power switch is turned off 3 Connect the printer to the computer with the provided USB cable or an ethernet cable 4 Plug the power c...

Page 14: ...altec be www altec be NL BE 3 2 Installing the ink ribbon 1 Open the top cover of the printer by pulling the green levers located on each side of the printer and lifting the top cover to the maximum...

Page 15: ...c nl 32 0 2 270 34 88 info altec be www altec be NL BE 3 Insert a ribbon spindle into the paper core 4 Install the paper core with the right side first onto the ribbon rewind hub first Then align the...

Page 16: ...0 2 270 34 88 info altec be www altec be NL BE 5 Insert a ribbon spindle into the ribbon core 6 Install the ink ribbon with the right side first onto the ribbon supply hub first Then align the yellow...

Page 17: ...the ink ribbon onto the waste paper core 8 Turn the waste paper core with the white ribbon rewind gear until the plastic leader is thoroughly wound Close the top cover of the printer after installing...

Page 18: ...ding media 3 3 1 Placing media in the printer 1 Open the top cover of the printer by pulling the green levers located on each side of the printer and lifting the top cover to the maximum open angle 2...

Page 19: ...www altec be NL BE 4 Place a roll of labels between the holders and close them onto the core 5 Lead the media under the white label guide bar 6 Place the media between the black media guides and place...

Page 20: ...be NL BE 7 Move the black media guides gap sensor to fit the media width by pushing the media guide adjustment button Please ensure that the black media guides are placed correctly Too tight Too wide...

Page 21: ...ToughSurface Industrial vinyl Inspection labels Laboratory labels Continuous media Labels with a notch out of range of gap sensor Black mark sensor The two small dots are the sensor B Black mark senso...

Page 22: ...y 4 2 Main menu Calibration Auto calibration Manual setup Threshold detect Maximum length Settings 1st label adjustment Interface Diagnostic Advanced Factory default File manager DRAM FLASH CARD USB I...

Page 23: ...a gap between them This can be space between the labels or a cut out notch in the media 1 Auto Calibration 2 Gap 3 Calibrating Black mark Use this method when a media has a notch that is out of range...

Page 24: ...please use the Manual Setup function to calibrate the sensor sensitivity Gap Calibrate the gap sensor on your media manually 1 Manual Setup 2 Gap 3 Scan Backing 4 Scan Paper 5 Intensity and Threshold...

Page 25: ...anually 1 Manual Setup 2 Black Mark 3 Scan Mark 4 Scan Paper 5 Intensity and Threshold 6 Get Label Length Yes How to scan Mark Place the notch or mark exactly on the two round dots of the Black mark s...

Page 26: ...w altec be NL BE Continuous Calibrate the gap sensor on your continuous media manually 1 Manual Setup 2 Gap 3 Remove Label 4 Scan Paper 5 Intensity and Threshold Remove label Remove continuous media f...

Page 27: ...used to set the sensor sensitivity to fixed or auto default auto 1 Threshold Detect 2A Option 1 Auto 2B Option 2 Fixed 4 3 4 Maximum length This option is used to set the maximum length for media cali...

Page 28: ...ivity 1 Min Paper 2 Set min paper length 4 3 7 Maximum paper length advanced Set the maximum gap black mark length to auto calibrate the sensor sensitivity 1 Max gap mark 2 Set max gap mark 4 4 Settin...

Page 29: ...altec be NL BE 4 4 2 Interface This option is used to set the printer interface settings Serial Set the baud rate parity data bits and stop bit s 1 Interface 2 Serial 3A Baud rate 4A Set baud rate 3B...

Page 30: ...NL BE Ethernet Use this menu to set the Ethernet configuration or check the Ethernet status 1 Interface 2 Ethernet Status Check the Ethernet status 3A Check status 4A Ethernet status Configure Ethern...

Page 31: ...me TPH CUT Model name Firmware version Firmware checksum Printer serial number Configuration file System date System time Printed mileage Cutting counter Printing settings Speed Density Width Height G...

Page 32: ...ved from your system and the right side characters are the corresponding hexadecimal values of the characters It allows users to verify and debug the data received by the printer To leave dump mode pl...

Page 33: ...270 34 88 info altec be www altec be NL BE Sensor This feature is used to check the media sensor state 1 Sensor 2A Gap sensor 3A Check Adjust gap sensor 2B Black mark sensor 3B Check Adjust black mark...

Page 34: ...used to set the LCD display brightness date time language and sound Display brightness Set the LCD display brightness 1 Advanced 2 Display brightness 3 Set the display brightness Date Time Set date ti...

Page 35: ...Language Set the language of the printer to English German Dutch or French 1 Advanced 2 Language 3 Set a language Sound Turn the printer sound on or off 1 Advanced 2A Sound OFF 2B Sound ON 4 4 5 Facto...

Page 36: ...L BE 4 5 File manager This feature is used to check the printer available memory and file list on DRAM FLASH CARD and USB Show delete and run BAS files saved on the memory device 1 File Manager 2A To...

Page 37: ...formation contact details and QR codes to instruction videos 4 6 1 Instruction videos Scan the QR codes on the LCD display to view instruction videos on your smartphone 1 Instruction videos 2A Install...

Page 38: ...be www altec be NL BE 4 6 2 Printer info View printer info serial number mileage printed labels and cutting counter 1 Printer info 2 View printer info 4 6 3 Contact details View the contact details o...

Page 39: ...can mean the following Out of media Install new roll of media 3 3 1 No media Install new roll of media 3 3 1 Check sensor type Go to chapter 3 3 2 Calibration required Go to chapter 4 3 No Ribbon No...

Page 40: ...an Ethernet cable In this menu you can access printer information and change settings 5 1 Accessing the Printer Web Interface Open a web browser and enter the IP address or host name of the printer i...

Page 41: ...d printing Top cover open closed check Reprint last label after error Adjust Set the print and tear off position Offset Reference X Y Shift X Y Adjust tear off position Adjust print and tear off posit...

Page 42: ...nection RS232 Port settings for the RS232 serial port Baud rate Data bits Parity Stop bit s Network Apply network settings Printer Name MAC Address IP Address DNS Server Host name of the printer Stati...

Page 43: ...ifications for errors Error notifications Carriage open Over heat Paper jam Paper empty Ribbon error and Cutter error Clock Set up internal clock Synchronise the internal printer clock with time serve...

Page 44: ...Print a test page with all current printer settings Please use media with a minimum width of 50mm preferably 100mm Ignore AUTO BAS Restart the printer without a loaded bas program Sensor Calibration...

Page 45: ...er The Refresh button reloads the status Green notifications ready Ready Printing Red notifications errors Pause Out of Memory Carriage Open Over Heat Paper Jam Paper Empty Ribbon Error Cutter Error F...

Page 46: ...k the printer status Configure printer settings Manage multiple printers To download this tool on your PC use the following link 6 1 TPM overview 1 Select printer s 2 Printer status Printer is ready E...

Page 47: ...nt action Cut Piece Code Page Maximum Length Reference Direction Offset Shift X Y Print speed 1 6 inch s Printing temperature 0 15 Media width in millimeters Media height in millimeters Gap Black mark...

Page 48: ...Time Gap sensor intensity Black mark intensity Continuous intensity N A for ATP 300 Pro Keyboard country code Top cover open closed check Reprint last label after error Turn ribbon use on off Turn ri...

Page 49: ...dule The optional Wi Fi module can be requested from Altec Ethernet Settings for Ethernet connection DHCP Set printer name and RAW port Static IP Set static IP address Subnet mask Default gateway MAC...

Page 50: ...88 info altec be www altec be NL BE TPH Care These settings are not available for the ATP 300 Pro Information Overview of ATP 300 Pro printer information Cutting counter Mileage km can be reset here...

Page 51: ...ame of the loaded file Size of the loaded file in Bytes DRAM FLASH default or CARD Send file to the printer Get retrieve a list of the files on DRAM FLASH CARD Then you can select files and remove del...

Page 52: ...hoose the required sensor and enter the label height and gap Paper Height Vertical label height from gap to gap Gap Height of the gap 2 Reset Printer Restart the printer Use this function when an erro...

Page 53: ...To be used with ZPL 9 Wi Fi Default Reset Wi Fi settings back to default 10 Dump Text Sets the printer to dump mode Reset the printer to leave dump mode 6 2 6 Bitmap Font Manager Load bitmap fonts in...

Page 54: ...l 32 0 2 270 34 88 info altec be www altec be NL BE 6 3 Program settings 6 3 1 Users Create users within the Printer Management tool 6 3 2 Alert Send notifications alerts to users when the status of c...

Page 55: ...Here you can set up groups of printers This way you can change settings in the Printer Management Tool and apply them directly to all printers in the group 6 3 4 Setup Change general program settings...

Page 56: ...ning the printer 1 Open the top cover of the printer by pulling the green levers located on each side of the printer and lifting the top cover to the maximum open angle 2 Get a Cleaning Wipe and remov...

Page 57: ...eaning Wipe Then place the waste roll back in the ribbon waste hub and close the ribbon supply cover 5 Clean the media guide bar and turn it around to clean it completely around 6 Clean the platen rol...

Page 58: ...visit our online FAQ Here we collect instructions common questions and solutions F A Q Instructions and troubleshooting Go to FAQ Need assistance from a representative Do you need support or assistan...

Page 59: ...58 31 0 78 615 20 33 info altec nl www altec nl 32 0 2 270 34 88 info altec be www altec be NL BE...

Reviews: