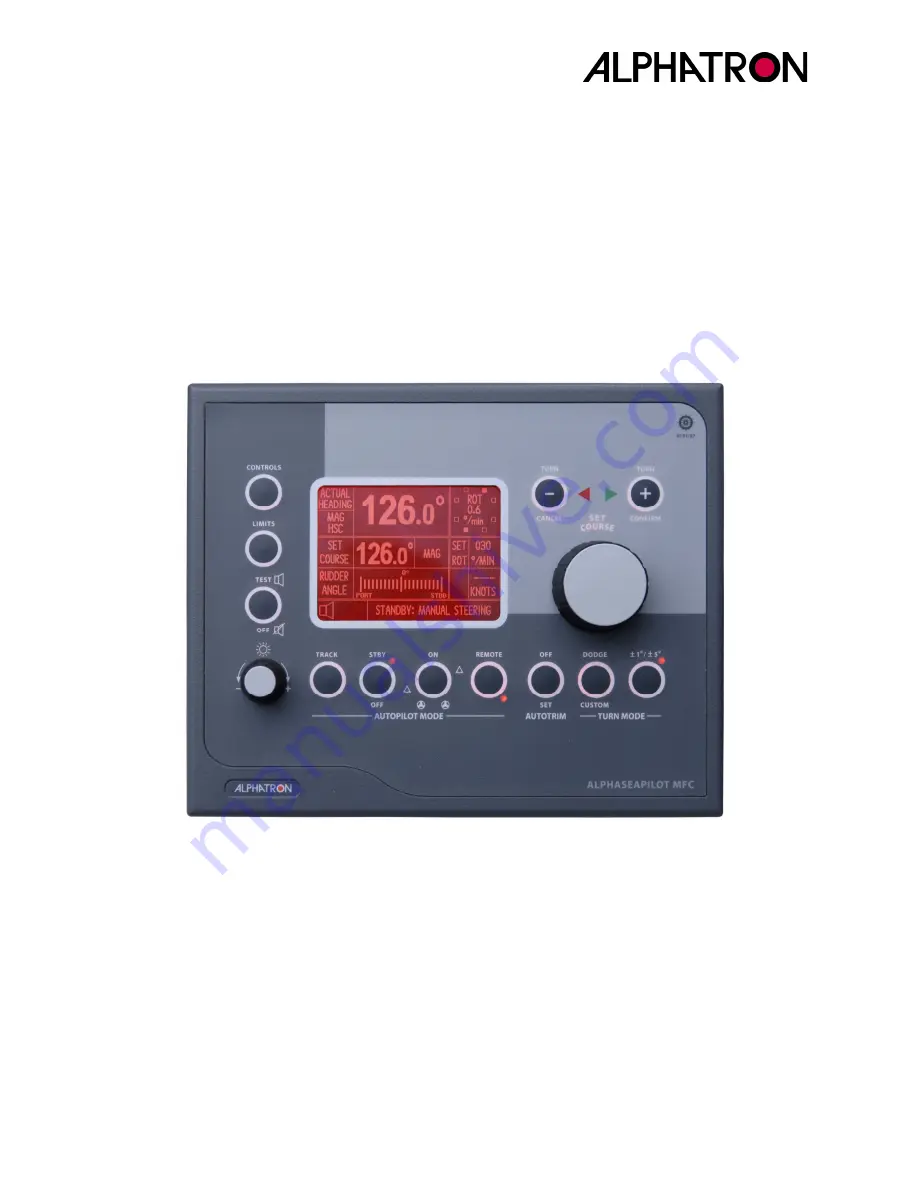
Alphatron ALPHASEAPILOT MFC Operating Manual Download Page 1


ALPHASEAPILOT MFC 
Autopilot 
 

Operating manual 

ALPHATRON MARINE B.V. 

Schaardijk 23 
3063 NH ROTTERDAM 
The Netherlands 
Tel: +31 (0)10 – 453 4000 
Fax: +31 (0)10 – 452 9214 
 
P.O. Box 210003 
3001 AA ROTTERDAM 
 
Web: www.alphatronmarine.com 
Mail: [email protected]


The information in this Manual is subject to change without notice and 
does not represent a commitment on the part of ALPHATRON MARINE 
B.V. 
 
Document 

:  

Manual ALPHASEAPILOT MFC 

Issue 

1.1 

 ALPHATRON MARINE B.V. 

 
Manufactured for Alphatron by Navitron Systems Ltd., Havant Hants UK 
 

Summary of Contents for ALPHASEAPILOT MFC

Page 1: ...Box 210003 3001 AA ROTTERDAM Web www alphatronmarine com Mail service alphatronmarine com The information in this Manual is subject to change without notice and does not represent a commitment on the...

Page 2: ...OTE The ALPHASEAPILOT Autopilot System is Type Approved and Wheelmarked compliant with IMO A342 ix as amended by MSC 64 67 Annexe 3 which is applicable to vessels up to 30 knots non High Speed Craft I...

Page 3: ...its Menu Section 2 6 19 1 18 The Remote Key Section 2 10 2 40 19 1 19 The Illumination Control Section 2 5 19 1 20 The Cancel and Confirm Keys Section 2 13 20 1 21 Using NT920NFU Dodge and Power Steer...

Page 4: ...To calibrate Adaptive Autopilot Steering vs Speed 57 2 30 Calibration of Adaptive Steering Performance vs Draft 58 2 31 Setting the Rudder Limit Control 59 2 32 Setting Rate of Turn Control 60 2 33 Se...

Page 5: ...wer Up 77 3 3 Operational Display Messages 78 3 4 Alarm Display Messages 80 3 4 i Heading Sensor Fail Messages 80 3 4 ii Miscellaneous Failure Messages 80 3 4 iii Speed Data Alarms 81 3 4 iv Track Mod...

Page 6: ...is used in adaptive mode and calibrated for the correct vessel type DISP or HSC per 2 16 will automatically set its own control parameters for optimum steering performance Adaptive non adaptive operat...

Page 7: ...mode until the Autopilot is engaged ON key operation NB The Autopilot can be switched OFF at any time by OFF key operation 1 3 Engaging Autopilot ON Section 2 2 2 18 The ALPHASEAPILOT MFC Autopilot ca...

Page 8: ...when no Speed Data is available non Adaptive OFF Autopilot operation is necessary and PID Control is required involving manual RUDDER YAW COUNTER Control adjustment iii Select ADAPT OFF via the rotar...

Page 9: ...teer Large deviations or protracted periods off the Heading Set due to insufficient rudder application in response to Yaw Typical stretched S characteristic of Understeer Action required Increase Rudd...

Page 10: ...ner keypad LED 1 6 Avoiding Unnecessary Rudder Correction Section 2 25 Frequent rudder movements when the vessel is yawing either side of the set heading in a seaway indicates that the autopilot sensi...

Page 11: ...D LT to a safe value range 5 to 50 via the rotary illumination control iii Turn the Course Selector Set Course Control clockwise to alter course to Starboard or anticlockwise to alter course to Port T...

Page 12: ...he LIMITS key again to step through the Menu listing until the ROT S box is flashing vi Use the rotary illumination control to select the required ROT in min or sec noting that 6 300 min 0 1 5 sec Usi...

Page 13: ...gain to step through the Menu listing until the RAD nm box is flashing vi Use the rotary illumination control to select the required Radius of Turn between the limits 0 1 9 9Nm 1 11 Adjusting Overshoo...

Page 14: ...S etc Track Operation is confirmed by red corner LED illumination of the Track key and additional display information for AUTO TRACK STEERING Mode Three Track sentence types are accepted XXHTC XXHSC X...

Page 15: ...nt and the Track graphic will show vessel icon left or right of heading with the error angle below If the Track Mode Heading to Waypoint is to be rejected use the CANCEL key If the Cancel key is used...

Page 16: ...operation of the TEST key confirmed by the alarm off icon in the bottom left display corner Audible alarms are re enabled by further 5 second continuous operation of the TEST key NB Audible alarms ma...

Page 17: ...ess the U TURN key confirmed by flashing red corner LED illumination NB U TURN request cancelled if required by second press of U TURN key A Use the STBD or PORT TURN key to specify the direction of U...

Page 18: ...for 1 course change steps or hold the key down to produce an increase in the new heading step values automatically from 1 to 5 to 10 etc B Note that the actual amount of course change ordered using th...

Page 19: ...display will revert automatically to its normal operating mode 1 18 The Remote Key Section 2 10 2 40 Where more than one Control Unit is installed in the Autopilot system or where Remote Power Steer...

Page 20: ...lot headings which may be automatically Track Mode Waypoint Steering etc or manually Dodge Custom Turns etc entered 1 21 Using NT920NFU Dodge and Power Steer if fitted NT920NFU Operating Instructions...

Page 21: ...topilot to return the vessel to the original Autopilot heading NFU MODE i Check that the Autopilot REMOTE key is activated ii Select NFU on the NT920NFU selector switch Confirmed by illumination of th...

Page 22: ...lever Port or Stbd to achieve the desired angle of Port or Stbd rudder Disengaging Follow Up Power Steer vi Press the ON OFF key on the NT990FU or use the REMOTE key on the Autopilot Control Unit to...

Page 23: ...ve Selection ii Rudder Control iii Yaw Control iv Counter Control v Autothrust vi Turn Type ROT or RAD 2 5 The Rotary Illumination Control 2 6 The LIMITS Menu i Rudder Limit ii Off Heading Alarm iii C...

Page 24: ...daptive Mode Calibration 2 19 Initial Course Keeping Performance 2 20 Optimising the Rudder Control Setting 2 21 Optimising the Rudder Control Band 2 22 Loop Gain Calibration 2 23 Autotrim Automatic P...

Page 25: ...ate of Turn 2 34 Setting Radius of Turn Control 2 35 Optimising the Off Heading Alarm 2 36 Setting and Confirming New Autopilot Courses 2 37 Setting the Watch Alarm Period 2 38 The Track Function 2 39...

Page 26: ...operational Standby keypad red LED activated Manual steering required A Red LED in the Autopilot Mode STANDBY keypads confirms the operational status of the steering mode which is also written at the...

Page 27: ...onventional PID Non Adaptive system which typically involves manual adjustment of the Autopilot controls Rudder Yaw Counter Rudder etc to achieve optimum steering performance Alternatively the ALPHASE...

Page 28: ...enu b Use the CONTROLS key again to select ADAPT box followed by flashing ON OFF c Use the rotary illumination control to select ON or OFF as required Adaptive mode ON or OFF where OFF PID 2 4 ii Rudd...

Page 29: ...sure that the average course is maintained whilst disregarding short term course errors arising from pitch and roll etc thus avoiding unnecessary Rudder movement As a general rule the Yaw control shou...

Page 30: ...selection of the Autopilot RUDDER THRUSTER Mode Manual value adjustment of the Thruster contribution would then be made to rapidly optimise steering performance To adjust AUTOTHRUST gain a Use the CON...

Page 31: ...AD calibration respectively 2 5 The Rotary Illumination Control This is a dual function device used as a dimmer control for the Autopilot Control Unit keypad LED s and display backlight illumination l...

Page 32: ...e specified rudder limit angle is reached 2 6 II Off Heading Alarm Any departure by the vessel from the Set Course by a predetermined angle specified via the LIMITS Menu will be signaled both audibly...

Page 33: ...et Course Control to move the cursor to parameter number 36 COURSE COMPARATR c Use the rotary illum control to set ON OFF as required To set the two highest priority heading inputs a If not already in...

Page 34: ...specify maximum permissible safe Rate of Turn and normal operating Rate of Turn respectively Max Permissible Safe Rate of Turn Display Mode min or sec It should be noted that a maximum permissible sa...

Page 35: ...cursor to parameter number 6 ROT SCALING c Use the rotary illum control to set SEC or MINUTE 2 6 VI Radius of Turn RAD Calibration Provided Radius of Turn RAD control mode has been selected via the Au...

Page 36: ...select DODGE box followed by flashing current value 5 to 90 c Use the rotary illum control to set DODGE value required 2 6 VIII Custom Turn Calibration The CUSTOM turn facility allows the operator to...

Page 37: ...Autotrim facility OFF press the AUTOTRIM key for 5 seconds until the red corner OFF LED illuminates Autotrim will automatically revert to the active state when the Autopilot is switched OFF and ON ag...

Page 38: ...hat the use of Remote Autopilot Control Units and or Remote Power Steer Units Follow Up Non Follow Up etc is permitted and that their input signals will be accepted by the Autopilot system Without REM...

Page 39: ...ion of the U TURN key at any time will exit the U TURN mode The required direction of turn is acknowledged by the Control Unit display which will show or NEW COURSE PORT 180 NEW COURSE STBD 180 The Co...

Page 40: ...ding or the CANCEL key to abort and exit the next course instruction mode 2 11 iii The 1 5 Key When this TURN MODE key is selected subsequent use of the TURN or TURN keys will produce permanent increm...

Page 41: ...clicks in 5 step changes Thereafter in 10 steps In this manner prolonged rotation of the Course Selector produces large course change orders which would otherwise require many turns geared to a fixed...

Page 42: ...o parameter number 45 SET COURSE ALARM c Use the rotary illum control to set 10 to 90 as required d Rotate the Autopilot Set Course Control to move the cursor to parameter number 47 NEW COURSE T OUT e...

Page 43: ...U TURN TRACK mode etc use of the TURN or TURN keys will produce permanent incremental Autopilot course changes to Stbd or Port Single press key operation TURN will order course changes in 1 steps whi...

Page 44: ...f information relevant to the software and Set Up standards of the system This information includes i Supplier and model number ii Autopilot type selected in Set Up Menu flashing iii Control Unit soft...

Page 45: ...uster data STW or SOG Autopilot operating mode Alarm type Use of the CONTROLS key will display the Controls Menu and use of the LIMITS key will display the Limits Menu on the right hand side of the no...

Page 46: ...d CONFIRM keys for 5 seconds to display the Set Up table parameters ii Use the rotary Set Course Control to select the 5th parameter VESSEL TYPE iii Press the AUTOTRIM key for a period of 5 seconds no...

Page 47: ...Control settings via the CONTROLS Menu i Rudder 5 x2 ii Yaw 1 x3 iii Counter 1 x4 To engage the Autopilot iv Press the ON key which will be confirmed by illumination of the red corner LED in the ON k...

Page 48: ...ard Yaw will initiate PORT rudder and the RED chevron The actual angle of corrective rudder applied to correct Yaw will be directly proportional to the Yaw angle and to the Controls Menu setting of th...

Page 49: ...e RUDDER control setting will need to be decreased NB Once the Adaptive calibration has been optimised versus Speed Draft input data the RUDDER parameter adjustment will be automatic in the Adaptive o...

Page 50: ...t rudder manually applied to steer the vessel dead ahead on the desired heading i e Trim compensated at the instant of Autopilot engagement In the ON mode the Autotrim APH function continuously monito...

Page 51: ...rrect immediately after shooting a trawl etc or on a new heading particularly when large course changes are ordered This might result in the wrong mean direction through the water when initially settl...

Page 52: ...ory default 50 seconds However adjustment to reduce or increase the time may sometimes be required To Evaluate Autotrim Time Constant i The Autopilot must be set to ON the ship stable on course and th...

Page 53: ...UNTER value via the CONTROLS Menu between the Limits of 1 to 9 where 9 produces maximum counter rudder i With the Autopilot engaged ON and the vessel underway on a stable heading use the Autopilot Set...

Page 54: ...g control more accurately than 0 7 In practice the cumulative effects of Counter Rudder and Autotrim APH combine to produce an overall resolution of 0 2 This combined effect is particularly important...

Page 55: ...Control System all necessary parameters including SOG will be available from the HTC sentence In the event that SOG data is absent or fails an audible alarm and display NO SOG DATA will be displayed...

Page 56: ...ustment of PID controls via the CONTROLS menu per sections 2 19 to 2 25 b Speed Through the water STW input data must be available An alarm will be generated if Adaptive calibration or mode entry is a...

Page 57: ...optimised per item a above use the CONTROLS key for 5 seconds to capture the Autopilot control parameters speed correlation commensurate with this speed e Repeat c and d at normal working and maximum...

Page 58: ...rotary illumination control to step through to calibration parameter CAL7 FIG 2 30 refers d With the vessel at minimum operating speed and the Autopilot steering performance optimised sections 2 19 2...

Page 59: ...be necessary to quickly arrest the vessel in a potential broach condition etc The Rudder Limit control can be set from 5 to 50 in 5 steps or switched OFF via the LIMITS Menu When the limit of prescrib...

Page 60: ...P Menu and is unaffected by Track data See Section 2 33 a TO SET RATE OF TURN Operational Once Rate of Turn mode has been selected and set any turns or heading changes ordered will be limited to the s...

Page 61: ...maximum the Autopilot will permit during automatic heading control To set maximum Safe Rate of Turn i Simultaneously press the CANCEL and CONFIRM keys for 5 seconds until the Set Up Table is displaye...

Page 62: ...ols Menu Sect 2 4 vi Speed over the Ground SOG data available Control Unit display The Control Unit display continuously shows the value of SET RADIUS OF TURN thus the current operational value is alw...

Page 63: ...f the alarm TEST key but is programmable via the SET UP Menu in two categories i OHA DELAY Parameter No 35 in the Set Up Menu this can be programmed from 10 to 60 seconds in 2 sec steps as the delay t...

Page 64: ...me a b c above and it must be noted that if only one heading input is available the CCA function must be switched OFF To switch ON OFF the Course Comparator Alarm CCA a Simultaneously press the CANCEL...

Page 65: ...in 5 steps from 10 to 90 Actual set course and new course data is shown on the Control Unit display whether manually or automatically Track ordered TURN MODE key selection of U TURN or NEXT COURSE al...

Page 66: ...the TEST OFF keypad A new timing period will automatically commence whenever the TEST OFF key is operated If the Control Unit alarm is not cancelled by TEST OFF key operation within a further one min...

Page 67: ...the Autopilot system and their order of priority are i XX HTC ii XX APB iii XX HSC Heading to Steer data is in each sentence type and is continuously read by the Autopilot system to provide automatic...

Page 68: ...ADING and HEADING TO WP shown Every 18 seconds this display is interrupted for a period of 1 sec to display the received HTS data sentence type HTC APB or HSC i e HTC DATA Since arrival at a waypoint...

Page 69: ...No data data fail The NMEA Track Data fail no data alarms are both audible and visual appearing in the bottom left corner of the display as HTS DATA FAIL etc and persist until the Track key is used to...

Page 70: ...rected accordingly Manual Deviation Correction This is the only facility for electronic deviation correction if the Sensor Coil is the solitary heading input for the Autopilot 2 39 i Automatic Deviati...

Page 71: ...data confirmed by a new display of 03 060o e Repeat the AUTOTRIM key and new courses steered through 360o every 30o as instructed by the display until the SAVE message appears f Press the AUTOTRIM key...

Page 72: ...MOTE keys simultaneously for a period of 5 seconds to transfer Master status to the subject Control Unit confirmed by a double bleep d Check transfer by powering down and powering up again when the sp...

Page 73: ...hed and Non Latched Power Steer Controls In addition to the Follow Up NT990 FU and Non Follow Up NT920 NFU Power Steer options the Autopilot will accept proprietary unit power steer inputs via a dedic...

Page 74: ...ion of a proprietary sprung to centre jog lever which in its central position demands no rudder movement allowing the Autopilot full control of the rudder for steering purposes Movement left Port or r...

Page 75: ...seconds until the Set Up Menu is displayed with a black cursor highlighting the Set Up parameter currently selected b Rotate the Autopilot Set Course Control to move the cursor to parameter number 62...

Page 76: ...nisms that continuously monitor the operational integrity of a wide range of functions from heading input data to steering gear response These are brought to the attention of the watch by audible and...

Page 77: ...hing iii Control Unit software version iv Control Unit Address identity v Master status if applicable vi Distribution Unit software versions 6 items The message WAITING flashing may also be shown on t...

Page 78: ...G Autopilot engaged to control Rudder only iv AUTO STEERING Autopilot engaged to control Thruster only v AUTO STEERING Autopilot engaged for Rudder Thruster vi REMOTE AUTO STEERING 2nd Station Control...

Page 79: ...ix MANUAL WHEEL Follow Up wheel Power Steer Mode via special isolated input facility xx REMOTE F U STEERING Navitron proprietary FU NFU active xxi REMOTE N F U STEERING Navitron proprietary NFU active...

Page 80: ...NMEA Channel 2 HDM Heading sentence fail HCC 2 FAIL NMEA Channel 2 HCC Heading sentence fail NO NMEA H DG IN No NMEA Heading data available of any type CCA DAT FAIL No Heading data or only one Headin...

Page 81: ...ecified rudder angle reached 3 5 Operational Status LED s There are a total of 11 LED s on the ALPHASEAPILOT MFC Control Unit panel i O STBY Red corner LED illuminated confirms STANDBY Mode ii O ON Re...

Page 82: ...Operating manual ALPHASEAPILOT MFC Issue 1 1 Page 82 of 84 ALPHASEAPILOT MFC Dimensions ALPHASEAPILOT MFC...

Page 83: ...Operating manual ALPHASEAPILOT MFC Issue 1 1 Page 83 of 84 ALPHASEAPILOT MFC Connectiondiagram ALPHASEAPILOT MFC...

Page 84: ...fr E mail mail pronav no E mail info etna fr SPAIN SINGAPORE Crame Navtronics Pte ltd C Lanzarote 14 76 Playfair Road 28700 06 05 LHK 2 BUILDING San Sebastian de los Reyes SINGAPORE 367996 MADRID Tel...

Reviews: