background image

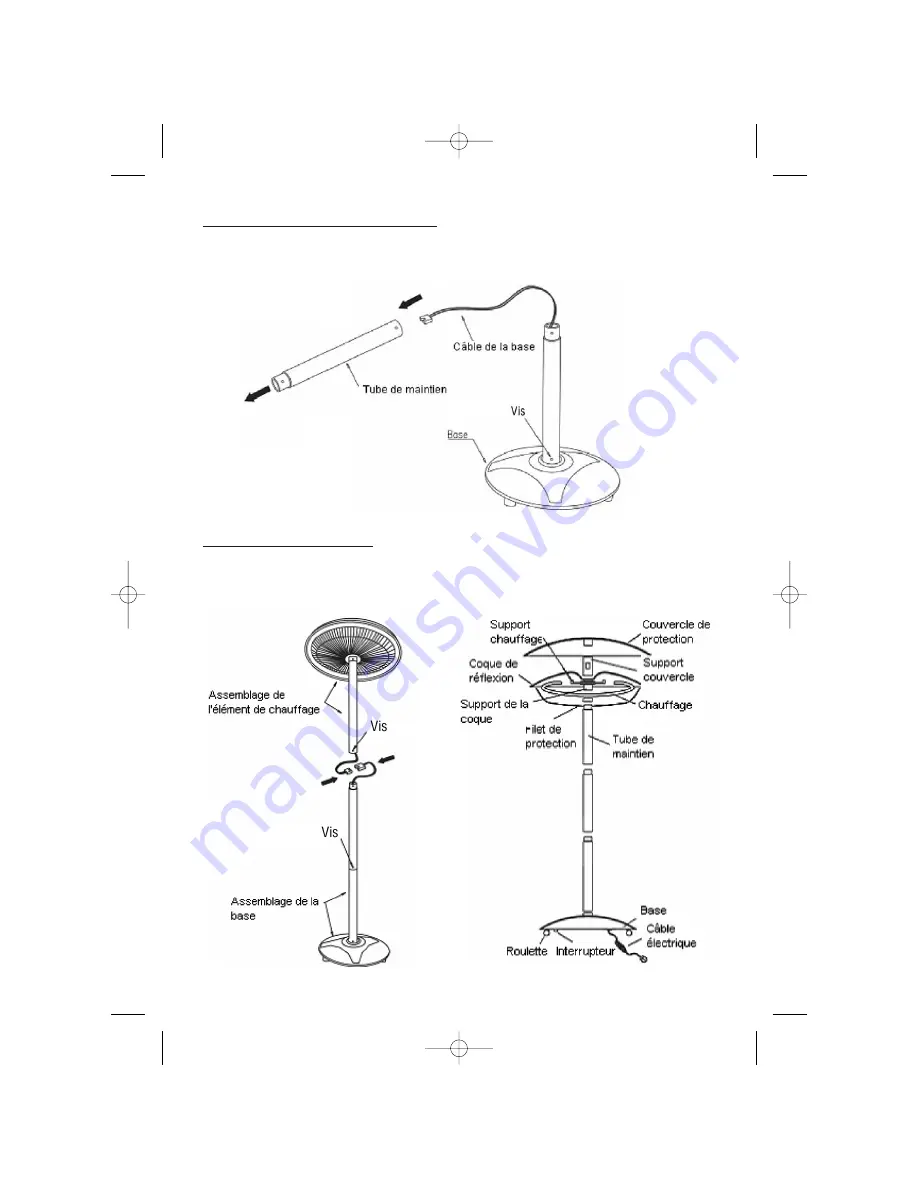
4: Assemblage de la troisième section du tube .
Faire passer le câble électrique venant de la base au travers du troisième tube,
emboîter cette section sur celle déjà installée sur la base, sans la visser pour le moment.

5 : Assemblage complet et fixation
La base se trouvant à la verticale, connecter les deux sections du câble électrique . S’assurer
de la stabilité de l’appareil, visser fermement chaque section.

5

  notice_CT3000  22/11/06  17:39  Page 5

Summary of Contents for CT 3000

Page 1: ...CHAUFFAGE D EXTÉRIEUR PATIO HEATER CT 3000 MODE D EMPLOI USER MANUAL notice_CT3000 22 11 06 17 39 Page 1 ...

Page 2: ...audes Ne jamais déplacer ou débrancher l appareil en tirant sur le cordon d alimentation Avant de ranger l appareil s assurer qu il est bien débranché et complètement refroidi Débrancher l appareil avant de le nettoyer Ne pas nettoyer l appareil avec des produits chimiques abrasifs Ne pas introduire d objets métalliques pointus ni vos doigts dans l appareil pour ne pas l endommager et éviter tout ...

Page 3: ...instants à chauffer ASSEMBLAGE ASSEMBLAGE ATTENTION Pour un maximum de sécurité assembler soigneusement l appareil tel que décrit ci dessous en faisant particulièrement attention à ce que les éléments chauffants les tubes et la base soient fermement emboîtés puis visser l ensemble 1 Enlever les cales de protection Démonter le filet de protection en enlevant les vis de fixation de la tête du chauff...

Page 4: ...t Puis renverser l élément chauffant qui doit être bien stable faire tourner légèrement le tube dans son emplacement sur l élément chauffant sans le fixer pour le moment 3 Assemblage de la base Comme le montre le schéma ci dessous faire passer le câble électrique partant de la base à l intérieur du tube correspondant à la base retourner la base qui doit être stable Faire tourner le tube dans son e...

Page 5: ... tube emboîter cette section sur celle déjà installée sur la base sans la visser pour le moment 5 Assemblage complet et fixation La base se trouvant à la verticale connecter les deux sections du câble électrique S assurer de la stabilité de l appareil visser fermement chaque section 5 notice_CT3000 22 11 06 17 39 Page 5 ...

Page 6: ...TIT GUIDE DE DEP PETIT GUIDE DE DEPANNAGE ANNAGE Mauvais fonctionnements Causes possibles Dépannages L appareil ne se met pas Appareil mal branché Retirer la fiche rebrancher en marche correctement La prise est défectueuse La faire remplacer par un électricien L appareil ne marche pas Un objet empêche Le placer sur une surface alors qu il est alimenté l interrupteur Marche plane et stable Enlever ...

Page 7: ...ge the appliance by pulling the cord To avoid any risk of burn never move the appliance when it is hot Before tidying the appliance make sure that it is unplugged from the power and that it is completely cooled Unplug the appliance before cleaning Do not clean the appliance with abrasive chemicals Do introduce neither metallic objects nor fingers inside the appliance in order to protect you from e...

Page 8: ... on it will take some time to start heating ASSEMBL ASSEMBLY Y CAUTION For safety reasons carefully assemble the device as set out below and make sure the heating element tubes and base are tightly fitted then bolted to each other 1 Remove the soft foam from the heating elements Remove the protective net from the head of the heater remove the screw Remove the soft foam gen tly as per the direction...

Page 9: ...nding to the heating element The heating element must be turned over and remain stable Gently turn the tube in its setting on the heating element without attaching it for the time being 3 Base Assembly As indicated in the figure below pass the electrical cable from the base inside the tube section corre sponding to the base Turn the base over It must remain stable Turn the tube in its setting Tigh...

Page 10: ...ch this section to the section already attached to the base without screwing it on for the time being 5 Complete Assembly and Attaching The base is in a vertical position Plug the two sections of the electrical cable together Ensure that the device is stable Tightly screw the sections together 10 notice_CT3000 22 11 06 17 39 Page 10 ...

Page 11: ...inegar or abrasives TROUBLESHOOTING TROUBLESHOOTING Issues Potential causes Solutions The device will not The device is not Remove the plug and plug turn on plugged in properly it in again properly The plug is defective Have it replaced by an electrician The device does not An object is preventing the Place it on a flat and stable work but the current On Off button from working service Look for th...

Page 12: ... cycle hand it over a collection point for the recycling of electrical and electronic appliances The symbol on the product the instructions for use or the packing will inform about the methods of disposal The materials are recyclable as mentioned in its marking By recycling or others forms of re utilization of old appliances you are making an important contribution to protect our environment Pleas...

Reviews: