


21
ALNOR
®
systemy wentylacji
jest prawnie chronionym znakiem i technicznym patentem. Prawo do zmian zastrzeżone.
w
w
w
.a
ln
or
.com
.p
l
Instrukcja obsługi
HRQ-PremAIR-BUT-LCD
4.2.1 Select AUTO mode
To start the AUTO mode, touch the UP button or the DOWN button again and again until the AUTO
mode icon comes on. AUTO mode is available if at least one external sensor ids binded
(HRQ-PremAIR-SENS-CO2 or HRQ-PremAIR-SENS-RH).
4.2.2 Select MANUAL mode
When in AUTO mode, use the UP button or the DOWN button , to leave the AUTO mode. Touch the UP
or DOWN button again and again to select the correct ventilator speed. Refer to 3.3.2. for the speed settings
of the ventilator.
4.2.3 Select AWAY mode
To start the AWAY mode, touch the UP button or the DOWN button again and again until the AWAY
mode icon comes on.
4.2.4 Select PARTY mode
To start the PARTY mode, touch the UP button or the DOWN button again and again until the PARTY
mode icon comes on.
4.2.5 Select TIMER mode
To start the TIMER mode, touch the UP button or the DOWN button again and again until the TEMPORARY
mode icon comes on. The TIMER mode stays on for 60 minutes.
3.3.3 Default screen
The default screen shows the current state of the HRU: the actual ventilator speed, the bypass status and the
clock program. If there is a fault in the HRU, the fault indicator icon and the fault indicator code show on the
screen.
4. Operation and menus
4.1 Make the screen come on
Touch any capacitive button to power-up the device. The screen shows the actual setting of the HRU.
4.2 Operating mode
NOTE:
Depending on the capabilities of your HRU, you may not be able to select all the modes described
below. Only the modes that are supported by your HRU are visible on the screen. Residential air
handling units HRU-PremAIR sold before February 2021 do not have internal clock, therefore
CLOCK PROGRAM is not available.
!
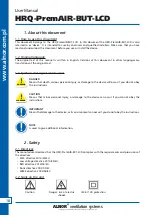
A
OK button
Touch to start or activate the
selected mode.
B
UP button
Touch to increase the number or
the item on the display.
C
DOWN button
Touch to decrease the number
or the item on the display.
D
MENU button
Touch to go through the
available menu settings.
E
BACK button
Touch to go back to the default
screen.


