background image

USER GUIDE 

Publication AP8769 

Summary of Contents for XB-14 MK2

Page 1: ...USER GUIDE Publication AP8769 ...

Page 2: ...uthorised agent with proof of purchase Units returned should be packed to avoid transit damage In certain territories the terms may vary Check with your ALLEN HEATH agent for any additional warranty which may apply Allen Heath XB 14 MK2 User Guide AP8769 Issue 2 Copyright 2012 Allen Heath Limited All rights reserved Allen Heath Limited Kernick Industrial Estate Penryn Cornwall TR10 9LU UK http www...

Page 3: ...E 10 0 10 20 30 40 50 6 10 63 26 GAIN MIC 0 LINE 10 0 10 20 30 40 50 15 15 80Hz LF 15 15 80Hz LF 120Hz 4k 200 2k 650 500 1k 3k 120Hz 4k 200 650 500 1k 3k CLFOUT TELCO1 TEL IN CLFOUT TELCO2 TEL IN TALK TALK O O 6 PRE O O 6 PRE O O 6 PRE O O 6 PRE O O 6 PRE O O 6 PRE O O 6 PRE O O 6 PRE O O 6 PRE CLFSCE 3 4 5 USB GUESTPHO NES1 GUEST PHONES2 CRM PHONE S EXTMONIN L R ST1 ST2 ST4 ST3 ST6 USB ST5 0 5 10...

Page 4: ...ture To reduce the risk of fire or electric shock do not expose the console to rain or moisture or use it in damp or wet conditions Do not place containers of liquids on it which might spill into any openings Ventilation Do not obstruct the ventilation slots or position the console where the air flow required for ventilation is impeded If the console is to be operated in a rack unit or flightcase ...

Page 5: ...rface scratching the surface with sharp objects or rough handling and vibration Environment Protect from excessive dirt dust heat and vibration when operating and storing Avoid tobacco ash smoke drinks spillage and exposure to rain and moisture If the console becomes wet switch off and remove mains pow er immediately Allow to dry out thoroughly before using again Cleaning Avoid the use of chemical...

Page 6: ...allen heath com http www allen heath com xb Warranty 3 Packed Items 4 Safety Instructions 5 Contents 7 Panel Drawings 8 Introduction to XB 14 9 Specifications 11 Dimensions 13 Block Diagram 14 Mono Input Channel 15 TELCO Channels 1 2 18 Stereo Input Channel ST1 ST2 21 Stereo Input Channels ST3 ST4 23 Master Section 24 Remote Interface connectors 27 On Switch Options 28 Remote Interface wiring 29 U...

Page 7: ...4 MIN MAX EXMO N PGMMIX FADER AUX AUX AUX AUX AUX AUX AUX AUX AUX 0 5 10 15 20 30 40 50 O O 0 5 10 15 20 30 40 50 O O 0 5 10 15 20 30 40 50 O O 0 5 10 15 20 30 40 50 O O 0 5 10 15 20 30 40 50 O O 0 5 10 15 20 30 40 50 O O 0 5 10 15 20 30 40 50 O O 0 5 10 15 20 30 40 50 O O 0 5 10 15 20 30 40 50 O O 0 5 10 15 20 30 40 50 O O USB SOURCE SELECT CRM PHONES SELECTION MIXB MIXB MIXB MIXB MIXB MIXB MIXB ...

Page 8: ...st of the gain comes from the first stage so unwanted noise is kept to a minimum There is no pad switch or pad circuit line level signals are simply plugged into the second stage of the pre amp by using the line input jack socket This has the great advantage of lower noise when using the line input It is common to attenuate line level signals then amplify them back up again which can give more noi...

Page 9: ...annel Output matrix Both the operator and guest headphone outputs and the control room speakers have an output matrix with priority switched feeds This means the operator could be monitoring one bus while a guest is listening to the program mix There are many possible combinations Electronically balanced outputs The main program outputs are on XLR connectors with an electronically balanced output ...

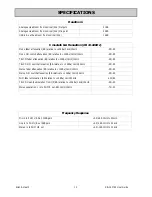
Page 10: ...R inserts TRS jack sockets 2dBu nominal 21dBu maximum Aux output Jack socket 0dBu nominal 21dBu maximum Mix B outputs RCA phono sockets 0dBu nominal 21dBu maximum Audition outputs RCA phono sockets 0dBu nominal 21dBu maximum Telco output XLR 0dBu nominal 21dBu maximum CRM Speaker outputs RCA phono sockets 0dBu nominal 21dBu maximum THD n Mic in to PGM L R Out 0dB gain 1kHz 10dBu out 0 01 Mic in to...

Page 11: ...tion dB 22 22kHz Mono fader attenuation dB relative to 10dBu 1kHz 10kHz 95 95 Mono ON switch attenuation dB relative to 10dBu 1kHz 10kHz 95 95 TELCO fader attenuation dB relative to 10dBu 1kHz 10kHz 95 95 TELCO ON switch attenuation dB relative to 10dBu 1kHz 10kHz 95 95 Stereo fader attenuation dB relative to 10dBu 1kHz 10kHz 95 90 Stereo ON switch attenuation dB relative to 10dBu 1kHz 10kHz 95 95...

Page 12: ...0 20 30 40 50 6 10 63 26 GAIN MIC 0 LINE 10 0 10 20 30 40 50 15 15 80Hz LF 15 15 80Hz LF 120Hz 4k 200 2k 650 500 1k 3k 120Hz 4k 200 650 500 1k 3k CLFO UT TELCO1 TEL IN CLFO UT TELCO2 TEL IN TALK TALK O O 6 PRE O O 6 PRE O O 6 PRE O O 6 PRE O O 6 PRE O O 6 PRE O O 6 PRE O O 6 PRE O O 6 PRE CLFSCE 3 4 5 USB GUESTPHONE S1 G UESTPHONES2 CRM PHO NES EXTMO NIN L R ST1 ST2 ST4 ST3 ST6 USB ST5 0 5 10 15 2...

Page 13: ...IC M4 FADER UP LOGIC T1 FADER UP LOGIC T2 FADER UP LOGIC ST1 START PULSE ST1 STOP CUE PULSE ST2 START PULSE ST2 STOP CUE PULSE ST3 START PULSE ST3 STOP CUE PULSE ST4 START PULSE ST4 STOP CUE PULSE 1 9 2 10 3 11 4 12 5 13 6 14 7 15 GROUND ST5 START PULSE ST5 STOP CUE PULSE 8 ST6 START PULSE ST6 STOP CUE PULSE ST7 START PULSE ST7 STOP CUE PULSE MUTE_M1 MUTE_M2 MUTE_M3 MUTE_M4 1 9 2 10 3 11 4 12 5 13...

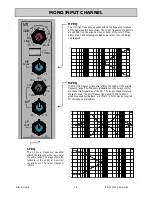
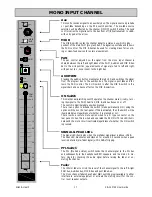
Page 14: ... Chassis Nom inal level is 0dBu The insert point is after the 100Hz filter and be fore the EQ Gain Control This adjusts the gain of the input amplifier to match the signal level of the input The gain is varied from 6dB attenuation to 63dB for signals plugged in to the xlr socket Mic Input and 10dB to 26dB for signals plugged into the Line input jack 100Hz High Pass Filter The Hi pass filter is use...

Page 15: ...t maximum cut and boost The corner frequency is 80Hz HF EQ The HF High Frequency equaliser affects the frequency response of the higher audible frequencies The corner frequency of 12kHz is around 3dB from the maximum cut or boost of the circuit It has plenty of gain and actually gives slightly more that the 15dB leg end suggests 10 00 Hz 100 00 1000 00 10000 00 30000 00 20 00 15 00 10 00 5 00 0 00...

Page 16: ...e PGM Audition MIX B and Aux buses on or off The switch is illuminated green when pressed There is an option to disable the switch make permanently ON using the option switches on the rear panel If this is activated then the switch will be illuminated green regardless of whether it is pressed or not There is also a remote mute option wired to a D type connector on the rear panel When this is wired...

Page 17: ...n 1 Chassis Pin 2 hot Pin 3 Cold impedance bal anced ground TELCO Channel Filters The TELCO Channel has a high pass and low pass total cut filter which is designed to allow the user to reduce the frequency range of the channel when used with a telephone caller The high pass filter can be varied from 20Hz full range to 6kHz The low pass filter from 20kHz full range to 700Hz The default position ful...

Page 18: ...CO channel so the caller does not hear any dis tracting echo of their voice If the AUX or AUDITION switch is pressed the TELCO clean feed signal is sourced from the selected bus but minus the signal sent from that TELCO channel This is a really useful feature that can enable the operator to send a mix of signals from different channels to the telephone caller the sources may be on or off air becau...

Page 19: ...d stays on for around 0 5 seconds when a peak level is detected pre fader signal within 5dB of clipping PFL Switch The PFL Pre Fade Listen switch sends the channel signal to the PFL bus and subsequently to the headphones CRM speakers and the main L R me ters Used for checking the audio signal before raising the fader or switching on the channel or raising the fader Fader The 100mm fader controls t...

Page 20: ...nnel EQ The stereo channel EQ is 2 band with corner frequencies of 12kHz for the HF and 80Hz for the LF 1 0 0 0 Hz 1 00 0 0 1 0 00 0 0 1 0 0 00 0 0 3 0 00 0 0 0 2 0 0 0 1 5 0 0 1 0 0 0 5 0 0 0 0 0 5 0 0 1 0 00 1 5 00 2 0 00 d B r AUX This control sends a signal to an auxiliary bus The signal is sourced pre fade or post fade depending on the PRE switch position and is a com bined sum of the left an...

Page 21: ...e jammed permanently ON SIGNAL PEAK LEDs The Signal LED illuminates when the pre fader L or R signal level is above 15dB The Peak LED illuminates and stays on for around 0 5 seconds when a peak level is detected pre fader signal within 5dB of clipping PFL Switch Sends the summed L R stereo channel signals to the PFL bus Fader The 100mm fader controls the level of the stereo channel L R signals to ...

Page 22: ... USB 2 The connector is a standard USB B Type connector When connected to a computer Windows or Mac you will be able to transfer stereo audio to and from the XB 14 The signal source for the send is selected using the switches below the USB connector If all switches are un pressed the post fader main program mix will be sent to the USB output The priority switch matrix also gives the choice of post...

Page 23: ...ader Main PGM Outputs Standard XLR output connector for the main program mix left right outputs Wired Pin 1 Chassis Pin 2 hot Pin 3 Cold Electronically balanced nominal level 4dBu 0VU AUX Output Standard 1 4 6 25mm Jack socket for aux output Wired Tip Hot Ring cold Sleeve Chassis Impedance bal anced Nominal level 0dBu Mono Output Standard RCA phono socket for the Mono PGM bus output The mono progr...

Page 24: ...tor switches These 5 switches select the signal source for the control room speak ers headphones monitor and the meters They work on a priority basis If they are all up then the post fade main PGM signals will feed the monitor circuit if any of the switches are pressed then the PGM signal will be replaced If more than one switch is pressed the switch nearest the meters will take priority The PFL s...

Page 25: ... level of the operators control room headphones from off fully attenuated to maximum The headphone amplifier has a gain of 12dB Guest Phones level Adjusts the level of the guests headphones from off fully attenuated to maximum Each headphone output socket has a dedicated amplifier with a gain of 12dB EX MON level This is the master level control for the external monitor stereo input The range of a...

Page 26: ...LECTOR OUTPUT 2 M3 FADER UP LOGIC OPEN COLLECTOR OUTPUT 3 T1 FADER UP LOGIC OPEN COLLECTOR OUTPUT 4 M1 EXTERNAL MUTE INPUT ACTIVE LOW 5 M3 EXTERNAL MUTE INPUT ACTIVE LOW 6 T1 EXTERNAL MUTE INPUT ACTIVE LOW 7 CUT CRM SPEAKERS INPUT ACTIVE LOW 8 GROUND 9 M2 FADER UP LOGIC OPEN COLLECTOR OUTPUT 10 M4 FADER UP LOGIC OPEN COLLECTOR OUTPUT 11 T2 FADER UP LOGIC OPEN COLLECTOR OUTPUT 12 M2 EXTERNAL MUTE I...

Page 27: ...ion then the corresponding channel s ON switch will be disabled made so that it is jammed ON The green LEDs in the switch will then permanently illuminate UNLESS Unless you are using the Stereo channel ON switches for transport Start Cue and would like the channel mute circuit disabled but the switch illumination still to follow the switch position In this case use the last switch in the row to di...

Page 28: ...3 14 15 ON AIR 12V 12V REMOTE A Pin 12 mute Mono Ch2 Ground Pin 1 CH 1 Fader UP Input resistor 10 Ohms for over current protection Ensure input current is less than 100mA Relay or circuit Remote mute switch for Mono Ch2 100mA max 1 2 3 4 5 6 7 8 9 10 11 12 13 14 15 Optional REMOTE B Start pulse wire to tip Cue pulse wire to sleeve 3 5mm Jack Plug Additional Ground wire may be required To CD player...

Page 29: ...rectional USB 1 1 compliant audio CODEC It is fully compliant with USB2 ports and uses standard Windows and MAC Core Audio Drivers In other words plug it in and your computer will find it and be able to transfer audio to and from the USB device You will need some form of audio software running on your computer for playback recording or a voice over internet phone but on a basic level you can use y...

Page 30: ...IGNAL PFL PE AK PFL E NAB LE TO GUEST INSERT M2 INSE RT M1 LINE LINE MIC MIC 100Hz 12kHz 15 15 HF 15 MF 15 12kH z 15 15 HF 15 MF 15 6 10 63 26 GAIN MIC 0 LINE 10 0 10 20 30 40 50 6 10 63 26 GAIN MIC 0 LINE 10 0 10 20 30 40 50 15 15 80Hz LF 15 15 80H z LF 120Hz 4k 200 2k 650 500 1k 3k 120H z 4k 200 650 500 1k 3k CLF OUT TELCO 1 TEL IN CLF O UT TELCO 2 TEL IN TALK TALK O O 6 P RE O O 6 PRE O O 6 P R...

Page 31: ...0 30 40 50 O O MIN MA X C RM TALK TOGUES T L R BA L PGM FD R PG M FD R PGM FD R PG M FDR PG M FDR PGM FD R PGM FD R PG M FDR PG M FD R PG M FDR MIXB BU S BU S BU S BUS BUS BU S BU S BUS BU S BU S MIXB PO WE R AU D O UT L R ST4 MIN MA X EXMO N PG M MIX FA D ER AUX AU X AU X AUX AUX AU X AU X AUX AUX 0 5 10 15 20 30 40 50 O O 0 5 10 15 20 30 40 50 O O 0 5 10 15 20 30 40 50 O O 0 5 10 15 20 30 40 50 ...

Page 32: ... ST4 ST3 ST6 USB ST5 0 5 10 15 20 30 40 50 O O MIN MAX CRM TALK TOGUEST L R BAL PGM FDR PGM FDR PGM FDR PGM FDR PGM FDR PGM FDR PGM FDR PGM FDR PGM FDR PGM FDR MIXB BUS BUS BUS BUS BUS BUS BUS BUS BUS BUS MIXB PO WE R AUDOUT L R ST4 MIN MAX EXMO N PGM MIX FADER AUX AUX AUX AUX AUX AUX AUX AUX AUX 0 5 10 15 20 30 40 50 O O 0 5 10 15 20 30 40 50 O O 0 5 10 15 20 30 40 50 O O 0 5 10 15 20 30 40 50 O ...

Page 33: ...corporated into studio furniture using the optional 19 rack fixing kit The following pictures give you an idea of how the rack fixing kit is fitted to the XB 14 Should you decide to purchase the kit please follow the fitting instructions provided with the kit The rack mounting kit part number is ZED1402 RK19 ...

Page 34: ...e ground Ring cold Tip hot BALANCED 1 ground 2 hot 3 cold 2 hot 1 ground 3 cold Sleeve ground Ring cold Tip hot BALANCED BALANCED BALANCED XLR FEMALE XLR MALE BALANCED UNBALANCED Sleeve ground Ring cold Tip hot BALANCED Sleeve ground Ring cold Tip hot BALANCED UNBALANCED adapter UNBALANCED INSTRUMENT CABLE TRS JACK CABLE MIC CABLE TRS to XLR F CABLE TRS to XLR M CABLE TO FROM INPUT OUTPUT 2 Output...

Page 35: ...s and becoming an official Registered User you will ensure that any warranty claim you might make is actioned quickly and with the minimum delay Alternatively you may either copy or cut off this section of the page fill in the details and return it by mail to Allen Heath Ltd Kernick Industrial Estate Penryn Cornwall TR10 9LU UK Investigate ALLEN HEATH s other ranges at www allen heath com Large Li...

Page 36: ...to change mixer functionality NOTE We advise that the modifications below are carried out by an authorised Allen Heath service centre The following information is provided to give the user an idea of how the console can be modified if required The diagram below shows the mixer with the rear cover removed Modifications to the rear mounted boards are relatively straightfor ward and can be done in si...

Page 37: ...ter PCBs re spectively the feed selection buttons on the right hand side of the mixer are changed from priority mix to additive mix The default setting is priority mixing where pressing a button higher up on the mixer cuts the previous signal to listen to the selected signal In additive mixing mode the bottom button still priority switches between the main program mix and Mix B but all other feeds...

Reviews: