background image


21


Usar el metrónomo (clic) 

 
Puede usar el metrónomo integrado ("clic") para ayudarle a mantener el tiempo cuando practica con 
el instructor de batería integrado o con patrones. Puede cambiar el tempo (velocidad), el volumen, el 
sonido y la firma de tiempo del metrónomo. 
 

Activar y desactivar el metrónomo 

 
Para activar o desactivar el metrónomo, pulse el botón 

Click

.  


Ajustar el tempo del metrónomo 

 
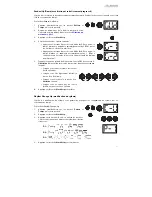
Para ajustar el tempo (velocidad) del metrónomo: 

1.


Pulse el botón 

Tempo

2.


Aparece en la 

Pantalla

 el tempo actual (

30

 – 

280

) en BPM ("beats por 

minuto"). Use los botones 

– / +

 para ajustar el nuevo tempo.  

3.


Espere 4 segundos. El módulo de batería guarda automáticamente el 
nuevo ajuste. 


Ajustar el volumen del metrónomo 


Para ajustar el volumen del metrónomo: 

1.


Pulse dos veces el botón 

Click

2.


La 

Pantalla

 muestra el nivel de volumen (

L00

 – 

L32

). Use los botones 

– / +


para ajustar el volumen del metrónomo (el nivel de volumen 
predeterminado es 

L25

). 

3.


Espere 4 segundos. El módulo de batería guarda automáticamente el 
nuevo ajuste. 


Cambiar el sonido del metrónomo 


Para cambiar el sonido "clic" del metrónomo: 

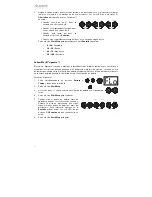
1.


Pulse simultáneamente los botones 

Click

 y 

1

2.


Aparece en la 

Pantalla

 CL ("clic") y el número del sonido (

CL1 – CL5

). Use 

los botones 

– / +

 para ajustar el sonido del metrónomo. 


CL1:

 Carrillón y clic (predeterminado) 


CL2:

 Clave 


CL3:

 Baqueta lateral 


CL4:

 Cencerro 


CL5:

 Vocal 

3.


Espere 4 segundos. El módulo de batería guarda automáticamente el nuevo ajuste. 


Cambiar la firma de tiempo del metrónomo 


Para cambiar la firma de tiempo del metrónomo: 

1.


Pulse simultáneamente los botones 

Click

 y 

2.


2.


Aparece en la 

Pantalla

 la firma de tiempo actual. Use los botones 

– / +

 para 

seleccionar una firma de tiempo: 

1/2

2/2

3/4

4/4

 o 

6/8

3.


Espere 4 segundos. El módulo de batería guarda automáticamente el 
nuevo ajuste. 

CLICK

TEMPO

CLICK

CLICK

1

CLICK

2

Summary of Contents for DEBUT KIT

Page 1: ...User Guide English 3 14 Gu a del usuario Espa ol 15 26 Guide d utilisation Fran ais 27 38 Guida per l uso Italiano 39 50 Benutzerhandbuch Deutsch 51 62 Appendix English 63...

Page 2: ...2...

Page 3: ...s 2 Floor pedals hi hat and kick Cable snake Sound module power adapter 2 Sticks Drum Stool Headphones Drum key Velcro strap User Guide Safety Warranty Manual Support For the latest information about...

Page 4: ...evel surface 2 Unfold the rack legs and loosen the joints of each rack arm to unfold If needed flip the drum module arm vertically and then tighten to set it in place Once the kit has been fully expan...

Page 5: ...cure the cable snake to the module 6 Connect the labeled 1 4 cables at the tail end of the cable snake to each respective drum pad cymbal and foot pedal in the drum kit Secure the cables using the Vel...

Page 6: ...ttern See Playing Along with Patterns for more information 7 Pattern Button Press this button to enter Pattern Mode Press both this button and the Tempo Button simultaneously to use the Built In Drum...

Page 7: ...Aux In Use a 1 8 stereo cable not included to connect an external audio device smartphone CD player etc to this input 6 USB Port Use a standard USB cable not included to connect your computer to this...

Page 8: ...ively 2 The Display will show the volume level L00 L32 Use the buttons to set the kit s volume level the default volume level is L28 3 Wait 4 seconds The kit s new volume setting will be saved automat...

Page 9: ...volume level L00 L32 Use the buttons to set the metronome s volume level the default volume level is L25 3 Wait 4 seconds The drum module will automatically save the new setting Changing the Metronom...

Page 10: ...exercise you want to do The Display will show which exercise you have selected 1 Beat Check bCH 2 Gradual Up Down GUd 3 Rhythm Change Up C U 4 Follow Me FLo 5 Drum Mute d U Beat Check This exercise ev...

Page 11: ...e pads in time with the metronome The six LEDs of the 1 5 Variation buttons indicate how accurate or in time you are When you are right on the beat the 3 and 4 buttons light up When you are slightly o...

Page 12: ...use the entire drum kit In this exercise the drum module will alternate between 1 a drum pattern and 2 a metronome track of the same length during which you play the drum pattern yourself To use Follo...

Page 13: ...p button while powering it back on PoF will appear on the display to confirm the feature is off Note After powering off this feature will be re enabled Repeat the procedure described above to disable...

Page 14: ...rmation will be sent to your computer sequencer etc 5 Stop recording Using the Drum Module as the Sound Module MIDI IN VOL MIDI OUT R L R L USB 1 Using a standard USB cable not included connect the dr...

Page 15: ...hi hat y bombo Manojo de cables Adaptador de corriente del m dulo de sonido 2 Baquetas Banqueta para bater a Auriculares Llave de ajuste de tambores Tira de velcro Gu a del usuario Manual sobre la seg...

Page 16: ...culaciones de cada brazo de la estructura para poder desplegarlos De ser necesario incline el m dulo de bater a para que quede m s vertical y luego aj stelo para que quede firme en esa posici n Una ve...

Page 17: ...el manojo de cables al m dulo 6 Conecte los cables de 1 4 pulg del manojo a sus respectivos pads de tambor platillo y pedal de la bater a seg n la etiqueta en el extremo de cada uno los cables Sujete...

Page 18: ...nto Tocar con acompa amiento de patrones 7 Bot n de patr n Pulse este bot n para entrar al modo de patr n Pulse simult neamente este bot n y el bot n Tempo para usar el instructor de bater a integrado...

Page 19: ...ositivo de audio externo tel fono inteligente reproductor de CD etc 6 Puerto USB Use un cable USB est ndar no incluido para conectar su computadora este puerto permiti ndole enviar y recibir mensajes...

Page 20: ...6 7 8 9 o 10 respectivamente 2 La Pantalla muestra el nivel de volumen L00 32 Use los botones para ajustar el volumen del kit el nivel de volumen predeterminado es L28 3 Espere 4 segundos El m dulo de...

Page 21: ...ivel de volumen L00 L32 Use los botones para ajustar el volumen del metr nomo el nivel de volumen predeterminado es L25 3 Espere 4 segundos El m dulo de bater a guarda autom ticamente el nuevo ajuste...

Page 22: ...4 o 5 que corresponde al ejercicio que desea realizar Aparece en la Pantalla el ejercicio que seleccion 1 Chequeo del beat bCH 2 Arriba abajo gradual GUd 3 Cambio ascendente de ritmo C U 4 S game FLo...

Page 23: ...el metr nomo Los seis LED de los botones 1 5 Variaci n indican cu n preciso a tiempo va usted Cuando est bien en el beat se encienden los botones 3 y 4 Cuando est ligeramente fuera del beat se enciend...

Page 24: ...itmos de bater a que usan el kit de bater a completo En ejercicio se repite un loop de tambor que alterna entre 1 el patr n de bater a propiamente dicho y 2 una pista del metr nomo de la misma longitu...

Page 25: ...ncender Aparece PoF en la Pantalla para confirmar que la funci n est desactivada Nota Despu s de apagar el m dulo esta funci n se habilita nuevamente Repita el procedimiento precedente para inhibirla...

Page 26: ...nciador etc 5 Detenga la grabaci n C mo usar el m dulo de bater a como m dulo de sonido MIDI IN VOL MIDI OUT R L R L USB 1 Usando un cable USB est ndar no incluido conecte el puerto USB del m dulo de...

Page 27: ...ble multipaire Adaptateur secteur du module de son 2 pilons Banc Casque d coute Cl de batterie Bande de fixation Velcro Guide d utilisation Consignes de s curit et informations concernant la garantie...

Page 28: ...u support et d vissez les bagues de fixation des articulations sur chaque bras afin de pouvoir les d plier Si n cessaire placez le bras du module de son la verticale puis revissez le Une fois le suppo...

Page 29: ...35 mm identifi s de l autre extr mit du c ble multipaire chaque pad de batterie cymbale et p dale de l ensemble de batterie Fixez les c bles l aide de la bande de fixation Velcro N h sitez pas ajuste...

Page 30: ...tern Appuyez sur cette touche pour acc der au mode Pattern Appuyez sur cette touche et sur la touche Tempo en m me temps afin d utiliser le professeur de batterie int gr Pour de plus amples informatio...

Page 31: ...l phone intelligent lecteur CD etc cette entr e 6 Port USB Utilisez un c ble USB standard non inclus pour brancher votre ordinateur afin de transmettre et recevoir des messages MIDI Veuillez consulte...

Page 32: ...ctionner l ensemble 6 7 8 9 ou 10 respectivement L cran affichera le niveau de volume L00 L32 2 Utilisez les touches afin de r gler le niveau du volume de l ensemble le niveau par d faut est L28 3 Att...

Page 33: ...era le niveau de volume L00 L32 Utilisez les touches afin de r gler le niveau du volume du m tronome le niveau par d faut est L25 3 Attendez 4 secondes Le module enregistrera automatiquement le nouvea...

Page 34: ...e que vous d sirez faire L cran affichera l exercice s lectionn 1 Beat Check bCH 2 Gradual Up Down GUd 3 Rhythm Change Up C U 4 Follow Me FLo 5 Drum Mute d U Beat check v rification rythmique Cet exer...

Page 35: ...m tronome 5 Frappez les pads au rythme du m tronome Les six DEL des touches 1 5 Variation indiquent la pr cision en temps avec laquelle vous frappez les pads Lorsque vous suivez le rythme les touches...

Page 36: ...i utilisent tout l ensemble de batterie Dans cet exercice une boucle de batterie se r p te alternant entre 1 l encha nement de batterie et 2 une piste de m tronome de la m me dur e au cours de laquell...

Page 37: ...l cran pour confirmer que la fonctionnalit est d sactiv e Remarque Apr s la mise hors tension cette fonction sera r activ e R p tez la proc dure ci dessus pour la d sactiver chaque fois que vous allum...

Page 38: ...ordinateur s quenceur etc 5 Arr tez l enregistrement Utilisation du module de percussion comme module de son MIDI IN VOL MIDI OUT R L R L USB 1 l aide d un c ble USB standard non inclus reliez le por...

Page 39: ...ssa Fascio di cavi Adattatore di alimentazione modulo audio 2 bacchette Sgabello batteria Cuffie Chiave per batteria Fascetta in velcro Guida per l uso Istruzioni di sicurezza e garanzia Assistenza Pe...

Page 40: ...e uniforme 2 Aprire le gambe del rack e allentare i giunti di ciascun braccio rack per aprirlo Se necessario collocare il braccio del modulo batteria verticalmente quindi stringerlo per fissarlo in p...

Page 41: ...cavi al modulo 6 Collegare i cavi etichettati 1 4 alla coda del fascio di cavi a ciascun pad batteria piatto e pedale presenti nel kit batteria Fissare i cavi servendosi della fascetta in velcro Sent...

Page 42: ...i veda il paragrafo Suonare con i pattern 7 Tasto Pattern premere questo tasto per entrare in modalit Pattern Premere contemporaneamente questo tasto e il tasto Tempo per utilizzare il Drum Coach inco...

Page 43: ...tazione per collegare un dispositivo audio esterno smartphone lettore CD ecc a questo ingresso 6 Porta USB servirsi di un cavo USB standard non in dotazione per collegare il computer a questa porta pe...

Page 44: ...tivamente 2 A Display comparir il livello di volume L00 L32 Servirsi dei tasti per impostare il livello del volume del kit Il livello di volume predefinito 28 3 Attendere per 4 secondi Il modulo batte...

Page 45: ...di volume L00 L32 Servirsi dei tasti per impostare il livello del volume del metronomo Il livello di volume predefinito 25 3 Attendere per 4 secondi Il modulo batteria salver automaticamente il nuovo...

Page 46: ...rcizio che si desidera effettuare A Display comparir l esercizio selezionato 1 Beat Check bCH 2 Gradual Up Down GUd 3 Rhythm Change Up C U 4 Follow Me FLo 5 Drum Mute d U Utilizzo della funzione Beat...

Page 47: ...a tempo con il metronomo I sei LED a livello dei tasti 1 5 Variation indicano il livello di precisione raggiunto quanto si a tempo Quando si perfettamente a tempo si accendono i tasti 3 e 4 Quando si...

Page 48: ...egano l intero set batteria In questo esercizio un loop di batteria si ripete alternando tra 1 il pattern di batteria stesso e 2 una traccia di metronomo della stessa durata durante la quale si suona...

Page 49: ...accenderlo PoF compare a Display a conferma dello spegnimento della funzione Nota bene dopo lo spegnimento questa funzione sar nuovamente abilitata Ripetere la procedura di cui sopra per disattivarla...

Page 50: ...ter sequenziatore ecc 5 Ferma la registrazione Utilizzo del modulo batteria come modulo audio MIDI IN VOL MIDI OUT R L R L USB 1 Servendosi di un cavo USB standard non in dotazione collegare la porta...

Page 51: ...hlange Soundmodul Netzteil 2 Sticks Trommelhocker Kopfh rer Stimmschl ssel Klettverschluss Benutzerhandbuch Sicherheitshinweise und Garantieinformationen Kundendienst F r aktuelle Informationen zu die...

Page 52: ...r und l sen Sie die Gelenke jedes Rackarms um sie zu aufzuklappen Klappen Sie den Drummodularm bei Bedarf vertikal um und ziehen Sie ihn dann fest um ihn in Position zu bringen Ziehen Sie die Gelenkkl...

Page 53: ...an um die Kabelschlange am Modul zu befestigen 6 Verbinden Sie die beschrifteten 1 4 Kabel am hinteren Ende der Kabelschlange mit den jeweiligen Drum Pads Becken und Fu pedalen im Drum Kit Sichern Sie...

Page 54: ...orlagen f r weitere Informationen 7 Vorlagetaste Dr cken Sie diese Taste um in den Vorlage Modus zu gelangen Dr cken Sie diese Taste und die Tempo Taste gleichzeitig um den integrierten Drum Coach zu...

Page 55: ...ten um ein externes Audioger t Smartphone CD Player etc an diesen Eingang anzuschlie en 6 USB Anschluss Verwenden Sie ein handels bliches USB Kabel separat erh ltlich um Ihren Computer hier anzuschlie...

Page 56: ...Variationstaste leuchtet gr n 2 Das Display zeigt die Lautst rke an L00 L32 Verwenden Sie die Tasten um die Lautst rke der Kits einzustellen die Standardlautst rke ist L28 3 Warten Sie 4 Sekunden Das...

Page 57: ...Das Display zeigt die Lautst rke an L00 L32 Verwenden Sie die Tasten um die Lautst rke des Metronoms einzustellen die Standardlautst rke ist L25 3 Warten Sie 4 Sekunden Das Drum Modul wird die neuen E...

Page 58: ...m welche bung Sie versuchen m chten Das Display zeigt an welche bung Sie ausgew hlt haben 1 Genauigkeit bCH 2 Gradueller Tempowechsel GUd 3 Rhythmuswechsel C U 4 Nachspielen FLo 5 Stummschalten d U Ge...

Page 59: ...spricht der aktuellen Metronomeinstellung 5 Schlagen Sie die Pads im Takt des Metronoms an Die sechs LEDs der 1 5 Variationstasten zeigen an wie taktgenau Sie spielen Wenn Sie genau im Takt spielen le...

Page 60: ...Drum Kit verwenden In dieser bung wird ein Drum Loop wiederholt wobei zwischen 1 dem Schlagzeugrhythmus selbst und 2 einer Metronom Spur in der gleichen L nge alterniert wird bei der Sie den eben geh...

Page 61: ...ie Start Stopp Taste beim Einschalten gedr ckt halten Auf dem Display wird PoF angezeigt um zu best tigen dass die Funktion deaktiviert ist Hinweis Nach dem Ausschalten wird diese Funktion erneut akti...

Page 62: ...Computer Sequenzer usw Gesendet 5 Beenden Sie die Aufnahme Verwendung des Drum Moduls als Sound Modul MIDI IN VOL MIDI OUT R L R L USB 1 Verbinden Sie den USB Anschluss des Drum Moduls ber ein Standar...

Page 63: ...main outputs right and left mono 1 8 TRS auxiliary input USB port MIDI Power jack Power 9 V 500 mA center pin positive Dimensions width x height x depth sound module only 5 8 x 7 2 x 4 4 147 mm x 183...

Page 64: ...alesis com Manual Version 1 2...

Reviews: