background image

Jawzilla Portable Clamping Jaws

AFTER SALES SUPPORT

e-mail: [email protected]

1800 909 909

MODEL: №. JH1000-01  •  03/2016  •  52539

(toll free)

6

AFTER SALES SUPPORT

(toll free)

Jawzilla Portable Clamping Jaws

e-mail: [email protected]

1800 909 909

MODEL: №. JH1000-01  •  03/2016  •  52539

Parts List

1.   Rail push handle
2.   Sliding clamp rail
3.   Safety slider
4.   Rear leg release knob
5.   Rear folding leg
6.   Front leg locking knob (x2)
7.   Front folding leg (x2)
8.   Clamp foot pedal
9.   Foot pedal folding release lever
10.  Front leg lock notch
11.  Clamp locking lever
12.  Fixed clamping jaw
13.  Moving clamping jaw
14.  Rear leg securing slot
15. Front securing slot

10

11

14

15

Parts List

Summary of Contents for 52539 Jawzilla

Page 1: ...fo www powertoolsupport com Read all safety warnings and all instructions thoroughly before operating this product Ensure you keep your manual in a safe place for future reference IM ed8 52539 JAWZILLA PORTABLE CLAMPING JAWS ...

Page 2: ... website or contact details for example Advantage You are not required to manually enter a website address or contact details How it works To scan the QR code all you need is a smartphone with QR codes reader software and an Internet connection This type of software can be downloaded for free from your smartphone s app store Try it out now Just scan the QR code with your smartphone and find out mo...

Page 3: ...ts 11 Folding the Portable Clamping Jaws for Storage 12 Carrying Transporting the Clamping Jaws 14 Using the Clamping Jaws as an Anvil 14 Using the Clamping Jaws as a Press 14 Ripping a Plank 15 Clamping SquareTubing 15 Sharpening Chainsaws 15 Removing the Fixed and Moving Clamping Jaw Facings 16 Maintenance 16 Warranty 17 Environmental Protection 17 What your 5 year warranty means 17 Service Supp...

Page 4: ...re to do so could result in serious personal injury Intended use of the Jawzilla Portable Clamping Jaws NOTE This product is for private domestic DIY use only It is not suitable for commercial industrial or trade use This product is suitable for use to clamp objects work pieces and can also be used as a workbench sawhorse vice or machine press NOTE First time users or inexperienced operators pay p...

Page 5: ...duct may show symbols These represent important information about the product or instructions on its use Read these instructions for use carefully Wear safety gloves Wear eye protection Hand crush area Do not place hands between the clamping jaws Warning ...

Page 6: ...re the clamping stand out in the elements Do not sit or stand on the clamping stand at any time The clamping stand must be used only for its prescribed purpose Any other use then those mentioned in this instruction manual will be considered a case of misuse The manufacturer shall not be liable for any damage or injury resulting from such case of misuse Never alter or change the product specificati...

Page 7: ... and knobs are tightened Dress properly Do not wear loose clothing or jewelry they can be caught by moving parts Nonskid footwear is recommended when working outdoors Wear protective hair covering to contain long hair Do not use product in damp or wet locations A moist work piece or damp pad may prevent the clamp from gripping firmly A dry condition is introduced to this product This product is ON...

Page 8: ...push handle 2 Sliding clamp rail 3 Safety slider 4 Rear leg release knob 5 Rear folding leg 6 Front leg locking knob x2 7 Front folding leg x2 8 Clamp foot pedal 9 Foot pedal folding release lever 10 Front leg lock notch 11 Clamp locking lever 12 Fixed clamping jaw 13 Moving clamping jaw 14 Rear leg securing slot 15 Front securing slot 10 11 14 15 Parts List ...

Page 9: ...AFTER SALES SUPPORT toll free Jawzilla Portable Clamping Jaws e mail help powertoolsupport com 1800 909 909 MODEL JH1000 01 03 2016 52539 7 1 2 3 4 5 6 10 7 13 12 11 9 6 8 7 Parts List ...

Page 10: ...e to move in any direction 6 Secure the rear folding leg 5 into position by tightening the rear leg release knob 4 in a clockwise direction Fig B 7 Pull down the foot pedal 8 fully to the ground until you hear a click to indicate the foot pedal 8 is engaged and locked into position Fig G NOTE If you have difficulty engaging the locking mechanism on the foot pedal tilt the unit slightly backwards s...

Page 11: ...AFTER SALES SUPPORT toll free Jawzilla Portable Clamping Jaws e mail help powertoolsupport com 1800 909 909 MODEL JH1000 01 03 2016 52539 9 C B A F E D I H G Assembly TIGHT LOOSE ...

Page 12: ... the clamping material in between the fixed clamping jaw 12 and the moving clamping jaw 13 push down the clamp locking lever 11 to the locking position Fig M then using your foot push down the clamp foot pedal 8 to fully secure the clamping material in place Fig N NOTE Ensure your clamping material work piece is secured in the clamping stand before commencing any work WARNING Stop immediately if t...

Page 13: ...ll engage locking the sliding clamp rail 2 before it can be fully extended and removed This is a safety feature to ensure the slide clamp rail 2 does not come straight off the end of the clamping jaws and hence possibly causing injury 3 Using your finger push up the safety slider 3 to allow release of the sliding clamp rail 2 from the end of the clamping jaws Fig O 4 Turn the sliding clamp rail 2 ...

Page 14: ...ticlockwise direction Fig S 3 Pull the rear folding leg 5 out from the rear leg securing slot 14 so that it can unfold down 4 Before inserting the rear folding leg into the front securing slot 15 the clamp foot pedal 8 needs to be released and folded upwards To do this pull down on the foot pedal folding release lever pulling it towards you Fig U This will disengage the clamp foot pedal from the c...

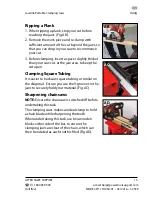
Page 15: ...ing jaws backwards to elevate the front by 1 2cms then attempt to release the rear leg release knob s again 9 Push the front folding leg 7 up into the upright position and ensure the leg is locked into position by engaging the ball bearing at the top of the leg with the notch on the outside of the stand housing 10 Repeat for the other leg The clamping jaws is now ready for storage T S R W V U X Fo...

Page 16: ... the moving clamping jaw 13 together This ensures that when carrying the clamping jaws the sliding clamp rail 2 will not slide off the end and cause injury FigY 3 Use the rear folding leg 5 as a handle to carry the clamping jaws Fig Z Using the Clamping Jaws as an Anvil The fixed jaw is sufficiently robust to be used as an anvil for strip metal work Fig AA WARNING Do not use the moving jaw as an a...

Page 17: ...ghtly thicker than your saw cut at the jaw area to keep the cut open Clamping SquareTubing It is easier to hacksaw square tubing or similar on the diagonal Ensure you use the V grooves in the jaws to securely hold your material Fig AC Sharpening chainsaws NOTE Ensure the chainsaw is switched off before undertaking this task The clamping Jaws makes an ideal clamp to hold a chain blade while sharpen...

Page 18: ...TE When the jaw facings are removed the connection pins holding the jaw facing in place will disengage Be careful not to loose these Maintenance Never use water or chemical cleaners to clean the portable clamping Jaws Use soapy water or a mild detergent Wipe clean with a dry cloth Always store your portable clamping jaws in a dry place out of the reach of children and do not allow use by persons u...

Page 19: ... thisWorkzone Titanium Jawzilla Portable Clamping Jaws making it easy to maintain and operate Use onlyWorkzone Titanium replacement parts for your product Non conforming parts or modifications made to parts will void your warranty What your 5 year warranty means Great care has gone into the manufacture of this product and it should therefore provide you with years of good service when used properl...

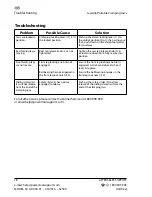
Page 20: ...ase knob 4 in a clockwise direction to fully secure into position Front folding legs are not secure Front leg locking knob 6 not engaged Ball bearing has not engaged in the front leg lock notch 10 Ensure the front leg locking knob 6 is engaged A click can be heard when it locks into place Ensure the ball bearing engages in the front leg lock notch 10 Sliding clamp rail 2 will not release from the ...

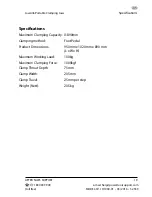
Page 21: ... JH1000 01 03 2016 52539 19 Specifications Maximum Clamping Capacity 0 890mm Clamping method Foot Pedal Product Dimensions 950mm x 1020mm x 890 mm L x W x H Maximum Working Load 100kg Maximum Clamping Force 1000kgf ClampThroat Depth 75mm Clamp Width 205mm ClampTravel 25mm per step Weight Nett 20 5kg Specifications ...

Page 22: ...ts are developed to our stringent quality specifications If you are not entirely satisfied with this product please return it to your nearest ALDI store within 60 days from the date of purchase for a full refund or replacement or take advantage of our after sales support by calling the supplier s Customer Service Hotline Made in China WORKZONE TITANIUM is a registered trademark of ALDI Stores DIST...

Reviews: