


CONTENTS
OVERVIEW OF THE PHONE
....................................................
•
Keys
........................................................................................
1-2
•
Icons
........................................................................................
1-3
•
LED Indicator
........................................................................
1-4
INSTALLATION
..........................................................................
•
Safety and precautions
......................................................
2-1
•
Getting started
....................................................................
2-3
CALLS
........................................................................................
•
Making a call
..........................................................................
3-1
•
Receiving a call
......................................................................
3-2
•
Displaying your number
........................................................
3-2
•
While communicating, you can also...
..................................
3-3
DIRECTORY
................................................................................
•
Accessing the directory
......................................................
4-1
•
Exiting your directory
..........................................................
4-3
•
Managing your directory
......................................................
4-4
CALL MEMORY
........................................................................
•
Accessing the call memory
..................................................
5-1
•
Exiting the call memory
........................................................
5-1
•
Managing/clearing the call memory
....................................
5-2
VOICE MAIL
..............................................................................
€
CONVERSION / SAVING A NUMBER
..............................
SHORT MESSAGES
................................................................
•
Reading your short messages
............................................
6-1
•
Handling your short messages
..........................................
6-3
•
Call back
..................................................................................
6-4
•
Exiting your short messages
..............................................
6-4
MENU
........................................................................................
•
Accessing the Menu
..............................................................
7-1
•
Exiting the Menu
....................................................................
7-2
•
Customizing the Menu
..........................................................
7-2
7
6
5
5
5
4
3
2
1
WARRANTY/INFORMATION
WARRANTY
We would like to congratulate you for choosing this mobile phone and we
hope that this product will satisfy all your needs.
We would like to remind you that this mobile phone has been approved in
accordance with European regulations, certified by the CE marking.
Notwithstanding any other applicable statutory warranties, this mobile
phone is guaranteed for parts and workmanship for a period of ONE (1)
year, from the date of purchase shown on your invoice. Nonetheless, if the
statutory warranty in force in your country exceeds TWELVE (12) months,
the statutory warranty will apply in place of the manufacturer's
warranty. However, if the statutory warranty does not exceed TWELVE
(12) months, the total warranty period (statutory and contractual) shall
be TWELVE (12) months.
The warranty for the batteries, different from that of the phone, is
stated in the "Recommendations" leaflet.
This warranty shall not, however, apply in the case of use not conforming
with the User's Manual, or in the case of defects due to external causes,
in particular humidity or liquid infiltration, or in the case of improper
installation, repair or modification performed by parties not authorized
by the manufacturer or dealer.
In case of defect, return your mobile phone to your dealer.
INFORMATION
•
Internet address: www.alcatel.com
•
Alcatel Hot Line no.: See “Alcatel Services” leaflet (call charged
according to rates applicable in caller's country).
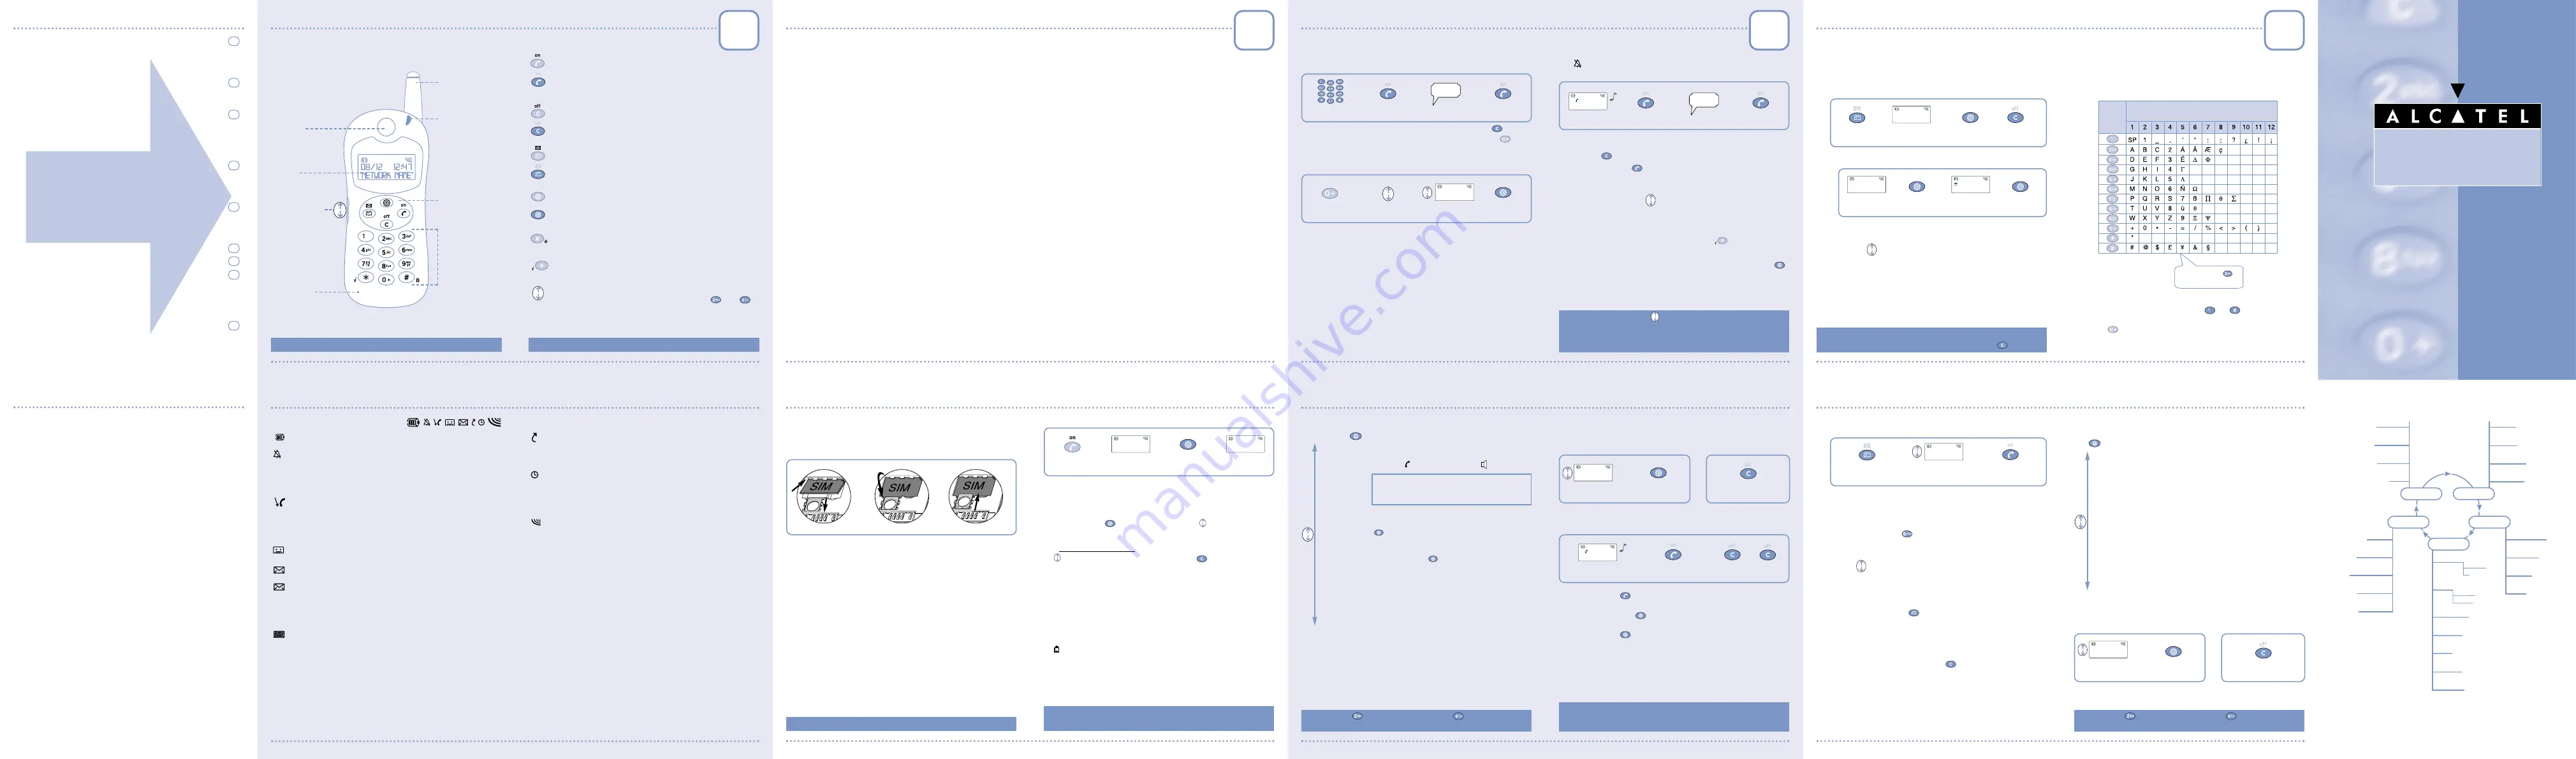
OVERVIEW OF THE PHONE
Volume control
LED
Indicator
Antenna
Display
screen
Earpiece
Alphanumeric
keypad
Microphone
KEYS
Switch the phone on
(long keypress)
Send or Take a call / Hang up
Access call memory (Redial)
Switch the phone off / Return to standby screen
(long keypress)
Delete a character / Return to previous screen
Access short messages
(long keypress)
Access directory
Access voice mail
(long keypress)
Access MENU / Confirm an option
Lock keypad
(long keypress)
Display your number
(1)
(long keypress)
Volume control /
Scroll options
(in this case, you can use the
and
keys).
+
–
Function
keys
© Alcatel 1999
+
–
(1)
See Chapter 3, page 2 to enter your number.
ICONS
Battery charge level
"Silent" mode:
You have activated the "Audio/Mode/Silent" MENU option
so that no alert tone is emitted by your phone (ring tone,
appointment reminder, etc.)
........................
Chapter 7, page 3
Unanswered incoming call:
You have been called but have not answered. The icon
clears when ALL the unanswered incoming calls stored in
the call memory have been consulted
......
Chapter 5, page 2
Voice message received:
or
You must call your voice mail to listen to your messages
..............................................................................
Chapter 5, page 3
Unread short message:
You have received a short message but have not read it.
The icon clears when ALL the messages have been read in
FULL
......................................................................
Chapter 6, page 1
Short message list is full:
Your terminal cannot store any more messages. You
must delete at least one message by accessing the list
................................................................................
Chapter 6, page 1
Call forwarding activated:
You have activated the "Services/Uncond.CF" MENU
option to forward your calls
..........................
Chapter 7, page 7
Appointment scheduled:
You have activated the "Clock/Appointmt." MENU option.
The icon automatically clears when the appointment time
passes
................................................................
Chapter 7, page 4
Signal strength indicator
LED INDICATOR
Green, flashing:
The flashing indicates that your phone is connected to
the network.
Green, steady:
The phone is in Hands-Free mode
..............
Chapter 3, page 3
Red, flashing:
Battery charge is too low.
•
Environment
Do not expose the phone to unfavourable environmental
conditions (humidity, rain, liquid infiltration, dust, sea air, etc.).
Outside the manufacturer's recommended operating temperature range
(-20° C to +55° C), the legibility of the phone's display may be impaired, though
this is temporary and not serious.
Do not attempt to open the battery or dry cells for they contain chemical
substances.
Do not dispose of used batteries in household waste. Batteries must be
disposed of in accordance with locally applicable environmental legislation.
•
Traffic safety
Remember to always check whether local legislation allows operation of a
mobile phone while driving a vehicle.
The phone must imperatively be connected to an external antenna when
switched on in a vehicle. Electromagnetic waves may otherwise interfere with
the vehicle electronics.
Check that the antenna is mounted and located away from driver and
passengers or separated from them by a metal screen (e.g. car roof). Park your
car before using the phone. User should use the “Easy-to-install Hands-Free
Car Kit” (ref. MP 70) or the “Digital Hands-Free Car Kit“ (ref. MP 71)
accessories while driving.
Check with your dealer or manufacturer if the car's electronic systems (ABS
anti-lock brakes, air bag) are adequately shielded from mobile phone RF energy.
Always avoid placing the phone on the dashboard.
SAFETY AND PRECAUTIONS
We recommend that you read this chapter carefully before use.
As with all radio transceivers, your mobile phone emits electromagnetic waves.
This phone conforms to international regulations insofar as it is used under
normal conditions and in accordance with the following instructions.
THE MANUFACTURER DISCLAIMS ANY LIABILITY FOR DAMAGE WHICH MAY
RESULT AS A CONSEQUENCE OF IMPROPER USE OR USE CONTRARY TO THE
INSTRUCTIONS CONTAINED HEREIN.
•
Conditions of use
The retractable antenna (depending on terminal) must be fully extended. Avoid
contact between the antenna and your skin when the phone is switched on.
Switch the phone off before boarding an aircraft. Use could lead to legal action
against the user.
Switch the phone off when in health care facilities except in areas specified.
Operation may interfere with the functionality of electronic medical devices
(pacemakers, hearing aids, insulin pumps, etc.). Persons with a pacemaker
should not carry the phone in a breast pocket. Persons with a pacemaker or
hearing aid should use the ear opposite the device.
Switch your phone off when near gas or flammable substances.
Strictly obey all signs and instructions when in a fuel depot or chemical plant,
at a refuelling point (service station) or any potentially explosive atmosphere.
Do not let children use the phone without supervision.
Do not attempt to open or repair it yourself.
Use only the dry cells, batteries, chargers and accessories approved by the
manufacturer. The manufacturer disclaims any liability for damage caused by
use of other batteries, chargers or accessories.
Switch your phone off before removing the dry cells or battery.
INSTALLATION
1
- Inserting the SIM card
The SIM card supplied with the subscription must be micro sized.
(1)
See your operator.
(2)
Check the availability of this service with your operator.
Insert card
Lock flap
Switch your phone
on (long keypress)
Enter your
PIN code
Confirm
Standby screen
08/12
12:47
“NET NAME”
PIN Code?
--------
Do not leave your PIN code
(1)
near your phone and store your card in a
safe place when you are not using it.
2
- Powering your phone
For further information on inserting your battery, see
"Recommendations" leaflet.
•
While the phone is searching for a network,
<<<-->>>
is displayed.
(
? ? ? - ? ? ?
is displayed
if your SIM card is not identified by the network
(1)
).
•
If you are asked to check the time and date, enter the data if needed,
then confirm by
(use the volume control keys
to switch from one to
the other).
•
If Cellbroadcast messages are displayed, use the volume control keys
to browse through them and/or press the
key to delete them
(see "Services/Networks/SMS-CB" menu option in Chapter 7, page 11).
•
One of the following symbols may appear next to the network name:
■
: You have selected the "Manual" search mode for network
connection using the "Services/Networks/Searching" menu
option (Chapter 7, page 11).
!
: You are connected to a network that isn't your subscribed
network.
: You are in an area with preferential rates
(2)
.
+
–
+
–
GETTING STARTED
Check that flap is fully open
3
- Switching your phone on
Push card down
(1)
If you do not know your code, see your operator.
RECEIVING A CALL
An incoming call is indicated by a progressively louder ring tone
(1)
, unless
the
icon is displayed
(you have activated the "Audio/Mode/Silent" menu
option - Chapter 7).
Incoming call...
(2)
Take the call
Talk
and hang up
➘
0146522495
bla, bla
bla
•
Switching the ring tone off (without losing the call)
Press the
key when the phone is ringing: you can still answer the
call by pressing the
key.
•
Adjusting the ring tone and earpiece volume
Use volume control keys
.
DISPLAYING YOUR NUMBER
You can display your own number by pressing the
key (long
keypress).
If your number is not displayed, enter it and confirm by pressing the
key. To later modify it, see the "Numbers/YourNumber" menu option
(Chapter 7, page 5).
+
–
(1)
Use the volume control keys
to increase/decrease the volume if necessary.
(2)
Caller's number/ID is displayed if given by the network. Check the availability of
this service with your operator (see "Services/Calls/Caller ID?" menu option -
Chapter 7, page 9).
+
–
In order to make or receive a call, you MUST switch your phone on and
fully extend the retractable antenna (depending on model).
MAKING A CALL
CALLS
Dial the number
Make the call
Talk
and hang up
If you make a mistake, you can erase a digit by pressing the
key. To
enter characters “+” and “P” (pause), make a long keypress on
(the
following characters scroll: 0, +, • and P).
•
Making an international call
bla, bla,
bla
Once the country code is displayed, dial the rest of the number and
make the call.
•
Making an emergency call
To make an emergency call, dial 112 or any other number given by your
operator.
As with any wireless phones, this phone relies upon radio signals.
Therefore connection for emergency calls in all conditions and at all
times cannot be guaranteed.
Display the prefix "+"
(long keypress)
Display countries
(long keypress)
Confirm
Select country
¤
CANADA
CHILE
+
–
+
–
Volume control keys
WHILE COMMUNICATING, YOU CAN ALSO...
How to use the options?
Selecting an option
Clearing an option
—
Handsfree?
—
Dial ?
—
Call hold?
—
Save Num.?
—
Messages ?
—
Exit ?
Second incoming call
(1)
Take the call
OR
➘
0362214770
Refuse
then
•
If you press the
key, the incoming call is accepted and the
ongoing call is automatically put on hold: you can then swap between
calls by pressing the
key.
•
If you press the
key, you shall access the options (the incoming
call is accepted ending the ongoing call, ....).
Select your option
Confirm
Return to the
previous screen
YOUR CALL
Handsfree?
„
OR
+
–
1 -
Press the
key to access the following options:
+
–
2 -
Handling a second incoming call
(1)
Caller's number/ID is displayed if given by the network. Check the availability of
this service with your operator (see "Services/Calls/Caller ID?" menu option -
Chapter 7, page 9).
(
)
Activate/deactivate the Hands-Free mode integrated in
the phone ( symbol then switches to
).
CAUTION: Keep the phone away from your ear when
Hands-Free mode is activated, the amplified volume
could damage your hearing.
Make a second call (an ongoing call will be automatically
put on hold, you can switch between calls by pressing the
key).
Put the ongoing call on hold (you can later resume the
call by pressing the
key).
Store a phone number in the call memory (Chapter 5).
Read your short messages.
Return to the previous screen.
Your directory can hold up to 250 files (names and phone numbers)
which are stored in your SIM card
(1)
.
ACCESSING THE DIRECTORY
DIRECTORY
(1)
The capacity of your SIM card depends on your network operator.
(2)
If you make a mistake, you can erase a digit by pressing the
key.
1 -
If your directory is empty, the phone suggests that you create the
first file:
If you wish to use your directory abroad, store the numbers in
international format with "+" (Chapter 3, page 1).
Use the
key to move from one character to another.
+
–
Enter the name
(2)
(up to 10 characters)
Confirm
NAME?
----------
Number of keypresses
Key
•
Entering the name and phone number in the first file
Access the directory
Cancel
DIR. empty !
Create ?
Do you wish to create
the first file?
Confirm
OR
(
)
Enter the number
(2)
Confirm
?--------
---------
•
To create files
See "Create ?" option in the paragraph "MANAGING YOUR
DIRECTORY".
SP = "Space" character
Example: Press
twice for letter B
To enter a name
(1)
, press the corresponding key as many times as
necessary as shown in the table below:
How to use the options?
Selecting an option
Clearing an option
MANAGING YOUR DIRECTORY
From the names list, you can access the following options by pressing
the key:
—
Create ?
—
Modif.Num?
—
ModifName?
—
File No. ?
—
Delete ?
—
Exit ?
Create a file (name and phone number) which will be
automatically stored in your SIM card (proceed as
described in the previous paragraph).
Display/modify the phone number corresponding to the
selected name.
Modify the selected name.
Display/modify the selected file number.
Delete the selected file (name and phone number).
Return to the names list in the directory.
Select your option
Confirm
Return to names list
DIRECTORY
Create ?
„
OR
+
–
•
Selecting a name by its first character
You can also use the alphabetic search by entering the first letter
of the name.
Example: Press the
key twice to find the first name beginning
with "N".
Then scroll the list to select the name with the volume control
keys .
•
Displaying a phone number
You can display the phone number corresponding to the selected
name by pressing the
key.
+
–
Access the directory
Make the call
¤
DUPONT
MARTIN
+
–
Select the name
2-
If your directory is not empty, the list of names and numbers is
displayed:
EXITING YOUR DIRECTORY
From the names list, you can press the
key to return to the
standby screen.
+
–
AUDIO
CLOCK
Update
Format
Appointmt.
Time/Date
NUMBERS
YourNumber
Voice Mail
Keypad
Prefix
Msg alert
Key Beeps
Ring tone
Mode
SET UP
Display
Languages
WelcomeMsg
Batt.Save
Digital HF
SERVICES
Security
Billing
Uncond.CF
Call Frwd
Calls
Call Bars
Networks
PIN Code
...
Duration
Expense
All rights reserved. Alcatel reserves the right, in the customer's interest,
to alter material or technical specifications without prior notice.
MENU
3DS05856AAAA 02
1
3
2
4
1
2
3
4
1
2
1
2
1
2
3
4
3
4
3
4
!
Do not remove the antenna.
You can use the
key to scroll upwards, and the
key to scroll
downwards.
To enter a number, use keys from
to
.
Characters “+” and “P” (pause) are displayed with a long keypress
on
(the following characters scroll: 0, +, • and P).
You can use the
key to scroll upwards, and the
key to scroll
downwards.
1
2
3
4
O N E T O U C H
O N E T O U C H
English
club db


