


11. TAP
Press this button with the beat to get the BPM of the music
manually. Press and hold this button during two seconds to
activate Auto BPM.
12. DISPLAY
Indicates all the functions as they are occurring. Please see more
details on LCD instructions on
.
13. CUE
In pause mode, press this button to set a memorized point for
instant play. In play mode, press this button to pause the music
and return to the memorized point.
Holding down this button will start the playback from the cue
point. Releasing it will pause the track and return to the cue
point.
After pressing this button to set the new cue, the stutter
condition will be eliminated.
14. PLAY/PAUSE
Press this button to start the playback or let the playback pause.
15. PITCH ON/OFF
Press this button to activate or deactivate pitch adjustment.
16. PITCH RANGE
Switch the pitch range between 8%, 16 % and 100%.
A. When the LED light is off, it sets under 8%.
B. When the LED light is on, it sets under 16%.
C. When the LED light is blinking, it sets under 100%.
page16
17. MT (MASTER TEMPO)
When this function is activated, the key of the song will be locked
even though the pitch fader is adjusted.
It allows us to select the Key Lock (Master Tempo). Key Lock
mode allows us to alter the value of PITCH in a track without
changing the perception of the original note. When the Key Lock
mode is activated LED lights attached to the KEY LOCK button. If
this feature is not active and significantly modify the playback
speed value by potentiometer Pitch (25) listen to the music
considerably modified. By increasing the speed will hear the
effect called "Mickey Mouse". When slow we will hear the effect
called "James Earl Jones.”
18. PITCH BEND
Press “ ” to rise up the speed and Press “-” to Slow down the
speed. To return to the original playback speed, release the
button. The pitch bend acts even when the pitch button ON /
OFF (15) is not activated. The pitch bend range depends on the
range selected with the button (16).
19. PROG
The maximum tracks can be edited are 99.
Start PROG-Edit:
In pause mode, press this button to edit program. The display
MM:SS: FF position will show “P-xx” and then “xx” will flash.
Select a track by pressing SKIP (CD/MP3) or Folder-SKIP (only
MP3) and then press this button to store it. Repeat the same
process and finally press this button again to finish a program.
(*) If you want to change the folder, first press the FOLDER (3)
and press the SKIP button to move within the available folders.
After selecting the desired folder, press the FOLDER button to
enter the mode tracks.
Play PROG:
Press PLAY/PAUSE to play the program and PROG will flash in the
display. Once stopping the program playback, it can be added
more songs to the program continually.
Exit PROG Play/Edit:
In pause mode, pressing this button for two seconds can return
to the normal playback. Once returning to the normal playback,
pressing this button can enter the program again. You can
continue the program playback, store more songs into the
program or wipe out the program in this condition.
20. OPEN/CLOSE
Press to eject the disc.
Note: Disc can't be ejected unless CUE or PAUSE button has been
pressed first. Thus will avoid any undesired ejection.
21. SOUND EFFECT
These buttons will activate Flanger, Filter, Echo, Reverse effects.
When any effect is selected, REALY button (19) will light and
flash. Press Relay to switch between Gain & Parameter (the
selected one will be blinking) showing in the display. Use the jog
wheel to change the value of them.
Flanger: Gain- 0~100, Parameter: 1/32~ 16/1
Filter: Gain- 0~100, Parameter: -60~+60
Echo: Gain- 0~100, Parameter: 1/32~1/1
All the three above effects can be parameterize in the same way.
And the same applies to the REVERSE function.
22. SCRATCH
Press this button to activate the scratch function. Touch and turn
the top flat surface of the jog wheel to perform scratch effect.
You can play any effect during scratch mode.
23. SEARCH
Press this button first and dial the jog wheel to perform the fast
search forward or backward.
24. JOG WHEEL
24.1. Pitch Mode: Use the wheel to adjust the speed to get an
even close BPM with another playing unit.
24.2. Scratch Mode: The top flat surface is used for scratch
effect. The ring of the wheel is used for adjusting the speed.
24.3. Effect Mode: Adjust the gain and the parameter of the
digital effect.
25. PITCH CONTROL SLIDER
To match the beat of the other music piece you should adjust the
Pitch Control to change the speed.
To adjust the pitch you first have to activate the Pitch function
(15). The percentage of pitch applied will be displayed on the
display.
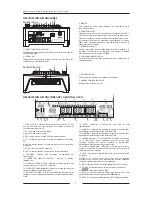
+
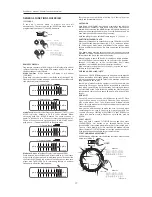
PRESS RANGE SEVERAL TIMES:
RANGE
8%-16%-100%
RANGE
8%-16%-100%
RANGE
8%-16%-100%
8%
16%
100%
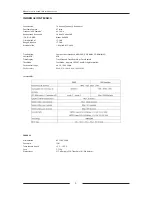
1
SELECT EFFECT i.e. FLANGER & TURN IT ON
2
PRESS RELAY BUTTON TO CHOOSE BETWEEN GAIN or PARAMETER
2.1 GAIN SELECTED > IN DISPLAY “G ###” BLINK (GAIN > DRY/WET)
2.2 PARAMETER SELECTED > IN DISPLAY “Parameter value” BLINK
> GAIN= 28%
GAIN
PARAMETER
> PARAMETER = 8 Flange cicles per Beat
Blink
Blink
3
TURN WHEEL TO SET GAIN AND PARAMETER (Effect must be ON)
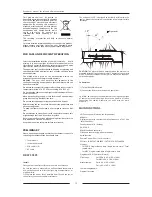
1
PLAY/PAUSE MODE
2
PRESS PROG > ENTER PROG MODE
PROG.
PRESS
3
SELECT TRACKS WITH SKIP BUTTONS > View selected song at Display.
4
PRESS PLAY AND PROGRAM STARTS
4
EXIT PROGRAM MODE > PRESS PROG. BUTTON 2 sec.
> PROG at Display will blink
DISPLAY >
PROG.
PRESS 2 sec.
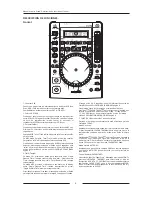
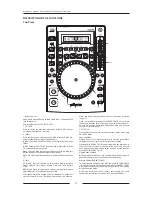
Xceed user manual. Description of the functions. Top view.
15