Agreto BZLC0010 User Manual Download Page 7


AGRETO LoadCounter II M 

© AGRETO electronics GmbH  


page:7 

6.4


Process of detecting a load 

The loads are recorded by the reed sensor, which must receive a certain 

number of impulses, and a pause time, which must then pass at least. If both 

conditions are met, a load is counted. 
The minimum number of pulses ensures that even interruptions in the spreading 

process, and thus exceeding the break time, do not lead to an additional load 

(e.g. break while driving, longer drive at the headland, drive to the next field ...) 
The pause time, in turn, ensures that no additional load is counted even if the 

scraper floor is running for a long time or a trailer is tipped up several times. 
As soon as more than 100 impulses are required for a load, individual impulses 

that occur during the break are not recorded (for example if the PTO shaft 

moves a little while driving on the road). 
This logic ensures the greatest possible security when recording the number of 

loads. 

6.5


Setting the parameters 

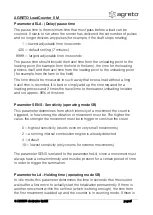
For the correct recording of the loads, the parameters for the number of pulses 

and the pause time may have to be adjusted. In mode 5B, the parameters for 

time recording are also available. 
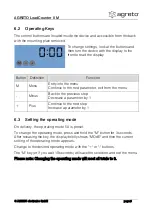
To open the parameter menu, briefly press the "M" key. The first parameter that 

is relevant for the set operating mode appears on the display. 
The name of the parameter is displayed for two seconds, then the set value 

appears. 
Use the "+" or "-" keys to change the value of the parameter. The value of the 

parameters IMP and dELA can be increased or decreased by 100 by pressing 

the button for more than a second. 
Use the "M" key to change to the next parameter, the set value is saved. After 

the last parameter, the first parameter is displayed again. 
To exit the menu, press and hold the "M" button for three seconds, or simply 

wait 10 seconds without pressing a button. 


Summary of Contents for BZLC0010

Page 1: ...AGRETO electronics GmbH User Manual AGRETO LoadCounter II M...

Page 2: ...ounter 10 7 Assembly 11 7 1 Positioning the sensor and the magnet 11 7 2 Mounting the sensor and the magnet 12 7 3 Positioning of the meter 13 7 4 Fixing the mounting plate 13 7 5 Fastening the counte...

Page 3: ...Seals Mounting parts Manual 3 Intended use The AGRETO LoadCounter II M is designed for counting loads on manure spreaders with scraper floors and other transport vehicles with moving parts To record t...

Page 4: ...rom tip over fall and inattention while working with the measuring instrument during getting on and off the tractor 4 3 Personal protective equipment WARNING For individuals who work with the device o...

Page 5: ...1 cable length 3m Powered by 2 x AAA batteries Battery life approx 3 years 6 Configuration 6 1 Selection of the operating mode The AGRETO LoadCounter II M has 2 operating modes In the first mode only...

Page 6: ...rom the menu Minus Back to the previous step Decrease a parameter by 1 Plus Continue to the next step Increase a parameter by 1 6 3 Setting the operating mode On delivery the operating mode 5A is pres...

Page 7: ...the PTO shaft moves a little while driving on the road This logic ensures the greatest possible security when recording the number of loads 6 5 Setting the parameters For the correct recording of the...

Page 8: ...can deduct a small safety reserve so that every load is counted safely The set feed rate has no effect here Example PTO shaft on manure spreader Since the number of impulses is very high here it is be...

Page 9: ...e travel time to the nearest unloading location and set approx 90 of this time Parameter SENS Sensitivity operating mode 5B This parameter determines from which intensity of a movement the count is tr...

Page 10: ...et time the count stops and the sum is reset to the value at the beginning of the rest phase The meter is now in idle mode 1 summation is stopped immediately at the end of the movement 20 default 100...

Page 11: ...is attached to one of the scraper floor shafts If there is no suitable option here the magnet can also be attached to the side of a chain wheel or a flange The sensor is attached to a frame part Exam...

Page 12: ...en the sensor in the hole The sensor must protrude at least 10 mm from the bracket The sensor tip must be 5 to 8 mm away from the magnet A 5 5 mm hole or an M5 thread is required for the fastening the...

Page 13: ...ed on the mounting plate Disassemble the meter from the mounting plate Hold the mounting plate in the desired position to the desired mounting position Use the mounting plate as a template and mark th...

Page 14: ...then tighten every screw again so that the housing is evenly pressed against the mounting plate 7 6 Attaching the seal Thread the seal wire through the holes in the two screws Thread both ends of the...

Page 15: ...umber is the sum of the loads 8 2 Reading the hours operating mode 5B In operating mode 5B the sum of the counted loads and the sum of the counted hours are displayed alternately at intervals of 5 sec...

Page 16: ...currently detecting movement or vibration and is in counting mode The round arrow means that pulses are counted now The n lights up in the setting mode when entering the number of pulses The x means...

Page 17: ...nd remove the meter Remove the old batteries and dispose them properly Insert 2 new AAA batteries into the device in the specified direction Mount the counter again on the mounting plate Seal the devi...

Page 18: ...probably relatively low so that the necessary intensity for the count is not reached Set the parameter SENS down so that the counter triggers even with minor movements To hold longer periods of rest...

Page 19: ...e warranty period begins with the first accounting to an end customer and ends 5 years from this date of invoice Prerequisite for warranty service are the presentation of the original invoice and comp...

Page 20: ...ct to technical or design changes All information in this manual is supplied without liability despite careful preparation A liability by the author is excluded Copyright 2021 AGRETO electronics GmbH...

Reviews: