


Chapter 3
3-31
Adjustments and Correction Constants
Serial Number Correction Constants (Test 55)
Serial Number Correction Constants (Test 55)
Analyzer warm-up time: 5 minutes.
This procedure stores the analyzer serial number in the A9 CPU assembly EEPROMs.
CAUTION
Perform this procedure only if the A9 CPU assembly has been replaced.
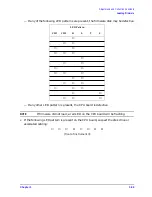
1. Record the ten character serial number that is on the analyzer’s rear panel
identification label.
2. Press
to erase the HP/Agilent
logo.
3. Enter the serial number with an external keyboard or by rotating the front panel knob
to position the arrow below each character of the instrument serial number, and then
pressing
to enter each letter.
Press
if you made a mistake.
4. Press
when you have finished entering the title.
CAUTION
You cannot correct mistakes after you perform step 5, unless you contact the
factory for a clear-serial-number keyword. Then you must perform the
“Option Numbers Correction Constants (Test 56)” on page 3-32
and repeat
this procedure.
5. Press
.
6. Observe the analyzer for the results of the routine:
• If the analyzer displays the message
Serial Cor DONE
, you have completed this
procedure.
• If the analyzer does not display
DONE
, then either the serial number that you entered
in steps 3 and 4 did not match the required format or a serial number was already
stored. Check the serial number recognized by the analyzer:
a. Press
.
b. Look for the serial number displayed on the analyzer screen.
c. Repeat this adjustment test.
• If the analyzer continues to fail this adjustment routine, contact the nearest Agilent
Technologies sales or service office.
Preset
DISPLAY MORE TITLE ERASE TITLE
SELECT LETTER
DONE
System
SERVICE MENU TESTS
55
x1
EXECUTE TEST YES
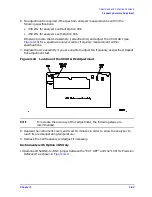
Preset
System
SERVICE MENU FIRMWARE REVISION
Summary of Contents for 8753ES
Page 14: ...Contents xiv Contents ...
Page 15: ...1 1 1 Service Equipment and Analyzer Options ...
Page 26: ...1 12 Chapter1 Service Equipment and Analyzer Options Service and Support Options ...
Page 27: ...2 1 2 System Verification and Performance Tests ...
Page 203: ...3 1 3 Adjustments and Correction Constants ...
Page 262: ...3 60 Chapter3 Adjustments and Correction Constants Sequences for Mechanical Adjustments ...
Page 263: ...4 1 4 Start Troubleshooting Here ...
Page 297: ...5 1 5 Power Supply Troubleshooting ...
Page 317: ......
Page 318: ...6 1 6 Digital Control Troubleshooting ...
Page 337: ...6 20 Chapter6 Digital Control Troubleshooting GPIB Failures ...
Page 338: ...7 1 7 Source Troubleshooting ...
Page 369: ...7 32 Chapter7 Source Troubleshooting Source Group Troubleshooting Appendix ...
Page 370: ...8 1 8 Receiver Troubleshooting ...
Page 381: ...8 12 Chapter8 Receiver Troubleshooting Troubleshooting When One or More Inputs Look Good ...
Page 382: ...9 1 9 Accessories Troubleshooting ...
Page 389: ...9 8 Chapter9 Accessories Troubleshooting Inspect the Error Terms ...
Page 390: ...10 1 10 Service Key Menus and Error Messages ...
Page 439: ...10 50 Chapter10 Service Key Menus and Error Messages Error Messages ...
Page 440: ...11 1 11 Error Terms ...
Page 451: ...11 12 Chapter11 Error Terms Error Correction ...
Page 452: ...12 1 12 Theory of Operation ...
Page 482: ...13 1 13 Replaceable Parts ...
Page 487: ...13 6 Chapter13 Replaceable Parts Ordering Information Figure 13 1 Module Exchange Procedure ...
Page 500: ...Chapter 13 13 19 Replaceable Parts Replaceable Part Listings Figure 13 7 8753ET Cables Top ...
Page 502: ...Chapter 13 13 21 Replaceable Parts Replaceable Part Listings Figure 13 8 8753ES Cables Top ...
Page 512: ...Chapter 13 13 31 Replaceable Parts Replaceable Part Listings Figure 13 13 8753ES Cables Front ...
Page 544: ...14 1 14 Assembly Replacement and Post Repair Procedures ...
Page 550: ...Chapter 14 14 7 Assembly Replacement and Post Repair Procedures Covers Figure 14 2 Covers ...
Page 597: ...14 54 Chapter14 Assembly Replacement and Post Repair Procedures Post Repair Procedures ...


