1.4. Vacuum Operation
There are two vacuum preparation options:
l
Low Vacuum (for use in atmospheric pressures to 10
-3
Torr)
l
High Vacuum (preparation for environments from 10
-3
to 10
-6
Torr).
Special preparations include:
l
Parts are lubricated with vacuum-compatible lubricants.
l
Materials, fasteners, and coatings are selected to be compatible with the specified level of
vacuum.
l
High-vacuum systems are designed to eliminate trapped volumes.
l
Prior to assembly, gimbal parts are thoroughly cleaned in a clean environment.
l
The gimbal is packaged in a special polyethylene bag.
Vacuum Guidelines
To ensure that the gimbal will continue to perform well in the vacuum environment, use the
guidelines that follow (in addition to standard handling, installation, and lubrication guidelines
outlined in this manual).
1. Do not remove the gimbal from its sealed bag until it is ready to use.
2. Always handle the gimbal in a clean environment and use powder-free polyethylene gloves to
prevent any contaminants from adhering to the surface of the gimbal.
3. During installation, use cleaned, vented, stainless steel fasteners to secure the gimbal.
4. Reduced air pressure eliminates significant convective heat transfer. This, coupled with the
viscous vacuum-compatible lubricants, could result in excessive motor operating temperatures.
Because of this, consider all continuous torque ratings to be
40 to 60% lower
than the value
specified for operation in normal atmospheric environment. Reduce motor usage accordingly.
5. We recommend that you use a small quantity of
Braycote® 602EF
grease or a compatible
substitute of equal quality lubricant in vacuum applications.
6. To reduce outgassing during the initial pump-down to vacuum pressure, Aerotech recommends
that you bake out vacuum systems when you first install them into the vacuum chamber. Bake
the vacuum components at 60 °C for 24 to 48 hours to desorb water vapor from surfaces and
degas polymers (such as cable insulation).
AOM360D
Hardware Manual
18
www.aerotech.com
Summary of Contents for AOM360D Series
Page 1: ...Revision 2 00 AOM360D Series Direct Drive Gimbals HARDWARE MANUAL ...
Page 20: ...This page intentionally left blank AOM360D Hardware Manual 20 www aerotech com ...
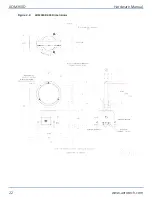
Page 22: ...Figure 2 2 AOM360D 300 Dimensions AOM360D Hardware Manual 22 www aerotech com ...
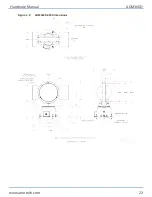
Page 23: ...Figure 2 3 AOM360D 400 Dimensions Hardware Manual AOM360D www aerotech com 23 ...
Page 24: ...Figure 2 4 AOM360D 500 Dimensions AOM360D Hardware Manual 24 www aerotech com ...
Page 26: ...Figure 2 5 View of AOM360DShowing Mounting Holes AOM360D Hardware Manual 26 www aerotech com ...
Page 28: ...This page intentionally left blank AOM360D Hardware Manual 28 www aerotech com ...
Page 34: ...Figure 3 2 Feedback Interconnection Drawing AOM360D Hardware Manual 34 www aerotech com ...
Page 40: ...This page intentionally left blank AOM360D Hardware Manual 40 www aerotech com ...
Page 46: ...This page intentionally left blank AOM360D Hardware Manual 46 www aerotech com ...


