background image

3.2. Motor and Feedback Wiring

DANGER

: To decrease the risk of electrical shock, injury, death, and damage to the

equipment, obey the precautions that follow.

l

Make sure that all components are grounded correctly and that they obey the local
electrical safety requirements.

l

It is the responsibilty of the system integrator or qualified installer to determine and
meet all safety and compliance requirements when they integrate the AGV-SPO into
a completed system.

l

Restrict access to the galvo when it is connected to a power source.

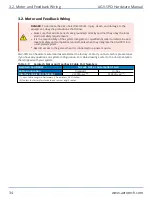
AGV-SPO scan heads are wired and assembled at the factory. Contact your Aerotech representative
if you have any questions on system configuration. For cable drawings, refer to the documentation
that shipped with your system.

Table 3-3:

Aerotech Motor and Feedback Cable Part Numbers

Aerotech Controller

Nmark GCL or Automation1 GL4

Cable Application

Standard

Hi-Flex

Interface Cable Part Number

C23680-xxx

(1,2)

C23690-xxx

(1,2)

(1) -xxx = Cable Length in Decimeters (1 Decimeter = 3.937 inches)

(2) Contact the factory for standard and custom length cables

3.2. Motor and Feedback Wiring

AGV-SPO Hardware Manual

34

www.aerotech.com

Summary of Contents for AGV-SPO Series

Page 1: ...Revision 2 00 AGV SPO Single Pivot Point Galvo Scanner HARDWARE MANUAL...

Page 2: ...spare or replacement parts To get help immediately contact a service office or your sales representative Include your customer order number in your email or have it available before you call This man...

Page 3: ...2 2 Dimensions 23 2 3 Securing the Scan Head to the Mounting Surface 24 2 4 Attaching the Focal Lens to the Scan Head 26 2 5 Air Requirements 28 2 6 Water Requirements 29 Chapter 3 Electrical Specific...

Page 4: ...ta Lens Complete Assembly 26 Figure 2 3 Assembly of Focal Lens to Scan Head AGV SPO 27 Figure 2 4 Air Cooling AC Locations 28 Figure 2 5 Water Cooling WC Locations 29 Figure 3 1 Galvo X Axis Machine D...

Page 5: ...ies Mirror Specifications 19 Table 3 1 Motor and Feedback Connector Pinouts 33 Table 3 2 Mating Connector Part Numbers for the Motor and Feedback Connector 33 Table 3 3 Aerotech Motor and Feedback Cab...

Page 6: ...This page intentionally left blank List of Tables AGV SPO Hardware Manual 6 www aerotech com...

Page 7: ...e impaired l The life expectancy of the product could be decreased Safety notes and symbols are placed throughout this manual to warn you of the potential risks at the moment of the safety note or if...

Page 8: ...ional ground and safety precautions are required for applications that require access to the AGV SPO while it is energized DANGER Use of this product increases the risk of exposure to visible and or i...

Page 9: ...assigned a particular hazard level which is indicated by the Laser Class label that is affixed to the device near the location where laser radiation is emitted Brief descriptions of each of the variou...

Page 10: ...h a laser device that can generate a sufficiently intense beam a laser area will be produced that includes the aiming volume as well as the reflections from all objects that can be exposed to the radi...

Page 11: ...appropriate shutter as per any and all applicable regulations in order to prevent unwanted emission of the laser beam Place the beam shutter between the laser source and the scan head refer to Figure...

Page 12: ...This page intentionally left blank Laser Shutter AGV SPO Hardware Manual 12 www aerotech com...

Page 13: ...machinery into which it is to be incorporated or of which it is to be a component has been found and declared to be in conformity with the provisions of the Directive 2006 42 EC and with national imp...

Page 14: ...This page intentionally left blank EU Declaration of Incorporation AGV SPO Hardware Manual 14 www aerotech com...

Page 15: ...m is fed and a beam exit aperture through which the laser beam is emitted from the unit after deflection Only suitable lasers of the appropriate wavelength power level beam diameter etc may be fed int...

Page 16: ...Figure 1 2 Standard AGV SPO Chapter 1 Overview AGV SPO Hardware Manual 16 www aerotech com...

Page 17: ...coatings available Contact factory for details F Theta Lenses Available Optional Lxx Contact the factory for F Theta Lens options Air Cooling Optional refer to Section 2 5 AC Air cooling Water Cooling...

Page 18: ...built in a 20 C 68 F environment Extreme temperature changes could cause a decrease in performance or permanent damage to the AGV SPO At a minimum the environmental temperature must be controlled to w...

Page 19: ...000 Hours NOTE All specifications are per axis unless noted 1 All angles are optical unless otherwise noted 2 Without AC air cooling option 3 After an initial four hour warm up expect an ambient tempe...

Page 20: ...1 4 Vacuum Operation Contact the factory for information about operation in a vacuum environment 1 4 Vacuum Operation AGV SPO Hardware Manual 20 www aerotech com...

Page 21: ...ntact Aerotech Global Technical Support DANGER Use of this product increases the risk of exposure to visible and or invisible laser radiation l Do not stare into the laser beam put your body parts in...

Page 22: ...powder free gloves when you handle optical components Lift only by the base of the scan head Carefully remove the AGV SPO from its protective shipping container Before operating the AGV SPO it is impo...

Page 23: ...2 2 Dimensions Figure 2 1 AGV14SPO Galvanometer Scanner Dimensions AGV SPO Hardware Manual 2 2 Dimensions www aerotech com 23...

Page 24: ...RNING The AGV SPO is precision machined and verified for flatness at the factory l Do not machine the AGV SPO housing If you must machine a surface to achieve a required flatness machine the mounting...

Page 25: ...with precision flatstones to remove any burrs or high spots 3 Clean the mounting flange and the mating surface of the scan head with the appropriate cleaners isopropyl alcohol for the scan head 4 Line...

Page 26: ...figurations that include a focal lens For AGV SPO scan heads that are provided without a focal lens the user is responsible for supplying both the F Theta lens and the necessary lens adapter Contact t...

Page 27: ...om of the scan head 5 Make sure that the dowel pin in the lens adapter is aligned with the reference slot in the scan head and attach the lens adapter to the scan head using the appropriate hardware T...

Page 28: ...i is required when using this feature Gas must be delivered through a polyurethane air hose with an outer diameter of 4 mm Unless otherwise specified a gas flow rate of 20 SLPM standard liters per min...

Page 29: ...act the factory to discuss the specifics of your application A supply of coolant is necessary for AGV SPO models furnished with the WC water cooling option This feature requires a source of distilled...

Page 30: ...This page intentionally left blank 2 6 Water Requirements AGV SPO Hardware Manual 30 www aerotech com...

Page 31: ...onditions that are approved in this manual Electrical installation requirements will depend on the ordered product options Installation instructions in this section are for Aerotech products equipped...

Page 32: ...arrive from the factory completely wired and assembled The AGV scan heads contain galvano motors with dual analog encoder feedback Both the primary and secondary position feedback signals of each gal...

Page 33: ...4 SIN1 Encoder Sine 1 15 COS1 Encoder Cosine 1 16 5V Common Ground 17 SIN2 Encoder Sine 2 18 COS2 Encoder Cosine 2 19 CCW LMT The limit signal that shows the maximum permitted machine travel in negati...

Page 34: ...ccess to the galvo when it is connected to a power source AGV SPO scan heads are wired and assembled at the factory Contact your Aerotech representative if you have any questions on system configurati...

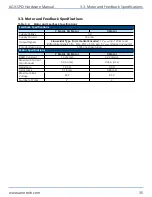
Page 35: ...nto 120 Load differential signals SIN SIN COS COS are 5 V pk pk relative to ground Encoder Resolution 4096 lines revolution Motor Specifications Y Motor XG Motor X Motor BEMF Constant 1 4 V krpm 4 3 V...

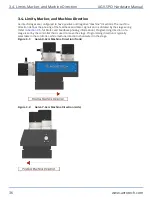
Page 36: ...o Section 3 5 for Motor and Feedback phasing information Programming direction of a stage is set by the controller that is used to move the stage Programming direction is typically selectable in the c...

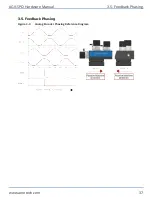
Page 37: ...3 5 Feedback Phasing Figure 3 3 Analog Encoder Phasing Reference Diagram AGV SPO Hardware Manual 3 5 Feedback Phasing www aerotech com 37...

Page 38: ...This page intentionally left blank 3 5 Feedback Phasing AGV SPO Hardware Manual 38 www aerotech com...

Page 39: ...nth Use the system application s and conditions duty cycle speed and environment to define the inspection interval Monthly inspections should include but not be limited to l Visually inspect the galvo...

Page 40: ...omponent lifetime The cleaning procedure for the AGV SPO is intended to help prolong the component lifetime IMPORTANT Wear clean powder free gloves when you handle optical components DANGER Make sure...

Page 41: ...sensitive and should only be cleaned when it is absolutely necessary and only by experienced personnel In many cases minor imperfections in the surface of the mirror can be less harmful than the surfa...

Page 42: ...instructions Reduction in power as the laser beam passes through the scan head Optical surfaces contaminated with dirt and debris Refer to Section 4 2 Optical surfaces damaged Contact Aerotech servic...

Page 43: ...ation RMA number must accompany any returned product s The RMA number may be obtained by calling an Aerotech service center or by submitting the appropriate request available on our website www aerote...

Page 44: ...l rates apply If during the on site repair it is determined the problem is not warranty related then the terms and conditions stated in the following On Site Non Warranty Repair section apply On site...

Page 45: ...Appendix B Revision History Revision Description 2 00 General update 1 00 New Manual AGV SPO Hardware Manual Appendix B Revision History www aerotech com 45...

Page 46: ...This page intentionally left blank Appendix B Revision History AGV SPO Hardware Manual 46 www aerotech com...
Page 47: ...mmended 39 cleaning the turning mirrors 41 compressed air 28 coolant 29 D Dimensions 23 Directive 2006 42 EC 13 E Electrical Installation 31 EN 60204 1 2010 13 EN ISO 12100 2010 13 EU 2015 863 13 F Fe...

Page 48: ...ial number 22 Service and Inspection Schedule 39 solvents 39 stabilizing stage 22 stage stabilizing 22 T Table of Contents 3 Temperature Effects 18 Turning Mirrors 41 U Unpacking and Handling the Scan...

Reviews: