background image

818 34 80-00/6

9

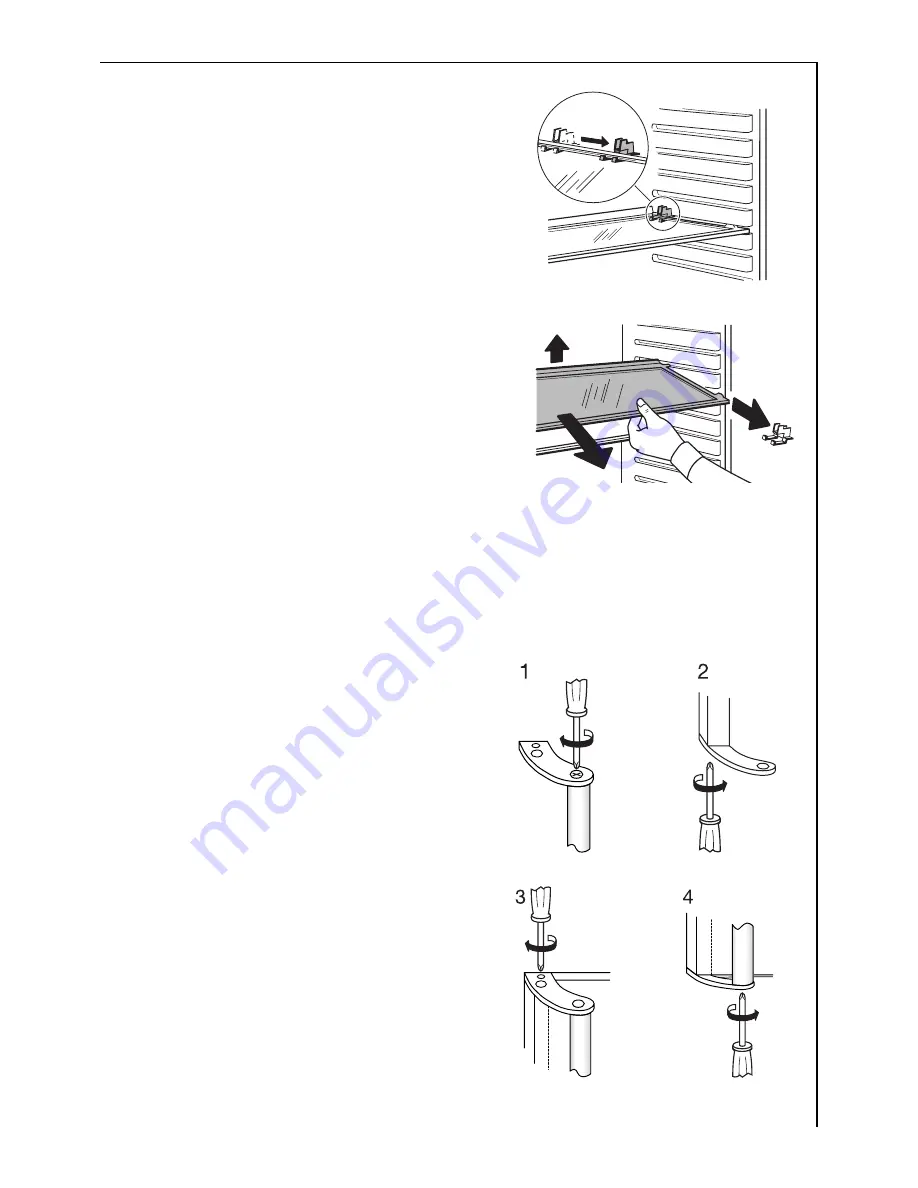
Remove the transport fittings from 
the storage shelves:

4.

Slide the fittings securing the shelf 
forward to the thicker section on 
the edge of the storage shelf.

5.

Slide the storage shelf far enough 
forward so that it can be hinged 
downwards and the fittings can be 
removed from the guides.

Fitting the Door Handles

Caution!

 Do not overtighten the screws (max. 2 Nm) as you may 

damage the door handles.

0


1.

Screw the top handle bracket to the 
handle rod (1). Fit the bottom han-
dle bracket on the lower left-hand 
side of the door (2).

2.

Fit the top handle bracket on the 
top left-hand side of the door (3) 
and screw the handle rod to the 
bottom handle bracket (4). 

Summary of Contents for SANTO 70388 KG

Page 1: ...SANTO 70388 KG Electronic Refrigerator Freezer Operating Instructions 818 34 80 00 6 ...

Page 2: ...and numbered instructions guide you step by step in the operation of the appliance 2 3 Supplementary information regarding operation and practical uses of the appliance appear after this symbol 2 Tips and notes concerning economical and environmentally sound use of the appliance are marked with the cloverleaf Explanations of the technical terminology used in the operating instructions can be found...

Page 3: ...eezer needs ventilation 11 Appliance Alignment 11 Electrical Connection 12 Reversing The Door 13 Appliance Description 17 View of Appliance 17 Freezer tray 18 Cold Accumulation Block 18 Control Panel 19 Temperature setting buttons 20 Temperature Displays 20 ALARM OFF button 21 Prior to Initial Start Up 21 Initial Start Up 22 Temperature Adjustment 23 COOLMATIC FROSTMATIC 24 COOLMATIC 24 FROSTMATIC...

Page 4: ...2 Frozen Storage 33 Storage Goods Symbols Freezing Calendar 33 Preparation of Ice Cubes 34 Defrosting 34 The refrigerator is defrosted automatically 34 Freezer Compartment Defrosting 34 Hints and Tips 35 Normal Operating Sounds 35 Food Storage 35 Energy Saving Advice 36 Maintenance and Cleaning 36 Internal Cleaning 37 External Cleaning 37 Replacing the light bulb 38 What to do if 39 Regulations St...

Page 5: ...ce Centre Make sure that the power plug is not squashed or damaged by the back of the fridge freezer A damaged power plug may overheat and cause a fire If the power plug socket is loose do not insert the power plug There is a risk of electric shock or fire Any electrical work required to install this appliance should be carried out by a qualified electrician or competent person Parts which heat up...

Page 6: ...y drinks in the freezer Ice lollies can cause frost freezer burns if consumed straight from the freezer compartment Do not remove items from the freezer compartment if your hands are damp wet as this could cause skin abrasions or frost freezer burns Bottles and cans must not be placed in the freezer They can burst when the contents freeze Manufacturers recommended storage times should be adhered t...

Page 7: ...aper Please dispose of the packaging with due care for the environment Old Appliances When disposing of your old appliance Make the appliance unusable by cutting off the cable and remove any door catches to ensure small children cannot be trapped inside Help to keep your country tidy use an authorised disposal site Appliance Transport Two persons are required for transport of the appliance There a...

Page 8: ...d Before Use Packaging 0 1 Remove all adhesive tape and packaging from the interior of the appli ance 3 Any remnants of adhesive can be removed with white spirit 2 Remove the transport protection pieces and pull off the adhesive tape 3 Wash the inside of the appliance with lukewarm water with a little bicarbonate of soda added 5 ml to 0 5 litre of water Do not use soap or detergent as the smell ma...

Page 9: ... can be hinged downwards and the fittings can be removed from the guides Fitting the Door Handles 1 Caution Do not overtighten the screws max 2 Nm as you may damage the door handles 0 1 Screw the top handle bracket to the handle rod 1 Fit the bottom han dle bracket on the lower left hand side of the door 2 2 Fit the top handle bracket on the top left hand side of the door 3 and screw the handle ro...

Page 10: ...nce is designed The climate classification can be found on the rating plate which is located at the left on the inside of the appliance The following table shows which ambient temperature is correct for each climate classification If installation next to a source of heat is unavoidable the following minimum clearances must be maintained at the sides of the appliance for electric cookers 3 cm for o...

Page 11: ... a hanging cabinet a clearance of at least 10 cm between the top of the appliance and the cabinet above it must be maintained Please check whether after installing your appliance and especially after reversing the door the door seal seals tightly A badly fitting door seal may lead to heavy frosting and a higher power consumption see also What to do if Appliance Alignment 0 1 The appliance must be ...

Page 12: ...loured in accordance with the following code Green and Yellow Earth Blue Neutral Brown Live As the colours of the wires in the mains lead of this appliance may not correspond with the coloured markings indentifying the terminals in your plug proceed as follows 1 The wire coloured green and yellow must be connected to the terminal marked with the letter E or by the earth symbol or coloured green an...

Page 13: ...earing cover on the plinth from the left to the right 2 Close the freezer compartment door Open the fridge compart ment door and unscrew the retaining screw for the self clos ing mechanism on the top of the freezer compartment door 3 With the freezer compartment door closed remove the cross head screws from the lower door bearing and remove the door bearing downwards 4 Move the bearing pivot from ...

Page 14: ...ism on the bottom of the fridge compart ment door 8 Move the upper bearing pivot to the left 9 Unscrew the top handle bracket from the handle rod 1 Unscrew the bottom handle bracket from the door 2 10 Unscrew the top handle bracket from the door 3 and screw onto the bottom right hand side of the door 4 1 Caution Do not use excessive force and overtighten the screws max 2 Nm as you may damage the d...

Page 15: ... excessive force and overtighten the screws max 2 Nm as you may damage the door handles 12 Fasten the self closing mechanism to the bottom left of the fridge compartment door 13 Carefully slide the fridge com partment door onto the top bear ing pivot and close 14 Slide the centre door bearing into the bottom left of the fridge com partment door and fasten to the housing ...

Page 16: ...of the freezer compartment door 16 Carefully slide the freezer com partment door onto the centre bearing pivot and close 17 Place the lower door bearing with the bearing pivot in the lower left of the freezer compartment door and fasten 18 Open the freezer compartment door and fit the plinth ...

Page 17: ...artment with lid â Door storage compartments ä Bottle compartment ã Fruit and vegetable drawers å Bottle rack ç Shelves é Freezer drawer only for storage When defrosting the bottom drawer also serves as a water collecting vessel è Freezer drawer for storage and freezing ê Freezer tray ë Rating plate ...

Page 18: ...accumulation block is enclosed with the appliance 3 In the event of power failure or a malfunction of the appliance the cold accumulation block will increase the hold over period by several hours The cold accumulation block will be most effective when placed at the front of the upper freezer tray When defrosting the appliance place the cold accumulation block on top of the frozen food to keep it c...

Page 19: ...utton and COOLMATIC indicator light yellow COOLMATIC for intensive cooling in the refrigerator 5 FROSTMATIC button and FROSTMATIC indicator light yellow FROSTMATIC for fast freezing in the freezer compartment 6 Temperature display for freezer compartment 7 Temperature setting buttons for freezer compartment 8 ALARM OFF button and warning indicator light red see section Control and Information Syst...

Page 20: ...erature is indicated by flashing numbers ACTUAL temperature means The temperature display indicates the current temperature inside the fridge or the freezer compartment The ACTUAL temperature is indi cated with static illuminated numbers 3 Once the COOLMATIC or the FROSTMATIC function has been switched on the DESIRED temperature that was set originally for the fridge or the freezer cannot be chang...

Page 21: ...tion This is necessary to allow the oil to flow back into the compressor Otherwise the compressor may be damaged 0 1 Please clean the appliance interior and all accessories prior to initial start up see section Maintenance and Cleaning 2 The appliance must be correctly installed in accordance with the chap ter Installation before it is put into operation for the first time Care should be especiall...

Page 22: ... compressor will start and then run automatically 3 Press the ALARM OFF button to switch off the warning tone 4 Set the refrigerator to the desired temperature see section Tempera ture Adjustment 3 Goods to be refrigerated can be loaded immediately after switching on because the storage temperature in the refrigerator is quickly reached 5 Set the freezer temperature to 18 C or colder see section T...

Page 23: ...ton is pressed the temperature is adjusted by 1 C Adjustable temperature range for the freezer compartment 15 C to 24 C Adjustable temperature range for the refrigerator compartment 2 C to 8 C 15 C Holiday mode 3 Note From a food science point of view 5 C for the refrigerator compartment and 18 C for the freezer compartment should be consi dered cold enough as a storage temperature 3 Once the requ...

Page 24: ...a ture display shows the ACTUAL refrigerator temperature 2 The COOLMATIC function can be ended manually at any time by press ing the COOLMATIC button again The yellow light goes out FROSTMATIC The FROSTMATIC function provides for quick freezing of fresh food products and at the same time protects previously stored goods against undesired warming in the freezer compartment 0 1 The FROSTMATIC functi...

Page 25: ...is taking place in the temperature display for the refrigerator On reaching 1 the refrigerator will switch off The temperature dis play will go off 3 The appliance is only completely disconnected from the electricity supply when the power plug has been removed from the power outlet Note The appliance cannot be switched on or off if unplugged or if there is no power being supplied to it Following c...

Page 26: ... 0 1 To set the holiday mode press the WARMER or COLDER but ton The temperature display will change and indicate in flashing numbers the DESIRED temperature that is currently set 2 Press the WARMER button until the temperature display indicates H for holiday The temperature shown in the temperature display will change in steps of 1 C until it reaches 8 C After 8 C the value 15 C will appear in the...

Page 27: ...left open If you need more time to load or rearrange refrigerated or frozen foods you can switch off the warning tone by pressing the ALARM OFF but ton If the doors are still left open the warning tone will sound again at the end of the appropriate period of time If the doors remain open for longer than 80 minutes the warning tone will switch itself off automatically The red warning display will g...

Page 28: ...ture display continue to flash If the possibility of partial or complete thawing exists you should check the quality of the foods A rise in temperature may be caused by frequent door opening for long periods of time loading with large quantities of warm foods high ambient temperature an error with the appliance Function Errors If the electronics in the appliance detects a technical defect that has...

Page 29: ...n and removed 2 To insert at a different height use the same procedure in reverse Adjustment for tall items 0 1 Remove the front half of the two part vario glass storage shelf and insert it at a different level Space is then gained for storage of tall items on the storage shelf below Variable Inner Door The door compartments can be pulled up and removed and inserted at other positions as needed Bo...

Page 30: ... rack for ward until it can be tilted upwards then slide the front sup port into the next level up Bottle Holder Some models are equipped with a bottle holder in the bottle compart ment This is used to prevent individual bottles from falling over and can be slid sideways ...

Page 31: ...in the centre of the said shelf with a thermometer inside 2 Leave the fridge door closed overnight and check the temperature first thing in the morning 3 At this point the temperature should read no more than 5 C if it does you need to adjust the temperature regulator to a colder setting For further information on keeping food cool and safe a guide published by the Ministry of Agriculture Fisherie...

Page 32: ...sed further cooked into meals may not under any circumstances be frozen a second time 0 1 For freezing the maximum capacity press the FROSTMATIC button 24 hours prior to freezing or 4 to 6 hours for smaller quantities Yellow indicator lights up 3 The FROSTMATIC button need not be pressed for freezing of small quantities of up to 3 kg 2 All foods must be packed air tight prior to freezing so that t...

Page 33: ...the freezer compartment with previously frozen goods the required storage temperature of 18 C must be reached Load freezer only with packaged frozen goods so that they do not dry out or lose their flavour and so that no flavour contamination of other frozen goods can occur Please observe maximum storage times and expiry dates of frozen goods 2 When possible store frozen goods separately according ...

Page 34: ...e form of white frost in the freezer compartment during operation and when the door is opened especially in the middle at the top Remove this white frost from time to time with a soft plastic scraper e g a dough scraper Do not under any circumstances use hard or pointed objects for this purpose The appliance should be defrosted when the thickness of the white frost has reached about 4 mm but at le...

Page 35: ...r compartment In addition remove pieces of ice that break away before defrosting is complete 5 After defrosting thoroughly clean the freezer interior as well as interior accessories see section Maintenance and Cleaning Hints and Tips Normal Operating Sounds You may hear faint gurgling or bubbling sounds when the refrigerant is pumped through the coils or tubing at the rear to the cooling plate eva...

Page 36: ...h on unnecessarily often Ensure there are no obstructions preventing the door from closing properly Maintenance and Cleaning Before any maintenance or cleaning work is carried out DISCONNECT the appliance from the ELECTRICITY supply 1 Warning Do not use detergents abrasive powders highly perfumed cleaning products wax polishes or cleaning products containing bleach or alcohol Never clean the appli...

Page 37: ...keep it cold 3 Switch off the apliance and remove plug from the mains or disconnect from the electricity supply 4 Defrost the freezer compartment see section Defrosting 5 Clean the inside and accessories with warm water and bicarbonate of soda 5 ml to 0 5 litre of water 6 Rinse and dry thoroughly 7 Regularly check the door seals and wipe clean to ensure they are clean and free from debris 8 Regula...

Page 38: ...o service Replacing the light bulb 3 For safety reasons the interior lighting switches off after 7 minutes when the door is open It switches on again the next time the door is opened 1 Warning Danger of electrical shock Before replacing the light bulb switch off the appliance and remove the mains plug Light bulb specifications 220 240 V max 25 W fitting E 14 0 1 To switch the appliance off press a...

Page 39: ... relative to ambient conditions Temperature display shows a square or a letter There is a function fault Please contact your local Service Force Centre Do not open the door of the appliance again Warning tone sounds red warning display is flashing Open door warning Please check in Control and Information System section Warning tone sounds red warning display and freezer temperature display are fla...

Page 40: ...y of Electrical Engineers VDE were observed in the manufacture of this appliance The refrigerant circuit has been checked for leaks Excessive build up of frost If the door seal is not airtight probably after reversing the door apply warm air to the non sealing area using a hair dryer set to a gentle heat do not use a fan heater for this purpose This will make the rubber more supple and allow it to...

Page 41: ...The refrigerant is evaporated in the evaporator Similar to all other liquids refrigerant requires heat to evaporate This heat is removed from the interior of the appliance as a result the interior is cooled The evaporator is therefore located inside the appliance or placed in foam immediately behind the inner wall and thus not visible Compressor The compressor looks like a small drum It is driven ...

Page 42: ...s or removable parts of glass or plastic Costs incurred for calls to put right an appliance which is improperly installed or calls to appliances outside the United Kingdom Appliances found to be in use within a commercial environment plus those which are subject to rental agreements Products of AEG manufacture which are not marketed by AEG European Guarantee If you should move to another country w...

Page 43: ... you will need to give the following details 1 Your name address and post code 2 Your telephone number 3 Clear and concise details of the fault 4 The model and serial number of the appliance found on the rating plate 5 The purchase date Please note that a valid purchase receipt or guarantee documentation is required for in guarantee service calls Customer Care For general enquiries concerning your...

Page 44: ...55 million Electrolux Group products such as refrigerators cookers washing machines vacuum cleaners chain saws and lawn mowers are sold each year to a value of approx USD 14 billion in more than 150 countries around the world AEG Hausgeräte GmbH Postfach 1036 D 90327 Nürnberg http www aeg hausgeraete de Copyright by AEG 818 3480 00 6 0404 Subject to change without notice ...

Reviews: