background image

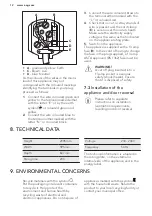
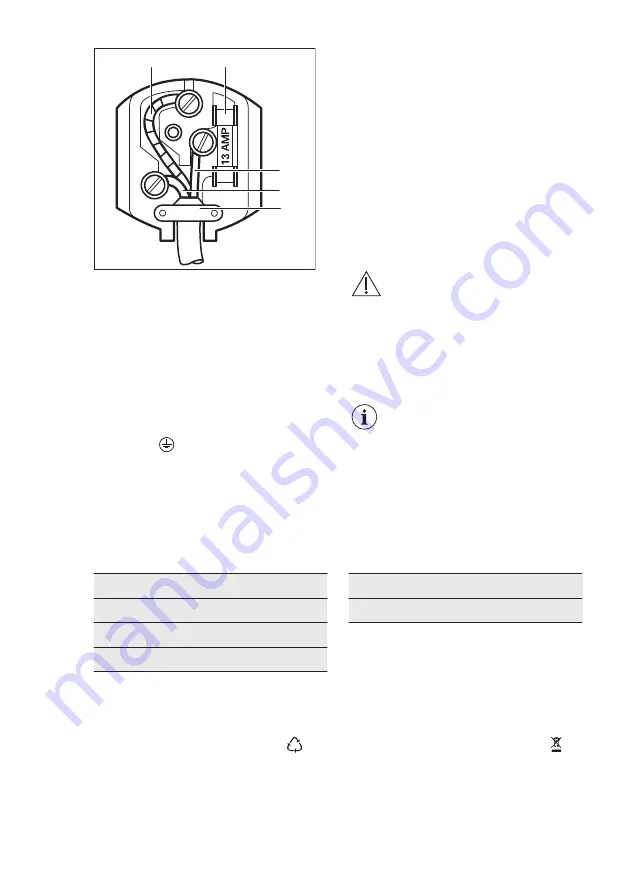
A

B

C

D

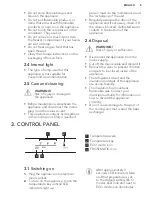
E

A

 - green and yellow: Earth

C

 - brown: Live

D

 - blue: Neutral

As the colours of the wires in the mains

lead of this appliance may not

correspond with the coloured markings

identifying the terminals in your plug,

proceed as follows:

1.

Connect the wire coloured green and

yellow to the terminal marked either

with the letter “E“ or by the earth
symbol   or coloured green and

yellow.

2.

Connect the wire coloured blue to

the terminal either marked with the

letter “N“ or coloured black.

3.

Connect the wire coloured brown to

the terminal either marked with the

“L“ or coloured red.

4.

Check that no cut, or stray strands of

wire is present and the cord clamp

(

E

) is secure over the outer sheath.

Make sure the electricity supply

voltage is the same as that indicated

on the appliance rating plate.

5.

Switch on the appliance.

The appliance is supplied with a 13 amp

fuse (

B

). In the event of having to change

the fuse in the plug supplied, a 13 amp

ASTA approved (BS 1362) fuse must be

used.

WARNING!

A cut off plug inserted into a

13 amp socket is a serious

safety (shock) hazard. Ensure

that it is disposed of safely.

7.3 

Installation of the

appliance and door reversal

Please refer to separate

instructions on installation

(ventilation requirements,

levelling) and door reversal.

8. 

TECHNICAL DATA

Height

2005 mm

Width

595 mm

Depth

647 mm

Rising time

20 h

Voltage

230 - 240 V

Frequency

50 Hz

The technical information is situated in

the rating plate, on the external or

internal side of the appliance and in the

energy label.

9. 

ENVIRONMENTAL CONCERNS

Recycle materials with the symbol 

.

Put the packaging in relevant containers

to recycle it. Help protect the

environment and human health by

recycling waste of electrical and

electronic appliances. Do not dispose of

appliances marked with the symbol 

with the household waste. Return the

product to your local recycling facility or

contact your municipal office.

*

www.aeg.com

12

Summary of Contents for RCB53725MW

Page 1: ...USER MANUAL EN User Manual Fridge Freezer RCB53725MW RCB53725MX ...

Page 2: ...for better service www registeraeg com Buy Accessories Consumables and Original spare parts for your appliance www aeg com shop CUSTOMER CARE AND SERVICE Always use original spare parts When contacting our Authorised Service Centre ensure that you have the following data available Model PNC Serial Number The information can be found on the rating plate Warning Caution Safety information General in...

Page 3: ...tchen areas in shops offices and other working environments By clients in hotels motels bed and breakfast and other residential type environments Keep ventilation openings in the appliance enclosure or in the built in structure clear of obstruction Do not use mechanical devices or other means to accelerate the defrosting process other than those recommended by the manufacturer Do not damage the re...

Page 4: ...rical shock The appliance must be earthed Make sure that the parameters on the rating plate are compatible with the electrical ratings of the mains power supply Always use a correctly installed shockproof socket Do not use multi plug adapters and extension cables Make sure not to cause damage to the electrical components e g mains plug mains cable compressor Contact the Authorised Service Centre o...

Page 5: ...e appliance and if necessary clean it If the drain is blocked defrosted water collects in the bottom of the appliance 2 6 Disposal WARNING Risk of injury or suffocation Disconnect the appliance from the mains supply Cut off the mains cable and discard it Remove the door to prevent children and pets to be closed inside of the appliance The refrigerant circuit and the insulation materials of this ap...

Page 6: ... this mode the temperature is set between 3 and 4 C This is the best temperature to ensure good food preservation with minimal energy consumption To activate ECO mode press the temperature key repeatedly until LED indicator next to ECO mode icon lights up 3 6 FROSTMATIC function If you need to insert a large amount of warm food into fridge compartment for example after doing the grocery shopping o...

Page 7: ...emove all drawers from the appliance and place the food on a glass shelf In the event of accidental defrosting for example due to a power failure if the power has been off for longer that the value shown in the technical data chart under Rising time consume defrosted quickly or cook it immediately and then freeze it again 4 3 Storing food in a fridge compartment Cover or wrap the food particularly...

Page 8: ...net CAUTION Take care of not to damage the cooling system CAUTION When moving the cabinet lift it by the front edge to avoid scratching the floor The equipment has to be cleaned regularly 1 Clean the inside and accessories with lukewarm water and some neutral soap 2 Regularly check the door seals and wipe clean to ensure they are clean and free from debris 3 Rinse and dry thoroughly 4 If accessibl...

Page 9: ...tands stable Audible or visual alarm is on The cabinet has been re cently switched on or the temperature is still too high Refer to Door Open Alarm or High Temperature Alarm The temperature in the ap pliance is too high Refer to Door Open Alarm or High Temperature Alarm The lamp does not work The lamp is in stand by mode Close and open the door The lamp does not work The lamp is defective Contact ...

Page 10: ...C or COOLMATIC manually or wait until the function resets auto matically to set the tempera ture Refer to FROSTMATIC or COOLMATIC function The temperature in the ap pliance is too low too high The temperature regulator is not set correctly Set a higher lower tempera ture The food products temper ature is too high Let the food products temper ature decrease to room tem perature before storage Many ...

Page 11: ... the lighting device Contact your Authorised Service Centre 7 INSTALLATION WARNING Refer to Safety chapters 7 1 Positioning This appliance can be installed in a dry well ventilated indoor where the ambient temperature corresponds to the climate class indicated on the rating plate of the appliance Climate class Ambient temperature SN 10 C to 32 C N 16 C to 32 C ST 16 C to 38 C T 16 C to 43 C 7 2 El...

Page 12: ...mp fuse B In the event of having to change the fuse in the plug supplied a 13 amp ASTA approved BS 1362 fuse must be used WARNING A cut off plug inserted into a 13 amp socket is a serious safety shock hazard Ensure that it is disposed of safely 7 3 Installation of the appliance and door reversal Please refer to separate instructions on installation ventilation requirements levelling and door rever...

Page 13: ...ENGLISH 13 ...

Page 14: ...www aeg com 14 ...

Page 15: ...ENGLISH 15 ...

Page 16: ...www aeg com shop 280156717 D 502017 ...

Reviews: