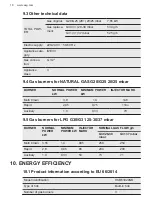
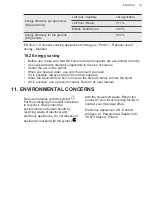
background image

detergent. After cleaning, wipe the

hob dry with a soft cloth.

• To clean the enamelled parts, caps

and crowns, wash them with warm

soapy water and dry them carefully

before you put them back on.

7.5 Cleaning the spark plug

This feature is obtained through a

ceramic ignition candle with a metal

electrode. Keep these components well

clean to prevent difficult lighting and

check that the burner crown holes are

not obstructed.

7.6 Periodic maintenance

Speak to your local Authorised Service

Centre periodically to check the

conditions of the gas supply pipe and the

pressure adjuster, if fitted.

8. TROUBLESHOOTING

WARNING!

Refer to Safety chapters.

8.1 What to do if...

Problem

Possible cause

Remedy

There is no spark when you

try to activate the spark gen‐

erator.

The hob is not connected to

an electrical supply or it is

connected incorrectly.

Check if the hob is correctly

connected to the electrical

supply.


The fuse is blown.

Make sure that the fuse is

the cause of the malfunction.

If the fuse is blown again

and again, contact a quali‐

fied electrician.


Burner cap and crown are

placed incorrectly.

Place the burner cap and

crown correctly.

The flame extinguishes im‐

mediately after ignition.

Thermocouple is not heated

up sufficiently.

After lightning the flame,

keep the knob pushed for

equal or less than 10 sec‐

onds.

The flame ring is uneven.

Burner crown is blocked with

food residues.

Make sure that the injector is

not blocked and the burner

crown is clean.

8.2 If you cannot find a

solution...

If you cannot find a solution to the

problem yourself, contact your dealer or

an Authorised Service Centre. Give the

data from the rating plate. Make sure,

you operated the hob correctly. If not the

servicing by a service technician or

dealer will not be free of charge, also

during the warranty period. The

information about guarantee period and

Authorised Service Centres are in the

guarantee booklet.

www.aeg.com

16

Summary of Contents for HKB63320NB

Page 1: ...USER MANUAL EN User Manual Hob HKB63320NB ...

Page 2: ...ter service and repair information www aeg com support Register your product for better service www registeraeg com Buy Accessories Consumables and Original spare parts for your appliance www aeg com shop CUSTOMER CARE AND SERVICE Always use original spare parts When contacting our Authorised Service Centre ensure that you have the following data available Model PNC Serial Number The information c...

Page 3: ... Keep all packaging away from children and dispose of it appropriately WARNING The appliance and its accessible parts become hot during use Keep children and pets away from the appliance when in use and when cooling down If the appliance has a child safety device it should be activated Children shall not carry out cleaning and user maintenance of the appliance without supervision 1 2 General Safet...

Page 4: ...e installing it in the built in structure Do not use a steam cleaner to clean the appliance If the glass ceramic surface glass surface is cracked switch off the appliance and unplug it from the mains In case the appliance is connected to the mains directly using junction box remove the fuse to disconnect the appliance from power supply In either case contact the Authorised Service Centre In case o...

Page 5: ...s Always take care when moving the appliance as it is heavy Always use safety gloves and enclosed footwear Seal the cut surfaces with a sealant to prevent moisture from causing swelling Protect the bottom of the appliance from steam and moisture Do not install the appliance next to a door or under a window This prevents hot cookware from falling from the appliance when the door or the window is op...

Page 6: ...opening width of minimum 3 mm 2 3 Gas connection CAUTION When using a gas cylinder always keep it on a flat horizontal surface with the gas valve on top All gas connections must be made by a qualified person Before installation make sure that the local distribution conditions nature of the gas and gas pressure and the adjustment of the appliance are compatible Make sure that there is air circulati...

Page 7: ...lass ceramic Always lift these objects up when you have to move them on the cooking surface Use only stable cookware with the correct shape and diameter larger than the dimensions of the burners Make sure cookware is centrally positioned on the burners Do not use large cookware that overlap the edges of the appliance This can cause damage to the worktop surface Make sure the flame does not go out ...

Page 8: ... the comprehensive ramp by means of a threaded nut G 1 2 Screw the parts without force adjust the connection in the necessary direction and tighten everything A B C A End of shaft with nut B Washer supplied with the appliance C Elbow supplied with the appliance Rigid connection Carry out connection by using metal rigid pipes copper with mechanical end Flexible connection with mechanical end Natura...

Page 9: ...justment of minimum level To adjust the minimum level of the burners 1 Light the burner 2 Turn the knob on the minimum position 3 Remove the knob 4 With a thin screwdriver adjust the bypass screw position A A 5 If you change from natural gas G20 G25 20 25 mbar to liquid gas fully tighten the bypass screw in from liquid gas to natural gas G20 G25 20 25 mbar undo the bypass screw approximately 1 4 o...

Page 10: ...k phase wire L N 1 Connect the green and yellow earth wire to the terminal which is marked with the letter E or the earth symbol or coloured green and yellow 2 Connect the blue neutral wire to the terminal which is marked with the letter N or coloured blue 3 Connect the brown live wire to the terminal which is marked with the letter L It must always be connected to the network phase 3 7 Assembly 1...

Page 11: ...0 mm B A A Removable panel B Space for connections Kitchen unit with oven The electrical connection of the hob and the oven must be installed separately for safety reasons and to let easy remove oven from the unit 4 PRODUCT DESCRIPTION 4 1 Cooking surface layout 4 2 1 3 1 Auxiliary burner 2 Rapid burner 3 Multi Crown burner 4 Control knobs 4 2 Control knob Symbol Description no gas supply off posi...

Page 12: ...r it is regular If after some tries the burner does not light check if the crown and its cap are in correct positions WARNING Do not keep the control knob pushed for more than 15 seconds If the burner does not light after 15 seconds release the control knob turn it into off position and try to light the burner again after minimum 1 minute CAUTION In the absence of electricity you can ignite the bu...

Page 13: ...o prevent spills and injuries CAUTION Make sure that the bottoms of pots do not stand too close to the control knob otherwise the flame heats the control knob up CAUTION Make sure that pot handles are not above the front edge of the cooktop CAUTION Make sure that the pots are placed centrally on the burner in order to get the maximum stability and a lower gas consumption CAUTION Liquids spilt duri...

Page 14: ...iary 1 5 Fish Sepia with peas Multi Crown 1 5 Roasted tuna steak Rapid 5 8 Eggs based meals Omelette Multi Crown 1 5 Vegetables Mushrooms with sea sonings Semi rapid 2 6 Caponata with vegeta bles Multi Crown 4 8 Frozen spinach with butter Rapid 1 4 Fried dishes French fries Multi Crown 5 9 Donuts Multi Crown 3 7 Snacks cooked with pan Roasting nuts Semi rapid 2 5 Croutons of bread Multi Crown 2 7 ...

Page 15: ... Be very careful when you replace the pan supports to prevent the hob top from damage 2 The enamel coating occasionally can have rough edges so be careful when you wash the pan supports by hand and dry them If necessary remove stubborn stains with a paste cleaner 3 After you clean the pan supports make sure that they are in correct positions 4 For the burner to operate correctly make sure that the...

Page 16: ...hob is correctly connected to the electrical supply The fuse is blown Make sure that the fuse is the cause of the malfunction If the fuse is blown again and again contact a quali fied electrician Burner cap and crown are placed incorrectly Place the burner cap and crown correctly The flame extinguishes im mediately after ignition Thermocouple is not heated up sufficiently After lightning the flame...

Page 17: ...O 03 IT MADE IN ITALY TYPE IP20 0049 A B C A Stick it on Guarantee Card and send this part if applicable B Stick it on Guarantee Card and keep this part if applicable C Stick it on instruction booklet 9 TECHNICAL DATA 9 1 Hob dimensions Width 590 mm Depth 520 mm 9 2 Bypass diameters BURNER Ø BYPASS 1 100 mm Multi Crown 57 Rapid 52 Auxiliary 28 ENGLISH 17 ...

Page 18: ...AL POWER kW MINIMUM POWER kW INJECTOR MARK Multi Crown 3 9 1 4 146 Rapid 2 95 0 75 119o Auxiliary 1 0 0 33 70 9 5 Gas burners for LPG G30 G31 28 30 37 mbar BURNER NORMAL POWER kW MINIMUM POWER kW INJECTOR MARK NOMINAL GAS FLOW g h G30 28 30 mbar G31 37 mbar Multi Crown 3 55 1 4 095 258 254 Rapid 2 8 0 95 86 204 200 Auxiliary 1 0 0 33 50 73 71 10 ENERGY EFFICIENCY 10 1 Product information according...

Page 19: ...amount you need If it is possible always put the lids on the cookware When the liquid starts to boil turn down the flame to barely simmer the liquid If it is possible use a pressure cooker Refer to its user manual 11 ENVIRONMENTAL CONCERNS Recycle materials with the symbol Put the packaging in relevant containers to recycle it Help protect the environment and human health by recycling waste of ele...

Page 20: ...www aeg com shop 867367712 B 522021 ...

Reviews: