background image

4. 

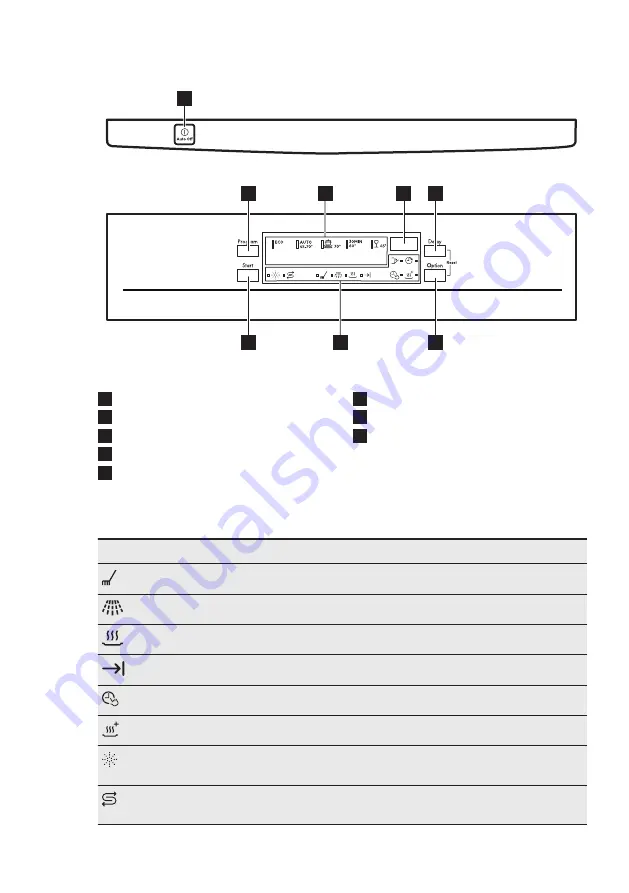
BEDIENINGSPANEEL

1

2

4

5

6

8

3

7

1

Aan/uit-toets

2

Program

-toets

3

Programma-indicatielampjes

4

Weergave

5

Delay

-toets

6

Option

-toets

7

Indicatielampjes

8

Start

-toets

4.1 

Indicatielampjes

Aanduiding

Beschrijving

Wasfase. Gaat aan wanneer de wasfase loopt.

Spoelfase. Gaat aan wanneer de spoelfase loopt.

Droogfase. Gaat aan wanneer de droogfase loopt.

Einde-indicatielampje.

TimeSaver-indicatielampje.

XtraDry-indicatielampje.

Glansmiddelindicatielampje. Dit indicatielampje is altijd uit als het pro-
gramma in werking is.

Zoutindicatielampje. Dit indicatielampje is altijd uit als het programma in
werking is.

NEDERLANDS

7

Summary of Contents for FFB53600ZM

Page 1: ...USER MANUAL NL Gebruiksaanwijzing 2 Afwasautomaat EN User Manual 25 Dishwasher FR Notice d utilisation 46 Lave vaisselle FFB53600ZM FFB53600ZW ...

Page 2: ...d om het door te lezen zodat u er optimaal van kunt profiteren Ga naar onze website voor Advies over gebruik brochures het oplossen van problemen en onderhoudsinformatie www aeg com webselfservice Registreer uw product voor een betere service www registeraeg com Koop accessoires verbruiksartikelen en originele reserveonderdelen voor uw apparaat www aeg com shop KLANTENSERVICE Gebruik altijd origin...

Page 3: ...omplexe beperkingen dienen altijd uit de buurt te worden gehouden mits ze voortdurend onder toezicht staan Houd kinderen jonger dan 3 jaar uit de buurt of onder permanent toezicht Laat kinderen niet met het apparaat spelen Houd wasmiddelen uit de buurt van kinderen Houd kinderen en huisdieren uit de buurt van het apparaat als de deur open is Kinderen mogen zonder toezicht geen reinigings en onderh...

Page 4: ...e slangsets mogen niet opnieuw worden gebruikt 2 VEILIGHEIDSVOORSCHRIFTEN 2 1 Montage WAARSCHUWING Alleen een erkende installatietechnicus mag het apparaat installeren Verwijder alle verpakkingsmaterialen Installeer en gebruik geen beschadigd apparaat Installeer of gebruik het apparaat niet op een plek waar de temperatuur onder de 0 C komt Volg de installatie instructies op die zijn meegeleverd me...

Page 5: ... de binnenkant WAARSCHUWING Gevaarlijke spanning Als de watertoevoerslang beschadigd is sluit dan onmiddellijk de waterkraan en haal de stekker uit het stopcontact Neem contact op met de service afdeling om de watertoevoerslang te vervangen 2 4 Gebruik Ga niet op de open deur zitten of staan Vaatwasmiddel is gevaarlijk Volg de veiligheidsinstructies op de verpakking van het wasmiddel op Speel niet...

Page 6: ... 8 10 9 11 6 7 12 2 3 1 1 Bovenblad 2 Bovenste sproeiarm 3 Onderste sproeiarm 4 Filters 5 Typeplaatje 6 Zoutreservoir 7 Luchtopening 8 Glansmiddeldoseerbakje 9 Afwasmiddeldoseerbakje 10 Bestekkorf 11 Onderkorf 12 Bovenkorf www aeg com 6 ...

Page 7: ...hrijving Wasfase Gaat aan wanneer de wasfase loopt Spoelfase Gaat aan wanneer de spoelfase loopt Droogfase Gaat aan wanneer de droogfase loopt Einde indicatielampje TimeSaver indicatielampje XtraDry indicatielampje Glansmiddelindicatielampje Dit indicatielampje is altijd uit als het pro gramma in werking is Zoutindicatielampje Dit indicatielampje is altijd uit als het programma in werking is NEDER...

Page 8: ...ngen Drogen XtraDry Sterk bevuild Serviesgoed be stek en pannen Voorspoelen Wassen 70 C Spoelingen Drogen TimeSaver XtraDry 3 Pas bevuild Serviesgoed en bestek Wassen 60 C of 65 C Spoelingen XtraDry Normaal of licht bevuild Teer servies goed en glas werk Wassen 45 C Spoelingen Drogen XtraDry 1 Dit programma biedt het meest efficiënte water en energieverbruik voor normaal vervuild servies goed en b...

Page 9: ...n programma worden ingesteld en de gebruikersmodus worden ingevoerd Instellingen die in de gebruikersmodus beschikbaar zijn Het niveau van de waterverzachter afgestemd op de waterhardheid De activering of deactivering van de aanduiding leeg glansmiddelreservoir De activering of deactivering van AirDry Omdat het apparaat de instellingen opslaat hoeft u deze niet bij aanvang van iedere cyclus te con...

Page 10: ... 57 9 37 42 65 75 6 5 7 5 46 52 8 29 36 51 64 5 1 6 4 36 45 7 23 28 40 50 4 0 5 0 28 35 6 19 22 33 39 3 3 3 9 23 27 5 1 15 18 26 32 2 6 3 2 18 22 4 11 14 19 25 1 9 2 5 13 17 3 4 10 7 18 0 7 1 8 5 12 2 4 7 0 7 5 1 2 1 Fabrieksinstelling 2 Gebruik geen zout op dit niveau Stel ongeacht het gebruikte soort wasmiddel het juiste waterhardheidniveau in om de bijvulindicator voor zout geactiveerd te houde...

Page 11: ...iding glansmiddelreservoir leeg geactiveerd aanduiding glansmiddelreservoir leeg gedeactiveerd 2 Druk op Start om de instelling te wijzigen 3 Druk op aan uit om de instelling te bevestigen 6 4 AirDry AirDry biedt goede droogresultaten met minder energieverbruik Tijdens de droogfase opent de deur automatisch en blijft op een kier staan LET OP Probeer de deur van het apparaat niet binnen 2 minuten n...

Page 12: ...terken Als XtraDry aanstaat kunnen de duur van sommige programma s het waterverbruik en de temperatuur van de laatste spoeling worden beïnvloed De optie XtraDry is een permanente optie voor alle programma s anders dan en hoeven niet iedere cyclus te worden gekozen In de andere programma s is de instelling van XtraDry permanent en wordt in de volgende cycli automatische gebruikt Deze configuratie k...

Page 13: ... wordt regelmatig herhaald 8 1 Het zoutreservoir LET OP Gebruik uitsluitend grof zout dat voor vaatwassers is gemaakt Fijn zout verhoogt het risico op corrosie Het zout wordt gebruikt om de hars in de waterontharder te herladen en voor goede wasresultaten voor dagelijks gebruik Het zoutreservoir vullen 1 Draai de dop linksom om het zoutreservoir te openen 2 Doe 1 liter water in het zoutreservoir a...

Page 14: ...U kunt het schuifje voor de vrij te geven hoeveelheid B instellen tussen stand 1 laagste hoeveelheid en stand 4 of 6 hoogste hoeveelheid 9 DAGELIJKS GEBRUIK 1 Draai de waterkraan open 2 Druk op de aan uittoets om het apparaat te activeren Zorg dat het apparaat in de programmakeuzemodus staat Vul het zoutreservoir als het zoutindicatielampje brandt Vul het glansmiddeldoseerbakje als het indicatiela...

Page 15: ...e programma aangaat Het display geeft de programmaduur weer 3 Stel de bruikbare opties in 4 Druk op Start om het programma te starten Het indicatielampje van de lopende fase is aan De programmaduur neemt af in stappen van 1 minuut Een programma starten met een uitgestelde start 1 Stel een programma in 2 Blijf op Delay drukken tot het display de uitgestelde tijd toont die u wilt instellen van 1 tot...

Page 16: ...en van de borden en gooi ze in de vuilnisbak Spoel de vaat niet eerst af Kies indien nodig een programma met voorwasfase Gebruik altijd de hele ruimte van de mandjes Zorg ervoor dat de vaat in de manden elkaar niet raakt of overlapt Alleen dan kan het water de vaat volledig bereiken en wassen U kunt apart vaatwasmiddel glansmiddel en zout gebruiken of kiezen voor het gebruik van multitabletten bij...

Page 17: ...et ander bestek Zorg er voor dat glazen andere glazen niet aanraken Leg kleine voorwerpen in de bestekmand Leg lichte voorwerpen in het bovenrek Zorg ervoor dat de voorwerpen niet verschuiven Zorg er voor dat de sproeiarm vrij kan ronddraaien voordat u een programma start 10 5 Voor het starten van een programma Zorg er voordat u het gekozen programma start voor dat De filters schoon zijn en correc...

Page 18: ... 3 Verwijder de platte filter A 4 Was de filters 5 Zorg ervoor dat er geen etensresten of vuil in of rond de rand van de opvangbak zitten 6 Plaats de platte filter terug A Zorg ervoor dat het goed onder de 2 geleidingen zit 7 Plaats de filters B en C terug 8 Plaats de filter B terug in de platte filter A Rechtsom draaien tot het vastzit www aeg com 18 ...

Page 19: ...Om de prestaties van uw apparaat op en top te houden raden we u aan iedere maand een specifiek schoonmaakproduct voor vaatwasmachines te gebruiken Volg de instructies op de verpakking van de producten zorgvuldig op 12 PROBLEEMOPLOSSING Als het apparaat niet start of stopt tijdens de bediening kijk dan of u het probleem zelf kunt oplossen met behulp van de informatie in de tabel of door contact op ...

Page 20: ...u ervan dat de gootsteenafvoer niet verstopt is Controleer of het filter in de afvoerslang niet verstopt is Controleer of het binnenfiltersysteem niet verstopt is Verzeker u ervan dat de aftapslang geen knikken of bochten heeft De anti overstromingsbevei liging is ingeschakeld Op het display verschijnt Draai de waterkraan dicht en neem contact op met de service afdeling Het apparaat stopt en start...

Page 21: ...ingen en tips voor andere mogelijke oorzaken Schakel het apparaat na controle aan en uit Als het probleem opnieuw optreedt neemt u contact op met onze klantenservice Voor alarmcodes die niet in de tabel vermeld zijn neemt u contact op met de service afdeling 12 1 De was en droogresultaten zijn niet naar tevredenheid Probleem Mogelijke oorzaak en oplossing Slechte wasresultaten Raadpleeg Dagelijks ...

Page 22: ...innenkant van het appa raat is nat Dit is geen fout van het apparaat Het wordt veroor zaakt door de vochtigheid in de lucht die tegen de wanden condenseert Opvallend veel schuim tijdens het wassen Gebruik alleen wasmiddel voor afwasautomaten Het glansmiddeldoseerbakje is lek Neem contact op met de klantenservice Roestresten op bestek Er wordt voor het wassen teveel zout in het water ge bruikt Zie ...

Page 23: ...estendige voorwer pen in het apparaat worden gewassen Laad de korf voorzichtig in en uit Raadpleeg de folder voor het laden van de korven Leg tere voorwerpen in de bovenkorf Raadpleeg Voor het eerste gebruik Dagelijks gebruik of Aanwijzingen en tips voor mogelijke andere oorzaken 13 TECHNISCHE INFORMATIE Afmetingen Breedte hoogte diepte mm 600 850 625 Elektrische aansluiting 1 Voltage V 220 240 Fr...

Page 24: ...t te recyclen Help om het milieu en de volksgezondheid te beschermen en recycle het afval van elektrische en elektronische apparaten Gooi apparaten gemarkeerd met het symbool niet weg met het huishoudelijk afval Breng het product naar het milieustation bij u in de buurt of neem contact op met de gemeente www aeg com 24 ...

Page 25: ...he very best from it Visit our website for Get usage advice brochures trouble shooter service information www aeg com webselfservice Register your product for better service www registeraeg com Buy Accessories Consumables and Original spare parts for your appliance www aeg com shop CUSTOMER CARE AND SERVICE Always use original spare parts When contacting our Authorised Service Centre ensure that y...

Page 26: ...hall be kept away unless continuously supervised Children of less than 3 years of age should be kept away unless continuously supervised Do not let children play with the appliance Keep detergents away from children Keep children and pets away from the appliance when the door is open Children shall not carry out cleaning and user maintenance of the appliance without supervision 1 2 General Safety ...

Page 27: ...aged appliance Do not install or use the appliance where the temperature is less than 0 C Follow the installation instructions supplied with the appliance Always take care when moving the appliance as it is heavy Always use safety gloves and enclosed footwear 2 2 Electrical connection WARNING Risk of fire and electric shock The appliance must be earthed Make sure that the parameters on the rating ...

Page 28: ... the water inlet hose 2 4 Use Do not sit or stand on the open door Dishwasher detergents are dangerous Obey the safety instructions on the detergent packaging Do not drink and play with the water in the appliance Do not remove the dishes from the appliance until the programme is complete Some detergent may remain on the dishes The appliance can release hot steam if you open the door while a progra...

Page 29: ... 8 10 9 11 6 7 12 2 3 1 1 Worktop 2 Upper spray arm 3 Lower spray arm 4 Filters 5 Rating plate 6 Salt container 7 Air vent 8 Rinse aid dispenser 9 Detergent dispenser 10 Cutlery basket 11 Lower basket 12 Upper basket ENGLISH 29 ...

Page 30: ...or Description Washing phase It comes on when the washing phase operates Rinsing phase It comes on when the rinsing phase operates Drying phase It comes on when the drying phase operates End indicator TimeSaver indicator XtraDry indicator Rinse aid indicator It is always off while the programme operates Salt indicator It is always off while the programme operates www aeg com 30 ...

Page 31: ...inses Dry XtraDry Heavy soil Crockery cut lery pots and pans Prewash Wash 70 C Rinses Dry TimeSaver XtraDry 3 Fresh soil Crockery and cutlery Wash 60 C or 65 C Rinses XtraDry Normal or light soil Delicate crock ery and glass ware Wash 45 C Rinses Dry XtraDry 1 This programme offers the most efficient use of water and energy consumption for crockery and cut lery with normal soil This is the standar...

Page 32: ...available in the user mode The level of water softener according to the water hardness Activation or deactivation of the rinse aid empty notification Activation or deactivation of AirDry As the appliance stores the saved settings there is no need to configure it before every cycle How to set the programme selection mode The appliance is in programme selection mode when the programme indicator flas...

Page 33: ...per water hardness level to keep the salt refill indicator active Multi tabs containing salt are not effective enough to soften hard water How to set the water softener level Make sure the appliance is in user mode 1 Press Program The indicators and are off The indicator still flashes The display shows the current setting e g level 5 2 Press Program repeatedly to change the setting 3 Press the on ...

Page 34: ...Dry is automatically activated with all programmes excluding if applicable To improve the drying performance refer to the XtraDry option or activate AirDry CAUTION If children have access to the appliance it is advised to deactivate AirDry as opening the door may pose a danger How to deactivate AirDry Make sure the appliance is in user mode 1 Press Delay The indicators and are off The indicator st...

Page 35: ...ion 7 2 TimeSaver This option increases the pressure and the temperature of the water The washing and the drying phases are shorter The total programme duration decreases by approximately 50 The washing results are the same as with the normal programme duration The drying results can decrease How to activate TimeSaver Press Option until the indicator is on The display shows the updated programme d...

Page 36: ...ntainer immediately start a programme to prevent corrosion 8 2 How to fill the rinse aid dispenser A B D C MAX 1 2 3 4 A B D C CAUTION Only use rinse aid specifically designed for dishwashers 1 Press the release button D to open the lid C 2 Fill the dispenser A until the rinse aid reaches the marking MAX 3 Remove the spilled rinse aid with an absorbent cloth to prevent too much foam 4 Close the li...

Page 37: ...g The function comes into operation 5 minutes after the completion of the programme After 5 minutes if the programme has not started Starting a programme 1 Press the on off button to activate the appliance Make sure that the appliance is in programme selection mode and the door is closed 2 Press Program again and again until the indicator of the desired programme is on The display shows the progra...

Page 38: ...ore you start a new programme End of the programme All buttons are inactive except for the on off button 1 Press the on off button or wait for the Auto Off function to automatically deactivate the appliance If you open the door before the activation of Auto Off the appliance is automatically deactivated 2 Close the water tap 10 HINTS AND TIPS 10 1 General Follow the hints below to ensure optimal c...

Page 39: ... wash items that are dishwasher safe Do not put in the appliance items made of wood horn aluminium pewter and copper Do not put in the appliance items that can absorb water sponges household cloths Remove remaining food from the items Make soft the remaining burned food on the items Put hollow items cups glasses and pans with the opening down Make sure that cutlery and dishes do not bond together ...

Page 40: ...system is made of 3 parts C B A 1 Turn the filter B counterclockwise and remove it 2 Remove the filter C out of filter B 3 Remove the flat filter A 4 Wash the filters 5 Make sure that there are no residues of food or soil in or around the edge of the sump 6 Put back in place the flat filter A Make sure that it is correctly positioned under the 2 guides 7 Reassemble the filters B and C 8 Put back t...

Page 41: ...month To maintain the performance of your appliance at its best we recommend to use monthly a specific cleaning product for dishwashers Follow carefully the instructions on the packaging of the product 12 TROUBLESHOOTING If the appliance does not start or it stops during operation first check if you can solve the problem by yourself with the help of the information in the table or contact an Autho...

Page 42: ... drain hose has no kinks or bends The anti flood device is on The display shows Close the water tap and contact an Authorised Service Centre The appliance stops and starts more times during op eration It is normal It provides optimal cleaning results and en ergy savings The program lasts too long Select the TimeSaver option to shorten the program time If the delayed start option is set cancel the ...

Page 43: ...esults Refer to Daily use Hints and tips and basket loading leaflet Use more intensive washing programmes Clean spray arm jets and filter Refer to Care and Cleaning Poor drying results Tableware has been left for too long inside a closed appliance There is no rinse aid or the dosage of rinse aid is not enough Set the rinse aid dispenser to a higher level Plastic items may need to be towel dried Fo...

Page 44: ...s of deter gent in the dispenser at the end of the programme The detergent tablet got stuck in the dispenser and therefore was not completely washed away by water Water cannot wash away the detergent from the dis penser Make sure that the spray arm is not blocked or clogged Make sure that items in the baskets do not impede the lid of the detergent dispenser from opening Odours inside the appliance...

Page 45: ...ode W 0 50 1 Refer to the rating plate for other values 2 If the hot water comes from alternative source of energy e g solar panels use the hot water supply to decrease energy consumption 14 ENVIRONMENTAL CONCERNS Recycle materials with the symbol Put the packaging in relevant containers to recycle it Help protect the environment and human health by recycling waste of electrical and electronic app...

Page 46: ... cette notice afin d utiliser au mieux votre appareil Visitez notre site Internet pour Obtenir des conseils d utilisation des brochures de l aide des informations www aeg com webselfservice Enregistrez votre produit pour obtenir un meilleur service www registeraeg com Acheter des accessoires consommables et pièces de rechange d origine pour votre appareil www aeg com shop SERVICE APRÈS VENTE Utili...

Page 47: ... ayant un handicap très important et complexe doivent être tenus à l écart à moins d être surveillés en permanence Les enfants de moins de 3 ans doivent être tenus à l écart à moins d être surveillés en permanence Ne laissez pas les enfants jouer avec l appareil Ne laissez pas les détergents à la portée des enfants Tenez les enfants et les animaux éloignés de l appareil lorsque la porte est ouvert...

Page 48: ...ession pour nettoyer l appareil Si l appareil dispose d orifices d aération à la base veillez à ne pas les couvrir par ex avec de la moquette L appareil doit être raccordé au circuit d eau à l aide des tuyaux neufs fournis N utilisez pas de tuyaux provenant d anciens appareils 2 CONSIGNES DE SÉCURITÉ 2 1 Installation AVERTISSEMENT L appareil doit être installé uniquement par un professionnel quali...

Page 49: ...n nouveau dispositif a été installé compteurs d eau etc laissez l eau s écouler jusqu à ce qu elle soit parfaitement propre et claire Pendant et après la première utilisation de l appareil vérifiez qu aucune fuite n est visible Le tuyau d arrivée d eau comporte une vanne de sécurité et une gaine avec un câble d alimentation intérieur AVERTISSEMENT Tension dangereuse Si le tuyau d arrivée d eau est...

Page 50: ...empêcher les enfants et les animaux de s enfermer dans l appareil 3 DESCRIPTION DE L APPAREIL 5 4 8 10 9 11 6 7 12 2 3 1 1 Plan de travail 2 Bras d aspersion intermédiaire 3 Bras d aspersion inférieur 4 Filtres 5 Plaque de calibrage 6 Réservoir de sel régénérant 7 Fente d aération 8 Distributeur de liquide de rinçage 9 Distributeur de produit de lavage 10 Panier à couverts 11 Panier du bas 12 Pani...

Page 51: ...lume au cours de la phase de lavage Phase de rinçage Il s allume au cours de la phase de rinçage Phase de séchage Il s allume au cours de la phase de séchage Voyant de fin Voyant TimeSaver Voyant XtraDry Voyant du réservoir de liquide de rinçage Ce voyant est toujours éteint pendant le déroulement du programme Voyant du réservoir de sel régénérant Ce voyant est toujours éteint pen dant le déroulem...

Page 52: ...y Très sale Vaisselle cou verts plats et casseroles Prélavage Lavage à 70 C Rinçages Séchage TimeSaver XtraDry 3 Vaisselle fraîche ment salie Vaisselle et cou verts Lavage à 60 C ou 65 C Rinçages XtraDry Normalement ou légèrement sale Vaisselle fragile et verres Lavage à 45 C Rinçages Séchage XtraDry 1 Ce programme vous permet d optimiser votre consommation d eau et d énergie pour la vaisselle et ...

Page 53: ...isation fourni avec votre appareil 6 RÉGLAGES 6 1 Mode Programmation et mode Utilisateur Lorsque l appareil est en mode Programmation il est possible de sélectionner un programme et d entrer en mode Utilisateur Réglages disponibles en mode utilisateur Le niveau de l adoucisseur d eau en fonction de la dureté de l eau L activation ou la désactivation de la notification du distributeur de liquide de...

Page 54: ...ur un niveau adéquat pour vous garantir de bons résultats de lavage Dureté de l eau Degrés alle mands dH Degrés français fH mmol l Degrés Clarke Réglage du niveau de l adoucisseur d eau 47 50 84 90 8 4 9 0 58 63 10 43 46 76 83 7 6 8 3 53 57 9 37 42 65 75 6 5 7 5 46 52 8 29 36 51 64 5 1 6 4 36 45 7 23 28 40 50 4 0 5 0 28 35 6 19 22 33 39 3 3 3 9 23 27 5 1 15 18 26 32 2 6 3 2 18 22 4 11 14 19 25 1 9...

Page 55: ...age du liquide de rinçage reste actif Comment désactiver la notification du distributeur de liquide de rinçage vide Assurez vous que l appareil est en mode Utilisateur 1 Appuyez sur Start Les voyants et sont éteints Le voyant clignote toujours L affichage indique le réglage actuel notification du distributeur de liquide de rinçage vide activée notification du distributeur de liquide de rinçage vid...

Page 56: ...lignote rapidement pendant quelques secondes puis s éteint Activer des options peut avoir un impact sur la consommation d eau et d énergie ainsi que sur la durée du programme 7 1 XtraDry Activez cette option pour améliorer les performances de séchage Lorsque l option XtraDry est activée la durée de certains programmes la consommation d eau et la température du dernier rinçage peuvent être affectés...

Page 57: ...reil peut prendre 5 minutes pour recharger la résine dans l adoucisseur d eau Pendant ce temps l appareil semble ne pas fonctionner La phase de lavage ne démarre qu une fois cette procédure achevée La procédure sera répétée régulièrement 8 1 Réservoir de sel régénérant ATTENTION Utilisez uniquement du gros sel spécialement conçu pour les lave vaisselle Le sel fin augmente le risque de corrosion Le...

Page 58: ... épongez le avec un chiffon absorbant pour éviter tout excès de mousse 4 Fermez le couvercle Assurez vous que le bouton d ouverture se verrouille correctement Vous pouvez tourner le sélecteur de quantité délivrée B entre la position 1 quantité minimale et la position 4 ou 6 quantité maximale 9 UTILISATION QUOTIDIENNE 1 Ouvrez le robinet d eau 2 Appuyez sur la touche Marche Arrêt pour allumer l app...

Page 59: ...si le programme n a pas démarré Départ d un programme 1 Appuyez sur la touche Marche Arrêt pour mettre en marche l appareil Assurez vous que l appareil est en mode de sélection de programme et que la porte est fermée 2 Appuyez sur Program à nouveau et encore jusqu à ce que l indicateur du programme souhaité soit allumé L affichage indique la durée du programme 3 Sélectionnez les options compatible...

Page 60: ...e en mode Programmation Assurez vous que le distributeur de produit de lavage n est pas vide avant de démarrer un nouveau programme de lavage Fin du programme Toutes les touches sont inactives sauf la touche marche arrêt 1 Pour éteindre l appareil appuyez sur la touche marche arrêt ou attendez que la fonction Auto Off l éteigne automatiquement Si vous ouvrez la porte avant l activation de Auto Off...

Page 61: ...t ne chargez pas les paniers 4 Lorsque le programme de lavage est terminé réglez l adoucisseur d eau en fonction de la dureté de l eau dans votre région 5 Ajustez la quantité de liquide de rinçage libérée 6 Activez la notification du distributeur de liquide de rinçage vide 10 4 Chargement des paniers Utilisez uniquement cet appareil pour laver des articles qui peuvent passer au lave vaisselle Ne m...

Page 62: ...iné il peut rester de l eau sur les surfaces intérieures de l appareil 11 ENTRETIEN ET NETTOYAGE AVERTISSEMENT Avant toute opération d entretien éteignez l appareil et débranchez la fiche de la prise secteur Les filtres sales et les bras d aspersion obstrués diminuent les résultats de lavage Contrôlez les régulièrement et nettoyez les si nécessaire 11 1 Nettoyage des filtres Le système de filtres ...

Page 63: ...jet fin et pointu 11 3 Nettoyage extérieur Nettoyez l appareil avec un chiffon doux humide Utilisez uniquement des produits de lavage neutres N utilisez pas de produits abrasifs de tampons à récurer ni de solvants 11 4 Nettoyage intérieur Nettoyez soigneusement l appareil y compris le joint en caoutchouc de la porte avec un chiffon doux humide Si vous utilisez régulièrement des programmes de court...

Page 64: ...arre pas Vérifiez que le hublot de l appareil est fermé Appuyez sur Start Si vous avez sélectionné un départ différé annulez le ou attendez la fin du décompte L appareil a lancé la procédure de rechargement de la résine dans l adoucisseur d eau La durée de cette pro cédure est d environ 5 minutes L appareil ne se remplit pas d eau L affichage indique ou Assurez vous que le robinet d eau est ouvert...

Page 65: ...ible La porte de l appareil est difficile à fermer L appareil n est pas de niveau Desserrez ou serrez les pieds réglables si disponibles De la vaisselle dépasse des paniers Bruit de cliquetis ou de bat tement à l intérieur de l ap pareil La vaisselle n est pas correctement rangée dans les pa niers Reportez vous au manuel de chargement du pa nier Assurez vous que les bras d aspersion peuvent tourne...

Page 66: ...s verres et la vaisselle La quantité de liquide de rinçage libérée est trop im portante Placez le sélecteur de dosage du liquide de rinçage sur un niveau plus faible La quantité de produit de lavage est excessive Il y a des taches et traces de gouttes d eau séchées sur les verres et la vaisselle La quantité de liquide de rinçage libérée n est pas suf fisante Placez le sélecteur de dosage du liquid...

Page 67: ...ure du couvercle du distributeur de liquide de rinçage Odeurs à l intérieur de l appa reil Reportez vous au chapitre Nettoyage intérieur Dépôts calcaires sur la vaissel le dans la cuve et à l intérieur de la porte Le niveau de sel régénérant est bas vérifiez le voyant de remplissage Le bouchon du réservoir de sel régénérant est dévissé L eau de votre arrivée est dure Reportez vous au cha pitre Ado...

Page 68: ...ite à partir de sources d énergie respectueuses de l environnement par exemple panneaux solaires utilisez une arrivée d eau chaude afin de réduire la consommation d éner gie 14 EN MATIÈRE DE PROTECTION DE L ENVIRONNEMENT Recyclez les matériaux portant le symbole Déposez les emballages dans les conteneurs prévus à cet effet Contribuez à la protection de l environnement et à votre sécurité recyclez ...

Page 69: ...FRANÇAIS 69 ...

Page 70: ...www aeg com 70 ...

Page 71: ...FRANÇAIS 71 ...

Page 72: ...www aeg com shop 156910913 A 192018 ...

Reviews: