background image

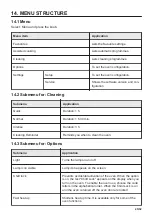
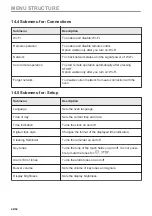
14.4 Submenu for: Connections

Submenu

Description

Wi-Fi

To enable and disable: Wi-Fi.

Remote operation

To enable and disable remote control.

Option visible only after you turn on: Wi-Fi.

Network

To check network status and the signal power of: Wi-Fi.

Auto remote operation

To start remote operation automatically after pressing

START.

Option visible only after you turn on: Wi-Fi.

Forget network

To disable current network from auto connection with the

oven.

14.5 Submenu for: Setup

Submenu

Description

Language

Sets the oven language.

Time of day

Sets the current time and date.

Time indication

Turns the clock on and off.

Digital clock style

Changes the format of the displayed time indication.

Cleaning Reminder

Turns the reminder on and off.

Key tones

Turns the tone of the touch fields on and off. It is not possi‐
ble to mute the tones for:  , 

.

Alarm / Error tones

Turns the alarm tones on and off.

Buzzer volume

Sets the volume of key tones and signals.

Display brightness

Sets the display brightness.

46/52

MENU STRUCTURE

Summary of Contents for AssistedCooking 8000

Page 1: ...USER MANUAL EN User Manual Oven BPK948330T ...

Page 2: ...ooter service and repair information www aeg com support Register your product for better service www registeraeg com Buy Accessories Consumables and Original spare parts for your appliance www aeg com shop CUSTOMER CARE AND SERVICE Always use original spare parts When contacting our Authorised Service Centre ensure that you have the following data available Model PNC Serial Number The information...

Page 3: ...ection 15 5 3 Wireless connection 15 5 4 Initial preheating 16 6 DAILY USE 17 6 1 How to set Heating functions 17 6 2 How to set Assisted cooking 17 6 3 Heating functions 18 6 4 Notes on Moist Fan Baking 20 7 CLOCK FUNCTIONS 21 7 1 Clock functions description 21 7 2 How to set Clock functions 21 8 HOW TO USE ACCESSORIES 24 8 1 Inserting accessories 24 8 2 Using telescopic runners 24 8 3 Using Triv...

Page 4: ...replace Lamp 38 12 TROUBLESHOOTING 40 12 1 What to do if 40 12 2 How to manage Error codes 41 12 3 Service data 42 13 ENERGY EFFICIENCY 43 13 1 Product Information and Product Information Sheet 43 13 2 Energy saving 43 14 MENU STRUCTURE 45 14 1 Menu 45 14 2 Submenu for Cleaning 45 14 3 Submenu for Options 45 14 4 Submenu for Connections 46 14 5 Submenu for Setup 46 14 6 Submenu for Service 47 15 I...

Page 5: ...and the hazards involved Children between 3 and 8 years of age and persons with very extensive and complex disabilities shall be kept away from the appliance unless continuously supervised Children of less than 3 years of age should be kept away from the appliance unless continuously supervised Do not let children play with the appliance and mobile devices with My AEG Kitchen Keep all packaging aw...

Page 6: ...a steam cleaner to clean the appliance Do not use harsh abrasive cleaners or sharp metal scrapers to clean the glass door since they can scratch the surface which may result in shattering of the glass If the mains power supply cable is damaged it must be replaced by the manufacturer its Authorised Service Centre or similarly qualified persons to avoid an electrical hazard Excessive spillage must b...

Page 7: ...e appliance check if the oven door opens without restraint The appliance is equipped with an electric cooling system It must be operated with the electric power supply The built in unit must meet the stability requirements of DIN 68930 Cabinet minimum height Cabinet under the work top minimum height 600 600 mm Cabinet width 550 mm Cabinet depth 605 580 mm Height of the front of the appliance 594 m...

Page 8: ... Use only correct isolation devices line protecting cut outs fuses screw type fuses removed from the holder earth leakage trips and contactors The electrical installation must have an isolation device which lets you disconnect the appliance from the mains at all poles The isolation device must have a contact opening width of minimum 3 mm Fully close the appliance door before you connect the mains ...

Page 9: ...pliance has cooled down completely after use 2 4 Care and cleaning WARNING Risk of injury fire or damage to the appliance Before maintenance deactivate the appliance and disconnect the mains plug from the mains socket Make sure the appliance is cold There is the risk that the glass panels can break Replace immediately the door glass panels when they are damaged Contact the Authorised Service Centr...

Page 10: ...self cleaning program is in operation Non stick surfaces on pots pans trays utensils etc can be damaged by the high temperature Pyrolytic cleaning operation of all Pyrolytic Ovens and can be also a source for low level harmful fumes Fumes released from all Pyrolytic Ovens Cooking Residues as described are not harmful to humans including children or persons with medical conditions 2 6 Internal ligh...

Page 11: ...ating element 5 Lamp 6 Fan 7 Shelf support removable 8 Shelf positions 3 2 Accessories Wire shelf For cookware cake tins roasts Grill Roasting pan To bake and roast or as a pan to collect fat Trivet For roasting and grilling Use the trivet only with the Grill Roasting pan Food sensor To measure the temperature inside food 11 52 ...

Page 12: ...Telescopic runners For inserting and removing trays and wireshelf more easily 12 52 PRODUCT DESCRIPTION ...

Page 13: ...he oven 5 To turn on the selected function 6 To turn off the selected function Hold Press Hold and turn Turn on the main screen Confirm a setting or enter the selected submenu Adjust settings and navigate through the menu 4 2 Display 200 C 12 30 After turning on the display shows the main screen with the heating function and the default temperature 09 37 If you do not use the oven for 2 minutes th...

Page 14: ...y indicators Sound alarm function indicators when the set time of cooking ends the signal sounds The function is on The function is on Cooking stops automatically Sound alarm is off Timer indicators The timer starts at a lat er time The timer starts after closing the oven door To cancel the setting The timer starts when the oven rea ches the set temperature The timer starts when cooking starts Doo...

Page 15: ...he first connection You have to set Language Display brightness Buzzer volume Time of day Wireless connection 5 3 Wireless connection To connect the oven you need Wireless network with the Internet connection Step 1 Turn on the oven Step 2 Select Menu Settings Connections Step 3 Select Wi Fi Press the knob to turn it on Step 4 Choose wireless network with the Internet connection The oven wireless ...

Page 16: ...Remove all accessories and removable shelf supports from the oven Step 2 Set the maximum temperature for the function Let the oven operate for 1 h Step 3 Set the maximum temperature for the function Let the oven operate for 15 min The oven can emit an odour and smoke during preheating Make sure that the room is ventila ted 16 52 BEFORE FIRST USE ...

Page 17: ...rature settings Step 6 Turn and press the knob to set the temperature Step 7 Press Food Sensor you can plug the sensor at any time before or during cooking press to turn off the heating function Step 8 Turn off the oven Take a shortcut 6 2 How to set Assisted cooking Every dish in this submenu has a recommended function and temperature You can adjust the time and the temperature For some of the di...

Page 18: ...oast large meat joints or poultry with bones on one shelf position To make gratins and to brown True Fan Cooking To bake on up to three shelf positions at the same time and to dry food Set the temperature 20 40 C lower than for Conventional Cooking Frozen Foods To make convenience food e g french fries potato wedges or spring rolls crispy Conventional Cooking To bake and roast food on one shelf po...

Page 19: ...Plate Warming To preheat plates for serving Dough Proving To speed up the rising of the yeast dough It prevents dough surface from drying and keeps the dough elastic Defrost To defrost food vegetables and fruit The defrosting time depends on the amount and size of the frozen food Au Gratin For dishes such as lasagna or potato gratin To make gratins and to brown Slow Cooking To prepare tender succu...

Page 20: ...erms of crispiness colour and crust gloss 6 4 Notes on Moist Fan Baking This function was used to comply with the energy efficiency class and ecodesign requirements according to EU 65 2014 and EU 66 2014 Tests according to EN 60350 1 The oven door should be closed during cooking so that the function is not interrupted and the oven operates with the highest energy efficiency possible When you use t...

Page 21: ...untdown Maximum is 23 h 59 min This function has no ef fect on the operation of the oven Start criteria Comment The timer starts when you turn it on The timer starts after closing the door The timer starts when cooking starts The timer starts when the oven reaches the set temperature The timer starts at a specific time 7 2 How to set Clock functions How to set the clock Step 1 Select Time of day P...

Page 22: ...4 Select End action Press the knob How to delay start and end of cooking Step 1 Select Press the knob Step 2 Select Start criteria At a later time Press the knob Step 3 Turn the knob to set the start time Press the knob Step 4 Turn the knob to set the end of cooking Press the knob Step 5 Select End action Press the knob How to delay start without setting the end of cooking Step 1 Select Press the ...

Page 23: ...ready you can extend cooking time You can also change the oven function Step 1 Select Timer Step 2 Select preferred time icon to extend cooking time and press the knob to confirm Step 3 Also you can select the preferred heating function and press the knob to change it 23 52 CLOCK FUNCTIONS ...

Page 24: ... Push the shelf between the guide bars of the shelf support Deep pan Push the Deep pan between the guide bars of the shelf support Wire shelf Deep pan Push the Deep panDeep pan between the guide bars of the shelf support and the wire shelf on the guide bars above 8 2 Using telescopic runners Do not oil the telescopic runners Make sure you push back the telescopic runners fully in the oven before y...

Page 25: ...n together Place the wire shelf and the deep pan to gether on the telescopic runner 8 3 Using Trivet and Grill Roasting pan WARNING Be careful when you remove the accessories from a hot oven There is a risk of burns You can use the trivet to roast larger pieces of meat or poultry on one shelf position 25 52 HOW TO USE ACCESSORIES ...

Page 26: ... into the deep pan so that the supports of the wire shelf point down Step 2 Put the deep pan into the oven on the necessary shelf position 8 4 Food Sensor Food sensor measures temperature inside the food You can use the food sensor with every heating function CAUTION Use only the food sensor supplied and the original replacement parts There are two temperatures to be set The oven temperature minim...

Page 27: ...se recommended food core temperature settings Refer to Cooking Hints The oven calculates an approximate end of cooking time It depends on the quantity of food the set oven function and the temperature How to use Food Sensor Step 1 Turn on the oven Step 2 Set a heating function and if necessary the oven temperature Step 3 Insert Food Sensor Meat poultry and fish Casserole 27 52 HOW TO USE ACCESSORI...

Page 28: ...e remaining ingredients Step 4 Plug Food Sensor into the socket at the front of the oven The display shows the current temperature of Food Sensor Step 5 select and press the knob to set the core temperature of the sensor Step 6 Press the knob to set the preferred sensor option Sound alarm when food reaches the core temperature the signal sounds Sound alarm and stop cooking when food reaches the co...

Page 29: ...nsor plug from the socket and remove the dish from the oven WARNING There is a risk of burns as Food Sensor becomes hot Be careful when you unplug it and remove it from the food Take a shortcut 29 52 HOW TO USE ACCESSORIES ...

Page 30: ...s Step 4 Select Save current settings Press the knob to add the setting to the list of Favour ites 9 2 Automatic switch off For safety reasons the oven turns off after some time if a heating function works and you do not change any settings C h 30 115 12 5 120 195 8 5 200 245 5 5 250 maximum 3 The Automatic switch off does not work with the functions Light Food sensor End time Slow Cooking 9 3 Coo...

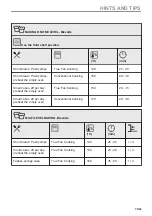
Page 31: ...s refer to cooking tables on our website To find the Cooking Hints check the PNC number on the rating plate on the front frame of the oven cavity 10 2 Moist Fan Baking For the best results follow suggestions listed in the table below C min Sweet rolls 16 pieces baking tray or dripping pan 180 2 25 35 Swiss roll baking tray or dripping pan 180 2 15 25 Whole fish 0 2 kg baking tray or dripping pan 1...

Page 32: ...8 cm diameter Dark non reflective 26 cm diameter Ceramic 8 cm diameter 5 cm height Dark non reflective 28 cm diameter 10 4 Cooking tables for test institutes Information for test institutes Tests according to EN 60350 IEC 60350 BAKING ON ONE LEVEL Baking in tins C min Fatless sponge cake True Fan Cooking 140 150 35 50 2 Fatless sponge cake Conventional Cook ing 160 35 50 2 Apple pie 2 tins Ø20 cm ...

Page 33: ... 30 Small cakes 20 per tray preheat the empty oven True Fan Cooking 150 20 35 Small cakes 20 per tray preheat the empty oven Conventional Cooking 170 20 30 MULTILEVEL BAKING Biscuits C min Short bread Pastry strips True Fan Cooking 140 25 45 1 4 Small cakes 20 per tray preheat the empty oven True Fan Cooking 150 23 40 1 4 Fatless sponge cake True Fan Cooking 160 35 50 1 4 33 52 HINTS AND TIPS ...

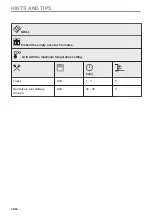
Page 34: ...GRILL Preheat the empty oven for 5 minutes Grill with the maximum temperature setting min Toast Grill 1 3 5 Beef steak turn halfway through Grill 24 30 4 34 52 HINTS AND TIPS ...

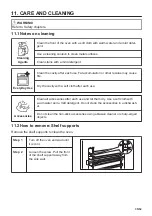
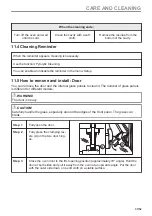
Page 35: ...due may cause fire Dry the cavity with a soft cloth after each use Accessories Clean all accessories after each use and let them dry Use a soft cloth with warm water and a mild detergent Do not clean the accessories in a dishwash er Do not clean the non stick accessories using abrasive cleaner or sharp edged objects 11 2 How to remove Shelf supports Remove the shelf supports to clean the oven Step...

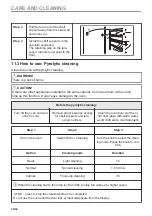
Page 36: ...ning Turn off the oven and wait until it is cold Remove all accessories except for shelf supports and tele scopic runners Clean the oven floor and the in ner door glass with warm water a soft cloth and a mild detergent Step 1 Step 2 Step 3 Turn on the oven Select Menu Cleaning Turn the knob to select the clean ing mode Press the knob to con firm Option Cleaning mode Duration Quick Light cleaning 1...

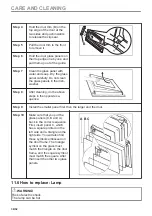
Page 37: ... the internal glass panels to clean it The number of glass panels is different for different models WARNING The door is heavy CAUTION Carefully handle the glass especially around the edges of the front panel The glass can break Step 1 Fully open the door A A Step 2 Fully press the clamping lev ers A on the two door hing es Step 3 Close the oven door to the first opening position approximately 70 a...

Page 38: ...the above steps in the opposite se quence Step 9 Install the smaller panel first then the larger and the door Step 10 Make sure that you put the glass panels C B and A back in the correct sequence First insert panel C which has a square printed on the left side and a triangle on the right side You will also find those symbols embossed on the door frame The triangle symbol on the glass must match t...

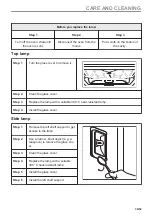
Page 39: ...ss cover Step 3 Replace the lamp with a suitable 300 C heat resistant lamp Step 4 Install the glass cover Side lamp Step 1 Remove the left shelf support to get access to the lamp Step 2 Use a narrow blunt object e g a teaspoon to remove the glass cov er Step 3 Clean the glass cover Step 4 Replace the lamp with a suitable 300 C heat resistant lamp Step 5 Install the glass cover Step 6 Install the l...

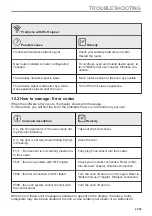
Page 40: ...o Clock Func tions chapter How to set Clock functions The door is not closed correctly Fully close the door The fuse is blown Make sure the fuse is the cause of the prob lem If the problem recurs contact a qualified electrician The oven Child Lock is on Refer to Menu chapter Submenu for Op tions Components need to be replaced Description Remedy The lamp is burnt out Replace the lamp for details re...

Page 41: ... handle on your own Code and description Remedy C2 the Food sensor is in the oven cavity dur ing Pyrolytic Cleaning Take out the Food sensor C3 the door is not fully closed during Pyrolyt ic Cleaning Close the door F111 Food sensor is not correctly inserted in to the socket Fully plug Food sensor into the socket F601 there is a problem with Wi Fi signal Check your network connection Refer to Be fo...

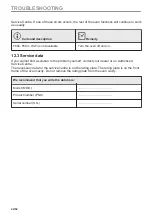
Page 42: ...ervice data If you cannot find a solution to the problem yourself contact your dealer or an Authorised Service Centre The necessary data for the service centre is on the rating plate The rating plate is on the front frame of the oven cavity Do not remove the rating plate from the oven cavity We recommend that you write the data here Model MOD Product number PNC Serial number S N 42 52 TROUBLESHOOT...

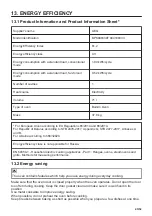
Page 43: ...478 2017 Appendix G STB 2477 2017 Annexes A and B For Ukraine according to 568 32020 Energy efficiency class is not applicable for Russia EN 60350 1 Household electric cooking appliances Part 1 Ranges ovens steam ovens and grills Methods for measuring performance 13 2 Energy saving The oven contains features which help you save energy during everyday cooking Make sure that the oven door is closed ...

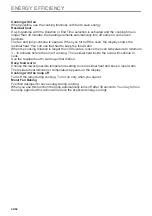
Page 44: ... the oven temperature to minimum 3 10 minutes before the end of cooking The residual heat inside the oven will continue to cook Use the residual heat to warm up other dishes Keep food warm Choose the lowest possible temperature setting to use residual heat and keep a meal warm The residual heat indicator or temperature appears on the display Cooking with the lamp off Turn off the lamp during cooki...

Page 45: ... Duration 1 h 30 min Intense Duration 3 h Cleaning Reminder Reminds you when to clean the oven 14 3 Submenu for Options Submenu Application Light Turns the lamp on and off Lamp icon visible Lamp icon appears on the screen Child lock Prevents accidental activation of the oven When the option is on the text Child Lock appears on the display when you turn on the oven To enable the oven use choose the...

Page 46: ...rent network from auto connection with the oven 14 5 Submenu for Setup Submenu Description Language Sets the oven language Time of day Sets the current time and date Time indication Turns the clock on and off Digital clock style Changes the format of the displayed time indication Cleaning Reminder Turns the reminder on and off Key tones Turns the tone of the touch fields on and off It is not possi...

Page 47: ...ode Activation deactivation code 2468 Licence Information about licenses Software version Information about software version Reset all settings Restores factory settings Reset all popups Restores all pop ups to the original settings 47 52 MENU STRUCTURE ...

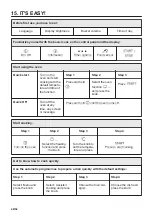
Page 48: ...en function and press the knob Press Quick Off Turn off the oven at any time any screen or message Press and hold until the oven turns off Start cooking Step 1 Step 2 Step 3 Step 4 Turn on the oven Select the heating function and press the knob Turn the knob to set the tempera ture and press Press to start cooking Get to know how to cook quickly Use the automatic programmes to prepare a dish quick...

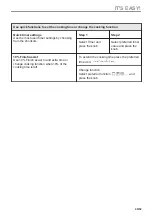
Page 49: ...ep 1 Step 2 Select Timer and press the knob Select preferred timer value and press the knob 10 Finish assist Use 10 Finish assist to add extra time or change cooking function when 10 of the cooking time is left To extend the cooking time press the preferred time icon 1 min 5 min 10 min Change function Select preferred function and press the knob 49 52 IT S EASY ...

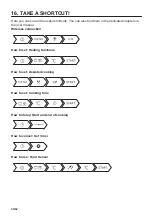
Page 50: ...an also find them in the dedicated chapters in the user manual Wireless connection MENU ON How to set Heating functions How to set Assisted cooking MENU How to set Cooking time How to delay Start and end of cooking How to cancel Set Timer How to use Food Sensor 50 52 ...

Page 51: ...tainers to recycle it Help protect the environment and human health by recycling waste of electrical and electronic appliances Do not dispose of appliances marked with the symbol with the household waste Return the product to your local recycling facility or contact your municipal office 51 52 ...

Page 52: ...www aeg com shop 867361209 C 092020 ...

Reviews: