background image

time, useful for example when a recipe

requires to cool down food products for a

certain period of time.
It is also useful when a reminder is

needed in order not to forget the bottles

or cans placed in the freezer for fast

cooling.

1. Press Mode until the corresponding

icon appears.

The DrinksChill indicator flashes.

The Timer shows the set value (30

minutes) for a few seconds.

2. Press the Timer regulator to change

the Timer set value from 1 to 90

minutes.

3. Press OK to confirm.

The DrinksChill indicator is shown.

The Timer starts to flash (min).

At the end of the countdown the "0 min"

indicator flashes and an audible alarm

sounds. Press OK to switch off the sound

and terminate the function.

To switch off the function repeat the

procedure until the DrinksChill goes off.

It is possible to change the

time at any time during the

countdown and at the end by

pressing the Temperature

colder button and the

Temperature warmer button.

4.10 Door open alarm

If the fridge door is left open for

approximately 5 minutes, the sound is on

and alarm indicator flashes.
The alarm stops after closing the door.

During the alarm, the sound can be

muted by pressing any button.

If you do not press any

button, the sound switches

off automatically after

around one hour to avoid

disturbing.

5. DAILY USE

5.1 Positioning the door

shelves

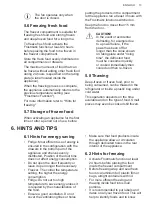
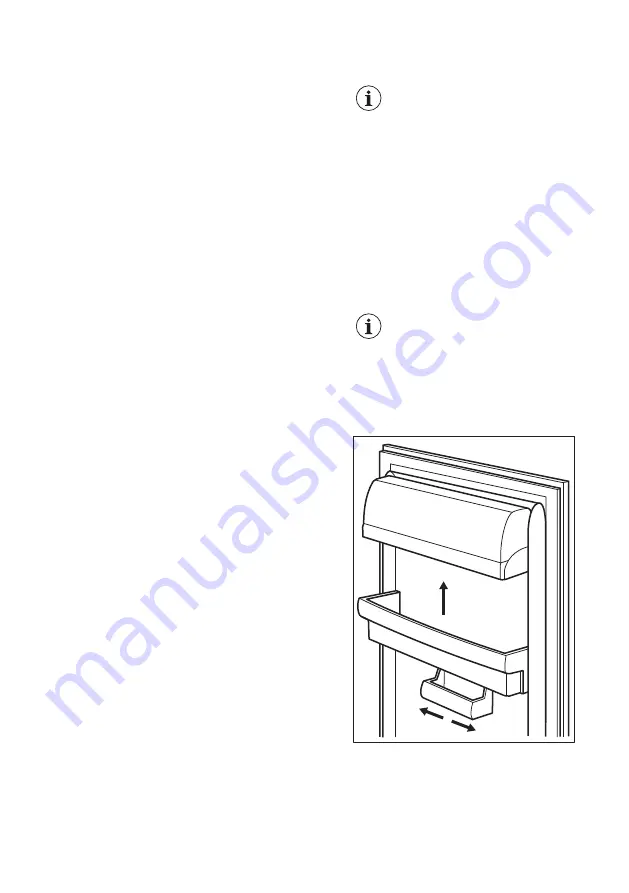
To permit storage of food packages of

various sizes, the door shelves can be

placed at different heights.

1. Gradually pull the shelf up until it

comes free.

2. Reposition as required.

This model is equipped with a variable

storage box which can be moved

sideways.

ENGLISH

11

Summary of Contents for AIK2654R

Page 1: ...USER MANUAL EN User Manual 2 Refrigerator DE Benutzerinformation 25 Kühlschrank AIK2654R ...

Page 2: ... to Get usage advice brochures trouble shooter service and repair information www aeg com support Register your product for better service www registeraeg com Buy Accessories Consumables and Original spare parts for your appliance www aeg com shop CUSTOMER CARE AND SERVICE Always use original spare parts When contacting our Authorised Service Centre ensure that you have the following data availabl...

Page 3: ...ies provided that they have been properly instructed Children of less than 3 years of age should be kept away from the appliance unless continuously supervised Children should be supervised to ensure that they do not play with the appliance Children shall not carry out cleaning and user maintenance of the appliance without supervision Keep all packaging away from children and dispose of it appropr...

Page 4: ...gents Do not use abrasive products abrasive cleaning pads solvents or metal objects When the appliance is empty for long period switch it off defrost clean dry and leave the door open to prevent mould from developing within the appliance Do not store explosive substances such as aerosol cans with a flammable propellant in this appliance If the supply cord is damaged it must be replaced by the manu...

Page 5: ...mponents The mains cable must stay below the level of the mains plug Connect the mains plug to the mains socket only at the end of the installation Make sure that there is access to the mains plug after the installation Do not pull the mains cable to disconnect the appliance Always pull the mains plug 2 3 Use WARNING Risk of injury burns electric shock or fire The appliance contains flammable gas ...

Page 6: ...appliance contact the Authorised Service Centre Use original spare parts only Please note that self repair or non professional repair can have safety consequences and might void the guarantee The following spare parts will be available for 7 years after the model has been discontinued thermostats temperature sensors printed circuit boards light sources door handles door hinges trays and baskets Pl...

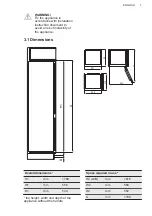
Page 7: ...t to avoid a risk of instability of the appliance 3 1 Dimensions B A H1 W1 D1 W2 D2 W3 D3 Overall dimensions H1 mm 1769 W1 mm 556 D1 mm 549 the height width and depth of the appliance without the handle Space required in use H2 A B mm 1816 W2 mm 560 D2 mm 552 A mm 1780 ENGLISH 7 ...

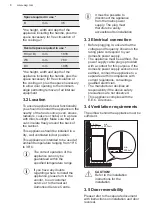
Page 8: ... temperature range If you have any doubts regarding where to install the appliance please turn to the vendor to our customer service or to the nearest Authorised Service Centre It must be possible to disconnect the appliance from the mains power supply The plug must therefore be easily accessible after installation 3 3 Electrical connection Before plugging in ensure that the voltage and frequency ...

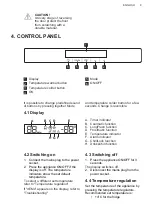
Page 9: ... Temperature indicator F Alarm indicator G ChildLock function H DrinksChill function 4 2 Switching on 1 Connect the mains plug to the power socket 2 Press the appliance ON OFF if the display is off The temperature indicators show the set default temperature To select a different set temperature refer to Temperature regulation If dEMo appears on the display refer to Troubleshooting 4 3 Switching of...

Page 10: ...om 1 to 3 are suitable for fish and meat Settings 4 and 5 are suitable for vegetables and fruits In these settings the compartment works similarly to the fridge compartment 2 Press the temperature buttons on the control panel to select the required setting 3 Press OK to confirm the setting The indicator returns to the fridge temperature setting in a few seconds 4 7 Frostmatic function The Frostmat...

Page 11: ... switch off the function repeat the procedure until the DrinksChill goes off It is possible to change the time at any time during the countdown and at the end by pressing the Temperature colder button and the Temperature warmer button 4 10 Door open alarm If the fridge door is left open for approximately 5 minutes the sound is on and alarm indicator flashes The alarm stops after closing the door D...

Page 12: ...nutritional values as well as high humidity level much longer in comparison to the regular refrigerator 5 4 Humidity control The LongFresh compartment has stops that prevent the drawers from falling out when fully extended To remove the drawer 1 Pull the drawer to the maximum 2 Lift and pull out the drawer The drawers marked with water drop symbols and can be used according to the desired storage ...

Page 13: ...d immediately then cooled and then re frozen 5 8 Thawing Deep frozen or frozen food prior to being consumed can be thawed in the refrigerator or inside a plastic bag under cold water This operation depends on the time available and on the type of food Small pieces may even be cooked still frozen 6 HINTS AND TIPS 6 1 Hints for energy saving Fridge Most efficient use of energy is ensured in the conf...

Page 14: ...C Higher temperature setting inside the appliance may lead to shorter shelf life The whole freezer compartment is suitable for storage of frozen food products Leave enough space around the food to allow air to circulate freely For adequate storage refer to food packaging label to see the shelf life of food It is important to wrap the food in such a way that prevents water humidity or condensation ...

Page 15: ...down at room temperature before inserting it To prevent food waste the new stock of food should always be placed behind the old one 6 7 Hints for food refrigeration Fresh food compartment is the one marked on the rating plate with Meat all types wrap in a suitable packaging and place it on the glass shelf above the vegetable drawer Store meat for at most 1 2 days Fruit and vegetables clean thoroug...

Page 16: ...radishes Savoy cabbage humid up to 14 days Peas kohlrabi humid up to 10 days Spring onions radishes as paragus spinach humid up to 7 days Fruit Pears dates fresh straw berries peaches humid up to 1 month Plums rhubarb gooseberries humid up to 21 days Apples not sensitive to cold quinces humid up to 20 days Apricots cherries humid up to 14 days Damsons grapes humid up to 10 days Blackberries curran...

Page 17: ...tment storage time for that kind of food can be increased by up to three times as well without loss on quality All food stored in a LongFresh compartment should be taken out of the drawers roughly 15 30 min before consumption particularly fruit and vegetables to be consumed without any additional cooking process Allowing fruit and vegetables to return to room temperature will improve the texture a...

Page 18: ... the goods 3 Leave the door open Protect the floor from the defrosting water e g with a cloth or a flat vessel 4 In order to speed up the defrosting process place a pot of warm water in the freezer compartment In addition remove pieces of ice that break away before defrosting is complete 5 When defrosting is complete dry the interior thoroughly 6 Switch on the appliance and close the door 7 Set th...

Page 19: ...re is set incorrect ly Refer to Control Panel chapter Many food products were put in at the same time Wait a few hours and then check the temperature again The room temperature is too high Refer to Installation chap ter Food products placed in the appliance were too warm Allow food products to cool to room temperature before storing The door is not closed cor rectly Refer to Closing the door secti...

Page 20: ... set to the lowest tempera ture Set a higher temperature Refer to Control Panel chapter Temperature set in the appli ance is too low and the am bient temperature is too high Set a higher temperature Refer to Control Panel chapter Water flows on the rear plate of the refrigerator During the automatic de frosting process frost melts on the rear plate This is correct There is too much con densed wate...

Page 21: ...ge Many food products are stor ed at the same time Store less food products at the same time The thickness of the frost is greater than 4 5 mm Defrost the appliance The door has been opened often Open the door only if neces sary The Frostmatic function is switched on Refer to Frostmatic func tion section The Coolmatic function is switched on Refer to Coolmatic function section There is no cold air...

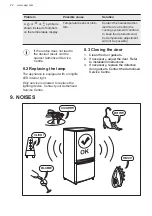
Page 22: ...not lead to the desired result call the nearest Authorized Service Centre 8 2 Replacing the lamp The appliance is equipped with a longlife LED interior light Only service is allowed to replace the lighting device Contact your Authorised Service Centre 8 3 Closing the door 1 Clean the door gaskets 2 If necessary adjust the door Refer to installation instructions 3 If necessary replace the defective...

Page 23: ...len Am Mattenhof 4a b 6010 Kriens Schlossstrasse 1 4133 Pratteln Comercialstrasse 19 7000 Chur Spare parts service Industriestrasse 10 5506 Mägenwil Tel 0848 848 111 Specialist advice Sale Badenerstrasse 587 8048 Zürich Tel 044 405 81 11 Warranty For each product we provide a two year guarantee from the date of purchase or delivery to the consumer with a guarantee certificate invoice or sales rece...

Page 24: ...he product to your local recycling facility or contact your municipal office For Switzerland Where should you take your old equipment Anywhere that sells new equipment or hand it in to official SENS collection points or official SENS recycling firms The list of official SENS collection points can be found at www erecycling ch www aeg com 24 ...

Page 25: ...Geräten nicht vorhanden sind Bitte nehmen Sie sich ein paar Minuten Zeit um das Beste aus ihm herauszuholen Besuchen Sie uns auf unserer Website um Anwendungshinweise Prospekte Informationen zu Fehlerbehebung Service und Reparatur zu erhalten www aeg com support Registrieren Sie Ihr Produkt um einen erstklassigen Service zu erhalten www registeraeg com Um Zubehör Verbrauchsmaterial und Original Er...

Page 26: ...dige Person beaufsichtigt werden oder von dieser Person Anweisungen erhalten haben wie das Gerät sicher zu bedienen ist und welche Gefahren bei nicht ordnungsgemäßer Bedienung bestehen Kinder zwischen 3 und 8 Jahren dürfen das Gerät be und entladen vorausgesetzt sie wurden ordnungsgemäß eingewiesen Dieses Gerät kann von Personen mit schweren und komplexen Behinderungen benutzt werden vorausgesetzt...

Page 27: ...nnen und zugängliche Ablaufsysteme Lagern Sie rohes Fleisch und Fisch in geeigneten Behältern im Kühlschrank so dass sie nicht mit anderen Lebensmitteln in Berührung kommen oder auf diese tropfen WARNUNG Halten Sie die Lüftungsöffnungen im Gerätegehäuse oder in der Einbaunische frei von Hindernissen WARNUNG Versuchen Sie nicht den Abtauvorgang durch andere als vom Hersteller empfohlene mechanische...

Page 28: ...htig da es sehr schwer ist Tragen Sie stets Sicherheitshandschuhe und festes Schuhwerk Stellen Sie sicher dass die Luft um das Gerät zirkulieren kann Warten Sie nach der Montage oder dem Wechsel des Türanschlags mindestens 4 Stunden bevor Sie das Gerät an die Stromversorgung anschließen So kann das Öl in den Kompressor zurückfließen Ziehen Sie den Stecker aus der Steckdose bevor Sie am Gerät arbei...

Page 29: ...r in das Gerät wenn solche Geräte nicht ausdrücklich vom Hersteller für diesen Zweck zugelassen sind Wird der Kältekreislauf beschädigt stellen Sie bitte sicher dass keine Flammen und Zündquellen im Raum vorhanden sind Lüften Sie den Raum Achten Sie darauf dass keine heißen Gegenstände auf die Kunststoffteile des Geräts gelangen Geben Sie keine Softdrinks in das Gefrierfach Dadurch entsteht Druck ...

Page 30: ...7 Jahre lang vorgehalten Thermostate Temperatursensoren Platinen Lichtquellen Lichtquellen Türscharniere Backbleche und Körbe Bitte beachten Sie dass einige dieser Ersatzteile nur an Reparaturbetriebe geliefert werden können und nicht alle Ersatzteile für alle Modelle relevant sind Türdichtungen sind innerhalb von 10 Jahren nach Produkteinstellung des Modells erhältlich 2 7 Entsorgung WARNUNG Verl...

Page 31: ...ohne Griff Platzbedarf während des Betriebs H2 A B mm 1816 W2 mm 560 Platzbedarf während des Betriebs D2 mm 552 A mm 1780 B mm 36 Höhe Breite und Tiefe des Geräts einschließlich Griff und zuzüglich des notwendigen Freiraums für die Zirkulation der Kühlluft Platzbedarf insgesamt während des Betriebs H3 A B mm 1816 DEUTSCH 31 ...

Page 32: ...Aufstellungsort des Geräts wenden Sie sich an den Verkäufer unseren Kundendienst oder nächstgelegenen autorisierten Kundendienst Es muss möglich sein das Gerät vom Netz zu trennen Daher muss der Stecker nach der Installation zugänglich bleiben 3 3 Elektroanschluss Kontrollieren Sie vor dem Einschalten des Geräts ob die Netzspannung und frequenz Ihres Hausanschlusses mit den auf dem Typenschild ang...

Page 33: ...nktion Coolmatic C Funktion LongFresh D Funktion Frostmatic E Temperaturanzeige F Alarmanzeige G Funktion ChildLock H Funktion DrinksChill 4 2 Einschalten des Geräts 1 Stecken Sie den Netzstecker in die Netzsteckdose 2 Drücken Sie ON OFF wenn das Display ausgeschaltet ist Die Temperaturanzeigen zeigen die jeweils eingestellte Standardtemperatur an Informationen zur Auswahl einer anderen Temperatur...

Page 34: ...e sowie der hohe Feuchtigkeitsgrad länger als im restlichen Kühlschrank erhalten bleiben 1 Drücken Sie Mode bis das entsprechende Symbol angezeigt wird Das Display zeigt 3 an Dies ist die Standardeinstellung welche die effektivste Leistung sicherstellt Die möglichen Einstellungen können variieren von 1 kälteste bis 5 wärmste Die Einstellungen von 1 bis 3 eignen sich für Fisch und Fleisch Die Einst...

Page 35: ...t 30 Minuten für einige Sekunden an 2 Drücken Sie den Timer Regler um den Timer Einstellungswert von 1 bis 90 Minuten zu ändern 3 Drücken Sie zur Bestätigung OK Die Anzeige DrinksChill wird angezeigt Im Timer blinkt min Nach Ablauf des Countdowns blinkt die Anzeige 0 min und es ertönt ein Alarmsignal Drücken Sie die Taste OK um den Alarmton und die Funktion auszuschalten Wiederholen Sie zum Aussch...

Page 36: ...rstellt werden um eine korrekte Luftzirkulation zu gewährleisten 5 3 LongFresh Fach Die Lagertemperatur und die relative Luftfeuchtigkeit in diesem Fach bieten optimale Lagerbedingungen für die verschiedensten Lebensmittel Einzelheiten zur Temperatureinstellung des LongFresh Fachs finden Sie im Abschnitt Einstellen des LongFresh Fachs Das LongFresh Fach eignet sich zum Lagern von verschiedenen fri...

Page 37: ... Bedarf automatisch ein Der Ventilator ist nur bei geschlossener Tür in Betrieb 5 6 Einfrieren frischer Lebensmittel Das Gefrierfach eignet sich zum Einfrieren frischer Lebensmittel und zur langfristigen Aufbewahrung gefrorener und tiefgefrorener Lebensmittel Um frische Lebensmittel einzufrieren aktivieren Sie bitte die Frostmatic Funktion mindestens 24 Stunden bevor Sie die einzufrierenden Lebens...

Page 38: ...ls erforderlich Sorgen Sie für eine gute Belüftung Bedecken Sie die Belüftungsgitter oder öffnungen nicht Vergewissern Sie sich dass die Lebensmittel im Inneren des Geräts eine Luftzirkulation durch entsprechende Öffnungen im hinteren Teil des Geräts ermöglichen 6 2 Tipps zum Einfrieren Schalten Sie die Frostmatic Funktion mindestens 24 Stunden bevor Sie die Lebensmittel in das Gefrierfach hinein ...

Page 39: ...htig die Lebensmittel so zu verpacken dass kein Wasser Feuchtigkeit oder Kondenswasser ins Innere gelangt 6 4 Einkaufstipps Nach dem Lebensmitteleinkauf Achten Sie darauf dass die Verpackung nicht beschädigt ist die Lebensmittel könnten verdorben sein Wenn die Verpackung aufgequollen oder nass ist wurde das Lebensmittel möglicherweise nicht unter den optimalen Bedingungen gelagert und das Auftauen...

Page 40: ... Vergewissern Sie sich dass sie auf Raumtemperatur abgekühlt sind bevor Sie sie in das Gerät stellen Um eine Verschwendung von Lebensmitteln zu vermeiden sollten neue Lebensmittel immer hinter die alten gelegt werden 6 7 Hinweise für die Kühlung von Lebensmitteln Das Fach für frische Lebensmittel ist auf dem Typenschild gekennzeichnet mit Fleisch alle Sorten Wickeln Sie Fleisch in geeignetes Mater...

Page 41: ... Karotten Kräuter Rosen kohl Sellerie feucht bis zu 1 Monat Artischocken Blumenkohl Chicorée Eisbergsalat En divien Feldsalat Kopfsalat Lauch Radicchio feucht bis zu 21 Tage Brokkoli Chinakohl Grün kohl Weißkohl Radies chen Wirsing feucht bis zu 14 Tage Erbsen Kohlrabi feucht bis zu 10 Tage Frühlingszwiebeln Radies chen Spargel Spinat feucht bis zu 7 Tage Obst Birnen Datteln frisch Erd beeren Pfir...

Page 42: ...ngFresh Fach aufbewahrt werden Achten Sie auf die Frische der Lebensmittel insbesondere auf das Verfallsdatum Qualität und Frische beeinflussen die Lagerzeit Die gesamte Lagerzykluszeit hängt von den Konservierungsbedingungen ab die vor der endgültigen Lagerung im Kühlschrank gemacht wurden Lebensmittel Obst Gemüse oder Tierfutter müssen vor der Einlagerung immer in Behältern oder Folie verpackt w...

Page 43: ...auen des Gefriergeräts VORSICHT Verwenden Sie niemals scharfe Metallwerkzeuge zum Abkratzen von Reif aus dem Verdampfer da Sie diesen beschädigen könnten Verwenden Sie kein anderes mechanisches Gerät oder jegliche künstliche Hilfsmittel um den Abtauprozess zu beschleunigen als was der Hersteller vorgeschlagen hat Stellen Sie ungefähr 12 Stunden vor dem Abtauen eine niedrigere Temperatur ein um aus...

Page 44: ...reffen 1 Trennen Sie das Gerät von der Stromversorgung 2 Entfernen Sie alle Lebensmittel 3 Tauen Sie das Gerät ab 4 Reinigen Sie das Gerät und alle Zubehörteile 5 Lassen Sie die Türen geöffnet um unangenehme Gerüche zu vermeiden 8 FEHLERSUCHE WARNUNG Siehe Kapitel Sicherheitshinweise 8 1 Was zu tun ist wenn Störung Mögliche Ursache Lösung Das Gerät funktioniert nicht Das Gerät ist ausgeschaltet Sc...

Page 45: ...iehe Abschnitt Funktion Frostmatic Die Funktion Coolmatic ist eingeschaltet Siehe Abschnitt Funktion Coolmatic Der Kompressor schaltet sich nicht sofort ein nach dem Sie Frostmatic oder Coolmatic gedrückt oder die Temperatur auf einen anderen Wert eingestellt ha ben Der Kompressor startet nach einer gewissen Zeit Das ist normal es ist kein Fehler aufgetreten Die Tür ist falsch ausgerich tet oder b...

Page 46: ...s an der Rückwand ab Das ist richtig An der Rückwand des Kühl schranks befindet sich zu viel Kondenswasser Die Tür wurde zu häufig ge öffnet Öffnen Sie die Tür nur bei Bedarf Die Tür wurde nicht vollstän dig geschlossen Achten Sie darauf dass die Tür vollständig geschlossen ist Die aufbewahrten Lebens mittel waren nicht verpackt Packen Sie die Lebensmittel richtig ein bevor Sie diese in das Gerät ...

Page 47: ...ist eingeschaltet Siehe Abschnitt Funktion Frostmatic Die Funktion Coolmatic ist eingeschaltet Siehe Abschnitt Funktion Coolmatic Im Gerät herrscht keine Kalt luftzirkulation Stellen Sie sicher dass die Kaltluft im Gerät zirkulieren kann Siehe Kapitel Tipps und Hinweise Bestimmte Oberflächen im Innern des Kühlraums sind zu bestimmten Zeiten wär mer Das ist ein normaler Zu stand DEMO erscheint auf ...

Page 48: ... Sie sich an Ihren autorisierten Kundendienst 8 3 Schließen der Tür 1 Reinigen Sie die Türdichtungen 2 Stellen Sie die Tür nach Bedarf ein Siehe Montageanleitung 3 Ersetzen Sie die defekten Türdichtungen falls erforderlich Wenden Sie sich an einen autorisierten Kundendienst 9 GERÄUSCHE SSSRRR CLICK HISSS BRRR BLUBB 10 TECHNISCHE DATEN Die technischen Daten befinden sich auf dem Typenschild innen i...

Page 49: ... Verkauf Badenerstrasse 587 8048 Zürich Tel 044 405 81 11 Garantie Für jedes Produkt gewähren wir ab Verkauf bzw Lieferdatum an den Endverbraucher eine Garantie von 2 Jahren Ausweis durch Garantieschein Faktura oder Verkaufsbeleg Die Garantieleistung umfasst die Kosten für Material Arbeits und Reisezeit Die Garantieleistung entfällt bei Nichtbeachtung der Gebrauchsanweisung und Betriebsvorschrifte...

Page 50: ...ltgeräten Überall dort wo neue Geräte verkauft werden oder Abgabe bei den offiziellen SENS Sammelstellen oder offiziellen SENS Recyclern Die Liste der offiziellen SENS Sammelstellen findet sich unter www erecycling ch www aeg com 50 ...

Page 51: ......

Page 52: ...www aeg com shop 222378991 E 052022 ...

Reviews: