background image

1. Clean the inside and accessories

with lukewarm water and some

neutral soap.

2. Regularly check the door seals and

wipe them clean to ensure they are

clean and free from debris.

3. Rinse and dry thoroughly.

7.3 Defrosting of the freezer

CAUTION!

Never use sharp metal tools

to scrape off frost from the

evaporator as you could

damage it.

Do not use a mechanical

device or any artificial

means to speed up the

thawing process other than

those recommended by the

manufacturer.

About 12 hours prior to

defrosting set a lower

temperature in order to build

up sufficient chill reserve in

case of any interruption in

operation.

A certain amount of frost will always form

on the freezer shelves and around the

top compartment.
Defrost the freezer when the frost layer

reaches a thickness of about 3-5 mm.

1. Switch off the appliance or pull out

electrical plug from the wall socket.

2. Remove any stored food and put it in

a cool place. 

CAUTION!

A temperature rise of the

frozen food packs during

defrosting may shorten

their safe storage life.

Do not touch frozen

goods with wet hands.

Hands can freeze to the

goods.

3. Leave the door open. Protect the

floor from the defrosting water e.g.

with a cloth or a flat vessel.

4. In order to speed up the defrosting

process, place a pot of warm water in

the freezer compartment. In addition,

remove pieces of ice that break away

before defrosting is complete.

5. When defrosting is complete, dry the

interior thoroughly.

6. Switch on the appliance and close

the door.

7. Set the temperature regulator to

obtain the maximum coldness and

run the appliance for at least 3 hours

using this setting.

Only after this time put the food back into

the freezer compartment.

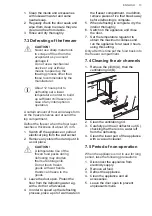
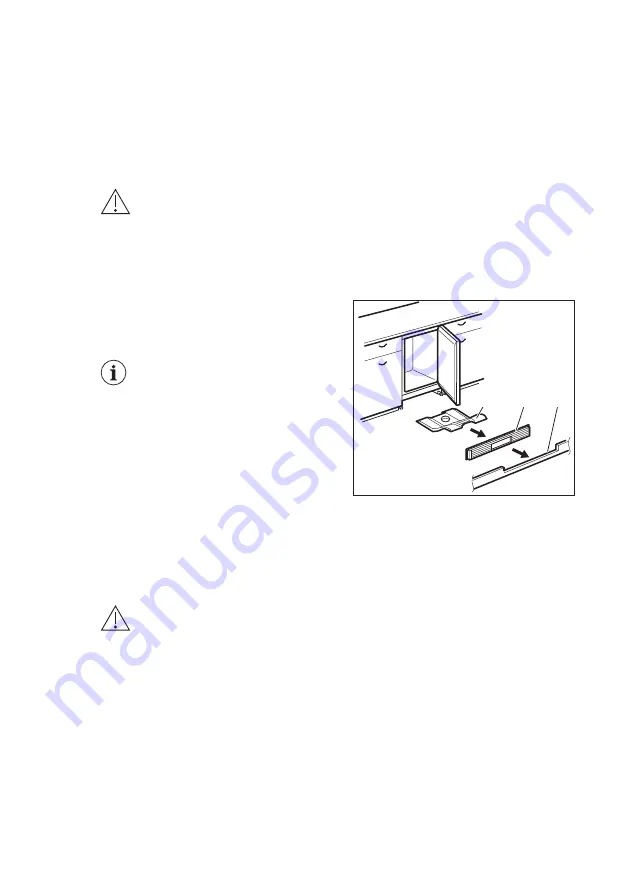
7.4 Cleaning the air channels

1. Remove the plinth (A), then the

ventilation grid (B).

C

A

B

2. Clean the ventilation grid.

3. Carefully pull the air deflector out (C),

checking that there is no water left

from the defrosting.

4. Clean the lower part of the appliance

with a vacuum cleaner.

7.5 Period of non-operation

When the appliance is not in use for long

period, take the following precautions:

1. Disconnect the appliance from

electricity supply.

2. Remove all food.

3. Defrost the appliance.

4. Clean the appliance and all

accessories.

5. Leave the door open to prevent

unpleasant smells.

ENGLISH

13

Summary of Contents for ABK682F1AF

Page 1: ...USER MANUAL EN User Manual Freezer ABK682F1AF ...

Page 2: ...usage advice brochures trouble shooter service and repair information www aeg com support Register your product for better service www registeraeg com Buy Accessories Consumables and Original spare parts for your appliance www aeg com shop CUSTOMER CARE AND SERVICE Always use original spare parts When contacting our Authorised Service Centre ensure that you have the following data available Model ...

Page 3: ... with very extensive and complex disabilities provided that they have been properly instructed Children of less than 3 years of age should be kept away from the appliance unless continuously supervised Children should be supervised to ensure that they do not play with the appliance Children shall not carry out cleaning and user maintenance of the appliance without supervision Keep all packaging aw...

Page 4: ...eloping within the appliance Do not store explosive substances such as aerosol cans with a flammable propellant in this appliance If the supply cord is damaged it must be replaced by the manufacturer its Authorised Service Centre or similarly qualified persons in order to avoid a hazard 2 SAFETY INSTRUCTIONS 2 1 Installation WARNING Only a qualified person must install this appliance Remove all th...

Page 5: ... Use WARNING Risk of injury burns electric shock or fire The appliance contains flammable gas isobutane R600a a natural gas with a high level of environmental compatibility Be careful not to cause damage to the refrigerant circuit containing isobutane Do not change the specification of this appliance Any use of the built in product as free standing is strictly prohibited Do not put electrical appl...

Page 6: ...wing spare parts will be available for 7 years after the model has been discontinued thermostats temperature sensors printed circuit boards light sources door handles door hinges trays and baskets Please note that some of these spare parts are only available to professional repairers and that not all spare parts are relevant for all models Door gaskets will be available for 10 years after the mode...

Page 7: ...ment 3 2 Location To ensure appliance s best functionality you should not install the appliance in the nearby of the heat source oven stoves radiators cookers or hobs or in a place with direct sunlight Make sure that air can circulate freely around the back of the cabinet This appliance should be installed in a dry well ventilated indoor position This appliance is intended to be used at ambient te...

Page 8: ... letter N or coloured black 3 Connect the wire coloured brown to the terminal either marked with the L or coloured red 4 Check that no cut or stray strands of wire is present and the cord clamp E is secure over the outer sheath Make sure the electricity supply voltage is the same as that indicated on the appliance rating plate 5 Switch on the appliance The appliance is supplied with a 13 amp fuse ...

Page 9: ...f Choose the setting keeping in mind that the temperature inside the appliance depends on room temperature frequency of opening the door quantity of food stored appliance location A medium setting is generally the most suitable one To operate the appliance 1 Turn the temperature regulator clockwise to obtain a lower temperature inside the appliance 2 Turn the temperature regulator counterclockwise...

Page 10: ...ating plate a label located inside the appliance When the freezing process is complete the appliance automatically returns to the previous temperature setting see Frostmatic Function For more information refer to Hints for freezing 5 2 Storage of frozen food When activating an appliance for the first time or after a period out of use before putting the products in the compartment let the appliance...

Page 11: ...side the compartment To avoid increase in temperature of already frozen food do not place fresh unfrozen food directly next to it Place food at room temperature in the part of the freezer compartment where there is no frozen food Do not eat ice cubes water ices or ice lollies immediately after taking them out of the freezer Risk of frostbites Do not re freeze defrosted food If the food has defrost...

Page 12: ...usage Ham Leftovers with meat 9 12 6 12 4 6 6 9 1 2 1 2 2 3 7 CARE AND CLEANING WARNING Refer to Safety chapters 7 1 Cleaning the interior Before using the appliance for the first time the interior and all internal accessories should be washed with lukewarm water and some neutral soap to remove the typical smell of a brand new product then dried thoroughly CAUTION Do not use detergents abrasive po...

Page 13: ...Do not touch frozen goods with wet hands Hands can freeze to the goods 3 Leave the door open Protect the floor from the defrosting water e g with a cloth or a flat vessel 4 In order to speed up the defrosting process place a pot of warm water in the freezer compartment In addition remove pieces of ice that break away before defrosting is complete 5 When defrosting is complete dry the interior thor...

Page 14: ...n The cabinet has been re cently switched on Refer to Door Open Alarm or High Temperature Alarm The temperature in the appli ance is too high Refer to Door Open Alarm or High Temperature Alarm The door is left open Close the door The compressor operates continually Temperature is set incorrect ly Refer to Control Panel chapter Many food products were put in at the same time Wait a few hours and th...

Page 15: ...et ter Temperature is set incorrect ly Refer to Control Panel chapter Appliance is fully loaded and is set to the lowest tempera ture Set a higher temperature Refer to Control Panel chapter Temperature set in the appli ance is too low and the am bient temperature is too high Set a higher temperature Refer to Control Panel chapter Water flows on the floor The melting water outlet is not connected t...

Page 16: ...tmatic func tion section There is no cold air circula tion in the appliance Make sure that there is cold air circulation in the appli ance Refer to Hints and Tips chapter Power indicator light flashes An error has occurred in measuring the temperature Contact a qualified electri cian or the nearest Author ized Service Centre If the advice does not lead to the desired result call the nearest Author...

Page 17: ...aration of the appliance for any EcoDesign verification shall be compliant with BS EN 62552 Ventilation requirements recess dimensions and minimum rear clearances shall be as stated in this User Manual at Chapter 3 Please contact the manufacturer for any other further information including loading plans 12 ENVIRONMENTAL CONCERNS Recycle materials with the symbol Put the packaging in relevant conta...

Page 18: ......

Page 19: ......

Page 20: ...www aeg com shop 211628269 A 372021 ...

Reviews: