65100K
Glaskeramik-Kochfeld
Ceramic glass hob
Montage- und Gebrauchsanweisung
Installation and Operating Instructions
Page 1: ...65100K Glaskeramik Kochfeld Ceramic glass hob Montage und Gebrauchsanweisung Installation and Operating Instructions ...
Page 2: ...void damaging the appliance 3 Information and practical tips 2 Environmental information 1 These numbers indicate step by step how to use the appliance 2 3 These operating instructions contain information on steps you can take yourself to rectify a possible malfunction Refer to the section What to do if In the event of any technical problems please contact your nearest cus tomer service centre at ...
Page 3: ...itching Off the Appliance 43 Cooking Zone Selection 43 Heat Setting Selection 44 Switching the Triple Ring Cooking Zone On and Off 45 Switching off a Cooking Zone 46 Residual Heat Indicator 47 Cooking with the Automatic Warm up Function 48 Cooking without the Automatic Warm up Function 49 Locking Unlocking the Control Panel 50 Timer 51 Uses Tables and Tips 53 Pans 53 Advice on Cooking with and wit...
Page 4: ...36 Installation Instructions 60 Technical Data 60 Regulations Standards Directives 61 Safety Instructions for the Installer 62 Electrical Connection 63 Service 65 Assembly 66 ...
Page 5: ...cover any damage that may occur Flush mounted appliances may only be operated following installa tion in suitable installation cabinets and workplaces which conform to the relevant standards This ensures sufficient protection against contact for electrical units as required by the VDE Association of German Electrical Engineers If your appliance malfunctions or if fractures cracks or splits appear ...
Page 6: ...ll on the cooking surface can damage it Do not use cast iron pans or pans with a rough burred or damaged base Scratching may occur if the pans are slid across the surface Do not place any pans on the hob frame Scratching and damage to the paint may occur Make sure that no acidic liquids e g vinegar lemon or descaling agents are spilt onto the hob frame since these cause dull spots If sugar or a pr...
Page 7: ...ppliances 1 Warning Before disposing of old appliances please make them inoper able so that they cannot be the source of danger To do this disconnect the appliance from the mains supply and re move the mains lead To protect the environment it is important that worn out appliances are disposed of in the correct manner The appliance must not be disposed of with household rubbish You can obtain infor...
Page 8: ...letely Control and function indicators Digital indicators or control lamp provide information about settings made functions activated as well as any residual heat of the corresponding cooking zone Safety cut out A safety cut out ensures that all cooking zones switch off automatically after a period of time if the setting has not been changed Keep warm setting 1 is the setting for keeping foods war...
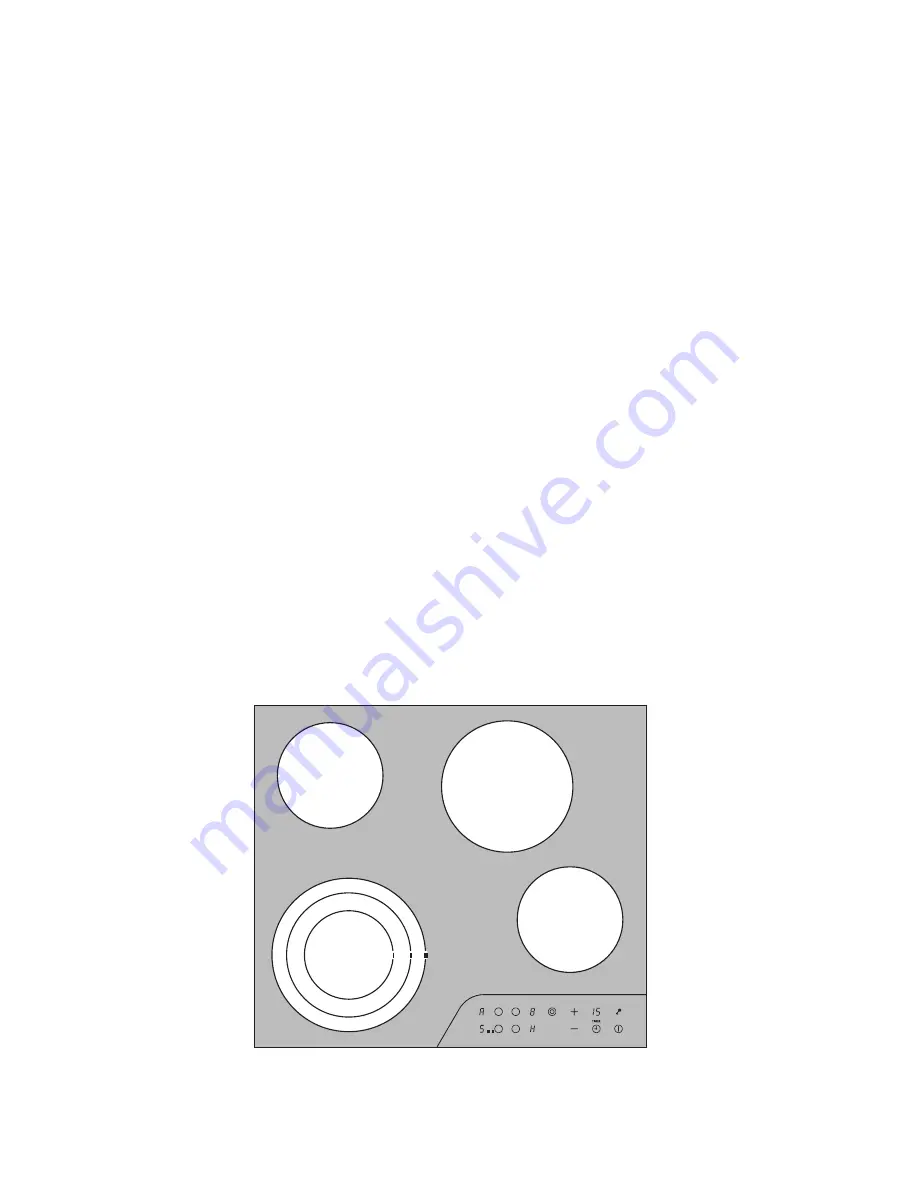
Page 9: ...2300W Single ring cooking zone 1200W Single ring cooking zone 1200W Control Panel Single ring cooking zone 1800W Cooking zone selection with displays for heat setting residual heat Booster button Mains button On Off Heat setting selector Lock Timer with control display Triple ring indicator ...
Page 10: ...Touch Control sensor field place your finger from above flat onto the required field until the appropriate displays come on or go out or the required function is carried out Switching On the Appliance The entire appliance is switched on using the On Off I sensor field Touch the On Off sensor field for approx 2 seconds The digital displays will show _ and the decimal point will flash 3 Once the On ...
Page 11: ...hed off any residual heat is shown with an h for Hot in the digital display for the appropriate cooking zones Cooking Zone Selection Zone Selection To select the required cooking zone touch the corresponding sensor field for approx one second A zero with a decimal point will light up in the appropriate cooking zone display window 0 3 The decimal point indicates that settings may only be made for t...
Page 12: ...d to increase the heat setting Lower the heat setting with sensor field 3 If several cooking zones are being used simultaneously the required cooking zone must be selected by touching the appropriate sensor field before adjusting the heat setting The decimal point in the display shows which cooking zone has been selected ...
Page 13: ...e each of the larger cooking rings can be switched on in turn in addition to the smallest cooking zone using the booster sen sor field on the control panel 3 These can only be activiated if the smaller ring is already switched on 1 Select the appropriate cooking zone 2 Set the required heat setting 3 Touch the booster sensor field ...
Page 14: ...ated 5 To switch off the outer heating rings touch the booster sensor field the corresponding outer heating ring is switched off Switching off a Cooking Zone 1 Select the required cooking zone with the cooking zone sensor fields 2 Touch sensor fields and simultaneously to switch off or turn sen sor field back to zero 3 A cooking zone may only be switched off when the decimal point is on in the coo...
Page 15: ...heat indicator only goes out when the cooking zone is cold 2 You can use the residual heat for melting and keeping food warm 1 Important As long as the residual heat indicator is illuminated there is a risk of burns 1 Important If the power supply is interrupted the h symbol will also go out and information about residual heat will no longer be available However it may still be possible to burn yo...
Page 16: ...ing The duration of the automatic warm up function depends on the heat setting selected Select the required cooking zone with the cooking zone sensor fields Touch sensor field until it reaches the required heat 1 to 8 The set heat setting will be displayed first After five seconds a automatic warm up function will replace the heat setting in the display At the end of the warm up time the heat sett...
Page 17: ...tic Warm up Function If you wish to use the cooking zone without automatic warm up select the required heat setting with the sensor field 1 Switch on the appliance and select the desired cooking zone using the cooking zone selection buttons 2 Touch sensor field to select the required heat setting from 9 to 1 3 You can adjust the heat setting at any time using the and but tons providing the cooking...
Page 18: ... a child safety feature 1 Touch the lock sensor field until the control indicator comes on 2 To release the lock touch the lock sensor field again continuously un til the control indicator goes out 3 Child safety feature If the hob is completely switched off using the On Off sensor field while the lock is on then the lock will still be ac tive when the hob is switched on again To reactivate the co...
Page 19: ...oking zone 00 will appear in the display 3 Using the or sensor fields set or adjust the required period of time until the zone is to switch off automatically eg 15 minutes After a few seconds the timer will start automatically and will show how much time remains before it will switch off In addition the Timer active display for the relevant cooking zone will light up At the end of the set cooking ...
Page 20: ...ensor field to activate the Timer function 3 Using the or sensor fields set the desired length of time for ex ample 20 minutes The Timer begins to run after a few seconds and indicates the time re maining When the set time has elapsed an audible signal is sounded 4 Touch the TIMER W sensor field to switch off the signal Ending the timer function prematurely There are two ways of switching off the ...
Page 21: ...n cold pan bases are normal ly bowed slightly inwards con cave They should never be bowed outwards convex If you wish to use special types of pan e g a pressure cooker sim mering pan wok etc please ob serve the manufacturer s instructions 2 Energy saving tips You can save valuable energy by observing the following points Always position pots and pans before switching on the cooking zone Dirty cook...
Page 22: ...e amounts of liquid cooking with pressure cookers very large quantities of soup stew with more than 2 litres of liquid General notes When cooking without the automatic warm up function we recom mend the use of a high heat setting to warm up the food using the button and then leave the dish to finish cooking at an appropriate lower heat setting Take special note of the results when you first use th...
Page 23: ...ction the warm up time can be selected as required Cooking Process Examples of Usage 9 Warming up Frying Deep fat frying Warming up large amounts of liquid boiling pasta browning meat browning goulash pot roast 8 4 5 Fast frying Steaks pieces of loin potato fritters fried sausages pancakes doughnuts 7 3 5 6 2 5 Frying Schnitzel cutlets liver fish rissoles fried eggs 5 8 5 Boiling Boiling up to 1 5...
Page 24: ...g a commercially available ceramic glass or stainless steel cleaner Light Soiling 1 Wipe the ceramic glass surface with a damp cloth and a little washing up liquid 2 Then rub dry with a clean cloth Remnants of cleaner must not be left on the surface 3 Thoroughly clean the entire ceramic glass cooking surface once a week with a commercially available ceramic glass or stainless steel cleaner 4 Then ...
Page 25: ...cooking zone on which some thing has melted has already cooled down warm it up again for cleaning Scratches or dark marks on the ceramic glass surface caused for exam ple by a pan base with sharp edges cannot be removed However they do not impair the function of the hob Hob Frame 1 Important Do not put vinegar lemon juice or scale removers on the hob frame otherwise dull spots will appear 1 Wipe t...
Page 26: ... intact or the circuit breaker at the household fuse box has tripped If the circuit breaker trips or the fuse blows several times please call an approved electrician the appliance has been properly switched on the control indicators in the control panel are on the correct cooking zone has been switched on the cooking zones are set to the desired heat setting for cooking the cooking zones have been...
Page 27: ...gh If the cooking zone is hot call the customer service a cooking zone cannot be switched off Check whether the touch fields are partially covered by a damp cloth or liquid the lock is activated a cooking zone cannot be switched on Check whether the lock is activated f is shown in the display Check whether the cooking zone has been overheated This indicator lights up to show overheating electronic...
Page 28: ...over any damage that may occur Technical Data Appliance dimensions Worktop cut out dimensions Cooking rings Width 572 mm Depth 502 mm Height 47 mm Width 560 mm Depth 490 mm Corner radius R5 Position Diameter Power Front left 120 175 210mm 800 1600 2300W Rear left 145mm 1200W Rear right 180mm 1800W Front right 145mm 1200W Connection voltage 230 V 50Hz Max total connection value 6 5kW ...
Page 29: ...6 44547 44548 relating to the operating features of electric cookers hobs ovens and grills for household use EN 55014 2 EN 55014 EN 61000 3 2 EN 61000 3 3 relating to basic requirements for electro magnetic compatibility protection EMC 5 This appliance complies with the following EU Directives 73 23 EWG dated 19 02 1973 Low Voltage Directive 89 336 EWG dated 03 05 1989 EMC Directive including Amen...
Page 30: ...tted underneath the hob The installation must guarantee shock protection The kitchen unit in which the appliance is fitted must satisfy the sta bility requirements of DIN 68930 For protection against moisture all cut surfaces are to be sealed with a suitable sealant On tiled work surfaces the joints in the area where the hob sits must be completely filled with grout On natural artificial stone or ...
Page 31: ...a higher grade must be used as the mains connecting cable The connection must be carried out as shown in the diagram The con necting links should be fitted according to the appropriate connection diagram The earth lead is connected to terminal E The earth lead must be longer than leads carrying electric current The cable connections must be made in accordance with regula tions and the terminal scr...
Page 32: ...64 ...
Page 33: ...Under what circumstances does the fault occur Prior to the telephone call it is im portant that you make a note of the following appliance code numbers that are given on the rating plate model description PNC code 9 digits S No code 8 digits We recommend that you record the code numbers here so that you al ways have them to hand When do you incur costs even during the warranty period if you could ...
Page 34: ...66 Montage Assembly ...
Page 35: ...67 ...
Page 36: ...ts such as refrigerators cookers washing machines vacuum cleaners chain saws and lawn mowers are sold each year to a value of approx USD 14 billion in more than 150 countries around the world Hier Typenschild aufkleben nur für Werk AEG Hausgeräte GmbH Postfach 1036 D 90327 Nürnberg http www aeg hausgeraete de Copyright by AEG 822 924 134 A 120203 01 Subject to change without notice Änderungen vorb...