background image

11 


Menus 

Menu Navigation 

Menus contain two types of lists; vertical list is the one you can see all items available and horizontal 
lists that only show the selected item’s options; mode or value. The other horizontal selections are 
hidden. Navigation is accomplished as follows: 

1.  Use the UP/DOWN arrow keys to select (highlight) the desired item in the vertical menu list 

2. 

Then use the left/right arrow keys to change the highlighted item’s current setting and scroll 
through the options. Some setting lists (horizontal menus) are as simple as ON or OFF options, 
others are longer lists like the Color Schemes with 16 colors to choose from for each item on the 
list. 

3.  Use the ENTER key as indicated to call a sub-menu of selections. Navigation in sub- menus 

works the same. 

4.  When selections are completed, use the ESC key to save and exit the menu. Sub- menus, if any, 

exit back to main menu and main menu exits back to measurement screen. 


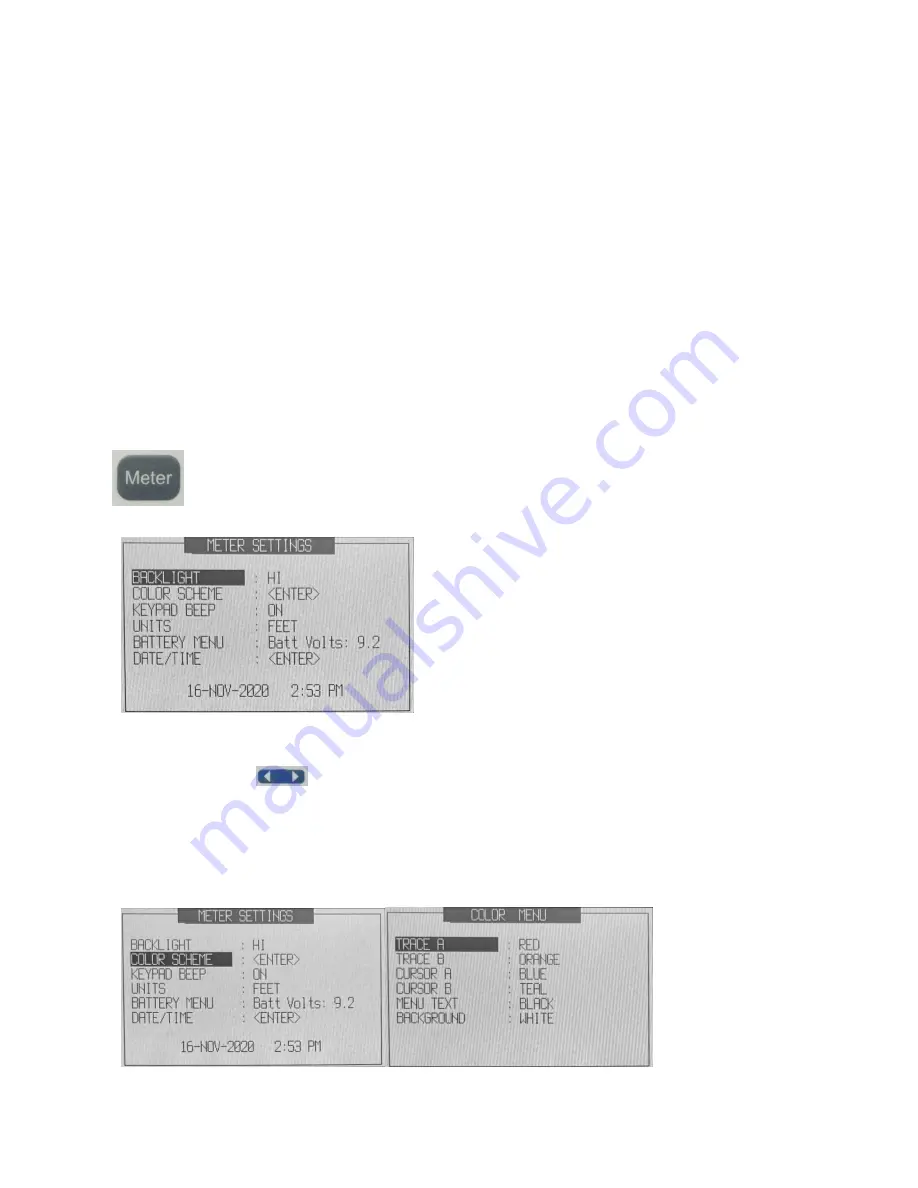
Meter Menu 

The Meter Menu provides for control of the instrument itself. It has direct action items that 
when highlighted and the left/right arrow key is pressed changes the current setting to the 
next item in the horizontal menu.  

The menu appears: 


Below is a list of items and their options: 

BACKLIGHT


LO, MED, HI  Press 

 to make a selection  

 (recommend MED for best light with less battery power consumption) 


COLOR SCHEME 

Selecting the 'COLOR SCHEME' menu item from the 'Meter' menu brings up this screen: 

COLOR SCHEME: Press ENTER to open sub-menu:  


Summary of Contents for Bravo MRI 3000

Page 1: ...Operation Manual Liberator Series Bravo MRI 3000 Analyzer Testing Made Simple _ Technology Inc...

Page 2: ...his document and all software or firmware designed by AEA Technology Inc is copyrighted and may not be copied or altered in any way without the written consent from AEA Technology Inc The AEA Logos ar...

Page 3: ...nd 5 feet 1 5 meter with a 3T Coil The MRI Analyzer when in its Belt Case is splash resistant and designed to work for relatively long periods in rain depending on intensity It is not designed to be i...

Page 4: ...of the semiconductor devices used in this instrument are susceptible to damage by static discharge Static charges are generated in numerous ways such as simple contact separation of materials and nor...

Page 5: ...ad menus and measurement screens 2 Provides user instructions in more detail than the Quick Start Guide including a section on Measurement Information and Helpful Tips 3 Provides specifications troubl...

Page 6: ...tion 1 General 1 Instrument Front Panel Layout 2 Screen Layouts 2 General 2 VNA Wide Format 2 VNA Narrow Format 4 SWR RL Wide Format 4 SWR RL Narrow Format 5 S21 Screen format 6 Keypad Operations 6 Po...

Page 7: ...ss Screen 18 CW Continuous Wave Screen 18 Cable Null Screens 18 Calibration Sequence Screens 19 MRI 3000 VNA Measurements 19 General Information 19 S11 VNA SCREEN 19 S21 VNA Screen Two Port Model only...

Page 8: ...nce and Troubleshooting Guides 37 Limited Warranty 37 Maintenance 37 Battery Replacement Instructions 37 Cleaning 38 Instrument Troubleshooting Guide 39 Factory Reset 39 Used to recover any program fa...

Page 9: ...cement for network analyzer applications that measure S11 4 Find resonant frequency and response curve 5 CW signal generator 6 Two plots may be simultaneously viewed on the same graph The MRI 3000 com...

Page 10: ...y plots on a chart This graph will display a different number of points depending on the width selected The sidebar section to the left of the chart numerically indicates measurements at center freque...

Page 11: ...ery sweep It should be noted that all of the above elements are common to both the VNA and SWR mode wide format screens As previously mentioned the MRI 3000 s screen is composed of the chart area and...

Page 12: ...tor for the value of Q for the circuit under test In VNA mode the Q factor is displayed only when narrow chart format is selected shown here and only if the impedance magnitude Z MAG is selected for e...

Page 13: ...eft scale displayed and selected by pressing the SWR RL key Due to there being only two graph possibilities SWR RL on this screen the top indicator will always display the SWR at center frequency the...

Page 14: ...ault settings There are two different power down sequences as described below the Power ON POWER ON Press the ON OFF key for one second A splash screen with AEA Technology s logo and Version informati...

Page 15: ...a saved setting or set desired settings Menu Keys These keys bring up the Meter Settings Options settings and Memory Operations menus respectively For details please refer to the Menus section on page...

Page 16: ...ted and measurements appear in graphic plots Continuous Wave mode stops the Sweep mode and only emits a continuous wave at the Center Frequency This changes the graphic plot to a list of tests showing...

Page 17: ...ly functions with one or both cursors enabled In SWR and RL pressing Auto Tune will cause the selected cursor to seek to the LOWEST point on the graph In VNA Mode the cursor will seek to the highest i...

Page 18: ...or setting CAUTION There is NO UNDELETE Once a test result or setup is erased it is permanently deleted The alpha numeric keypad operates like those on smaller cell phones Press a selected key once f...

Page 19: ...om for each item on the list 3 Use the ENTER key as indicated to call a sub menu of selections Navigation in sub menus works the same 4 When selections are completed use the ESC key to save and exit t...

Page 20: ...isible KEYPAD BEEP ON or OFF Press to make a selection UNITS FEET or METERS Press to make a selection BATTERY MENU Press ENTER to open sub menu Selecting the BATTERY MENU item from the Meter menu will...

Page 21: ...ESC to exit to Measurement Screen Mode Menu The Mode Key of the MRI 3000 will open the OPTIONS screen This allows you to change the various measurement options and settings for the instrument Use UP...

Page 22: ...on will initiate the broad banded calibration cycle This calibration is stored in the unit and is valid anywhere in the units operating range The Broadband calibration may be performed with or without...

Page 23: ...or C to be calculated correctly the user must specify which circuit model to use SYSTEM Z0 Allows the setting of the MRI 3000 s reference impedance Z0 to something other than 50 which is the default...

Page 24: ...cy Bandwidth Span Screens Frequency Specific Calibration Screens Calls a series of Prompt screens to attach the Open Short and Load Terminators followed by using ENTER to process calibration data for...

Page 25: ...enable the second CRSR B Cursors can be moved to the desired frequency via the LEFT RIGHT arrow key If both cursors are enabled pressing the CRSR key will toggle the cursor that is currently selected...

Page 26: ...ewing of any changes during DUT tuning being performed To exit press the Sweep CW key again to return to the previous testing mode and the swept measurements will resume Cable Null Screens SWR RLkeysw...

Page 27: ...f the measurement test results which may or may not be desired Calibration Sequence Screens Pressing ENTER after the Load is attached completes the calibration process for single port measurements and...

Page 28: ...Xs reactance With the desired parameter selected press SCALE to select the scale to best view the traces With the cursor enabled via the CRSR key the measurements at the cursor location are displayed...

Page 29: ...Remember if you do that same test lead and or adapter MUST be used with all measurements employing the Broadband Calibration Second make sure you have the correct terminators OPEN SHORT and LOAD with...

Page 30: ...the OPEN cal standard will yield the most consistent results 7 Press ENTER to continue 8 Second prompt will be to attach the SHORT Terminator 9 When attached press ENTER to continue 10 Last prompt wil...

Page 31: ...ips 1 When taking SWR measurements on a new system measure the components separately first and document each item s SWR Then measure the antenna system as a whole and document that measurement This wi...

Page 32: ...the usable frequency range clearly between the Cursors from low to high frequency SWR and Return Loss Measurement Steps SWR or Return Loss Measuring 1 Connect the test lead and any adapter if they ar...

Page 33: ...tinent user data downloads traces etc will be stored there Running MRI PC Vision Start the MRI PC Vision Application by either clicking on the icon on your desktop or by selecting it from the start me...

Page 34: ...this select COM Port Mgr Com Port from the dropdown menu at the top to open this dialog box Please Note You must ONLY change the COM port number DO NOT adjust any of the other settings Click on the dr...

Page 35: ...cle of the instrument AFTER you ve set the frequency range you want to test Please note that this menu is for compatibility with earlier versions the S11 Calibrate button will do the same thing Basic...

Page 36: ...tional OPEN standard to the MRI 3000 or attached cable and press the Ready button for step one The MRI PC Vision Program will assume control over the instrument and begin the calibration process When...

Page 37: ...29 if calibration has not already been completed you will be prompted to do so and the measured results of the UUT unit under test will be drawn on the graphs as shown here...

Page 38: ...ency scale along the bottom in MHz and the vertical scale control top left While the frequency scale is fixed it s determined by the frequency range you chose when you calibrated the instrument you ca...

Page 39: ...est viewing Smith Chart The Smith Chart display allows you to easily visualize the UUT s S Parameter characteristics Unlike the other displays in this application you move the cursors using the slide...

Page 40: ...ote that the cursor is at a point on the trace where the value in this case the SWR is at or below the limit line Note also that the limit line is GREEN If the cursor is at a place where the trace is...

Page 41: ...ming Your Chart Each chart displayed on the screen has a default header describing the measurement displayed The default heading for the SWR chart is SWR Plot for example Any chart can be renamed by s...

Page 42: ...up a file save dialog box Select the format to save your trace in give it a name and click SAVE It is advisable to save your traces as PCV format first You can later save individual charts in a standa...

Page 43: ...s in your instrument s file system The sys files belong to the system and should not be downloaded or deleted unless instructed to do so by support personnel The RTL SWR and VNA files are Return Loss...

Page 44: ...nstrument From the file management window shown earlier select the file s you wish to delete and click Delete CAUTION there is no UNDELETE function all saved test results and setups deletes are perman...

Page 45: ...the instrument other than the battery compartment as this can void the warranty If the instrument is not performing or charging correctly refer to Troubleshooting Guides at the end of this section or...

Page 46: ...t see recommended cleaners listed below sprayed on the cloth first Rinse with a clean soft damp cloth moistened in water only Do NOT spray detergents or water directly on the instrument Avoid using so...

Page 47: ...ructions Instrument will not turn off Firmware has faulted Power down with 10 second hold of ON OFF key This will load PRIOR good settings NOT current settings See page 5 for more help and Soft Reset...

Page 48: ...olution 1 Total Z Range 0 to 2K Resolution 1 Z Angle Range 180 Resolution 1 General Power requirement 12 18 VDC 650 mA min or 8 AA Batteries AC Adapter Included 110 240 VAC 50 60Hz 0 4A Output 15 VDC...

Page 49: ...i B 0070 1208 USB extension cord 15 ft 0070 1210 Belt Case 5001 1002 CD includes Operating Manual Training PPT and MRI PC Vision software 6055 1220 Optional Accessories Part Number N to SMA Adapters a...

Page 50: ...42 User s Notes...

Page 51: ...43 5933 Sea Lion Place Suite 112 Carlsbad California 92010 Tel 1 800 258 7805 or 1 760 931 8979 Fax 1 760 931 8969 www aeatechnology com...

Reviews: