background image

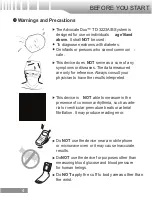
 Warnings and Precautions

 The Advocate Duo™ TD-3223A/B System is

designed for use on individuals 

age16and 

above

. It shall 

NOT

 be used:


To diagnose newborns with diabetes.

 On infants or persons who cannot communi -

cate.

 This device does 

NOT

 serve as a cure of any 

symptoms or diseases. The data measured 
are only for reference. Always consult your 
physician to have the results interpreted.

 This device is 

NOT

 able to measure in the 

presence of common arrhythmia, such as arte-
rial or ventricular premature beats or arterial 
fibrillation. It may produce reading error.

 Do 

NOT

 use the device near a mobile phone 

or microwave oven or it may cause inaccurate 
results.

 Do 

NOT

 use the device for purposes other than 

measuring blood glucose and blood pressure 
for human beings.

BEFORE YOU START


4

Do 

NOT

 apply the cuff to body areas other than 

the wrist.

Summary of Contents for Duo TD-3223 A

Page 1: ......

Page 2: ...that you must know about your system Please read it carefully and keep it for future reference 47 3223A 001 Version 1 0 2006 11 14 For other questions regarding this system please contact Diabetic Sup...

Page 3: ...handicapped persons or invalids 2 Use the device only for the intended use described in this manual 3 Do not use strips and control solutions which are not supplied by the manufacturer 4 Do not use th...

Page 4: ...and Key Function of the Monitor 11 LCD Display 12 Appearance of the Test Strip 13 PREPARATIONS BEFORE USE 14 Battery Installation and Replacement 14 Setting the Monitor 16 BLOOD GLUCOSE MEASUREMENT 18...

Page 5: ...t 35 MONITOR MEMORY 36 Viewing Results on the Monitor 36 Viewing Results on a Personal Computer 38 TAKE CARE OF YOUR MONITOR STRIP 39 Cleaning 39 Storage 39 PROBLEM SOLVING GUIDE 42 Error Message 43 P...

Page 6: ...e Always consult your physician to have the results interpreted This device is NOT able to measure in the presence of common arrhythmia such as arte rial or ventricular premature beats or arterial fib...

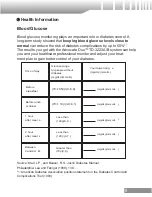
Page 7: ...ain better control of your diabetes Source Krall L P and Beaser R S Joslin Diabetes Manual Philadelphia Lea and Febiger 1989 138 1 American Diabetes Association position statement on the Diabetes Cont...

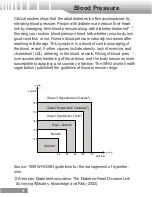
Page 8: ...ude obesity lack of exercise and cholesterol LDL adhering to the blood vessels Rising of blood pres sure accelerates hardening of the arteries and the body becomes more susceptible to apoplexy and cor...

Page 9: ...s The greatest feature of this system is itsspeaking function with a talk ing symbol on the monitor which is an acoustic aid for users espe cially with visual disability Please note that this function...

Page 10: ...ther than fingertips to check their blood glucose levels This system pro vides you to test on the palm the forearm the upper arm the calf or the thigh with the equivalent results to fingertip testing...

Page 11: ...en to use AST Food medication illness stress and exercise can affect blood glucose levels Capillary blood at fingertip reflects these changes faster than capillary blood at other sites Therefore when...

Page 12: ...ccurate blood glucose test results Use only Advocate Duo TD 3223 test strips and Advocate control solution with your Advocate Duo TD 3223A B Monitor NOTE Check your system to be sure that it is unopen...

Page 13: ...wer button for blood pressure measurement Position Symbol reminds you to put the device at the same level as your heart when measuring blood pressure Code Button is for code selection when calibrating...

Page 14: ...e Symbol Test Strip Symbol Test Result Error Message Good Symbol Day Average Result Systolic Pressure Pulse Rate Units for Blood Glucose Battery Symbol Units for Blood Pressure Result Indicators Diast...

Page 15: ...bsorbent hole of the strip Absorbent Hole Apply a drop of blood here the blood will be sucked automatically The minimum required blood volume is 0 7 microliter See pages 25 28 Testing Your Blood Gluco...

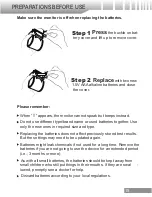
Page 16: ...s getting low the monitor will remind you by displaying two different messages 1 Battery Symbol appears with your test result This means it is about time to change the batteries al though still 30 mor...

Page 17: ...in required size and type Replacing the batteries does not affect previously stored test results But the settings may need to be updated again Batteries might leak chemicals if not used for a long ti...

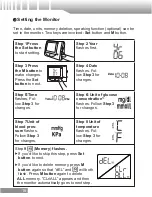
Page 18: ...r Two keys are involved Set button and M button Step 2 Year flashes first Step 4 Date flashes Fol low Step3 for changes Step 6 Unit of glucose concentration 3 flashes Follow Step 3 for changes Step 8...

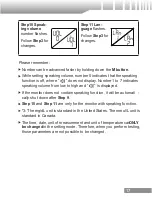
Page 19: ...to 7 indicates speaking volume from low to high and is displayed If the monitor does not contain speaking function it will be automati cally shut down after Step 9 Step 10 and Step 11 are only for th...

Page 20: ...ood glucose or pressure level AND you have followed all instructions described in the owner s manual contact your healthcare professional Possible Interferences 1 Severe dehydration and excessive wate...

Page 21: ...he codes are identical so the test results will be accurate Selecting code when the monitor is off Step 1Directly press the Code but ton Code and SEL appear first Next a flashing code number shows Ste...

Page 22: ...se lect code number while the number is flashing Step 3 Press the M button to set the code or wait 5 seconds for auto save Then blood drop symbol flashes You can apply test sample now It is important...

Page 23: ...using control solution When you can do three tests in a row that are within the expected range you are ready to test your blood To routinely check the monitor and test strips perform a single test fo...

Page 24: ...off the dispenser tip to ensure a good sample and an accurate result Use only for 90 days after first opening Record the discard date date opened plus 90 days on the control solution vial Discard afte...

Page 25: ...blood drop symbol flashes press the M button and then CTL appears on the display With the CTL sign on the display the monitor will NOT store your test result in memory Contact bars must be inserted a...

Page 26: ...o not directly apply the control solution into the test strip Step 5 Read and Compare the Re sult Compare the result with the range printed on the test strip vial The result should fall within this ra...

Page 27: ...until it is snug but not too tight Ad just depth of penetration 1 2 for soft or thin skin 3 for average skin 4 5 for thick or calloused skin For AST use clear cap instead of lancing device cap to get...

Page 28: ...shown below The code number and flashing will be kept for 3 minutes until the drop of blood is applied Be sure the code number on the dis play matches the code number on the test strip vial If the cod...

Page 29: ...sting to obtain blood After penetration gently massage the punctured area to obtain blood But pay attention NOT to smear the blood sample It is recommended to discard the first drop of blood with a cl...

Page 30: ...automatically stored in the monitor memory Turn the monitor off by re moving the test strip Discard the used test strip carefully to avoid contamina tion Step 6 Discard lancet Remove the lancing devic...

Page 31: ...mg dL 3 9 to 6 6 mmol L Lo or low symbol indicates hypoglycemia low blood glucose You should immediately treat hypoglycemia as recommended by your health care professional flashes when your result is...

Page 32: ...is work ing properly It is best to fast for at least eight hours before doing comparison tests Take your monitor with you to the lab While at the lab Make sure that the samples for both tests the moni...

Page 33: ...k of Clinical Chemistry Philadelphia W B Saunders Company 1994 959 Therefore it is best to fast for eight hours before doing comparison tests Factors such as the amount of red blood cells in the blood...

Page 34: ...reference 7 Blood pressure varies from two hands naturally Always measure your blood pressure on the same wrist Correct Application of the Pressure Cuff Slide the cuff onto your wrist Wrap the cuff co...

Page 35: ...g your left elbow with your right hand helps you hold still during measurement Remain still and do not talk or move during the measure ment Step 4 Measurement is in prog ress After power on all symbol...

Page 36: ...tes Please remember It is extremely important that you put the device at the same level of the heart If the device is put relatively lower higher than the heart your measurement will be higher lower t...

Page 37: ...systolic pressure between 100 and 140 mmHg diastolic pressure between 70 and 90 mmHg and the abnormal result both flash when your result is below reference range systolic pressure less than 100 mmHg...

Page 38: ...Recall the Stored Test Results Step 1 When the monitor is off press and release the M button 01 appears first followed by the latest result of blood glucose blood pressure along with date and time Ste...

Page 39: ...r The average was calculated from the test results of thelast 7 days 14 glucose tests have been performed in the last 7 days Memory Symbol Interpretation The average of 14 glucose tests performed in t...

Page 40: ...te s website www dsosi com Step2 Connect to Personal Computer Connect the interface cable to a serial port on the back of your computer With the monitor turned off connect the Interface Cable to the D...

Page 41: ...ff 3 The cuff can be cleaned by wiping with a moistened cloth and soap Do not immerse in water Storage 1 Monitor Storage Storage condition 20 C 50 C below 95 relative humidity Always store or transpor...

Page 42: ...and dry place Keep away from direct sun light and heat After removing a test strip from the vial immediately replace the vial cap and close it tightly Touch the test strip with clean and dry hands Use...

Page 43: ...trip may be a choking hazard If swallowed prompt ly see a doctor for help 3 Control solution storage Storage condition Store the control so lution tightly closed at temperatures be low 30 C 86 F Do NO...

Page 44: ...ult without pro ducing an error message or a symbol In the event of a problem refer to the information under TROUBLESHOOTING PROBLEM SOLVING GUIDE 42 Never try to disassemble the monitor in any circum...

Page 45: ...ove system operation range 40 C Unable to detect diastolic pressure Cuff pressure is not enough Blood glucose value is under measurement range 20mg dL Blood glucose value is over measurement range 600...

Page 46: ...tly installed Test strip inserted upside down or not completely inserted Insert the test strip correctly with the contact bars end first and facing up POSSIBLE CAUSE WHAT TO DO The strip is still insi...

Page 47: ...nd repeat the test again Control solution that is to warm or too cold Test strip deterioration and test strips should come to room before testing Repeat the test with a new test strip Monitor malfunct...

Page 48: ...OOTING POSSIBLE CAUSE WHAT TO DO Moving during measurement Measuring right after exercise Repeat measurement Rest at least 30 minutes before measurement POSSIBLE CAUSE WHAT TO DO May be not in correct...

Page 49: ...orage condition 4 C to 40 C 39 F to 104 F below 85 R H KETONE warning glucose value over 240 mg dL Measurement unit mg dL or mmol L Linear range 20 600 mg dL 1 1 33 3 mmol L Precision 5 CV Accuracy 15...

Page 50: ...In vitro diagnostic medical device Consult instructions for use Keep away from sunlight Keep dr y Temperature limitatio n Use by Date of manufacture Batch code Manufacture r Serial number Caution con...

Page 51: ...tell you when and what the monitor speaks Blood Glucose Measurement Welcome music Thank you for using this product Please relax during measurement The room temperature is 27 6 degree Celsius The code...

Page 52: ...lax during measurement The device is in inflation The device is in deflation with flashing symbol The systolic blood pressure is 146 millimeters of mercury The diastolic blood pressure is 82 millimete...

Page 53: ...temperature below 86F 30C Keep out of direct sunlight and humidity Warranty The Advocate Duo is warranted to be free of defects in material and workmanship for the period of one 1 year from the date...

Reviews: