background image

27

Chapter 4  

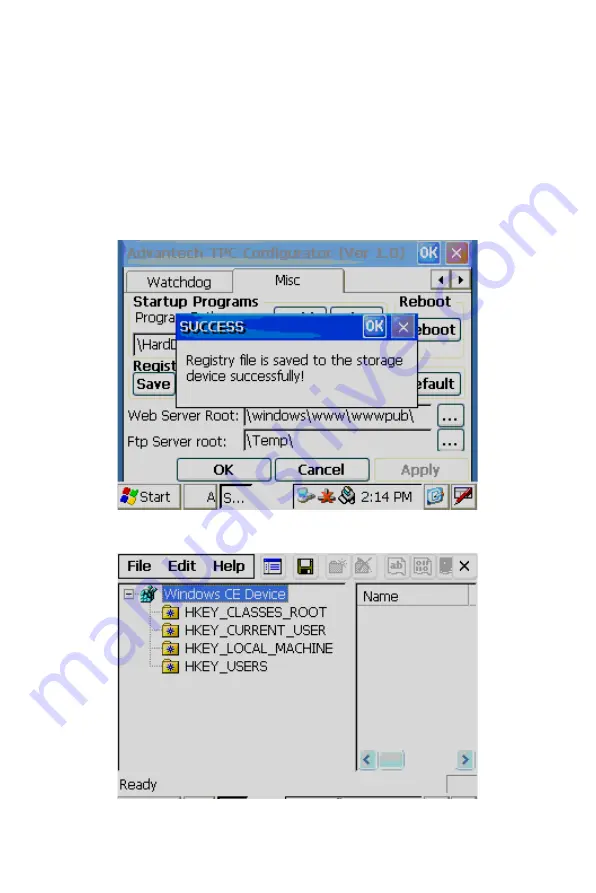
Registry: You can click the “Save” button to save the registry to a solid 
state disk, and click the “View” button to view, edit, create, or delete reg-
istry information. You also can backup or restore the registry setting by 
clicking the backup or restore button.

Figure 4.10: Registry Saving Success

Figure 4.11: Registry Editor

Note 

It is not allowed to backup and restore over
different image versions.

Summary of Contents for TPC-60S

Page 1: ...TPC 61S Series ARM9 Touch Panel Computers with 5 7 QVGA STN LCD Dis play User Manual...

Page 2: ...ission of Advantech Co Ltd Information provided in this manual is intended to be accurate and reli able However Advantech Co Ltd assumes no responsibility for its use nor for any infringements of the...

Page 3: ...acement materials service time and freight Please consult your dealer for more details If you think you have a defective product follow these steps 1 Collect all the information about the problem enco...

Page 4: ...the following measures Reorient or relocate the receiving antenna Increase the separation between the eauipment and receiver Conncect the dealer or an experienced radio TV technician for help This Tr...

Page 5: ...t does not work well or you cannot get it to work according to the user s manual e The equipment has been dropped and damaged f The equipment has obvious signs of breakage 14 Do not leave this equipme...

Page 6: ...ese ffnungen nicht abgedeckt werden 8 Beachten Sie beim AnschluB an das Stromnetz die AnschluBw erte 9 Verlegen Sie die NetzanschluBleitung so daB niemand dar ber fallen kann 10 Es sollte auch nichts...

Page 7: ...scription of your peripheral attachments Description of your software operating system version appli cation software etc A complete description of the problem The exact wording of any error messages P...

Page 8: ...TPC 60S Series User Manual viii...

Page 9: ...Figure 2 2 Power Connector and Power Lines 10 Figure 2 3 Pin Assignment on the Power Receptor 11 Figure 2 4 Plug Power Line to System Pw Receptor 11 Figure 2 5 Turn on the System 12 Chapter 3 System T...

Page 10: ...2 Networking 34 4 2 1 Network via Ethernet 34 Figure 4 19 Network and Dial up Connections 34 Figure 4 20 Selected Connection 35 Figure 4 21 Setting IP Address 35 Figure 4 22 Setting Name Servers 36 F...

Page 11: ...2 Appendix A Watchdog Timer Programming 54 A 1 DeviceIOControl 54 A 2 How to Use the Control Code 56 A 2 1 IOCTL _WDT_ENABLE 56 A 2 2 IOCTL _WDT_DISABLE 56 A 2 3 IOCTL_WDT_STROBE 56 A 2 4 IOCTL_WDT_GE...

Page 12: ...TPC 60S Series User Manual xii...

Page 13: ...This chapter gives background infor mation for the TPC 60S series Sections include Introduction Specifications LCD Specifications Touchscreen Specifications Power I O Port Arrangement Mounting Explode...

Page 14: ...ith other devices The I O interface includes serial ports RS 485 port Ethernet and USB Windows CE Support Advantech offers platform support for Windows CE The optional Windows CE operating system spec...

Page 15: ...card installed the system will automati cally boot from the on board NAND Flash CompactFlash card only the system will boot from CompactFlash card 1 2 4 Safety and Environment Safety FCC Class B CE an...

Page 16: ...mperature J 0 50 Ambient Control Contrast Adjustable Backlight 1 CCFL Backlight MTBF 40 000 hours Touch Type Resistive Base Glass Construction Tempered Glass Resolution Continuous Light Transmission 7...

Page 17: ...an open circuit if input level exceeds 33 VDC Maximum Current 2 A 1 6 I O Ports Arrangement TPC 60S panel computers provide 3 serial ports 1 Ethernet LAN port and 2 USB ports The arrangement of the I...

Page 18: ...opening 1 Install the panel computer into the panel opening 2 Find the eight clampers and eight long screws in the accessory pack Hook these clampers to the holes around the four sides of the bezel I...

Page 19: ...7 Chapter1 1 8 Exploded Diagram Figure 1 3 Assembly Exploded...

Page 20: ...TPC 60S Series User Manual 8 1 9 Dimensions and Cutout Weight 0 8 Kg Dimensions WxHxD 195 x 148 x 44 5 mm Cutout 188 x 141 mm suggested Figure 1 4 Dimensions and Cutout...

Page 21: ...2 CHAPTER 2 System Setup This chapter provides a brief explana tion for operating the TPC 60S...

Page 22: ...below 1 Open the package Please check the packing list at the beginning of this manual to make sure every item is there Figure 2 1 Unpack the Package 2 Connect the power connector to the 24 VDC power...

Page 23: ...wer Receptor 3 Plug the power lines into the system power receptor Figure 2 4 Plug the Power Line to the System Power Receptor Warning The system may be damaged when the power is turned on if the powe...

Page 24: ...TPC 60S Series User Manual 12 4 Turn on the System Figure 2 5 Turn on the System 5 Calibrate the touchscreen The detailed procedure is described in section 3 2...

Page 25: ...2 CHAPTER 3 System Tuning Sections include LCD Contrast Tuning Touchscreen Calibration Buzzer Setting...

Page 26: ...backlight can be automatically turned off when the device is no longer used to lengthen the device life Please go to Start Setting Control Panel Display as shown in the Figure below Figure 3 1 Displa...

Page 27: ...contrast or the button to decrease the LCD brightness or contrast You can also click the slider hold it and move it to the designed value and then release the button Figure 3 3 Advanced Backlight Util...

Page 28: ...ouble tapping in Windows CE Calibration is for users to calibrate the touch screen Figure 3 5 Stylus Properties Please press Calibration and then click Recalibrate to calibrate the touch screen as sho...

Page 29: ...n enables a beep when users use the touch screen To enable disable this functionality open Start Setting Control Panel Volume Sounds as shown in Figure 3 7 Figure 3 7 Volume Sounds Settting 1 As shown...

Page 30: ...Users can change the frequency of sounds by opening Start Setting Control Panel Buzzer Setting as shown in the figure 3 9 Figure 3 9 Buzzer Setting 1 Set the frequency of sounds as shown in Figure 3 1...

Page 31: ...2 CHAPTER 4 Windows CE NET 4 2 Sections include TPC Utilities Networking Application Program Development...

Page 32: ...it also reduces start up time In the field of industrial automation or for operator interface terminals this is an appealing feature because the impact of downtime is minimized Furthermore the small s...

Page 33: ...built into the standard Windows CE NET OS Upon boot up a small keyboard icon will appear on the status bar Tap this icon with the stylus to activate hide this Soft keyboard Figure 4 2 Soft Keyboard 4...

Page 34: ...e This page displays the basic system information There are two main parts system and memory The system shows the OS image version and CPU type The second part includes total capacity usage and curren...

Page 35: ...t IP and retrieve the new IP through the provided but ton Renew Use the Ping button to ping a specified IP address if you wish to test the connection Figure 4 5 Network You can get more detailed IP in...

Page 36: ...timer is the period that the watchdog will wait for a response Figure 4 7 WatchDog Setting Only when you select a time span and enable the watchdog will the response time be effective When the watchdo...

Page 37: ...e programs listed in the combo box will be automatically executed after the system has successfully booted Click the Add button to insert a file to the startup If you would like to remove the file fro...

Page 38: ...licking the Reboot button Once this button is clicked the dialog below will be dis played Figure 4 9 Reboot Machine There are two additional ways to reboot the system clicking a small machine icon on...

Page 39: ...k the View button to view edit create or delete reg istry information You also can backup or restore the registry setting by clicking the backup or restore button Figure 4 10 Registry Saving Success F...

Page 40: ...eful tools in the Advantech program Please go to Start Programs Advantech to run the tools as shown in Figure 4 12 The tools include ActiveSync Registry Editor Registry Saver Remote Display Applicatio...

Page 41: ...e Remote Display Application Remote Display Application displays a Windows CE device screen on a remote desktop It works with the Windows CE Remote Display Host application Because the connection is t...

Page 42: ...n you must run Remote Display Application on the panel com puter as shown in Figure 4 14 Click the Connect button and key in the host name or IP address as shown in the Figure 4 15 Figure 4 14 Remote...

Page 43: ...see the display of the panel computer and control it from the host machine as shown in Figure 4 16 Figure 4 16 Remote Display Host Application with the display of TPC 60S TPC CE Notepad TPC CE Notepad...

Page 44: ...rated utility to configure the basic settings of the panel computer Please refer to section 4 1 2 TPC Version Information TPC Version Information shows the version information of the operation system...

Page 45: ...e any parameters the default fre quency is 350 Hz and default duration is 30 ms Contrast exe Level Sets the contrast of the display The parameter is from 1 to 10 RegSave exe s Saves registry settings...

Page 46: ...ly The procedure is listed below step by step 1 Press Start in the task bar of Windows and select Setting Net working and Dial up connections Figure 4 19 Network and Dial up Connections Note Please ma...

Page 47: ...ailable connections will pop up Double click the icon that has the connection you want to configure For example double click DM9CE1 icon to configure Figure 4 20 Selected Connection 3 Select the IP Ad...

Page 48: ...Name Server tab Figure 4 22 Setting Name Servers 5 Press Start in of task bar of Windows and select Run Execute regsave to save the registry settings to a storage card Figure 4 23 Save Registry Note...

Page 49: ...C software development kit for eVC Install Microsoft ActiveSync Connect the host computer and TPC with a null modem cable included in the package Make sure the connection is solid on both RS 232 Seria...

Page 50: ...select the COM port serial 1 or serial 2 In this example we use COM1 of TPC to connect with COM1 of the host Figure 4 25 PC Connection Properties Please check the combox and select your desired COM po...

Page 51: ...39 Chapter4 Press the enter symbol from the keyboard to confirm the change Figure 4 27 Change Connection You can find the change is active The connection is via serial1 COM1 Figure 4 28 COM1 Set...

Page 52: ...Manual 40 Setting the Communication Environment of the Host Double click the icon ActiveSync on your host computer Figure 4 29 Microsoft ActiveSync Select File Connection Settings Figure 4 30 Select...

Page 53: ...41 Chapter4 Configure the connection setting Figure 4 31 Configure Connection Setting...

Page 54: ...es User Manual 42 A window will pop up after you press Get Connected Figure 4 32 Get Connected Please run repllog exe on the TPC Figure 4 33 Run Repllog exe on the TPC Press the Next button on your ho...

Page 55: ...below on the host computer once the TPC and the host PC are connected Select No and then press Next Figure 4 35 Connection on the Host PC Select Explore in the Microsoft ActiveSync window the window M...

Page 56: ...host computer must install the Microsoft ActiveSync service offered by Microsoft Then use the USB client to USB host cable and connect the USB client port of the panel computer and the USB host port o...

Page 57: ...y for Windows 2000 Server CD ROM drive VGA or higher resolution monitor A Super VGA 800 x 600 or larger monitor is recommended Mouse or compatible pointing device 200 MB hard disk space Note If you ch...

Page 58: ...es This version features new capabilities such as C exception handling Run Time Type Information RTTI and a plethora of new debugger functionalities Before you begin to develop your application you mu...

Page 59: ...he left side of the window and enter the new project name location in the right side of the window Figure 4 37 Starting a New Project Select ADVTPC in the main window of embedded Visual C Figure 4 38...

Page 60: ...s User Manual 48 After you complete the configuration procedure you can start to develop your application Press Build to compile your program to a exe file and download it to TPC Figure 4 39 Compiling...

Page 61: ...nfrastructure mode is used as an example in this section Windows CE NET on TPC 61S provides a wireless LAN utility for users to configure the PCMCIA wireless card to connect to a wireless LAN network...

Page 62: ...TPC 60S Series User Manual 50 Figure 4 41 Select a Network Wireless Properties Users can configure the items as figure 4 42 to link to the wireless LAN network Figure 4 42 Wireless Properties...

Page 63: ...ients associating to the same access point must have the same SSID Ad Hoc mode Please tick the box if users do not link to the network via the access point Encryption Wireless LAN utility provides WEP...

Page 64: ...TPC 60S Series User Manual 52 After the configuration matches the selected network the connection to the wireless LAN network should be successful Figure 4 44 Successful Connection...

Page 65: ...2 APPENDIX A Watchdog Timer Programming...

Page 66: ...perform the specified operation BOOL DeviceIoControl HANDLE hDevice DWORD dwIoControlCode LPVOID lpInBuffer DWORD nInBufferSize LPVOID lpOutBuffer DWORD nOutBufferSize LPDWORD lpBytesReturned LPOVERL...

Page 67: ...does not produce output data nOutBufferSize in Size in bytes of the buffer pointed to by lpOutBuffer lpBytesReturned out Long pointer to a variable that receives the size in bytes of the data stored...

Page 68: ...rSize unused lpOutBuffer unused nOutBufferSize unused A 2 2 IOCTL _WDT_DISABLE Disables the Watchdog time on your application lpInBuffer unsed nInBufferSize unused lpOutBuffer unused nOutBufferSize un...

Page 69: ...ts the Watchdog time setting lpInBuffer The DWORD pointer to your Watchdog time setting The Watchdog time setting is just a number 0 means 2 seconds 1 means 5 seconds 2 means 10 seconds 3 means 15 sec...

Page 70: ...T_CODE 0x905 For compatibility reasons you can define IOCTL as below define IOCTL_WDT_ENABLE 0x1001 define IOCTL_WDT_DISABLE 0x1002 define IOCTL_WDT_STROBE 0x1003 define IOCTL_WDT_GETTIMEOUT 0x1004 de...

Page 71: ...WDT_SET_TIMEOUT nIndex sizeof nIndex NULL 0 dwTemp NULL Enable the Watchdog timer DeviceIoControl m_hWDT IOCTL_WDT_ENABLE NULL 0 NULL 0 dwTemp NULL While 1 do your job here Sleep 8000 DeviceIoControl...

Page 72: ...TPC 60S Series User Manual 60...

Page 73: ...2 APPENDIX B Fuse Specifications...

Page 74: ...Fuse Replacement Step 1 Remove the fuse cover Step 2 Replace the damaged fuse with a new one Step 3 Replace the fuse cover Figure B 1 Fuse Replacement Note The fuse is set to break if the input volta...

Page 75: ...2 APPENDIX C Pin Assignments...

Page 76: ...RS 232 Pin Assignment C 2 RS 485 Pin Assignment C 3 COM Port Setting TPC 60S panel computers provide three COM ports RS 232 COM1 and COM2 4 wire RS 232 COM3 and RS 485 COM4 COM3 and COM4 share the sam...

Reviews: