background image

21 PPC-3150SW/3180SW/324W-PN4 User Manual

C

ha

pte

r 2
Sy

ste

m

 In

sta

lla

tio

n a

nd

 S

etu

p

2.

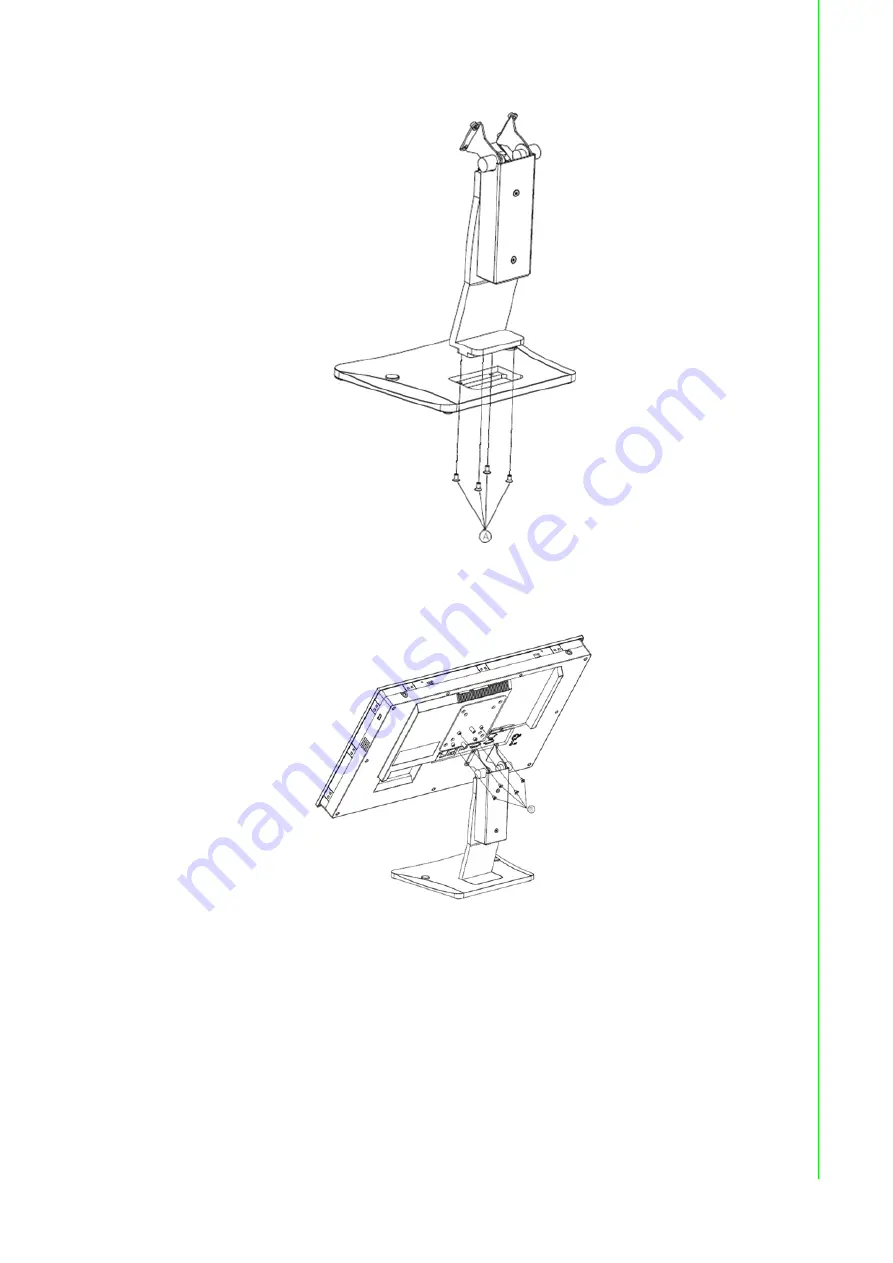
Use four M4 x 8L screws to secure the base plate to the mount stand.            

Figure 2.14 Securing the VESA Mount Base

3.

Use four M4 x 6L screws to secure the mount stand to the VESA mount bracket. 

Figure 2.15 Securing the VESA Mount Bracket

Summary of Contents for PPC-3150SW

Page 1: ...User Manual PPC 3150SW PPC 3180SW PPC 324W PN4 15 6 18 5 23 8 Panel PC with TFT LCD and Intel Pentium N4200 Processor...

Page 2: ...ntech assumes no liability under the terms of this warranty as a consequence of such events Because of Advantech s high quality control standards and rigorous testing most customers never need to use...

Page 3: ...pliant industrial enclosure products Technical Support and Assistance 1 Visit the Advantech website at http support advantech com to obtain the latest product information 2 Contact your distributor sa...

Page 4: ...vrez pas les ouvertures 8 Ensure that the voltage of the power source is correct before connecting the equipment to a power outlet The power outlet socket should have grounded connection Assurez vous...

Page 5: ...tion does not exceed 70 dB A Conform ment aux sp cifications de l IEC 704 1 1982 le niveau de pression acoustique la position de l op rateur ne d passe pas 70 dB A 18 The products are intended to be s...

Page 6: ...PPC 3150SW 3180SW 324W PN4 User Manual vi ATTENTION Ce produit n est pas un jouet et devrait tre gard hors de la port e des enfants...

Page 7: ...ther cards while the equipment is powered on Disconnect power before making any configuration changes The sudden rush of power as you connect a jumper or install a card may damage sensitive elec troni...

Page 8: ...PPC 3150SW 3180SW 324W PN4 User Manual viii...

Page 9: ...tallation 13 2 3 System Mounting 15 2 3 1 Wall Mounting 15 Figure 2 4 Wall Mount Plate 15 Figure 2 5 Rear Panel Screw Locations 16 Figure 2 6 Wall Mounting 16 Figure 2 7 Securing the Panel PC 17 2 3 2...

Page 10: ...Setup Program 30 4 2 1 Entering the BIOS Utility 30 4 2 2 LCD Brightness Settings 31 4 2 3 COM2 Mode Selection RS 232 422 485 33 4 2 4 OS Selection 35 4 2 5 BIOS AT ATX Setup 36 4 2 6 Wake on LAN 38...

Page 11: ...Chapter 1 1 General Information Introduction Specifications Dimensions...

Page 12: ...trial applications 1 2 Key Features 15 6 18 5 23 8 true flat WXGA TFT LCD with projected capacitive touch con trol Fanless design with low power consumption 1 x internal 2 5 SATA HDD and 1 x mSATA Con...

Page 13: ...ral Information 1 4 Rear Panel The PPC 3150SW 3180SW 324W PN4 rear panel features four VESA mount holes 75 x 75 mm as shown in Figure 1 2 Figure 1 2 Rear Panel VESA Screw Specifications Screw Type M4...

Page 14: ...PC 3150SW PN4A Dimensions Figure 1 4 PPC 3180SW PN4A Dimensions Figure 1 5 PPC 324W PN40A Dimensions Cutout dimensions 413 x 262 mm 410 96 75 00 75 00 260 26 269 419 70 58 60 30 60 Cutout dimensions 4...

Page 15: ...1000 Mbps Ethernet Intel I211 AT I O 2 x Serial ports 1 x RS 232 and 1 x RS 232 422 485 2 x USB 2 0 2 x USB 3 0 1 x Line Out 1 x HDMI Expansion 1 x Mini PCIe Speaker 2 x 1 W Operating System Microsof...

Page 16: ...PPC 3150SW PN4A PPC 3180SW PN4A PPC 324W PN40A Intel Pentium APL N4200 Fanless 15 6 18 5 23 8 panel PC 96PSA A90W19OT 3 Power adapter 100 240 VDC 90 W 19V with PFC PPC WLAN C1E Wi Fi module with ante...

Page 17: ...Chapter 2 2 System Installation and Setup Quick System Tour Memory Card Installation HDD Installation mSATA Installation Wireless LAN Card Installation System Mounting...

Page 18: ...e a moment to identify the locations of the device controls drives connectors and ports as shown in Figure 2 3 When placed upright the PPC 3150SW 3180SW 324W PN4 front panel should appear as shown in...

Page 19: ...tion Procedures The system installation procedures should be conducted in the following order 1 Install a SATA HDD or mSATA storage 2 Install a memory card 3 Install a wireless LAN module 4 Mount the...

Page 20: ...er Manual 10 2 Loosen and remove the 4 retention screws on the HDD bracket Remove the HDD bracket 3 Install a SATA HDD and affix in place using 4 retention screws 4 Close the HDD cover and affix in pl...

Page 21: ...nual Chapter 2 System Installation and Setup 5 Connect the SATA cable to the motherboard 2 2 2 mSATA Installation 1 Insert an mSATA card into the mSATA socket Secure the mSATA module using 2 retention...

Page 22: ...324W PN4 User Manual 12 2 2 3 Memory Card Installation 1 Insert the memory card into the slot highlighted by the red box in the image below Then install the memory and CPU thermal pads provided in th...

Page 23: ...e Card Installation Insert the full size mini PCIe card into the socket Secure the card in place using one of the retention screws provided in the accessory box 2 2 4 2 Half Size Mini PCIe Card Instal...

Page 24: ...half size mini PCIe card into the socket at an angle Secure the card in place using a screw from the accessory box 3 Connect the antenna cables and affix them to the brackets Take note of the cable r...

Page 25: ...nt plate 2 Mark the locations of the two plate screws holes on the wall 3 Drill two pilot holes at the marked locations on the wall 4 Align the wall mount plate screw holes with the pilot holes 5 Secu...

Page 26: ...l Screw Locations 7 Align the wall mount bracket attached to the panel PC with the wall mount plate on the wall and slide the panel PC downwards to hang the bracket on the mount plate Figure 2 6 Figur...

Page 27: ...ds to the device size PPC 3150SW 413 x 262 mm 16 25 x 10 31 in PPC 3180SW 479 30 x 300 30mm 18 87 x 11 82 in PPC 324W PN4 586 5 x 364 8 mm 23 09 x 14 36 in 2 Insert the panel PC into the cutout Retrie...

Page 28: ...PPC 3150SW 3180SW 324W PN4 User Manual 18 4 Tighten the screws in the hook brackets to secure the panel PC in place Figure 2 10 Fastening Hook Bracket Screws Figure 2 11 Panel Mount Rear View...

Page 29: ...the mounting arm s installation instructions to correctly mount the arm onto the surface as a base 2 Remove the four screws at the rear of the machine to gain assess to the VESA mount holes 3 Align t...

Page 30: ...d with your shipment To mount the panel PC onto a stand follow the steps outlined below 1 Remove the four original screws at the rear of the machine Use four M4 x 8L screws to affix the VESA bracket t...

Page 31: ...m Installation and Setup 2 Use four M4 x 8L screws to secure the base plate to the mount stand Figure 2 14 Securing the VESA Mount Base 3 Use four M4 x 6L screws to secure the mount stand to the VESA...

Page 32: ...PPC 3150SW 3180SW 324W PN4 User Manual 22 4 Use one M4 x 5L screw to attach the stand mount hinge cover Figure 2 16 Stand Mount Hinge Cover Figure 2 17 Completed Stand Mount...

Page 33: ...Chapter 3 3 Jumper Setting Motherboard Layout Jumpers and Connectors External COM Ports and Pin Definitions...

Page 34: ...ors on the mother board Figure 3 1 Motherboard Layout Diagram Connectors Functions CN1 LPC conn CN4 LCD backlight CN7 SATA power CN10 Resistive touch CN13 COM1 CN19 Speaker CN21 Front LED CN22 Power b...

Page 35: ...default 3 4 P2 CMOS clear JP3 Icon Backlight Power Selection 1 2 P3 5V 2 3 P4 3 3V default JP4 Icon Backlight PWM Power Selection 1 2 P5 5V 2 3 P6 3 3V default JP5 Icon Touch Power Selection 1 2 Clos...

Page 36: ...and Power Selection 1 2 P11 COM1 RI default 3 4 P12 COM1 5V 4 5 P13 COM1 12V SW1 Icon Panel Resolution 1 2 3 ON 4 OFF P14 1366 x 768 24 bit for PPC 3180SW 1 2 3 OFF 4 ON P15 1366 x 768 24 bit for PPC...

Page 37: ...Jumper Setting 3 3 External COM Port Pin Definition 3 3 1 COM1 RS 232 COM2 RS 232 422 485 Pin COM1 COM2 1 DCD COM2_422_485_TX 2 RXD COM2_422_485_TX 3 TXD COM2_422_RX 4 DTR COM2_422_RX 5 GND GND 6 DSR...

Page 38: ...PPC 3150SW 3180SW 324W PN4 User Manual 28...

Page 39: ...Chapter 4 4 Software Setup Driver Installation BIOS Setup Program...

Page 40: ...sure full functionality All drivers can be downloaded from the Advantech website at http www advantech com 4 2 BIOS Setup Program 4 2 1 Entering the BIOS Utility During system bootup press the Del but...

Page 41: ...31 PPC 3150SW 3180SW 324W PN4 User Manual Chapter 4 Software Setup 4 2 2 LCD Brightness Settings 1 Select the North Bridge item in the Chipset tab 2 Then select LCD Control...

Page 42: ...PPC 3150SW 3180SW 324W PN4 User Manual 32 3 Select Brightness Mode Control 4 There are six brightness levels available Select the level most suitable for your application needs...

Page 43: ...150SW 3180SW 324W PN4 User Manual Chapter 4 Software Setup 4 2 3 COM2 Mode Selection RS 232 422 485 1 Select the NCT6116D Super IO Configuration option in the Advanced tab 2 Select Serial Port 2 Confi...

Page 44: ...User Manual 34 3 Navigate to the Serial Port 2 Mode item and double click to set the COM2 operation mode as RS 422 or RS 485 4 When COM2 Mode is set as RS 485 the RS 485 Auto Flow item can be con figu...

Page 45: ...W 324W PN4 User Manual Chapter 4 Software Setup 5 When COM3 Mode is set as RS 485 the Serial Port3 Terminal can be config ured as enabled or disabled 4 2 4 OS Selection 1 Select the South Bridge item...

Page 46: ...N4 User Manual 36 2 The system supports different OS Windows Android Intel Linux Navigate to the OS Selection item to set the system OS 4 2 5 BIOS AT ATX Setup 1 Select the South Cluster Configuration...

Page 47: ...3150SW 3180SW 324W PN4 User Manual Chapter 4 Software Setup 2 Select the Miscellaneous Configuration item 3 Configure the Restore AC Power Loss item as Power On when in AT Mode and as Power Off for AT...

Page 48: ...PPC 3150SW 3180SW 324W PN4 User Manual 38 4 2 6 Wake on LAN 1 Select the South Cluster Configuration item in the Chipset tab 2 Select the Miscellaneous Configuration item...

Page 49: ...39 PPC 3150SW 3180SW 324W PN4 User Manual Chapter 4 Software Setup 3 Set Wake on PCIE as enabled 4 2 7 Wake on Ring 1 Select the NCT6106D Super IO Configuration item in the Advanced tab...

Page 50: ...PPC 3150SW 3180SW 324W PN4 User Manual 40 2 Set Wake on Ring to enabled...

Page 51: ...Appendix A A Watchdog Timer Programming...

Page 52: ...environment The number of watchdog timer intervals can be set as 0 255 via software Enter the Extended Function Mode MOV DX 2EH dependency by HW strap to 2Eh MOV AL 87H OUT DX AL OUT DX AL Configure l...

Page 53: ...PN4 User Manual Appendix A Watchdog Timer Programming MOV DX 2EH MOV AL F1H OUT DX AL MOV DX 2FH MOV AL 05H OUT DX AL set timeout value as 5s 00 timeout disabled Exit the Extended Function Mode MOV DX...

Page 54: ...e subject to change without notice No part of this publication may be reproduced in any form or by any means such as electronically by photocopying recording or otherwise without prior written permiss...

Reviews: