background image

EKI-6333AC-M12 Series User Manual

7

2.2

Connecting Hardware

2.2.1

Wall Mounting

The wall mounting option provides better shock and vibration resistance than the DIN
rail vertical mount.

Before the device can be mounted on a wall, you will need to remove the DIN rail
plate.

1.

On the installation site, place the device firmly against the wall. Make sure the 
device is vertically and horizontally level.

2.

Insert a pencil or pen through the screw holes on the mounting bracket to mark 
the location of the screw holes on the wall.

3.

Remove the device from the wall and drill holes over each marked location (4) 
on the wall, keeping in mind that the holes must accommodate wall sinks in 
addition to the screws.

4.

Insert the wall sinks into the walls.

5.

Align the mounting bracket over the screw holes on the wall.

6.

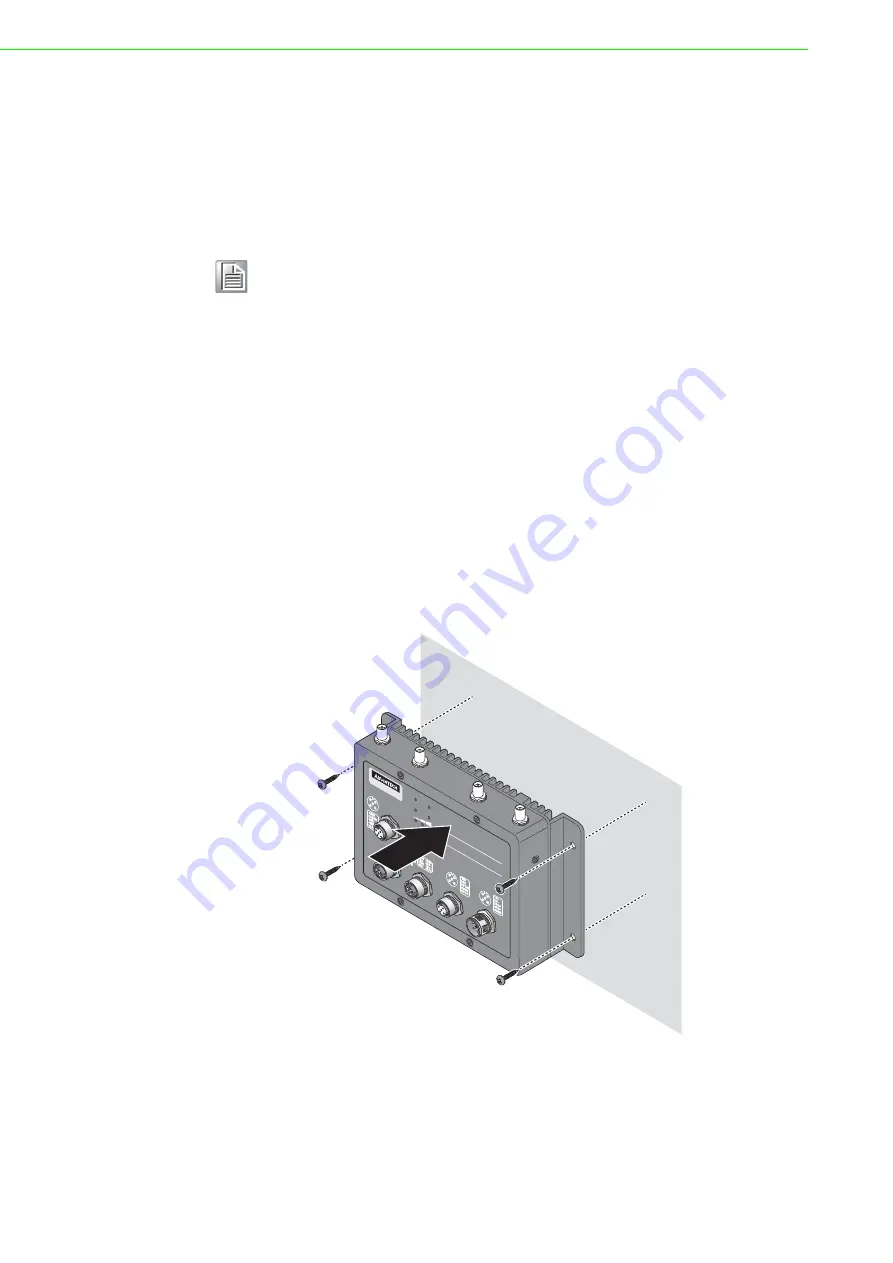
Starting with the upper bracket, insert a screw through the bracket and rotate it 
to secure. Do not tighten at this point. Repeat for the remaining locations, see 
the following figure.

Figure 2.5 Wall Mount Installation

7.

Once the device is installed on the wall, tighten the screws to secure the device.

Note!

When installing, make sure to allow for enough space to properly install 
the cabling.

Power

ALM

/Con

sole

ETH2

PWR

ETH1

USB

ETH1

ETH2

ALM

PW

R1

PW

R2

Status

WLAN1

WLAN

1

WLAN

1

WLAN

2

WLAN

WLAN2

EKI-6333AC-M12

Summary of Contents for EKI-6333AC-M12 Series

Page 1: ...User Manual EKI 6333AC M12 Series EN50155 Industrial M12 Wi Fi AP ...

Page 2: ...installation Advantech assumes no liability under the terms of this warranty as a consequence of such events Because of Advantech s high quality control standards and rigorous testing most of our customers never need to use our repair service If an Advantech product is defective it will be repaired or replaced at no charge during the warranty period For out of warranty repairs you will be billed a...

Page 3: ...hich can be determined by turning the equipment off and on the user is encouraged to try to correct the interference by one of the following measures Reorient or relocate the receiving antenna Increase the separation between the equipment and receiver Connect the equipment into an outlet on a circuit different from that to which the receiver is connected Consult the dealer or an experienced radio ...

Page 4: ... the problem The exact wording of any error messages Warnings Cautions and Notes Document Feedback To assist us in making improvements to this manual we would welcome comments and constructive criticism Please send all such in writing to support advantech com Warning Warnings indicate conditions which if not observed can cause personal injury Caution Cautions are included to help you avoid damagin...

Page 5: ...on it Do not place anything over the power cord All cautions and warnings on the equipment should be noted If the equipment is not used for a long time disconnect it from the power source to avoid damage by transient overvoltage Never pour any liquid into an opening This may cause fire or electrical shock Never open the equipment For safety reasons the equipment should be opened only by qualified ...

Page 6: ...uidelines are also recommended Wear a grounded wrist or ankle strap and use gloves to prevent direct contact to the device before servicing the device Avoid nylon gloves or work clothes which tend to build up a charge Always disconnect the power from the device before servicing it Before plugging a cable into any port discharge the voltage stored on the cable by touching the electrical contacts to...

Page 7: ... 2 2 2 Wireless Connection 8 2 2 3 Network Connection 9 2 2 4 USB Connection 9 2 2 5 Console Connection 10 2 2 6 Power Connection 10 Chapter 3 Web Interface 15 3 1 Log In 16 3 1 1 Changing Default Password 17 3 2 Overview 18 3 3 Network Settings 19 3 3 1 LAN 19 3 4 Wireless Settings 20 3 4 1 Operation Mode 20 3 4 2 WLAN 20 3 5 Administration 25 3 5 1 Syslog 25 3 5 2 NTP Time 25 3 5 3 HTTP 26 3 5 4...

Page 8: ...ard M12 5 Pin Female DC Power Input Connector 14 Figure 3 1 Login Screen 16 Figure 3 2 Administration HTTP 17 Figure 3 3 Overview 18 Figure 3 4 Network Settings LAN 19 Figure 3 5 Wireless Settings Operation Mode 20 Figure 3 6 Wireless Settings WLAN Basic 20 Figure 3 7 Wireless Settings WLAN Advanced 21 Figure 3 8 Wireless Settings WLAN Security 22 Figure 3 9 Wireless Settings WLAN Statistics 22 Fi...

Page 9: ...Chapter 1 1Introduction ...

Page 10: ... 2T2R WLAN transmission rate up to 867 Mbps Supports secure access with WEP 802 1x WPA WPA2 Personal WPA WPA2 Enterprise Provides Web based configuration Support Dual band 2 4G 5G concurrent Design with Dual radio module Anti vibration M12 design Wide Range Power Input 24 48 72 96 110 VDC 1 3 Specifications Specifications Description Interface I O Port M12 X Code EKI 6333ACX M12 D Code EKI 6333ACD...

Page 11: ...s Compatibility IEEE 802 11a b g n ac Speed 100 1000 Mbps EKI 6333ACX 10 100 Mbps EKI 6333ACD Power Power Consumption LV Model 12W HV Model 18W Power Input 24 48VDC LV model 72 96 110VDC HV model Software Operation Modes Access Point Bridge Client mode Management Web UI Regulatory Approvals EMC CE FCC Part 15 Subpart B Class B Rail Traffic EN 50155 Specifications Description WLAN 2 WLAN 2 WLAN 1 W...

Page 12: ...Chapter 2 2Getting Started ...

Page 13: ...orts x 2 4 Wall mounting holes Screw holes x4 used in the installation of a wall mounting plate 5 Power input port M12 5 pin male DC power connector port 6 ALM Console port M12 5 pin female port to access the managed switch s software EKI 6333AC M12 PWR1 ETH1 USB ETH1 ETH2 ALM Console PWR ETH2 PWR2 Status WLAN1 WLAN2 ALM 4 6 5 1 2 3 No Item Description 1 Antenna connectors Connectors for WLAN2 ant...

Page 14: ... Wireless Signal Strength Green AP mode Enable LED1 on LED2 LED3 off Disable LED1 LED2 LED3 off Client mode LED1 on Connect AP successfully RSSI 50dB LED2 LED3 on 50dB RSSI 60dB LED2 on LED3 blinking 60dB RSSI 80dB LED2 on LED3 off 80dB RSSI LED2 blinking LED3 off 4 ETH1 Green blinking Ethernet port 1 is transmitting or receiving data 5 PWR2 Green Power 2 is on Off Power 2 is off or power error co...

Page 15: ...l and drill holes over each marked location 4 on the wall keeping in mind that the holes must accommodate wall sinks in addition to the screws 4 Insert the wall sinks into the walls 5 Align the mounting bracket over the screw holes on the wall 6 Starting with the upper bracket insert a screw through the bracket and rotate it to secure Do not tighten at this point Repeat for the remaining locations...

Page 16: ... optimal signal strength Figure 2 7 Positioning the Antenna Note The location and position of the antenna is crucial for effective wireless connectivity Power ALM Console ETH2 PWR ETH1 USB ETH1 ETH2 ALM PWR1 PWR2 Status WLA N1 W LAN1 W LAN1 W LAN2 W LAN WLA N2 EKI 6333AC M12 Power ALM Console ETH2 PWR ETH1 USB ETH1 ETH2 ALM PWR1 PWR2 Status WLA N1 W LAN1 W LAN2 WLA N2 EKI 6333AC M12 R1 12 R1 2 TH1...

Page 17: ... Connector Pin Assignment Figure 2 8 M12 X Coded Connector Pin Assignment 2 2 4 USB Connection The managed USB models have Fast USB ports 5 pin shielded M12 connector with A coding circular connectors The USB port located on the switch s front side are used to connect to USB enabled devices 2 2 4 1 M12 A Coded Connector Pin Assignment Figure 2 9 M12 A Coded Connector Pin Assignment Pin Description...

Page 18: ... between the V1 terminal and the V1 terminal PW1 see the following illustrations The chassis ground screw terminal should be tied to the panel or chassis ground A redundant power configuration is supported through a secondary power supply unit to reduce network down time as a result of power loss Pin Description 1 TX 2 RX 3 P1 N 4 GND 5 P1 P 2 1 3 5 4 Warning Power down and disconnect the power co...

Page 19: ...ics Make sure to separate input and output wiring Label all wiring and cabling to the various devices for more effective management and servicing 2 2 6 3 Grounding the Device P2 P1 Chassis GND pane One DC Supply P2 P1 Chassis GND pane Dual DC Supplies Single DC Power Redundant DC Power Note Routing communications and power wiring through the same conduit may cause signal interference To avoid inte...

Page 20: ...lified and authorized to do so Caution Do not block air ventilation holes Note Before applying power to the grounded device it is advisable to use a volt meter to ensure there is no voltage difference between the power supply s negative output terminal and the grounding point on the device Drain Wire with Lug Connection to Grounding Point Caution Do not disconnect modules or cabling unless the pow...

Page 21: ...sh it in If there is any resistance remove the cable and re align it with the connector 3 Once the cable is fully seated in the port turn the nut on the cable to secure it to the connector Figure 2 13 Installing the Power Cable The power input is now connected to the switch The switch can be powered on To remove the power inputs Make sure the power is not connected to the device or the power conve...

Page 22: ...erminals are connected as shown in the following figure They are electrically floating inside the unit so that either may be grounded by the user if desired The chassis is earthened or ground GND The mating connection to the switch is created through a RD24 female connector Simply align the keyed female connector to the male connector and twist the threaded to secure Figure 2 15 Standard M12 5 Pin...

Page 23: ...Chapter 3 3Web Interface ...

Page 24: ...d to make sure your network environment supports the device setup before connecting it to the network 1 Launch your web browser on a computer 2 In the browser s address bar type in the device s default IP address 192 168 1 1 The login screen displays 3 Enter the default user name and password admin admin to log into the management interface You can change the default password after you have succes...

Page 25: ...ee Basic on page 20 2 Navigate to Home Administration HTTP The HTTP configuration page dis plays 3 Enter the username of the profile to change currently logged in user displays then enter the new password under the Password field 4 Re type the same password in the Confirm Password field 5 Click Apply to change the current account settings Figure 3 2 Administration HTTP ...

Page 26: ...vice System Time Displays the current date of the device System Up Time Displays the time since the last device reboot System Platform Displays the model name of the device Local Network Local IP Address Displays the assigned IP address of the device Local Netmask Displays the assigned netmask of the device MAC Address Displays the MAC address of the device System Status Memory Utilization Display...

Page 27: ...e interface Primary DNS Server Enter a value to specify the primary DNS server for the interface Secondary DNS Server Enter a value to specify the secondary DNS server for the interface MAC Address Display the MAC address to which packets are statically forwarded DHCP Server Select Enabled or Disabled to designate the DHCP server function type When a new DHCP server mode is selected the switch req...

Page 28: ...e items in the previous figure Item Description Operation Mode Click the drop down menu to select an operation mode Submit Click Submit to save the values and update the screen Item Description Wireless Network State Select Enabled or Disabled to set the WLAN state Operation Mode Supports three modes Operation Mode default Bridge and Client mode SSID Enter the name to distinguish it from other net...

Page 29: ...el Frequency Select the 2 4 or 5G wireless frequency to the least congested channel The available settings on a 2 4G setting are 2 412 GHz to 2 484 GHz For 5G the available settings are 5 18 GHz to 5 825 GHz The function is only enabled when Operation Mode is set to Access Point Submit Click Submit to save the values and update the screen Item Description Item Description Access Point Settings Bea...

Page 30: ...d WPA WPA2 Enterprise If data encryption is enabled the key is required and only sharing the same key with other wireless devices can the communication be established Submit Click Submit to save the values and update the screen Item Description Overview Mode Display the current operation mode of the device SSID Display the SSID Channel Frequency Display the current channel frequency of the device ...

Page 31: ...e items in the previous figure Tx packets bytes Displays the total Tx packets and corresponding bytes Rx packets bytes Displays the total Rx packets and corresponding bytes Wlan status TX packets Display the current Tx packets TX bytes Display the current Tx bytes RX packets Display the current Rx packets RX bytes Display the current Rx bytes Item Description Item Description Access Control Method...

Page 32: ...e click Wireless Settings WLAN Log Figure 3 11 Wireless Settings WLAN Log The following table describes the items in the previous figure Item Description Download Click Download to download the log file Auto Scroll Click the checkbox to enable the Auto Scroll function ...

Page 33: ...re 3 5 2 NTP Time To access this page click Administration NTP Time Figure 3 13 Administration NTP Time The following table describes the items in the previous figure Item Description Download Click Download to download the log file Auto Scroll Click the checkbox to enable the Auto Scroll function Item Description System Time Displays the system date and time Manual Time Set the system date and ti...

Page 34: ...HTTPS Click the drop down menu to enable or disable the function By default the function is disabled When enabled a NAT setting and Open Ports can be setup to direct connection requests to an internal server HTTPS port Enter the port to forward HTTPS traffic default 443 HTTP port Enter the port to forward HTTP traffic default 80 Username and password Username Display the user name Password Enter t...

Page 35: ...he previous figure Item Description Backup Download Configuration Click Backup to backup the device settings To Click PC or USB Drive to select the correct file location Restore Choose File Click Choose File to select the configuration file Upload Archive Click Upload Archive to restore the configuration to the device From Click PC or USB Drive to select the correct file location USB Drive Backup ...

Page 36: ...Administration Apply Configuration The following table describes the items in the previous figure Item Description Reset Click Reset to have all configuration parameters reset to their factory default values All changes that have been made will be lost even if you have issued a save Item Description Apply and Reboot Click Apply and Reboot to have configuration changes you have made to be saved acr...

Page 37: ...iguration changes you have made since the last time you issued a save will be lost Ping IP Address Name Enter the IP address or host name of the station to ping The initial value is blank The IP Address or host name you enter is not retained across a power cycle Host names are composed of series of labels concatenated with periods Each label must be between 1 and 63 characters long maximum of 64 c...

Page 38: ...ations are subject to change without notice No part of this publication may be reproduced in any form or by any means electronic photocopying recording or otherwise without prior written permission of the publisher All brand and product names are trademarks or registered trademarks of their respective companies Advantech Co Ltd 2019 ...

Reviews: