background image


VESR424D Serial Server


58 


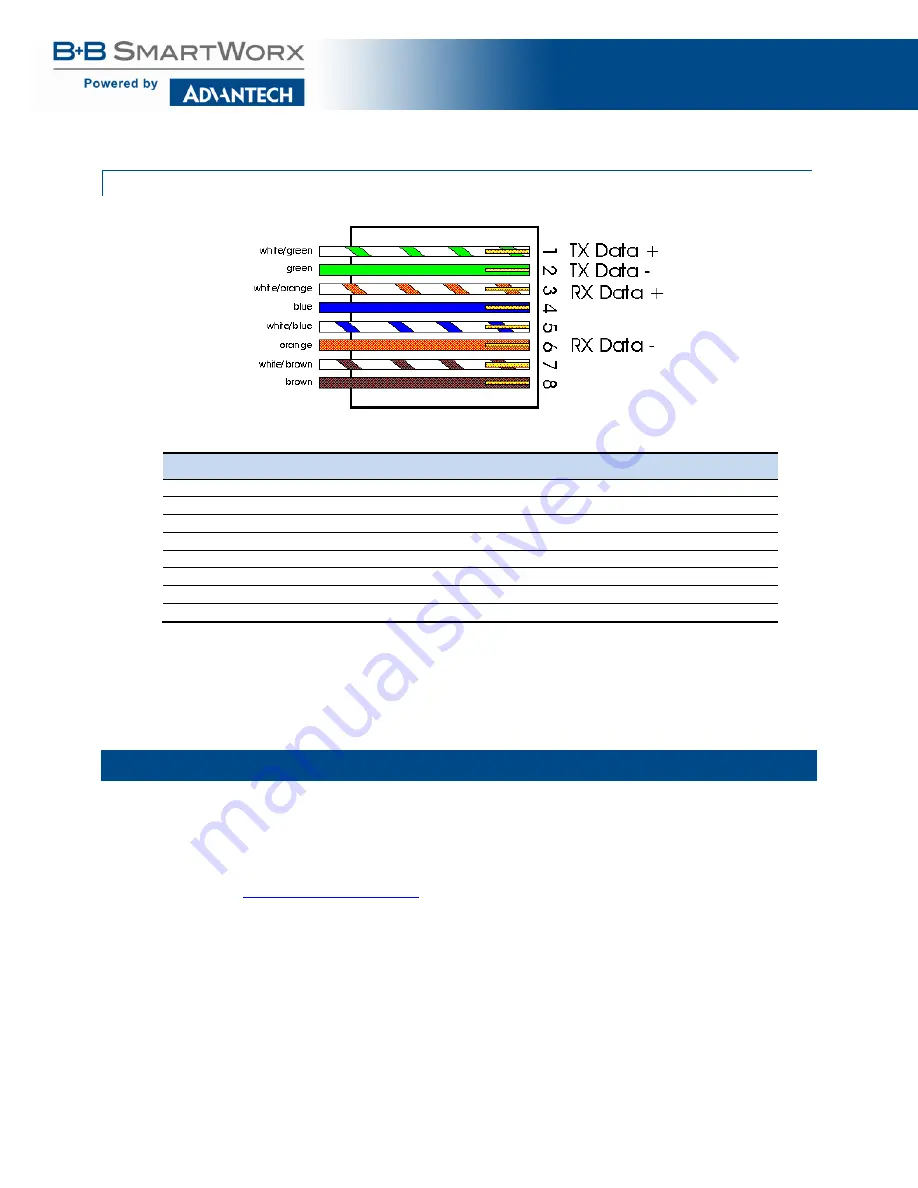
STANDARD ETHERNET CABLE RJ-45 PINOUT 


RJ45 Pin 

Signal 

Wire Color 

RJ45 Pin 

TX+ 

White-Green 

TX+ 

Green 

RX+ 

White-Orange 

Not used 

Blue 

Not used 

White-Blue 

RX- 

Orange 

Not used 

White-Brown 

Not used 

Brown 


ADVANTECH B+B SMARTWORX TECHNICAL SUPPORT 


USA/Canada: 

1 (800) 346-3119 (Ottawa IL USA)


Europe: 

+353 91 792444 (Ireland / Europe)


Email: 

[email protected]


Web: 

www.advantech-bb.com


Summary of Contents for B+B SmartWorx Vlinx VESR424D

Page 1: ...Vlinx Serial Server Model VESR424D USER MANUAL...

Page 2: ...Ottawa IL 61350 USA Phone 815 433 5100 Fax 815 433 5105 Advantech B B SmartWorx European Headquarters Westlink Commercial Park Oranmore Co Galway Ireland Phone 353 91 792444 Fax 353 91 792445 www adva...

Page 3: ...Connector 10 Serial Port Connectors 11 Power Connector 11 Mounting Hardware 11 Chapter 3 INSTALLATION INITIAL SETUP 13 Connecting the Power Supply 13 Connecting VESR424D Serial Server to Serial Devic...

Page 4: ...ring the Configuration Settings 38 Adding Virtual COM Ports 38 Removing Virtual COM Ports 39 CHAPTER 5 UPGRADING THE SERIAL SERVER FIRMWARE 40 Downloading Firmware Files 41 To download the latest firm...

Page 5: ...VESR424D Serial Server 5 Advantech B B SmartWorx Technical Support 58 Statements Precautions 59 FCC Radio Frequency Interference Statement 59 Electrostatic Discharge Precautions 60 Disclaimer Brand 60...

Page 6: ...twork media and an additional copper Ethernet pass through port Model VESR424D is built for use in industrial and transportation environments and features a heavy duty metal enclosure that is panel an...

Page 7: ...applications See specification tables for more information 10 100 Mbps Ethernet with auto selection TCP Client or Server or UDP operation configurable Virtual COM port and paired mode capabilities Fir...

Page 8: ...the following items included VESR424x Serial Server Module Quick Start Guide printed CD with User Manual and Software Panel Mount and DIN Rail Mount Adapters brackets included LED INDICATORS VESR424D...

Page 9: ...nnection has been made It flashes when there is data traffic on the Ethernet link SERIAL PORT LEDS P1 P2 P3 P4 Each serial port has an associated LED Serial Port LEDs flash green when data is being tr...

Page 10: ...remove power from the serial server wait a few seconds and turn the power on again The LEDs go back to their normal states when the device resumes normal operation USING THE RESET SWITCH TO RELOAD FA...

Page 11: ...onnections The second is a locking barrel jack connector Figure 5 Power Connectors NOTE The terminal block must be used for Class 1 Division 2 applications the barrel jack cannot be used for these app...

Page 12: ...al server allow the unit to be mounted in six different configurations Figure 7 VESR424D Showing Panel Mount Bracket Options If extra mounting brackets are needed they can be ordered from B B SmartWor...

Page 13: ...ass 1 Division 2 applications the barrel jack cannot be used for these applications See the specification tables for further information CONNECTING VESR424D SERIAL SERVER TO SERIAL DEVICES The VESR424...

Page 14: ...a common mode reference for the signal lines When configured for 2 wire operation the connection supports one signal pair Data A and Data B These lines transmit and receive signals using half duplex...

Page 15: ...nager software Via the network using a web browser Via a serial port using Vlinx Manager software Console Mode CONFIGURING VIA THE NETWORK USING VLINX MANAGER Model VESR424D Serial Server can be confi...

Page 16: ...able it will default to 169 254 102 39 NOTE For more information on how to use Vlinx Manager to configure your serial server refer to Section 4 Configuring the Serial Server CONFIGURING VIA A SERIAL P...

Page 17: ...pear to applications running on the host PC as if the serial ports were physically located on the host PC When a virtual COM port is configured on the PC using Vlinx Manager a new COM port appears in...

Page 18: ...rial servers Install it on your PC from the included CD Installation should launch automatically when the CD is placed in the CD ROM drive Follow the prompts to install the software Once the program i...

Page 19: ...dress of the device selected Click Connect The Progress text box and bar graph provide information to indicate whether serial server is detected and how far along the process is The text in the Progre...

Page 20: ...ation Table Configuration Pane Figure 17 Vlinx Manager Configuration Window MANUAL NOTE The screen shots shown in this manual refer to the VESR901 a similar B B SmartWorx serial server model Your scre...

Page 21: ...nformation Table The table displays the following information for each serial server Server Name the name reported by the serial server Connection the IP address of the serial server Port 1 Port 2 Por...

Page 22: ...nk Port x Network x port number each serial port connection is represented by a hyperlink Save Login Logout Configuration settings area in the middle of the pane where you can select the settings desi...

Page 23: ...NAVIGATING THE CONFIGURATION PAGES There are two ways to move from page to page in the Vlinx Manager software by clicking a specific link or by clicking Next or Back to move through the pages sequenti...

Page 24: ...server Initiate a login password change Figure 22 General Configuration Page CHANGING THE SERIAL SERVER S NAME 1 Type the new name into the Serial Server Name text box 2 Click Save CHANGING THE PASSWO...

Page 25: ...the network Figure 24 Network Configuration Page SETTING UP DYNAMIC IP ADDRESSING 1 Select the I want to use DHCP to setup the network check box SETTING UP STATIC IP ADDRESSING 1 Ensure the I want to...

Page 26: ...4 wire required by the serial device 2 Baud Rate select the Baud Rate between 75 baud and 230 400 baud required to communicate with the serial device 3 Data Bits select the number of Data Bits 5 6 7 o...

Page 27: ...et up the IP address and port number of the remote server that you want the client serial server to communicate with You also select whether you want the serial server to connect at power up or only w...

Page 28: ...tions change The server IP address box disappears and the number of connections box appears 3 Type the port number in the I want to wait for connection on TCP port number box 4 Select the maximum numb...

Page 29: ...of configuration options Figure 29 UDP Configuration SETTING THE SERIAL SERVER TO USE UDP 1 Select UDP protocol Options are provided for sending and receiving data to and from Nobody one way communica...

Page 30: ...lect the required Receive options e nobody receives from nobody f everyone on a specific UDP port receive broadcast receives from all UDP ports on the network specified later g only specific IP addres...

Page 31: ...ble For Paired Mode to work one serial server must be configured to initiate connections client and the other must be configured to wait for connections server The serial server configured as the clie...

Page 32: ...ss and TCP port numbers of the server in the appropriate text boxes 4 Select at power up if you want the serial server to always be connected when the serial port receives data if you only want to est...

Page 33: ...to four IP addresses to be able to connect and allow a specific range of IP addresses to connect if you want to specify a range of IP addresses that can connect 6 If you selected and allow a specific...

Page 34: ...fering to reduce the network overhead and minimize the data transmission latency For most applications the VESR424D will transmit data back and forth seamlessly between the end devices However certain...

Page 35: ...o the text box TO CLOSE A CONNECTION IF NO DATA IS RECEIVED BY THE SERIAL PORT FOR A PERIOD OF TIME 1 Select the I want to close all connections when data is not received by the serial port for a peri...

Page 36: ...data to be received by the serial port before sending it in the Character Count box 2 Type the desired number of characters into the text box TO FORCE THE SERIAL SERVER TO SEND ALL BUFFERED DATA RECEI...

Page 37: ...he ASCII character into the text box For instance if you want to send data when a is received enter 36 into the test box NOTE If Delimiter 1 is selected Delimiter 2 must also be used TO FORCE THE SERI...

Page 38: ...AFFECT 1 Click Save to Device ADDING VIRTUAL COM PORTS Clicking the Add icon located at the top of the Vlinx Manager Configuration window opens the Add Virtual COM Port dialog box Figure 39 Add Virtua...

Page 39: ...NG VIRTUAL COM PORTS Clicking the Remove icon located at the top of the Vlinx Manager Configuration window opens the Remove Virtual COM Port dialog box Figure 40 Remove Virtual COM Port Dialog Box Usi...

Page 40: ...1 Click the Upgrade button to open the Firmware Upgrade window Figure 41 Firmware Upgrade Dialog Box The name of the currently selected serial server appears in the top drop down list Other serial ser...

Page 41: ...RE FILES FROM A FILE 1 Click the Browse button to open an Open File dialog box 2 Browse to the drive and folder containing the firmware file 3 Select and download the file to the local firmware folder...

Page 42: ...tion about the type of network connections the IP addresses Subnet Masks and Default Gateways in use Figure 42 Diagnostics Dialog Box TESTING A SERIAL SERVER CONNECTION 1 Click the Diagnostics icon Th...

Page 43: ...nostics icon The Diagnostics dialog box appears 2 Select the option a virtual communications port 3 In the drop down box select the specific COM port you want to check 4 Click the Start button Informa...

Page 44: ...of Data Bits type of Parity and number of Stop Bits selected define the serial port parameters at which the serial server will operate These parameters must be configured to match the parameters set...

Page 45: ...ust be set manually by entering the appropriate addresses in these fields If you do not know what addresses to use in these fields ask your network administrator NOTE 1 This product is factory default...

Page 46: ...er via the network must know the IP Address of the server In DHCP mode factory default the serial server requests and receives a dynamic IP address from a DHCP server when it first connects to the net...

Page 47: ...del Port 1 LED Port 2 LED Port 3 LED Port 4 LED Ready LED 1 Port OFF n a n a n a ON 2 Port OFF ON n a n a OFF 4 Port OFF ON OFF OFF OFF g Release the Reset button The Ready LED will flash twice per se...

Page 48: ...replacement between two serial devices Serial devices connected to serial servers on each end of the link can communicate as if they were connected by a serial cable For Paired Mode to work one seria...

Page 49: ...are used on Model VESR424D Select the appropriate serial interface mode for the type of connection between the serial server s serial port and the device connected to it NOTE Refer to the Appendix D...

Page 50: ...r of simultaneous connections it will accept You can filter the connections it will accept based on specific IP addresses or ranges of IP addresses that you specify UDP User Datagram Protocol enables...

Page 51: ...02 39 Net Mask 255 255 255 0 Gateway 169 254 102 100 MAC Address Fixed see bottom label Firmware Version X X X current version Port 1 2 3 4 Serial Port Mode RS 232 Baud Rate 9600 Data Bits 8 Parity No...

Page 52: ...ertifications FCC Part 15 Class A UL Class 1 Div 2 Groups A B C D NEMA TS2 CE Directives 2014 30 EU Electromagnetic Compatibility 2011 65 EU Reduction of Hazardous Substances RoHS 2012 19 EU Waste Ele...

Page 53: ...TX Ethernet Single RJ 45F 8 pin Serial VESR424D four DB9M connectors DC Power 3 position pluggable terminal block or locking barrel connector NOTE the terminal block must be used for Class 1 Division...

Page 54: ...serial data if delimiter hex 2 is set and received Timeouts Inter character 0 to 65535 ms Serial 0 to 65535 ms Network 0 to 65535 ms minimum Force Transmit 0 to 65535 ms Maximum Character Count 0 to 8...

Page 55: ...60002 tcp This port is open when serial port 3 is configured for paired mode server As above 60003 tcp This port is open when serial port 4 is configured for paired mode server As above 68 udp This p...

Page 56: ...VESR424D Serial Server 56 APPENDIX C DIMENSIONAL DIAGRAM Figure 47 Dimensional Diagram of VESR424D Serial Server Units inches millimeters...

Page 57: ...B 4 DTR Output TDA Data A 5 GND GND GND 6 DSR Input 7 RTS Output 8 CTS Input 9 NOTE 1 In the RS 422 mode TX lines are outputs and RX lines are inputs Connect the serial server TXB line to the RXB line...

Page 58: ...een 1 2 TX Green 2 3 RX White Orange 3 4 Not used Blue 4 5 Not used White Blue 5 6 RX Orange 6 7 Not used White Brown 7 8 Not used Brown 8 ADVANTECH B B SMARTWORX TECHNICAL SUPPORT USA Canada 1 800 34...

Page 59: ...residential area is likely to cause harmful interference in which the user will be required to correct the interference at his own expense Any changes or modifications not expressly approved by the m...

Page 60: ...After removal always place the boards on a grounded static free surface ESD pad or in a proper ESD bag Do not slide the modules or standalone units over any surface WARNING Integrated circuits and fib...

Reviews: