background image


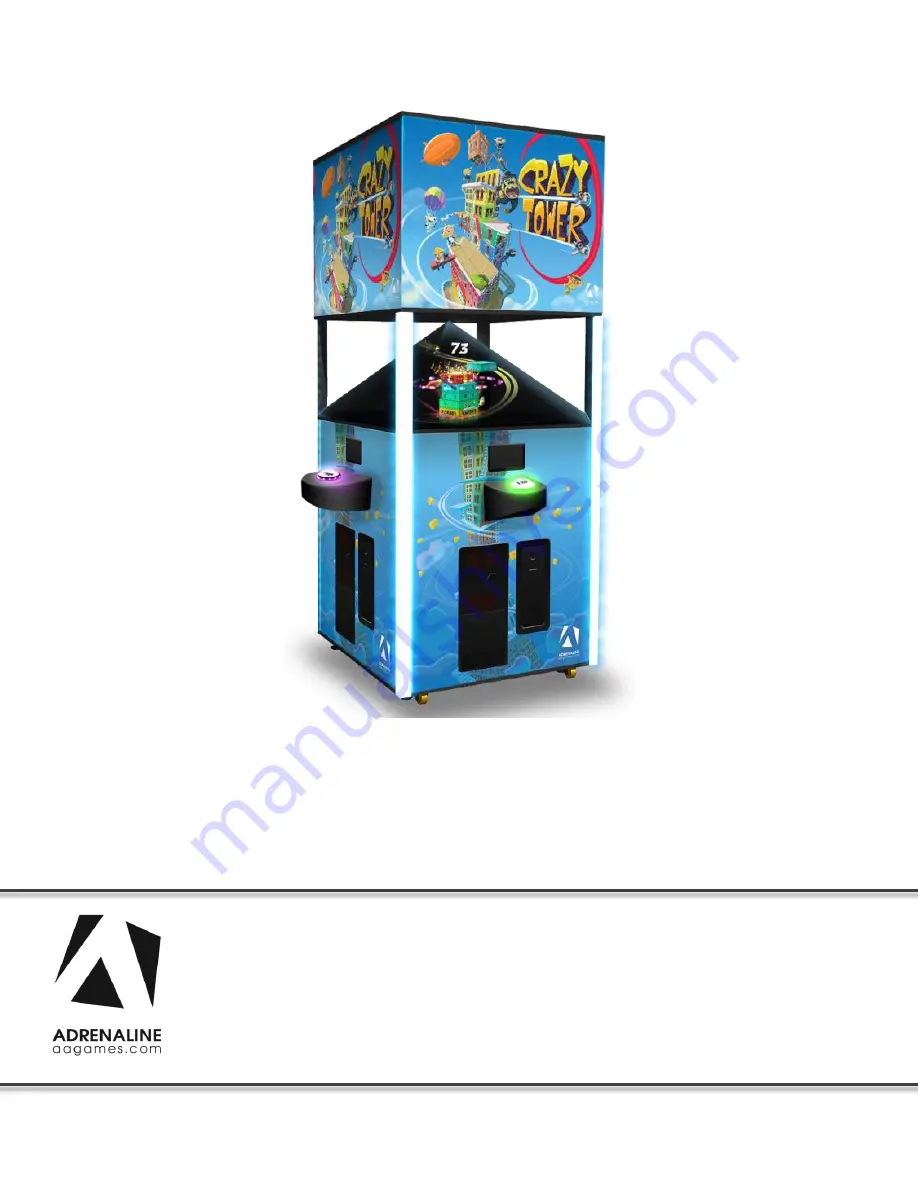
Crazy Tower Arcade 

Standard Version: CZT-36-1001 

Mega Crazy Tower: MCZT-48-1001 

Low Height Version: CZT-36-1003 


Operation & Service Manual 

Version 7.1 

* Read this manual before use 

Summary of Contents for Crazy Tower Arcade

Page 1: ...Crazy Tower Arcade Standard Version CZT 36 1001 Mega Crazy Tower MCZT 48 1001 Low Height Version CZT 36 1003 Operation Service Manual Version 7 1 Read this manual before use ...

Page 2: ...need support on how to update and or install your Crazy Tower Arcade product we invite you to contact your local distributor or reach us at support aagames com or by calling our support line 1 450 824 1671 Adrenaline Amusements Team Adrenaline Amusements 2273 Antonio Héroux street Terrebonne QC Canada J6X 4R3 ...

Page 3: ...inet Facts Standard version 36 8 Cabinet Facts Mega Crazy Tower 48 9 Cabinet Facts Low Height Version 10 Voltage All versions 10 Chapter 04 Unit Installation 11 Assembling your Crazy Tower Unit 11 Chapter 05 Operator Menu 15 Operator Menu 15 Station Reassignment 17 Chapter 06 Service Repair 18 Computer Connections Version GTX 1050 video card 18 Version GTX 1060 video card 19 Troubleshooting 20 Vid...

Page 4: ...t 31 Tray 31 Decal Prints Header 32 Standard Version 36 32 Mega Crazy Tower 48 32 Low height Version 32 Cabling 33 Standard 36 and Low Height Versions 33 Mega Crazy Tower 48 33 Wiring Harness 34 Chapter 08 Diagrams Schematics 35 I 0 board ADR 04 1001 Rev 1 35 Former I O Board ADR 04 1001 37 Power Distribution Schematics 41 Players Wiring 42 Coins Ticket Wiring 44 RGB LED Wiring 46 Chapter 09 Softw...

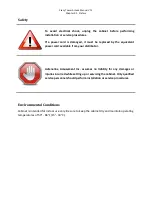
Page 5: ... prong plugs to help ensure proper grounding Do not use adapter plugs or remove the grounding prong from a cable If you must use an extension cable use a 3 wire cable with properly grounded plugs We do recommend a 15A rated current or higher power cord To help protect your system from sudden increases and decreases in electrical power use a surge suppressor line conditioner or Uninterruptible Powe...

Page 6: ...quivalent power cord available from your distributor Adrenaline Amusement Inc assumes no liability for any damages or injuries incurred while setting up or servicing the cabinet Only qualified service personnel should perform installation or service procedures Environmental Conditions Cabinet is intended for indoor use only Be sure to keep the cabinet dry and maintain operating temperatures of 59 ...

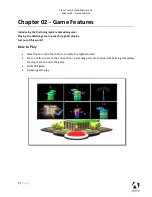
Page 7: ...edemption game Playing an addictive game in a see through 3D display Just out of this world How to Play Stack floors on top of each other to create the highest tower Press a button to stack the current floor Exceeding parts are chopped off Missing completely the target put an end to the game 100 Skill game 4 players game play ...

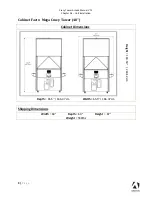
Page 8: ...Players Game Amazing hologram display with RGB LEDs animations Optimized footprint 4 players game in 20 sq 100 Skill Game challenge your friends Cabinet Facts Standard version 36 Cabinet Dimensions Height 92 233 68 cm Depth 54 137 16 cm Width 54 137 16 cm Shipping Dimensions Width 42 Depth 42 Height 98 Weight 450lbs ...

Page 9: ...l V7 1 Chapter 04 Unit Installation 9 P a g e Cabinet Facts Mega Crazy Tower 48 Cabinet Dimensions Height 103 59 263 12 cm Depth 65 5 166 37 cm Width 65 5 166 37 cm Shipping Dimensions Width 60 Depth 60 Height 87 Weight 550lbs ...

Page 10: ...n 10 P a g e Cabinet Facts Low Height Version Cabinet Dimensions Height 88 2235 2 mm Depth 53 50 1358 9 mm Width 53 50 1358 9 mm Shipping Dimensions Width 45 Depth 41 Height 98 Weight 450lbs Voltage All versions Voltage Operating 110V AC 3 AMP 220V AC 1 5 AMP ...

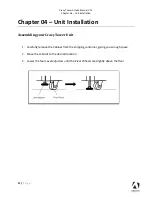
Page 11: ...Chapter 04 Unit Installation Assembling your Crazy Tower Unit 1 Carefully remove the Cabinet from the shipping container giving you enough space 2 Move the cabinet to the desired location 3 Lower the four Level adjustors until the Pivot Wheels are slightly above the floor ...

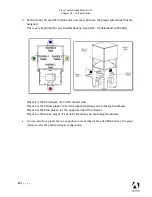
Page 12: ...ooting Chapter Player 1 is the Red player it s on the drawer side Player 2 is the Yellow player it s on the right side when you are facing the drawer Player 3 is the Blue player it s the opposite side of the drawer Player 4 is the Green player it s on left side when you are facing the drawer You can install any player box to any positions now as they all have UFO RGB buttons The player reference i...

Page 13: ...allation 13 P a g e 5 Locate the holes on the bracket that will hold in place the player boxes two on each side 6 Before sliding the player box on the bracket connect the cable from the cabinet to the cable inside the player box It is a 6 Pins connector ...

Page 14: ...You can connect the AC cable from the wall to the unit by using one of the two available Power Entry EMI filter connectors The default AC Input cable connected to the main power strip is located under the cabinet The 2nd connector is on the top of the unit if you have a ceiling AC cable available If you want to use the upper AC input you will need to use the AC From Top cable in the drawer instead...

Page 15: ...rator Menu 15 P a g e Chapter 05 Operator Menu Operator Menu Access the Operator Menu by pressing the Operator button located inside the drawer on the I O board directly Up Down Scroll Up Down Increase Decrease Value Select Button Select Deselect ...

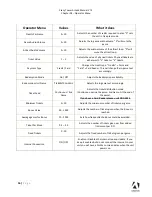
Page 16: ...mption availability Redemption Unit Name Tickets Coupons Adjusts the in game text accordingly Ticket Feed Continuous End Game Adjusts the ticket distribution mode Continuous during the game End Game At the end of the game If you have a Card Reader please use END GAME Minimum Tickets 0 20 Adjusts the minimum number of tickets per game Bonus Value 50 1000 Adjusts the number of tickets given when the...

Page 17: ...ssignment N A To edit the button and player positions Quit Game N A Exits the game and returns to the Windows desktop Resume Game N A Exits the Operator Menu and returns to the game Station Reassignment If the Coins and or Speakers doesn t work for all 4 stations you can do a Factory Reset to restore the 4 players positions If you have a defective projector during the time you are waiting the repl...

Page 18: ...Crazy Tower Arcade Manual V7 1 Chapter 06 Service Repair 18 P a g e Chapter 06 Service Repair Computer Connections Version GTX 1050 video card ...

Page 19: ...Crazy Tower Arcade Manual V7 1 Chapter 06 Service Repair 19 P a g e Version GTX 1060 video card ...

Page 20: ...properly to both the computer and to the projector Verify that the projector is powered on by looking on the glass that doesn t display the game You should see HDMI MHL Searching If not try to power on the projector by using the remote or by pressing the power button on the projector If the display in the glass seems to be offset or blurred you can adjusts the projector focus by turning the focus ...

Page 21: ...r you should see the fans spinning If not press the WHITE Power Button on the computer Make sure that the power plug is well connected and that the Power Supply switch is set to ON If a projector doesn t start automatically Using the remote Or directly on the projector press the menu button Using the arrows go to Setup and press Enter Verify that the settings are like those below ...

Page 22: ...Crazy Tower Arcade Manual V7 1 Chapter 06 Service Repair 22 P a g e Below are the other Projector Settings Screens as references ...

Page 23: ...ase the volume via the Speaker icon on the bottom right of your screen Verify the wirings behind the speakers and in the amplifier Verify that the 1 8 audio jack is plugged in the computer s sound input jack and that the other end RCA s are plugged in the sound amplifier If a player doesn t have sound refer to the wiring diagram below Each amplifier controls 2 players If the sound is not playing f...

Page 24: ...allpaper with a 150 seconds delay before the attract mode shows up It gives enough time for a wireless network to connect This delay will be present on each reboot if you don t connect your unit to the Internet Open the coin door and press the Operator button Choose Configure Wi Fi Connect a USB keyboard In the list of networks click the network you want to connect to and click connect Enter your ...

Page 25: ... needs to be disabled Exit the game to Windows Press on Start Right click on My Computer Choose Properties Click on Device Manager Expand Disk Drives Double click the 32GB Device Not the USB drive if there is one Go to Policies Remove the check in front of Enable Write caching on the device as seen below press OK and then YES to reboot the computer If it doesn t ask to reboot the computer you need...

Page 26: ...each side of the back acrylic panel to assure the position Do not slide the panel completely as you will have a Power Connector to unplug before removing the panel from the cabinet If you need to replace the Header LEDs gently remove the black horizontal cover on both the top and bottom The LEDs can be removed by gently pulling them off the cover as they are installed by adhesive The new one can b...

Page 27: ...cker ADR 75 0029 00 KIT Sticker for Tap Button FT 09 TAP 3 Complete Thermoformed Playable Platform Including Button Fan and Harness CZT 05 1001 KIT 4 Leg Leveler 1 2 13 x 4 Thread 2 3 8 Base Diameter INV 62805K 39 5 General Duty Rubber Caster 2 1 2 INV F25083 6 Bottom Vertical Frame Cover CZT 01 1012 7 Center Vertical Frame Cover CZT 01 1015 8 Top Vertical Frame Cover CZT 01 1112 ...

Page 28: ...ADR 40 0540 00KA 2 Door and Frame Assembly with Blank Upper and Bottom Door ADR 40 0745 20KA 3 Door Assembly With 2 Upper Mech Holder 1 Validator Cut Out Blank Bottom Door ADR 40 3000 06LKA 4 Ticket Bin with Level Sensor Switch ADR 42 1015 00 5 Ticket Dispenser D TYPE ADR TD 0001 6 Blank Door Black No Lock ADR 42 3607 90 7 Meter 12V 7 Digit with Bracket ADR 42 08012 072 ...

Page 29: ...8 Model CZT 10 1001 MCZT 10 1001 2 Canvas for Projector with Velcro and Snaps 36 x 36 Canvas for Projector with Velcro and Snaps 48 x 48 CZT 10 1002 MCZT 10 1002 3 Snaps for Canvas CZT 05 1009 4 Acrylic Cover for Corner LED for 36 X36 Model Acrylic Cover for Corner LED for 48 X48 Model CZT 05 1012 MCZT 05 1012 5 Thermoformed Playable Platform for Crazy Tower CZT 05 1001 6 Full Extension Slide Seri...

Page 30: ...ass D Audio Amplifier Board INV 14 0005 6 PC Box for Crazy Tower with Fujitsu H310 ADR 11 1017 02 CZT 7 Program Led Controller with SD Card INV 14 1023 01 PROG 8 Short Throw Pocket LED Projector CZT 10 1003 9 Restore USB Key Crazy Tower for H110 Restore USB Key Crazy Tower for Fujitsu H310 ADR 11 2014 CZT H110 ADR 11 2014 CZT H310 10 Hard Drive for Crazy Tower for H110 Hard Drive for Crazy Tower f...

Page 31: ...Melamine 5 8 CZT 02 1001 ITEM 04 MCZT 02 0001 ITEM 04 5 Melamine 5 8 CZT 02 1001 ITEM 05 MCZT 02 0001 ITEM 05 6 Plywood 5 8 CZT 02 1001 ITEM 06 MCZT 02 0001 ITEM 06 Tray Ref Part Description Part Number 1 Melamine 3 4 CZT 02 1002 ITEM 01 MCZT 02 1002 ITEM 01 2 Melamine 5 8 CZT 02 1002 ITEM 02 MCZT 02 1002 ITEM 02 3 Melamine 5 8 CZT 02 1002 ITEM 03 MCZT 02 1002 ITEM 03 4 Melamine 5 8 CZT 02 1002 IT...

Page 32: ...tion Part Number 1 Top Header Mega Crazy Tower including LEDs cable MCZT 09 1001 KIT 2 Melamine Decal Kit Mega Crazy Tower MCZT 09 1002 3 LEDs for Top Header Crazy Tower and Mega Crazy Tower MCZT 14 1001 Low height Version Ref Part Description Part Number 1 Top Header for Crazy Tower including LEDs cable and Tape CZT 09 1001 KIT 3 LEDs for Top Header Crazy Tower and Mega Crazy Tower MCZT 14 1001 4...

Page 33: ...to 2x C13 1 INV PW 200B 01 Cable USB 2 0 AB 2 INV USB AB1 02BK Mega Crazy Tower 48 Part Description Part Number Splitter Cable Barrel connector 2 1mm Female to 4x 2 1mm Male INV CN DCF 4M HDMI Cable 10 INV HDMI 140 10K HDMI Cable 12 INV HDMI 140 12K HDMI Cable Male to Female with Ethernet 28AWG 6 INV HDMI 141 06 HDMI Cable Male to Female with Ethernet 28AWG 10 INV HDMI 141 10 Power Cord IEC C13 to...

Page 34: ...o IO Board CZT 03 0002 Harness for Button Player 1 To 4 CZT 03 0003 Harness For I O Board to Player 1 only CZT 03 0004 Harness for IO Board to Player 2 3 4 Ticket Dispenser and Coin Door A B C CZT 03 0005 Harness For I O Board to Player 1 Ticket Dispenser and Coin Door A B CZT 03 0006 Harness for Top Header LEDs CZT 03 0009 Harness for Top Fan 80mm and 120mm CZT 03 0013 ...

Page 35: ...elect 4 White Up 5 Black GND 6 No Use No Use Player 1 Ticket 1 Red 12V 2 White OUT 3 Green OPTO1 4 Black GND J5 J6 J7 J8 Player 2 Ticket 1 Red 12V 2 White OUT 3 Green OPTO2 4 Black GND Player 3 Ticket 1 Red 12V 2 White OUT 3 Green OPTO3 4 Black GND Player 4 Ticket 1 Red 12V 2 White OUT 3 Green OPTO4 4 Black GND Player 1 Buttons 1 Red 12V 2 Blue OUT 3 Black GND 4 White IN1 5 No Use 6 No Use ...

Page 36: ...No Use 5V 12V Input DC J13 J14 J15 J16 USB To Computer Coin Door Player 1 1 White 12V 2 Black GND 3 Red IN1 4 Yellow IN2 5 Blue GND 6 Brown OUT1 7 Orange OUT2 8 Green 12V Coin Door Player 2 1 White 12V 2 Black GND 3 Red IN1 4 Yellow IN2 5 Blue GND 6 Brown OUT1 7 Orange OUT2 8 Green 12V Coin Door Player 3 1 White 12V 2 Black GND 3 Red IN1 4 Yellow IN2 5 Blue GND 6 Brown OUT1 7 Orange OUT2 8 Green 1...

Page 37: ... Red 12V 2 White OUT 3 Green OPTO2 4 Black GND Player 3 Ticket 1 Red 12V 2 White OUT 3 Green OPTO3 4 Black GND Player 4 Ticket 1 Red 12V 2 White OUT 3 Green OPTO4 4 Black GND Player 1 Buttons 1 Red 12V 2 Blue OUT 3 Black GND 4 White IN1 5 No Use 6 No Use J9 J10 J11 J12 Player 2 Buttons 1 Red 12V 2 Blue OUT 3 Black GND 4 White IN1 5 No Use 6 No Use Player 3 Buttons 1 Red 12V 2 Blue OUT 3 Black GND ...

Page 38: ...rown OUT1 7 Orange OUT2 8 Green 12V Coin Door Player 2 1 White 12V 2 Black GND 3 Red IN1 4 Yellow IN2 5 Blue GND 6 Brown OUT1 7 Orange OUT2 8 Green 12V Coin Door Player 3 1 White 12V 2 Black GND 3 Red IN1 4 Yellow IN2 5 Blue GND 6 Brown OUT1 7 Orange OUT2 8 Green 12V J17 Coin Door Player 4 1 White 12V 2 Black GND 3 Red IN1 4 Yellow IN2 5 Blue GND 6 Brown OUT1 7 Orange OUT2 8 Green 12V ...

Page 39: ... Blue Black OUT 3 Black Red GND 4 White Red IN1 5 No Use 6 No Use J9 J10 J11 J12 Player 2 Buttons 1 Red Black 12V 2 Blue Black OUT 3 Black Red GND 4 White Red IN1 5 No Use 6 No Use Player 3 Buttons 1 Red Black 12V 2 Blue Black OUT 3 Black Red GND 4 White Red IN1 5 No Use 6 No Use Player 4 Buttons 1 Red Black 12V 2 Blue Black OUT 3 Black Red GND 4 White Red IN1 5 No Use 6 No Use 5V 12V Input DC J13...

Page 40: ...Crazy Tower Arcade Manual V7 1 Chapter 08 Diagrams Schematics 40 P a g e J17 Coin Door Player 4 1 White 12V 2 Black GND 3 Red IN1 4 Orange Red IN2 5 Blue GND 6 Red Green OUT1 7 Orange OUT2 8 Green 12V ...

Page 41: ...Crazy Tower Arcade Manual V7 1 Chapter 08 Diagrams Schematics 41 P a g e Power Distribution Schematics ...

Page 42: ...Crazy Tower Arcade Manual V7 1 Chapter 08 Diagrams Schematics 42 P a g e Players Wiring Current version ...

Page 43: ...Crazy Tower Arcade Manual V7 1 Chapter 08 Diagrams Schematics 43 P a g e Players Wiring Version 1 Discontinued ...

Page 44: ...Manual V7 1 Chapter 08 Diagrams Schematics 44 P a g e Coins Ticket Wiring The wiring is the same for each player The difference is that Player 1 Drawer uses harness CZT 03 0006 while Players 2 3 4 uses harness CZT 03 0005 ...

Page 45: ...Crazy Tower Arcade Manual V7 1 Chapter 08 Diagrams Schematics 45 P a g e Coins Ticket Wiring Version 1 Discontinued ...

Page 46: ...Crazy Tower Arcade Manual V7 1 Chapter 08 Diagrams Schematics 46 P a g e RGB LED Wiring ...

Page 47: ... keyboard to the motherboard Connect the provided USB Recovery flash disk is in a Black USB port Power on the unit and press F8 on the keyboard to display the boot menu Choose the UEFI USB device 16GB The process takes 25 30minutes and the unit will reboot back in the game at the end The Wireless credentials will need to be re entered and Operator settings will be back at the default ones ...

Page 48: ... e Chapter 10 Card Reader If you use a card reader system it is important to follow those instructions You need to install 4 card readers one for each player You need to buy the optional Black Door to install Configure your Operator settings as seen on page 13 14 ...

Page 49: ...ard Reader 49 P a g e Embed System If you are using an Embed system you need to connect your harnesses to Adrenaline Amusements I O board harnesses You should refer to the Embed instructions manual for wiring pin out but here s Embed V5 example ...

Page 50: ... P a g e The Embed settings are Standard except Ticket Mech Type Dumb DC Drive Polarity Positive Notch Polarity Negative Game ticket notch width 10 Game ticket notch spacing 15 Game Drive Threshold 1 5V Notch Pulse 60ms Ticket Space 240ms Drive Debounce 40ms ...

Page 51: ...ents covers at no charge the replacement parts including standard shipping Customers have 30 days from delivery date to return back the defective equipment at their fees or they will be billed automatically Improper servicing or abuse will VOID existing warranties All warranty request needs to be validate with our technical support department After the 1 year warranty Adrenaline Amusements offers ...

Reviews: