background image


      RK3000 High Frequency Power Supply 

Operating Manual


Page 57 of 73 

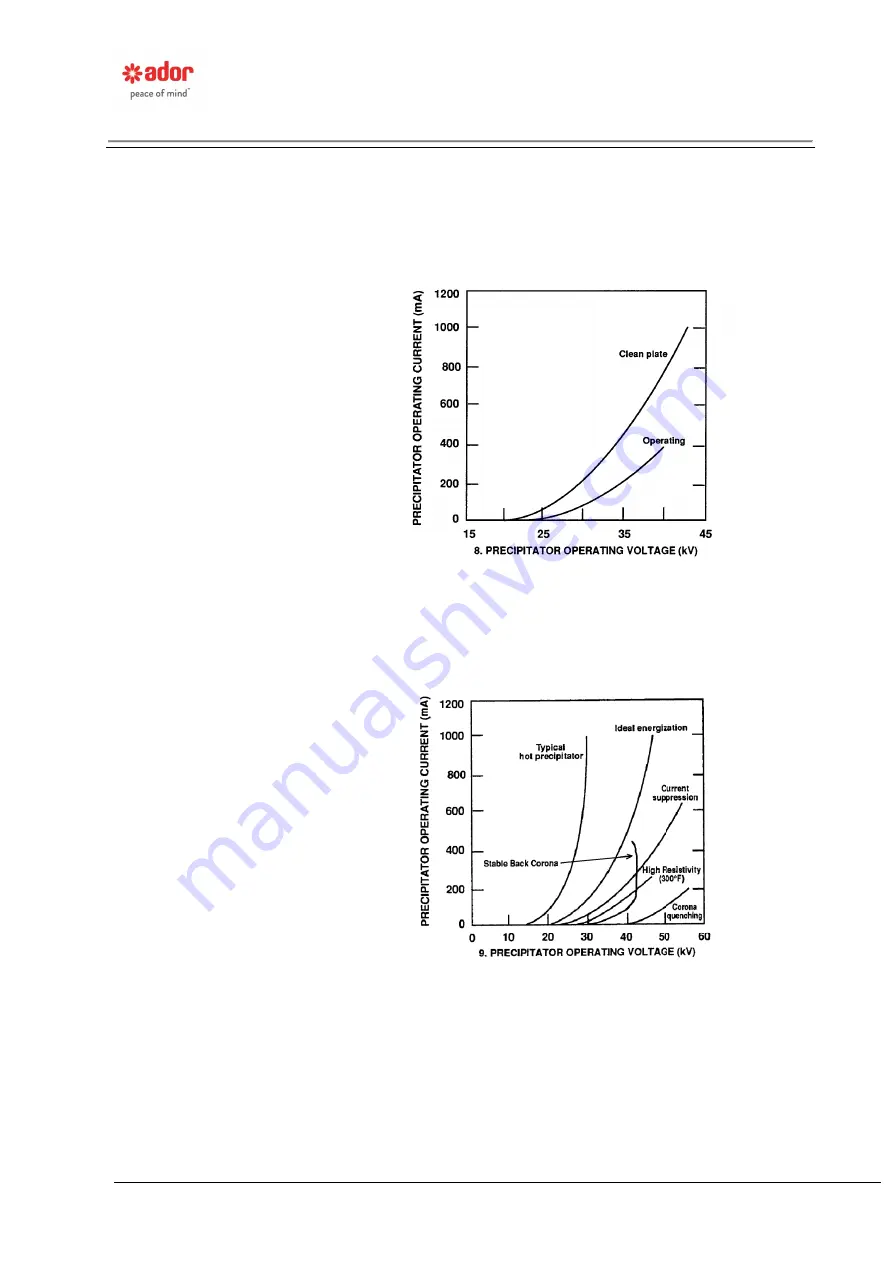
Waveforms #8 and #9, Back Corona Control 

Waveform #8 shows a typical secondary voltage versus secondary current curve for 
moderate and low resistivity precipitator operation. 


Sketch 8: Precipitator Operating Voltage (kV) 

Waveform #9 shows a typical secondary voltage versus secondary current curve for high-
resistivity precipitator operation where the precipitator is experiencing Back Corona. 


Sketch 9: Precipitator Operating Voltage (kV) 


Notice that with Back Corona, the current increases without a corresponding increase in 
voltage.  The point where the current starts to increase but the voltage remains the same 
(or even decreased) is the optimum operating point for Back Corona operation.  
Operating at higher current provides no increase in precipitator efficiency and only results 
in wasted power (and, in most cases, poorer collection efficiency). 

Summary of Contents for RK3000

Page 1: ...uency Power Supply Microprocessor Transformer Control for Electrostatic Precipitators ADOR POWERTRON LIMITED RAMNAGAR COMPLEX PLOT NO 51 D II BLOCK MIDC CHINCHWAD PUNE 411019 INDIA Version 1 02 DRG NO 5003 0004 13 06 1 ...

Page 2: ...RS 12 Average Readings 13 Coordination System 13 Definition of Control Responses 13 Display ID 13 Energy Management Mgt Setup Optional Feature 13 External Alarm Trip 13 External Alarm Message Text 14 Max Set Size 14 Pedestal Rate 14 Phase Back 14 Power Down Rapping 14 Pre Spark Readings 14 Primary Current Limit 14 Primary Voltage Limit 14 Process Sense 14 Quench Mode 15 Quench Time 15 Ramp Rate 15...

Page 3: ...4 ID Set Up 25 Coordination System 26 Programming Discrete Key Parameters 27 Limits key 27 RAMP 29 PHASE BACK 29 PED 29 QUENCH 30 PROMPT 30 Clear Alarm 30 Programming Prompt Key Parameters 31 PROMPT Key 31 Average Readings 31 Pre Spark Readings 32 Conduction Display 33 Spark Rate Control 33 Quench Mode 34 Process Sense 35 Reinitialize Interface Unit 35 Reinitialize Keyboard and Display Unit 36 Sof...

Page 4: ...destal Programmed to 1 and 10 Cycles 54 Waveforms 5 and 6 Automatic Parameter Adjustment with Sparking and Arcing 55 Waveform 7 Typical Control Waveform 56 Waveforms 8 and 9 Back Corona Control 57 CHAPTER 11 DESCRIPTION OF INTERFACE UNIT CONNECTIONS LEDS AND RELAYS 58 CHAPTER 12 TECHNICAL HELP 59 WARRANTY RETURN AUTHORIZATION 60 APPENDIX I WET PRECIPITATOR WASH DOWN SYSTEM OPTIONAL FEATURE 61 Wet ...

Page 5: ...l flexibility is available through the RK3000 s many easily programmed operating parameters and automatic features This flexibility in turn results in maximum precipitator efficiency and minimum outlet emissions This manual will define all the pre programmed and field programmable features of the RK3000 control as well as provide a description of the control components A description of typical wav...

Page 6: ...ntrol components o Keypad and Display Unit o Control Unit o Interface Communications Cable o Current Transformer o Potential Transformer o Secondary Signal Conditioning Resistors Keypad and Display Unit The Keypad and Display Unit is the user interface to the various operating modes and variable parameters of the system It communicates with one or more Interface Boards Electrical readings programm...

Page 7: ...nd digital signals present in the control and feedback circuits The IGBT firing circuit is located on this Unit It responds to precipitator operating conditions based on the parameters programmed into the Keyboard and Display Unit The switches for setting the Control Unit ID number are also located on this Unit Figure 2 Control Unit ...

Page 8: ...t and the Control Unit to provide a communications link for passing data Figure 3 Control Communications Cable Current Transformer The Current Transformer CT and load resistor combination when properly set provides a 5V signal at rated current to the Control Unit The signal is used for primary current display and limit Figure 4 Current Transformer ...

Page 9: ...mit Figure 5 Potential Transformer Secondary Signal Conditioning Resistors Signal conditioning resistors are provided for both the secondary current and secondary voltage reference signals Their values will vary depending on the transformer rectifier rating See schematic diagrams for proper values These signals are sent to the Control Unit for secondary voltage and current display and limits as we...

Page 10: ...order to get the control s up and running To get started quickly for each control cabinet follow the instructions in the order that they appear below 1 Enter the Programming security code page 24 2 Program the Max Set Size page 41 3 Program the Limits page 27 The other parameters and operating modes have default values based on typical precipitator operation They will allow the control and precipi...

Page 11: ...e programmed in order to get the control s up and running To get started quickly follow the instructions in the order that they appear below This must be done for each Keypad and Display Unit and each Control Unit control cabinet as applicable 1 Enter the security code page 26 2 Follow the ID set up on page 25 3 Program the Max Set Size page 37 4 Program the Limits page 27 The other parameters and...

Page 12: ...Ramp Rate Rapper System Set up Reinitialize Control Unit Reinitialize Keypad and Display Unit Relay Timers Conduction Display Secondary Current Limit Secondary Voltage Limit Separate Spark and Arc Control Responses Soft Start Soft Arc Detection Spark Numerical Display Spark Sensitivity Spark Rate Control Efficiency Display True RMS Primary Voltage Current Display Under Voltage Time Delay Under Vol...

Page 13: ...alf cycle or less before extinguishing The control phases back reduces the power for this condition The spark rate that is displayed in the Electrical Reading Screen is a sixty 60 second rolling average of these spark occurrences Arc High current electrical discharge that persists for great than one half cycle and usually requires removal of electrical power before it will extinguish The control q...

Page 14: ... precipitator efficiency For a more detailed description of Phase Back see Discussion of Typical Control Waveforms page 52 Power Down Rapping If the TR controller is communicating with a Microprocessor Rapper Control MRC NT over a communications loop or the optional relays and timers are installed on the Control Unit for controlling motor drives of mechanical rappers the TR power level can be set ...

Page 15: ...inues at the Ramp Rate until either current limit or voltage limit is reached or a spark or arc occurs The time programmed for the Ramp Rate is the time it takes the power to increase from the Phase Back level to pre spark current level The Ramp Rate is field programmed see Preprogrammed Levels and Operating Ranges page 68 for the lowest opacity operation under normal operating conditions For a mo...

Page 16: ...intain a spark rate equal to the programmed rate Spark Sensitivity Allows the detection of a spark to be based on a secondary voltage drop rather than a secondary current increase Soft Arc Where electrical noise poor electrical grounds or small signal to noise ratios exist arc detection can be performed based on a specific value of secondary voltage increase simultaneously with a specific value of...

Page 17: ...T is slowly increased and in turn the power to the precipitator This slow power rise eliminates current inrush on the power feeders and substations Spark Indicator and Numerical Display The Electrical Reading Screen shows the number of Sparks Per Minute that are occurring as well as a decimal point that flashes each time a spark occurs True RMS Primary Voltage and Current Displays The primary volt...

Page 18: ...l be the Device Status Screen Using the up and down arrow keys on the keypad the desired ID number TR Name is scrolled in between the arrows Pressing the ENTER key now will bring up the Device Status Screen for the chosen ID number Device Status Screen Displays operating conditions of an individual control Data such as Run Stop Alarm messages Status messages etc are shown here This is the opening ...

Page 19: ... the ENTER key is pressed the display changes to the Parameter Screen TR NAME Parameter Name Parameter Screen Permits programming of the selected parameter showing valid choices Parameter Name Programming Choices Alarm Summary Screen Identifies control names and alarms associated with those controls The elapse time from the alarm occurrence in days hours minutes and seconds is also provided The ar...

Page 20: ...e Communications Error communication error between Keypad and Display Unit and Control Unit MRC Comm Error communication error between the TR control and the Rapper control when Power Down Rapping is active Master Fuel Trip control de energized due to master fuel trip Memory Clear memory has been cleared Under voltage Trip due to under voltage condition Alarm 1 User defined alarm trip Alarm 2 User...

Page 21: ... for the programmable parameters LIMITS key Used to check or in conjunction with a security code to program the control limits primary voltage limit primary current limit secondary current limit secondary voltage limit and Under Voltage trip For programming ranges see Preprogrammed Levels And Operating Ranges page 68 RAMP key Used to check or in conjunction with a security code to program the valu...

Page 22: ...t a security code must be entered before the parameter can be changed Two padlock icons indicate that the control must also be in the stop mode to make a parameter change The CODE key is accessible at the Device Selection Device Status Electrical Reading and Prompt Screens If you are in the Parameter Screen press the ESC key This will back you up one screen to the Prompt Screen Enter the appropria...

Page 23: ...ONTROL WILL NOT ENERGIZE When the breaker is closed and the STOP START switch is placed in the START position there is a one second delay between the energizing of the contactor and firing of the IGBTs When the IGBTs are fired they are done slowly so there is no inrush on the control electrical feeders or substation Power is applied to its associated transformer until either sparking or arcing occ...

Page 24: ...eed to be told which Interface Boards it should be communicating with Viewing Parameters An access code is not required to view any of the control parameters modes limits set points toggles displays etc A code is also is not required to change screen views To view information follow the same instructions as for programming a parameter Security Programming Code Entry Before any programming changes ...

Page 25: ...ommunications loop basis That is all the Interface Units that talk over the same loop must have different sequential ID numbers amongst themselves and the Keypad and Display Units on the same loop must have different ID numbers amongst themselves To set up the ID numbers for the Keypad and Display Units as well as set the range of Interface Unit IDs that the Keypad and Display Unit s communicate w...

Page 26: ...reen will now appear Each Interface Unit must be set for its specific ID number This is accomplished by adjusting two miniature rotary switches on each Interface Board Set these switches so each Interface Unit has a unique ID number See page 62 Coordination System If all timers timers are an optional feature and my not be included on your particular control and their associated relays on the Inter...

Page 27: ... acceptable simply press ENTER without making any changes You will now be returned to the Device Selection screen Programming Discrete Key Parameters For programming purposes operating parameters are grouped into two types One type is the discrete key parameter that is associated with a specific key on the keypad and the other is a parameter that is associated with the PROMPT key The following ins...

Page 28: ...en and press ENTER If the present operating value is acceptable simply press ENTER without making any changed The Secondary Current Limit display will now appear Secondary Voltage Limit The Secondary Voltage Limit display is now shown The acceptable range for the Secondary Voltage Limit is presented to the right of the word Range In this example the present operating value is 99 kV Kilovolts If th...

Page 29: ... screen PHASE BACK Press the PHASE BACK key The Phase Back display appears The acceptable range for the Phase Back is presented to the right of the word Range In this example the range is 1 to 99 percent The present operating value for the Phase Back is presented to the right of the word Enter In this example the present operating value is 20 percent If the operating value is to be changed simply ...

Page 30: ...t making any changes The screen will now revert to either the Device Status Screen or the Electrical Reading Screen depending which screen was active when the PED key was pressed PROMPT Pressing this key brings up the Prompt screen that allows additional parameters to be viewed and programmed See Programming Prompt Key Parameters that follows this section Clear Alarm Pressing this key from the Dev...

Page 31: ...t Under Voltage Setup Energy Management set up Wash Down System Power Down Rapping Rapper System Set up If you are in a prompt screen and return to the Electrical Reading Screen or the Device Status Screen when you press the PROMPT key again you will be returned to the last prompt that was displayed If the security code times out before returning to the PROMPT key the prompts will start with the A...

Page 32: ...the Electrical Reading Screen will show the electrical readings that were present prior to the last spark and the mode area will display Pre Spk in the mode area The display will hold those readings until another spark occurs and then display the electrical reading prior to that spark If no spark occurs within five minutes the display returns to normal with the Pre Spark Readings mode still active...

Page 33: ... 0 to 100 If the operating mode is to be changed simply press the 0 or 1 key corresponding to the new mode the old value will be overwritten and press ENTER If the present operating mode is acceptable simply press ENTER without making any changes If 1 enable was selected the Electrical Reading Screen will show the firing on time percentage in the mode area To return the Electrical Reading Screen t...

Page 34: ...or the Spark Rate is presented to the right of the word ENTER In this example the present operating value is 24 sparks per minute If the operating value is to be changed simply press the numeric keys corresponding to the new value the old value will be overwritten and present ENTER If the present operating value is acceptable simply press ENTER without making any changes The spark rate value will ...

Page 35: ...king has occurred If sparking has not occurred in this time period and the control is not at a limit the control will rapidly raise the power level at a preprogrammed ramp rate until a spark or a limit is reached This allows a rapid recovery after an upset condition The acceptable range for the Process Sense time period is presented to the right to the word Range In this example the range is 10 to...

Page 36: ...ZE Reinitialize Keyboard and Display Unit Note To reinitialize the Keypad and Display Unit the control must be in the Stop mode On Off switch in the Off position Press the PROMPT key and then the DOWN key until the Re init Keypad Disp Prompt Screen appears Press ENTER and the Re init Keypad Disp Parameter Screen will appear To reinitialize the Keypad and Display Unit press the 1 key and then the E...

Page 37: ...ad and Display Unit will appear In the above example the software part number Xs and the software version number Xs would be replaced with the actual numbers Press ENTER and the Software Version Parameter Screen for the Interface Unit appears In the above example the software part number Xs and the software version number Xs would be replaced with the actual numbers Press ENTER or ESC to return to...

Page 38: ...d maximum secondary current is 1000 milliamps If the present rated TR maximum secondary current is to be changed simply press the numeric keys corresponding to the new value the old value will be overwritten and press ENTER If the present rated TR maximum secondary current value is acceptable simply press ENTER without making any changes In either case the third display Max Sec Voltage will appear...

Page 39: ...ip the control for an external alarm condition on the Alarm 1 input press the 1 key To just alarm for an external alarm condition on the Alarm 1 input press the 0 key Your selection will appear opposite the word Enter and become active when the ENTER key is pressed If the present operating mode is acceptable simply press ENTER without making any changes Either way the display will now change to th...

Page 40: ... the Electrical Reading Screen or the Device Status Screen depending on the screen you were in prior to pressing the PROMPT key External Alarm Message Text Press the PROMPT key and then the DOWN key until the External Alarm Message Text Prompt Screen appears Press ENTER and the External Alarm Message Text Parameter Screen will appear Press ENTER and a list of the first four alarm texts that could ...

Page 41: ...he External Alarm 3 Text Parameter Screen will appear Ext Alarm 3 Text External Alarm 3 Range 1 14 Enter 03 The second line in the display shows the present text for this alarm input The numbers in the range correspond to the numbers assigned to the various text messages that were previously viewed If the text message is to be changed simply press the numeric keys corresponding to the new text des...

Page 42: ...onding to the new value the old value will be overwritten and press ENTER If the present choice is acceptable simply press ENTER without making any changes Whether a change is made or not after the ENTER key is pressed the Primary Trip Parameter Screen or the Secondary Trip Parameter Screen will appear depending on the selection in the UV Detection Screen RED 01 Primary UV Trip Range 25 600 volts ...

Page 43: ...ystem Parameter Screen will appear This screen allows the control to be assigned to one of four separate energy management systems all four are not always available check electrical schematics for the Transceiver If the present choice is to be changed simply press the numeric key corresponding to the new value the old value will be overwritten and press ENTER If the present choice is acceptable si...

Page 44: ...condary voltage will drop to when power down rapping is activated is presented to the right of the word Enter In this example the present operating value is 30 kV If the operating value is to be changed simply press the numeric keys corresponding to the new value the old value will be overwritten and press ENTER If the present operating value is acceptable simply press ENTER without making any cha...

Page 45: ...key and then the key until the Spark Sensitivity Prompt Screen appears Press ENTER and the Spark Sensitivity Parameter Screen will appear The normal operating level for the Spark Sensitivity parameter is 00 At that sensitivity sparks are only detected off the primary current signal Any value entered from 1 to 20 will automatically cause the sparks to be detected off the secondary voltage signal Th...

Page 46: ...acceptable simply press ENTER without making any changes The Soft Arc Is Delta screen will now appear This screen allows the setting of the secondary current Vs increase delta value for the soft arc detection The secondary current value can be anywhere in the range shown in one ma increments If the operating value is to be changed simply press the numeric key s corresponding to the new value desir...

Page 47: ...e the power can be adjusted to between 0 and 100 IGBT conduction However if the control is detecting sparks and or arcs the control will only increase to the power levels at the point of spark arc detection It is recommended that when operating in the Manual Mode the power level be adjusted to just below the threshold of sparking If necessary us a clamp on amp meter to check for current transients...

Page 48: ...ked at the T R pipe and guard interface as well as at the pipe and guard support bushing interface 8 Energize the transformer rectifier control cabinet by placing the main circuit breaker in the on position 9 Enter the code for clearing the memory This initializes the microprocessor control 10 Program the control for the correct Max Set Size and Limits Also each Keypad and Display Unit must be pro...

Page 49: ...rger values of primary voltage primary current and secondary current This slow power up will take 10 seconds 17 The control should power up to either rated current or rated voltage If the control sparks before reaching a current or voltage limit a problem still exists inside the precipitator If there is no sparking but a voltage or current limit is not reached recheck the programmable parameter se...

Page 50: ...r rectifier controls as follows Program the Quench Mode for Arc Only Mode Program the Pedestal Rate to 1 cycle Program the Ramp Rate to 3 seconds Program the Phase Back to 25 percent Program the Process Sense to 10 seconds Program intermediate precipitator field transformer rectifier controls so they fall between those outlined above High Resistivity Ash Operation As a starting point for precipita...

Page 51: ...ine tuning should proceed by reprogramming the various parameters in the following order Phase Back Ramp Rate Quench Mode Pedestal Rate Process Sense Using the opacity meter as a guide use visual stack observation if opacity meter is unavailable reprogram each parameter one at a time until the lowest steadiest opacity readings are obtained Start with Phase Back parameter Reprogram the percent Phas...

Page 52: ...nt reduction after a Spark is called the Phase Back Phase Back is a discrete key programmable parameter Sketch 1 Quench Mode Arc Only Within one half cycle after reaching the Phase Back current level the RK3000 starts to increase current towards it s rating by increasing the conduction angle of the IGBTs The period of time it takes for the current to increase from the Phase Back level to the curre...

Page 53: ...rm 1 The Pedestal Rate still transfers operation to the Ramp Rate at the Phase Back level Larger Pedestal Rates are used when heavy or repetitive arcing is present in the precipitator Whipping discharge electrodes arcing across insulator surfaces or clinker formation on the discharge electrodes usually causes heavy or repetitive arcing Programming the Pedestal Rate for greater than 1 cycle increas...

Page 54: ...nch Time and turns the power off for the programmed time period If conditions within the precipitator are extremely severe and a great deal of sparking and arcing is occurring operating in the Arc and Spark Quench Mode can reduce the wear on the electrodes Sketch 3 Quench Mode Arc And Spark Sketch 4 Quench Mode Arc And Spark One of the outstanding features of the RK3000 is its ability to automatic...

Page 55: ...as conditions change within the precipitator Sketch 5 Typical Control Without Arcing Sketch 6 Typical Automatic Control With Arcing The Phase Back Ramp Rate and Pedestal Rate are all referenced to current levels As current increases the Phase Back is automatically increased the Ramp Rate is automatically decreased and the Pedestal Rate is automatically decreased based on a preprogrammed formula Co...

Page 56: ...Ramp go into operation Sparking becomes more frequent and occurs at lower and lower power levels The RK3000 phases back after each Spark to establish a new operating level just below the threshold of sparking Note that as the current gets lower the amount of Phase Back decreases automatically After each Phase Back the Ramp Rate tries to increase the current level back to maximum However due to exi...

Page 57: ... curve for high resistivity precipitator operation where the precipitator is experiencing Back Corona Sketch 9 Precipitator Operating Voltage kV Notice that with Back Corona the current increases without a corresponding increase in voltage The point where the current starts to increase but the voltage remains the same or even decreased is the optimum operating point for Back Corona operation Opera...

Page 58: ... Supply Operating Manual Page 58 of 73 CHAPTER 11 DESCRIPTION OF INTERFACE UNIT CONNECTIONS LEDs AND RELAYS R e f e r t o t h e f o l l o w i n g p a g e s f o r a d e s c Discription of Interface Unit Connections and Components ...

Page 59: ...ing Manual Page 59 of 73 CHAPTER 12 TECHNICAL HELP Technical help and parts can be obtained by contacting Ador Powertron Limited by any of the following ways Phone 91 20 27473778 27472532 Fax 91 20 27475817 E mail customercarehvr adorpower com ...

Page 60: ...eserves the right at its sole option to inspect Purchaser s schematic and or connecting diagrams and or to inspect job site conditions and installation Repairs or modifications by Purchaser will void this warrant unless approved by Redkoh Industries Except for warranties specifically set forth herein THERE SHALL BE NO WARRANTIES EXPRESSED OR IMPLIED NOR SHALL THERE BE A WARRANTY OR MERCHANTABILITY...

Page 61: ...d then the key until the Wash down System Prompt Screen appears Press ENTER and the Wash down Interval Parameter Screen will appear The wash down interval is the time between wash downs in hours minutes and seconds If the TR control is in the run mode when the Interval timer expires and the Wash Duration starts it automatically stops firing the IGBTs and opens the contactor If the TR control was o...

Page 62: ...is the time the relay contact between RR PWR and RR1 remains closed and in turn how long the wash down continues When this timer times out the relay contact opens and the wash down ceases The Range of this timer is one second to 99 hours 59 minutes 59 seconds The present operating value for the Wash down Duration is presented to the right of the word ENTER In this example the present operating val...

Page 63: ...tate the times previously entered remain in memory The present operating mode for the Automatic Wash down is presented to the right of the word ENTER In this example the present operating mode is disabled If the operating mode is to be changed simply press the numeric key corresponding to the new value the old value will be overwritten and press ENTER If the present operating mode is acceptable si...

Page 64: ... up Prompt Screen appears Press ENTER and the Global Rapper System screen will appear The global rapper system refers to the status of all the rapper relays selected under the Coordination System set up If the global rapper system is disabled none of relays will energize If the system is enabled all the relays have the capability of being individually energized or individually de energized To disa...

Page 65: ...f the Interval time is to be changed simply press the numeric keys corresponding to the new value the old value will be overwritten and press ENTER If the present Interval is acceptable simply press ENTER without making any changes Either way the display will now change to the Rapper On Time screen The On Time is the on time of the relay The Range of the On Time is 1 second to 99 hours 59 minutes ...

Page 66: ...g relay operation press 1 to enable Power Down If it is not desirable to reduce the power during relay operation press 0 to disable Power Down Your choice will appear next to the word Enable After you have made your selection press the ENTER key and the Rapper 1 Enable Disable screen will appear This screen is used to choose whether or not this rapper relay will operate or not If it is Enabled the...

Page 67: ...nit Enter the appropriate number of your choice during Alarm programming 1 External Alarm 1 2 External Alarm 2 3 External Alarm 3 4 External Alarm 4 5 High IGBT Temp 6 Low T R Level 7 High T R Temp 8 Full Hopper 9 Master Fuel Trip 10 High O2 Trip 11 T R Overpressure 12 Fan Fault 13 Interlock Error 14 Ext Charge Stop 15 Rapper Motor Fail 16 Impact Rapper Fail 17 Overload Relay Trip 18 High Cabinet ...

Page 68: ...0 1 99 1 increments Pedestal 2 1 10 cycles 1 cycle increments Quench Time 1 1 9 cycles 1 cycle increments Quench Mode 0 0 or 1 0 Arc 1 Arc Spark Process Sense 90 10 99seconds 1 second increments Spark Rate Control 0 0 or 1 0 Disable 1 Enable Spark Rate 24 2 200 SPM 1 SPM increments Under Voltage Trip Delay Time 30 10 99 1 second increments Under Voltage Trip Detection 0 0 or 1 0 Primary 1 Secondar...

Page 69: ... 00 1 99 59 59 1 second increments Rapper 3 4 On Time 00 00 00 1 99 59 59 1 second increments Rapper 1 4 Mode 0 0 1 or 2 0 None 1 one 2 two Rapper 1 4 Power Down 0 0 or 1 0 Disable 1 Enable Rapper 1 4 0 0 or 1 0 Disable 1 Enable Power Down Rapping Sec Voltage KV Level 0 1 kV increments Wash Down Interval 00 00 00 1 99 59 59 1 second increments Wash Down Delay 00 00 00 1 99 59 59 1 second increment...

Page 70: ...3 Device Select Key 24 Device Selection Screen 19 Device Status Screen 19 Digital Display 19 Display ID 13 Drain Delay 65 66 E Electrical Reading Screen 19 E mail 63 End ID Number 28 End ID Number Screen 27 29 Energy Management Mgt Setup 13 Energy Mgt Mode 21 Energy Mgt Setup 46 Enter Key 24 Esc Key 23 External Alarm Message Text 14 34 43 External Alarm Trip 34 42 External Alarm Trip 14 F Fax 63 F...

Page 71: ...rogramming Discrete Key Parameters 29 Programming Prompt Key Parameters 34 Prompt 32 PROMPT 23 Prompt Key 20 34 Prompt Screen 20 Q Quench 32 Quench Key 23 Quench Mode 15 34 37 49 Quench Time 15 R Ramp 31 Ramp Key 22 Ramp Rate 15 Rapping System Set up 15 Reinitialize 15 Reinitialize Interface Unit 39 Reinitialize Keyboard And Display Unit 39 Relay Timers 16 Run Stop 34 S SCR Conduction Angle 16 34 ...

Page 72: ...ower Supply Operating Manual Page 72 of 73 Update In Progress 20 V Viewing Parameters 26 W Warranty Repair 64 Wash Down System 47 65 Wash Down Delay 65 Wash Down Duration 65 66 Wash Down Interval 65 Watt Meter 18 Web Site 63 ...

Page 73: ...RK3000 High Frequency Power Supply Operating Manual Page 73 of 73 FOR PROFIBUS PROFINET Please refer document no 5003 0004 13 89 ...

Reviews: