


www.adeept.com
66
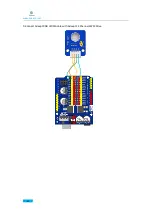
Input and Output
Each of the 14 digital pins on the Uno can be used as an input or output, using pinMode(),
digitalWrite(), and digitalRead() functions. They operate at 5 volts. Each pin can provide or
receive 20 mA as recommended operating condition and has an internal pull-up resistor
(disconnected by default) of 20-50k ohm. A maximum of 40mA is the value that must not be
exceeded on any I/O pin to avoid permanent damage to the microcontroller.
In addition, some pins have specialized functions:
Serial: 0 (RX) and 1 (TX). Used to receive (RX) and transmit (TX) TTL serial data. These pins are
connected to the corresponding pins of the ATmega8U2 USB-to-TTL Serial chip.
External Interrupts: 2 and 3. These pins can be configured to trigger an interrupt on a low value, a
rising or falling edge, or a change in value. See the attachInterrupt() function for details.
PWM: 3, 5, 6, 9, 10, and 11. Provide 8-bit PWM output with the analogWrite() function.
SPI: 10 (SS), 11 (MOSI), 12 (MISO), 13 (SCK). These pins support SPI communication using the SPI
library.
LED: 13. There is a built-in LED driven by digital pin 13. When the pin is HIGH value, the LED is on,
when the pin is LOW, it's off.
TWI: A4 or SDA pin and A5 or SCL pin. Support TWI communication using the Wire library.
The Uno has 6 analog inputs, labeled A0 through A5, each of which provide 10 bits of resolution
(i.e. 1024 different values). By default they measure from ground to 5 volts, though is it possible
to change the upper end of their range using the AREF pin and the analogReference() function.
There are a couple of other pins on the board:
AREF. Reference voltage for the analog inputs. Used with analogReference().
Reset. Bring this line LOW to reset the microcontroller. Typically used to add a reset button to
shields which block the one on the board.
Arduino Software (IDE)
Please refer to the following teaching video for IDE download and installation
:
https://youtu.be/BsTDVB8B240
Arduino Software (IDE) is used to write and upload the code for Arduino Board. First, install
Arduino software (IDE): visit
https://www.arduino.cc/en/Main/Software
. Download the
corresponding installation program according to your operating system. If you are a Windows
user, please select the “Windows Intaller” to download and install the driver correctly.
Summary of Contents for Hexapod 6 Legs Spider Robot
Page 1: ...www adeept com 1...
Page 40: ...www adeept com 36 The effect diagram after the assembly of three right feet...
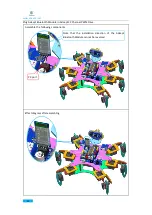
Page 49: ...www adeept com 45 The effect diagram after the assembly of three left feet...
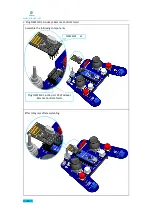
Page 63: ...www adeept com 59 C Connect Adeept Ultrasonic Module with Adeept 32 Channel PWM Drive...
Page 64: ...www adeept com 60 D Connect Adeept RGB LED Module with Adeept 32 Channel PWM Drive...
Page 65: ...www adeept com 61 E Connect Adeept Passive Buzzer Module with Adeept 32 Channel PWM Drive...
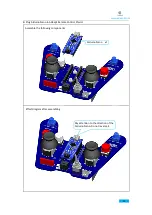
Page 66: ...www adeept com 62 F Connect 18650x2 Battery Holder with Adeept 32 Channel PWM Drive...
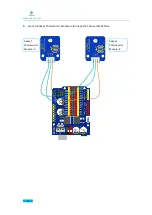
Page 67: ...www adeept com 63 G Connect 18650x2 Battery Holder with Adeept Remote Control Shield...
Page 75: ...www adeept com 71...
Page 77: ...www adeept com 73...
Page 79: ...www adeept com 75 Click the button to upload the sketch to the board...
Page 83: ...www adeept com 79...


