background image

89

Mini tritatutto senza filo KG 2156


Italiano

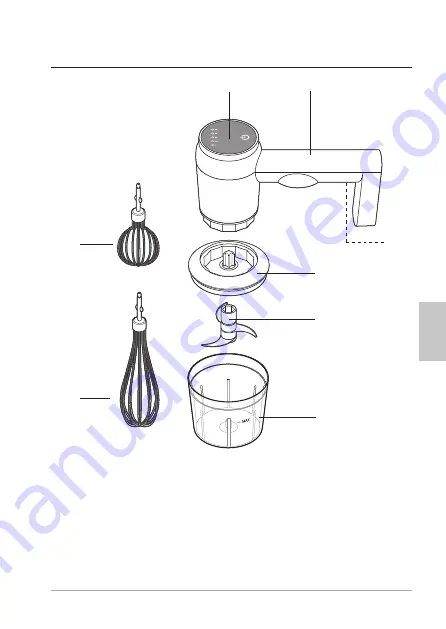
Descrizione 

1

2

4

5

6

8

7

3

1

Pannello di controllo

5

Unità da taglio

2

Maniglia

6

Contenitore in plastica

3

Porta di collegamento USB

7

Frusta

4

Coperchio del contenitore

8

Agitatore

Senza illustrazione: Cavo di ricarica USB

Summary of Contents for KG 2156

Page 1: ...iscelatore a mano Akumulatorowy minirozdrabniacz z mikserem ręcznym Беспроводной мини измельчитель с ручным миксером Snoerloze mini hakmolen met handmixer Bedienungsanleitung KG 2156 Operating instructions Instrucciones de operación Mode d emploi Istruzioni per l uso Instrukcja obsługi Руководство по эксплуатации Gebruiksaanwijzing Deutsch English Español Français Italiano Polski Русский Nederland...

Page 2: ...nktionen mit einem außergewöhnlichen Design vereint Die langjährige Erfahrung der Marke ADE stellt einen technisch hohen Standard und bewähr te Qualität sicher für mehr Frische in Ihrer Küche Wir wünschen Ihnen damit viel Freude und Genuss Ihr ADE Team Lieferumfang Kabelloser Mini Zerkleinerer mit Handmixer inkl Zubehör USB Ladekabel Bedienungsanleitung IM_Web_KG2156_202109_V1 ...

Page 3: ...gemeines 4 Sicherheit 5 Bestimmungsgemäßer Gebrauch 8 Auf einen Blick 9 Inbetriebnahme 10 Ein Ausschalten 11 Gebrauch 12 Schneebesen Rührer einsetzen wechseln 12 Mixen 13 Zerkleinern 14 Störung Abhilfe 17 Reinigen 17 Technische Daten 19 Konformitätserklärung 20 Garantie 20 Entsorgen 20 ...

Page 4: ...rgeben geben Sie auch diese Anleitung mit Die Nichtbeachtung dieser Bedienungsanlei tung kann zu Verletzungen oder Schäden am Artikel führen Zeichenerklärung Dieses Symbol in Verbindung mit dem Wort GEFAHR warnt vor schweren Verletzungen Dieses Symbol in Verbindung mit dem Wort WARNUNG warnt vor Verletzungen mittleren und leichten Grades Dieses Symbol in Verbindung mit dem Wort HINWEIS warnt vor S...

Page 5: ...nicht von Kindern vorgenommen werden Halten Sie Folien und Verpackungsmaterial von Kindern fern Es besteht Erstickungsgefahr Achten Sie auch darauf dass der Verpackungsbeutel nicht über den Kopf gestülpt wird Das Gerät enthält einen Lithium Polymer Akku Dieser darf nicht auseinandergenommen in Feuer gewor fen oder kurzgeschlossen werden Explosionsgefahr Schützen Sie den eingebauten Akku vor starke...

Page 6: ...es sereinsatz hantieren oder den Behälter leeren oder reinigen Berühren Sie die Messer nicht mit bloßen Händen Benutzen Sie das Gerät nicht wenn die Messer beschädigt sind Berühren Sie nicht sich bewegende Geräteteile und versuchen Sie nie sich bewegende Geräteteile mit der Hand oder durch andere Gegenstände zu stoppen Nach dem Ausschalten laufen die Einsätze noch kurz nach Warten Sie bis die Eins...

Page 7: ...treiben Sie das Gerät keinesfalls ohne Zutaten der Zerkleinerer könnte überhitzen Unterbrechen Sie das Verarbeiten von Lebensmitteln sofort wenn sich das Messer bzw der verwendete Ein satz nicht mehr oder nur noch sehr schwerfällig dreht Prüfen Sie ob sich ein Fremdkörper im Behälter befin det ob die Speise zu zäh oder fest ist ob das Messer bzw der Einsatz blockiert ist und ob der Zerkleinerer wi...

Page 8: ...sind Der Kunststoffbehälter mit Deckel dient zum Zerklei nern von Gemüse Obst Fleisch uvm Der Schneebesen dient zum Schlagen von Eiern und Sahne Der Rührer dient zum Schlagen von Cremes und Dips Das Gerät ist in erster Linie für kleine Küchen für das Cam pen für Reisen etc konzipiert und nicht für den gewerb lichen Einsatz geeignet Kochende bzw heiße Flüssigkeiten dürfen nicht mit dem Gerät gemixt...

Page 9: ...i Zerkleinerer KG 2156 Deutsch Auf einen Blick 1 2 4 5 6 8 7 1 Bedienfeld 5 Messereinheit 2 Handteil 6 Kunststoffbehälter 3 USB Anschlussbuchse 7 Schneebesen 4 Behälterdeckel 8 Rührer Ohne Abbildung USB Aufladekabel 3 ...

Page 10: ...er Fall benutzen Sie das Gerät nicht Wenden Sie sich in diesem Fall an den Händler bei dem Sie das Gerät gekauft haben 4 Reinigen Sie alle Teile vor dem ersten Gebrauch siehe Kapitel Reinigen Akku aufladen 1 Klappen Sie die Gummilasche ab 2 Verbinden Sie das beigelegte USB Aufladekabel mit der USB Anschluss buchse des Gerä tes und mit der USB Buchse eines USB Ladegerätes Die Kontrollleuchte des Be...

Page 11: ... muss wieder geladen werden wenn das Gerät nicht mehr funktioniert oder wenn die Kontrollleuchte rot blinkt Ein Ausschalten 1 Tippen Sie 2x auf um den Zerkleinerer einzu schalten Das Gerät startet immer mit der Geschwindig keitsstufe 5 höchste Stufe 2 Wählen Sie durch wiederholtes Antippen von die gewünschte Geschwindigkeitsstufe 5 4 3 2 1 Beachten Sie die Anzeige 3 Drücken Sie einige Sekunden auf...

Page 12: ...Schlagen von Cremes und Dips Zum Kneten von Teig sind Gerät und Einsätze nicht geeignet 1 Achten Sie darauf das der Zerkleinerer ausgeschaltet ist 2 Stecken Sie den gewünschten Einsatz in die Geräte Aufnahme Der Einsatz muss hör und fühlbar einrasten Um den Einsatz zu wechseln 1 Schalten Sie das Gerät aus und warten Sie bis die Auf sätze völlig zum Stillstand gekommen sind 2 Ziehen Sie den eingest...

Page 13: ...on der gewählten Geschwindigkeitsstufe ist Stufe 1 70 Sekunden Stufe 2 65 Sekunden Stufe 3 60 Sekunden Stufe 4 55 Sekunden Stufe 5 50 Sekunden Nach drei aufeinander folgenden Arbeits zyklen muss das Gerät 30 Minuten ab kühlen 1 Stellen Sie sicher dass die verwendete Rührschüssel auf einer rutschfesten und ebenen Unterlage steht 2 Geben Sie die gewünschten Zutaten in die Rührschüs sel Der mitgelief...

Page 14: ...n WARNUNG vor Verletzung Seien Sie vorsichtig wenn Sie mit der Messereinheit hantieren Die Messer sind scharf HINWEIS vor Sachschaden Verarbeiten Sie mit dem Zerkleinerer keine sehr harten Lebensmittel wie Kaffee bohnen oder Eis Das Gerät könnte dabei beschädigt werden Der Behälterdeckel mit Kunststoffbehälter dient zum Zer kleinern von Gemüse Obst Fleisch etc Lebensmittel vorbereiten Schneiden Si...

Page 15: ...Markierung Achten Sie darauf das die Achse der Messer einheit sicher in der Achsenaufnahme steckt Die Öffnung mit dem Sechskant Profil muss nach oben zeigen 4 Setzen Sie den Behälterdeckel auf den Kunststoffbe hälter wobei Aussparungen im Behälterdeckel dafür sorgen das er nur in einer Position richtig aufgesetzt werden kann Drehen Sie den Behälterdeckel ggf solange bis er schlüssig auf den Kunsts...

Page 16: ...was bis es schlüssig in den Deckelbehälter passt Handteil weiter festhalten 6 Halten Sie den Kunststoffbehälter mit einer Hand fest 7 Schalten Sie das Gerät ein indem Sie 2x auf tippen Der Kunststoffbehälter ist nicht für die Auf bewahrung von Lebensmittel geeignet Entnehmen Sie den Inhalt direkt nach der Ver arbeitung ...

Page 17: ...ich nicht oder nur sehr schwer oder auf dem Bedienfeld blinken alle Leuchten 1 rot 2 5 blau Zerkleinerer sofort aus schalten und folgende Punkte prüfen Hindernis im Kunst stoffbehälter Messer Einsatz blockiert Deckelbehälter rich tig aufgesetzt Speise zu fest oder zu zäh Reinigen WARNUNG vor Verletzung Seien Sie vorsichtig wenn Sie mit der Messereinheit hantieren Die Messer sind scharf ...

Page 18: ... warten Sie bis sich keine Teile mehr drehen 2 Ziehen Sie ggf den verwendeten Einsatz aus dem Gerät bzw ziehen Sie die Messereinheit vorsichtig aus dem Kunststoffbehälter heraus Handteil Wischen Sie den Handteil mit einem leicht angefeuch teten weichen Tuch sauber Zubehör 1 Spülen Sie den verwendeten Einsatz oder die Messer einheit unter warmem Wasser ab um den groben Schmutz zu entfernen 2 Reinig...

Page 19: ...er zu schützen Bei langem Nichtgebrauch Laden Sie den Akku voll ständig auf um zu verhindern das es zu einer Tiefent ladung kommt ca alle 3 Monate erforderlich Technische Daten Modell Kabelloser Mini Zerkleinerer mit Handmixer KG 2156 Akku 3 7 V 1300 mAh Typ Lithium Polymer USB Anschluss Ladespannung 5 V 1 0 A Leistung 45 W Inverkehrbringer GRENDS GmbH Stahltwiete 23 22761 Hamburg Germany Unsere P...

Page 20: ...undin sehr geehrter Kunde die Firma GRENDS GmbH garantiert für 2 Jahre ab Kaufda tum die kostenfreie Behebung von Mängeln aufgrund von Material oder Fabrikationsfehlern durch Reparatur oder Austausch Bitte geben Sie den Artikel im Garantiefall mit dem Kaufbeleg unter Angabe des Reklamationsgrundes an Ihren Händler zurück Entsorgen Verpackung entsorgen Entsorgen Sie die Verpackung sortenrein Geben ...

Page 21: ...r waltung Batterien und Akkus gehören nicht in den Hausmüll Alle Batterien und Akkus müssen bei einer Sam melstelle der Gemeinde des Stadtteils oder im Handel abgegeben werden Dadurch können Batterien und Akkus einer umweltscho nenden Entsorgung zugeführt werden Achtung Dieses Gerät enthält einen Akku der aus Sicherheits gründen fest eingebaut ist und nicht entnommen werden kann ohne das Gehäuse z...

Page 22: ...ent functions with an exceptional design The wealth of experience of the ADE brand ensures a high technical standard and proven quality for more freshness in your kitchen We wish you much pleasure and enjoyment Your ADE Team Scope of delivery Cordless mini chopper with hand mixer and accessories USB charging cable Operating Manual ...

Page 23: ...y 22 General information 24 Safety 25 Intended use 28 Overview 29 Start up 30 Switching the device on off 31 Use 32 Inserting changing the whisk stirrer 32 Mixing 33 Chopping 34 Fault Remedy 37 Cleaning 37 Technical data 39 Declaration of conformity 40 Warranty 40 Disposal 40 ...

Page 24: ...uct on to someone else pass on this operating manual as well Failure to observe this operating manual may result in injuries or damage to your product Explanation of symbols This symbol combined with the word DANGER warns of serious injuries This symbol combined with the word WARNING warns of moderate and mild injuries This symbol combined with the word NOTE warns of material damage This symbol in...

Page 25: ...ay from children There is a choking hazard Also pay attention that children do not pull the packaging material over their heads The device contains a lithium polymer battery Avoid dismantling throwing into fire or short circuiting the battery Risk of explosion Protect the built in battery from excessive heat The battery is firmly installed in the device and cannot and must not be replaced or remov...

Page 26: ...damaged Do not touch moving parts of the device and do not attempt to stop them by hand or using other objects After switching off the attachments continue running for a short time Wait for the moving parts to stop completely before touching them or handling the device NOTE on material damage This device is designed for intermittent operation with brief cycles After each working cycle let the devi...

Page 27: ...that the blade or any other attachment used rotates very slowly or is completely stuck Check the inside of the container for any obstacles whether the food being processed is too tough or hard whether the blade or any other attachment used is stuck and whether the chopper is correctly assembled Never place the device on or near hot surfaces e g hot plates etc Keep the USB charging cable away from ...

Page 28: ... The whisk is intended for beating eggs and cream The stirrer serves to whip creams and dips The device is primarily intended for private use in small kitchens during camping travelling etc and is not intended for commercial use The device must not be used to mix boiling or hot liquids You cannot use this device to knead dough Please be aware that the blades will wear out more quickly if used to p...

Page 29: ...KG 2156 cordless mini chopper English Overview 1 2 4 5 6 8 7 3 1 Control panel 5 Blade attachment 2 Handle 6 Plastic container 3 USB socket 7 Whisk 4 Container lid 8 Stirrer Not depicted USB charging cable ...

Page 30: ...is the case do not use the device In this case contact the dealer where you bought the device 4 Before first use clean all parts as described in chapter Cleaning Charging the battery 1 Open the rubber tab 2 Insert one end of the USB charging cable included into the USB socket of the device and the other end into the USB socket of the USB charger The control panel indicator shows the charging statu...

Page 31: ...e The battery must be recharged if the device does not switch on or if the indicator flashes red Switching the device on off 1 To switch on the chopper tap the button twice The device always starts at speed level 5 which is the highest level 2 Repeatedly tap the button to select the desired speed level from 1 to 5 Check the indicator 3 To switch off the chopper keep the button pressed for a few se...

Page 32: ...e stirrer serves to whip creams and dips The device and its attachments are not designed for kneading dough 1 Ensure that the chopper is powered off 2 Insert the desired attachment into the dedicated slot The attachment must engage with an audible click To change the attachment 1 Power off the device and wait for the attachments to stop completely 2 Remove the attachment with a little force ...

Page 33: ... working cycle depends on the selected speed level Level 1 70 seconds Level 2 65 seconds Level 3 60 seconds Level 4 55 seconds Level 5 50 seconds After three consecutive working cycles let the device cool down completely for 30 minutes 1 The mixing bowl must be placed on an anti slip and level surface 2 Add the desired ingredients to the mixing bowl Do not use the included plastic container as a m...

Page 34: ...injury The blade attachment must be handled with care The knives are sharp NOTE on material damage The chopper must not be used to process very hard foods such as coffee beans or ice Otherwise this could damage the device The container lid and plastic container are designed for chopping vegetables fruit meat and other foods Preparing foods Cut your ingredients into small 1 to 2 cm pieces before pu...

Page 35: ...ded The blade attachment must be properly inserted into the dedicated slot The hex shaped opening must face upwards 4 Place the container lid on the plastic container The container lid has recesses allowing it to be placed correctly in one position only If necessary adjust the container lid so that it sits firmly on the plastic container ...

Page 36: ... handle so that it fits securely into the plastic container Continue to hold the handle 6 Hold the plastic container firmly with one hand 7 Tap the button twice to switch on the device The plastic container must not be used to store food in it When you are done pour out the processed food directly ...

Page 37: ...ly stuck or all control panel indicators flash at the same time 1 red 2 5 blue Switch off the chopper immediately and check the following Are there any obstacles in the plastic container Is the blade attachment blocked Is the container lid placed correctly Is the food being processed too tough or hard Cleaning WARNING against injury The blade attachment must be handled with care The knives are sha...

Page 38: ...evice and wait for the moving parts to stop completely 2 If necessary carefully remove the blade attachment or any other attachment used from the plastic container Handle Wipe clean the handle with a slightly damp soft cloth Accessories 1 The blade attachment or any other attachment used should be rinsed in warm water after each use 2 The whisk stirrer container lid blade attachment and plastic co...

Page 39: ...water If you are not going to use the device for a long time make sure you fully charge the battery to avoid deep discharge repeat the procedure every 3 months if necessary Technical data Model KG 2156 cordless mini chopper with hand mixer Battery 3 7 V 1300 mAh Type Lithium polymer USB socket Charging voltage 5 V 1 0 A Power 45 W Distributor GRENDS GmbH Stahltwiete 23 22761 Hamburg Germany Our pr...

Page 40: ...GRENDS GmbH warrants for 2 years from the purchase date the cost free rectification of defects in material and workmanship through repair or exchange In the event of a warranty claim please return the product with the proof of purchase specifying the reason for claim to your dealer Disposal Disposing of the packaging Dispose of the packaging according to type Dispose of cardboard with waste paper ...

Page 41: ...ld not be disposed of along with household waste All batteries and rechargeable batteries must be brought to a local or district collection point or to the retailer Such batteries and rechargeable batteries can thus be disposed of in an environmentally friendly way Attention This device contains a battery that is permanently installed for safety reasons and cannot be removed without destroying the...

Page 42: ... funciones inteligentes con un diseño extraordinario La larga experiencia de la marca ADE le asegura unos elevados estándares técnicos y es garantía de calidad Para una cocina más fresca Deseamos que lo disfrute El equipo de ADE Volumen de entrega Minipicadora inalámbrica con batidora manual y accesorios Cable de carga USB Manual de instrucciones ...

Page 43: ...ón general 44 Seguridad 45 Uso adecuado 48 De un vistazo 49 Puesta en marcha 50 Encendido apagado 51 Utilización 52 Colocar cambiar las varillas el batidor 52 Batir 53 Picar 54 Problema Solución 57 Limpieza 57 Datos técnicos 59 Declaración de conformidad 60 Garantía 60 Eliminación 60 ...

Page 44: ...ompáñelo también de estas instrucciones Si no se tienen en cuenta las recomendaciones de este manual de instrucciones pueden producirse lesiones o daños en el artículo Explicación de símbolos Este símbolo unido a la palabra PELIGRO advierte de heridas graves Este símbolo unido a la palabra ADVERTENCIA advierte de heridas de grado medio o leve Este símbolo unido a la palabra INDICACIÓN advierte de ...

Page 45: ...e los niños Peligro de asfixia Tenga cuidado de que no introduzcan la cabeza en la bolsa del embalaje El aparato contiene una batería de polímero de litio La batería no debe sacarse arrojarse al fuego o poner en cortocircuito Riesgo de explosión Proteja la batería del calor intenso La batería está integrada fija en el aparato y no debe sustituirse o extraerse Existe riesgo de explosión si se extra...

Page 46: ...illas están dañadas No toque las piezas móviles del dispositivo ni intente detener las piezas con la mano ni con otros objetos Tras la desconexión las piezas siguen funcionando durante un breve periodo de tiempo Espere a que las piezas se detengan totalmente para manipular el dispositivo ADVERTENCIA de daños materiales El dispositivo está diseñado para periodos cortos de funcionamiento Al finaliza...

Page 47: ...imentos si la cuchilla o el accesorio utilizado no gira o lo hace muy lentamente Compruebe si existe un cuerpo extraño en el recipiente si la comida está demasiado dura o firme si la cuchilla o el accesorio está bloqueado o si la picadora está montada correctamente Nunca coloque el dispositivo sobre superficies calientes fogones etc o cerca de ellas Evite que el cable de carga USB entre en contact...

Page 48: ...arillas sirven para montar huevos y nata El batidor sirve para batir cremas y salsas El dispositivo está diseñado principalmente para cocinas pequeñas acampadas viajes etc y no es adecuado para uso comercial No se deben mezclar líquidos calientes o en ebullición con este aparato El dispositivo no es adecuado para amasar Tenga en cuenta que las cuchillas se desgastan más rápido al procesar alimento...

Page 49: ...nalámbrica KG 2156 Español De un vistazo 1 2 4 5 6 8 7 3 1 Panel de control 5 Unidad de corte 2 Asa 6 Recipiente de plástico 3 Toma USB 7 Batidor de varillas 4 Tapa del recipiente 8 Batidor Sin imagen Cable de carga USB ...

Page 50: ...el aparato En este caso diríjase al comercio en el que ha adquirido el aparato 4 Limpie todas las piezas antes del primer uso consulte el capítulo Limpieza Carga de la batería 1 Retire la solapa de goma 2 Conecte el cable de carga USB suministrado con la toma USB del dispositivo y con la toma USB de un cargador USB El indicador luminoso del panel de control muestra el estado del proceso de carga S...

Page 51: ...damente 2 5 3 horas Debe cargar la batería si el dispositivo deja de funcionar o si la luz indicadora parpadea en rojo Encendido apagado 1 Pulse dos veces el botón para encender la picadora El dispositivo se inicia siempre en el nivel de velocidad 5 es decir el más alto 2 Tocando las veces necesarias puede escoger el nivel de velocidad deseado 5 4 3 2 1 Preste atención al indicador 3 Pulse varios ...

Page 52: ...ata El batidor sirve para batir cremas y salsas El dispositivo y sus accesorios no son adecuados para amasar 1 Asegúrese de que la picadora esté apagada 2 Introduzca el accesorio deseado en el acople del dispositivo El accesorio debe encajar de forma audible y tangible Para cambiar el accesorio 1 Apague el dispositivo y espere a que el accesorio se haya detenido por completo 2 Extraiga con fuerza ...

Page 53: ...de del nivel de velocidad seleccionado Nivel 1 70 segundos Nivel 2 65 segundos Nivel 3 60 segundos Nivel 4 55 segundos Nivel 5 50 segundos Después de tres ciclos de funcionamiento consecutivos el dispositivo debe enfriarse durante 30 minutos 1 Asegúrese de que el bol para mezclas utilizado se encuentre sobre una superficie plana y antideslizante 2 Introduzca los ingredientes que desee en el bol pa...

Page 54: ...VERTENCIA de daños materiales No procese con la picadora alimentos muy duros como granos de café o hielo El dispositivo podría dañarse La tapa del recipiente de plástico se utiliza para picar verdura fruta carne etc Preparar los alimentos Corte los ingredientes en trozos pequeños de 1 a 2 cm antes de añadirlos al recipiente Quite los huesos los tendones y la piel de la carne Picar la comida 1 Reti...

Page 55: ...respondiente La apertura con el perfil hexagonal debe apuntar hacia arriba 4 Coloque la tapa sobre el recipiente de plástico en la tapa encontrará unas muescas que sirven para asegurar que solo se pueda colocar correctamente en una posición Gire la tapa lo necesario para que encaje perfectamente en el recipiente de plástico ...

Page 56: ...encaje bien en el recipiente con tapa Sujete el asa con una mano 6 Sostenga el recipiente de plástico con la otra mano 7 Encienda el dispositivo pulsando dos veces El recipiente de plástico no es adecuado para conservar alimentos Extraiga el contenido inmediatamente después de terminar de procesarlo ...

Page 57: ...tad o parpadean todas las luces del panel de control 1 rojo 2 5 azul Apague la picadora de inmediato y compruebe los siguientes puntos Hay algo obstruyendo el recipiente de plástico Están las cuchillas o el accesorio bloqueados Está el recipiente con tapa bien colocado Están los alimentos demasiado duros o firmes Limpieza ADVERTENCIA por riesgo de heridas Tenga cuidado al manipular las cuchillas L...

Page 58: ...s pueden rayarse 1 Apague el dispositivo y espere a que las piezas dejen de girar 2 En caso necesario extraiga el accesorio del dispositivo o retire con cuidado las cuchillas del recipiente de plástico Asa Limpie el asa con un paño suave ligeramente humedecido Componentes 1 Enjuague el accesorio utilizado o las cuchillas con agua tibia para eliminar la suciedad más gruesa 2 Lave las varillas el ba...

Page 59: ...n largo periodo de tiempo Cargue la batería completamente para evitar que se descargue totalmente deberá hacerlo aproximadamente cada 3 meses Datos técnicos Modelo Minipicadora inalámbrica con batidora manual KG 2156 Batería 3 7 V 1300 mAh Tipo Polímero de litio Conexión USB Tensión de carga 5 V 1 0 A Potencia 45 W Distribuidor GRENDS GmbH Stahltwiete 23 22761 Hamburgo Alemania Nuestros productos ...

Page 60: ...NDS GmbH garantiza durante 2 años a partir de la fecha de compra la eliminación de los defectos debidos a fallos de material o fabricación mediante reparación o cambio del equipo En caso de solicitar la aplicación de la garantía lleve el artículo a su distribuidor con el justificante de compra explicando el motivo de la reclamación Eliminación Eliminación del embalaje Deseche el envoltorio adecuad...

Page 61: ...uos domésticos Todas las pilas y baterías deben depositarse en los puntos de recogida del ayuntamiento del distrito o en los comercios De este modo puede realizarse la eliminación de pilas y baterías de una forma respetuosa con el medio ambiente Atención Este aparato incluye una batería que está instalada fija por razones de seguridad y que no puede extraerse sin romper la carcasa La extracción in...

Page 62: ...design exceptionnel Les années d expérience de la marque ADE garantissent une haute technicité et une qualité éprouvée pour des préparations culinaires fraîches et appétissantes Nous vous souhaitons beaucoup de plaisir à l élaboration de vos recettes préférées L équipe ADE Contenu de l emballage Minihachoir sans fil avec batteur à main et accessoires Câble de recharge USB Mode d emploi ...

Page 63: ...s 64 Sécurité 65 Utilisation conforme 68 Aperçu 69 Mise en marche 70 Allumage extinction 71 Utilisation 72 Installer changer le batteur le mélangeur 72 Mélange 73 Hachage 74 Problèmes solutions 77 Nettoyage 77 Caractéristiques techniques 79 Déclaration de conformité 80 Garantie 80 Mise au rebut 80 ...

Page 64: ...rce personne transmettez lui également ce mode d emploi Le non respect de ce mode d emploi peut entraîner des blessures ou endommager l article Légende Ce symbole associé au mot DANGER prévient de blessures graves Ce symbole associé au mot ATTENTION prévient de blessures moyennes et légères Ce symbole associé au mot AVERTISSEMENT prévient de dommages matériels Ce symbole désigne des informations s...

Page 65: ...à l écart des enfants Risque d asphyxie Veillez également à ce que le sac d emballage ne soit pas glissé sur la tête L appareil contient une batterie au lithium polymère Celle ci ne doit pas être démontée jetée au feu ou court circuitée Risque d explosion Protégez la batterie incorporée des fortes chaleurs La batterie incorporée est inamovible N essayez pas de la remplacer ou de la démonter vous m...

Page 66: ... l appareil si les lames sont endommagées Ne touchez pas les pièces mobiles de l appareil et n essayez jamais d arrêter ces pièces avec la main ou avec d autres objets Après l arrêt de l appareil les inserts continuent à fonctionner pendant un court moment Attendez que les accessoires s arrêtent complètement avant de manipuler l appareil AVERTISSEMENT Risque de dommages matériels L appareil est co...

Page 67: ...ement des aliments si la lame ou tout autre accessoire utilisé a arrêté de tourner ou tourne très difficilement Vérifiez si un corps étranger se trouve dans le bol si les aliments sont trop consistants ou trop durs si la lame ou l accessoire est bloqué e et si le hachoir est correctement assemblé Ne placez jamais l appareil sur ou près de surfaces chaudes par ex des plaques de cuisson Ne mettez pa...

Page 68: ...eur sert au battage des œufs et de la crème fraîche Le mélangeur sert au battage des crèmes et des sauces dips L appareil est conçu principalement pour les petites cuisines le camping les voyages etc et n est pas adapté à un usage professionnel Ne passez pas de liquides bouillants ou très chauds dans l appareil L appareil n est pas adapté au pétrissage de la pâte Gardez à l esprit que le hachage d...

Page 69: ...KG 2156 Français Aperçu 1 2 4 5 6 8 7 3 1 Panneau de commande 5 une unité de broyage 2 Appareil portatif 6 Bol en plastique 3 Prise de raccordement USB 7 Fouet 4 Couvercle du bol 8 Mélangeur Non illustré Câble de recharge USB ...

Page 70: ...as de dommages Si tel est le cas n utilisez pas l appareil Adressez vous à votre revendeur 4 Nettoyez toutes les pièces avant la première utilisation voir chapitre Nettoyage Recharge de la batterie 1 Abaissez le cache en caoutchouc 2 Branchez le câble de recharge USB fourni dans la prise USB de l appareil et dans la prise USB d un chargeur USB Le voyant de contrôle du panneau de commande indique l...

Page 71: ...es et demi à 3 heures La batterie doit être rechargée lorsque l appareil s arrête ou lorsque le voyant de contrôle clignote en rouge Allumage extinction 1 Appuyez deux fois sur pour allumer l appareil L appareil démarre toujours au niveau de vitesse 5 le plus élevé 2 Appuyez plusieurs fois sur pour sélectionner la vitesse 5 4 3 2 1 Surveillez l affichage 3 Appuyez pendant quelques secondes sur pou...

Page 72: ...et des sauces dips L appareil et ses accessoires ne sont pas adaptés au pétrissage de la pâte 1 Assurez vous que l appareil est éteint 2 Adaptez l accessoire de votre choix au connecteur de l appareil L accessoire doit se bloquer de façon perceptible en produisant un bruit Pour changer l accessoire 1 Éteignez l appareil et attendez que l accessoire soit complètement arrêté 2 Retirez l accessoire i...

Page 73: ... un cycle de travail dépend du niveau de vitesse sélectionné Niveau 1 70 secondes Niveau 2 65 secondes Niveau 3 60 secondes Niveau 4 55 secondes Niveau 5 50 secondes Après trois cycles de travail consécutifs l appareil de refroidir pendant 30 minutes 1 Assurez vous que le bol à mélanger est posé sur un support plan et non glissant 2 Mettez vos ingrédients dans le bol à mélanger Le bol en plastique...

Page 74: ...lessure Manipulez la lame avec prudence Les lames sont tranchantes AVERTISSEMENT Risque de dommages matériels N utilisez pas le hachoir pour transformer des aliments très durs tels que des gains de café ou des œufs Cela pourrait endommager l endommager Le bol en plastique avec couvercle sert au hachage des légumes des fruits de la viande etc Préparation des aliments Découpez les ingrédients en mor...

Page 75: ...sez pas la marque MAX Assurez vous que l axe de la lame est bien inséré dans son connecteur L ouverture hexagonale doit être orientée vers le haut 4 Mettez le couvercle sur le bol Des encoches dans le couvercle permettent de le bloquer dans une seule position Au besoin tournez le couvercle jusqu à ce qu il se bloque sur le bol ...

Page 76: ...he jusqu à ce qu il se bloque sur le bol Continuez de tenir fermement le manche 6 Tenez fermement le bol en plastique d une main 7 Allumez l appareil en appuyant 2 deux fois sur le bol en plastique n est pas adapté à la conservation d aliments Enlevez le contenu du bol directement après la transformation ...

Page 77: ...pas ou tourne difficilement ou tous les voyants du panneau de commande clignotent 1 rouge 2 5 bleu Éteignez immédiatement le hachoir et effectuez les vérifications suivantes Y a t il un obstacle dans le bol La lame l accessoire est il bloqué Le couvercle du bol est il bien en place L aliment est il trop dur ou trop consistant Nettoyage RISQUE de blessure Manipulez la lame avec prudence Les lames s...

Page 78: ...nez l appareil et attendez que toutes les pièces se aient complètement arrêté de tourner 2 Éventuellement sortez l accessoire de l appareil ou la lame du bol en plastique Appareil portatif Essuyez le manche à l aide d un chiffon doux légèrement humide Accessoires 1 Rincez l accessoire utilisé ou la lame à l eau chaude afin d en éliminer la saleté grossière 2 Lavez le batteur le mélangeur le couver...

Page 79: ...e non utilisation prolongée Chargez complètement la batterie pour éviter qu elle ne se vide à faire tous les 3 mois environ Caractéristiques techniques Modèle Minihachoir sans fil avec batteur à main KG 2156 Batterie 3 7 V 1300 mAh Type Lithium polymère Port USB Tension de charge 5 V 1 0 A Puissance 45 W Distributeur GRENDS GmbH Stahltwiete 23 22761 Hambourg Allemagne Nos produits font l objet de ...

Page 80: ...ition la compensation des défauts matériels ou de fabrication par le remplacement ou la réparation du produit Dans le cas où vous souhaitez faire usage de cette garantie veuillez remettre l article ainsi que la preuve d achat en indiquant les raisons de votre réclamation à votre revendeur Mise au rebut Élimination de l emballage Éliminer l emballage selon son type Jetez le papier et le carton avec...

Page 81: ...nt pas être éliminées avec les déchets ménagers Toutes les piles et batteries doivent être déposées dans un point de collecte de votre localité ou rapportées à leur point d achat Les piles et batteries seront ainsi traitées dans le respect de l environnement Attention Cet appareil renferme une batterie inamovible pour des raisons de sécurité Celle ci ne peut être retirée sans endommager le boîtier...

Page 82: ...gn fuori dal comune La pluriennale esperienza del marchio ADE garantisce un elevato standard tecnico e una qualità comprovata per dare maggiore freschezza alla vostra cucina Vi auguriamo tanto piacere e divertimento Il Suo team ADE Ambito della fornitura Mini tritatutto senza filo con miscelatore a mano e accessori inclusi Cavo di ricarica USB Istruzioni per l uso ...

Page 83: ...enerali 84 Sicurezza 85 Destinazione d uso 88 Descrizione 89 Messa in funzione 90 Accensione spegnimento 91 Uso 92 Montaggio sostituzione di frusta agitatore 92 Miscelazione 93 Sminuzzamento 94 Risoluzione dei problemi 97 Pulizia 97 Dati tecnici 99 Dichiarazione di conformità 100 Garanzia 100 Smaltimento 100 ...

Page 84: ...ioni per l uso La mancata osservanza delle istruzioni per l uso può causare lesioni alle persone o danni al prodotto Descrizione dei simboli Questo simbolo accompagnato dalla parola PERICOLO mette in guardia contro il rischio di gravi lesioni Questo simbolo accompagnato dalla parola AVVERTENZA indica il rischio di lesioni di lieve o media entità Questo simbolo accompagnato dalla parola ATTENZIONE ...

Page 85: ... dei bambini Vi è pericolo di soffocamento Prestare attenzione affinché i bambini non infilino la testa nel sacchetto di plastica L apparecchio contiene una batteria a polimeri di litio La batteria non deve essere smontata gettata nel fuoco o messa in cortocircuito Pericolo di esplosione Proteggere la batteria integrata dal calore eccessivo La batteria è saldamente installata nel dispositivo e non...

Page 86: ...ilizzare il dispositivo se le lame sono danneggiate Non toccare le parti mobili dell unità e non cercare mai di fermare tali parti con le mani o altri oggetti Dopo lo spegnimento gli inserti continueranno a funzionare per un breve periodo Attendere che gli inserti si siano fermati completamente prima di maneggiare l apparecchio ATTENZIONE a eventuali danni al prodotto L apparecchio è progettato pe...

Page 87: ...e l utilizzo sui cibi se le lame o l inserto prescelto non girano o più o lo fanno lentamente Verificare che non vi siano corpi estranei nel contenitore che i cibi non siano troppo duri o solidi che le lame o l inserto non siano bloccati e che il tritatutto sia effettivamente montato in modo corretto Non posizionare mai il dispositivo su una superficie calda oppure nelle sue vicinanze ad es piastr...

Page 88: ...ltro La frusta serve a montare uova e panna L agitatore serve a montare crema e salse L apparecchio è concepito innanzitutto per piccoli dolci è adatto a essere portato in campeggio in viaggio ecc e non è adatto all uso commerciale Non è possibile mischiare liquidi bollenti o caldi all interno del dispositivo L apparecchio non è adatto a creare impasti Notare che con lo sminuzzamento di alimenti m...

Page 89: ...56 Italiano Descrizione 1 2 4 5 6 8 7 3 1 Pannello di controllo 5 Unità da taglio 2 Maniglia 6 Contenitore in plastica 3 Porta di collegamento USB 7 Frusta 4 Coperchio del contenitore 8 Agitatore Senza illustrazione Cavo di ricarica USB ...

Page 90: ...ositivo In questo caso rivolgersi al rivenditore presso il quale è stato acquistato il dispositivo 4 Pulire tutte le parti prima del primo utilizzo vedere capitolo Pulizia Ricarica della batteria 1 Abbassare la linguetta di gomma 2 Collegare il cavo di ricarica USB in dotazione alla presa di collegamento USB dell apparecchio e poi alla presa USB di un dispositivo di ricarica USB La spia del pannel...

Page 91: ...5 3 ore È necessario ricaricare la batteria quando l apparecchio non funziona più o quando la spia lampeggia di rosso Accensione spegnimento 1 Toccare due volte su per accendere il tritatutto L apparecchio parte sempre dal livello di velocità 5 il livello massimo 2 Toccando più volte selezionare il livello di velocità desiderato 5 4 3 2 1 Fare attenzione all indicazione visualizzata 3 Premere per ...

Page 92: ...ema e salse L apparecchio e gli inserti non sono adatti a creare impasti 1 Accertarsi che il tritatutto sia spento 2 Inserire l inserto desiderato nell apposita apertura dell apparecchio L inserto deve scattare in posizione facendo un rumore udibile Per sostituire un inserto 1 Spegnere l apparecchio e aspettare che gli inserti siano completamente fermi 2 Tirare fuori l inserto montato con una cert...

Page 93: ...l ciclo di lavoro dipende dal livello velocità selezionato Livello 1 70 secondi Livello 2 65 secondi Livello 3 60 secondi Livello 4 55 secondi Livello 5 50 secondi Dopo tre cicli di lavoro consecutivi l apparecchio dev essere lasciato a raffreddare per 30 minuti 1 Accertarsi che la scodella utilizzata poggi su una superficie antiscivolo e piana 2 Inserire gli ingredienti desiderati nella scodella ...

Page 94: ...tenzione nel maneggiare il gruppo lame Le lame sono affilate ATTENZIONE a eventuali danni al prodotto Non utilizzare il tritatutto con alimenti duri come chicchi di caffè o ghiaccio altrimenti l apparecchio potrebbe danneggiarsi Il contenitore in plastica e il relativo coperchio servono a sminuzzare verdura frutta carne ecc Preparazione degli alimenti Tagliare gli ingredienti in piccoli pezzi da 1...

Page 95: ...o lame sia inserito correttamente nell apposita apertura L apertura del profilo esagonale deve essere rivolta verso l alto 4 Riporre il coperchio sul contenitore in plastica Gli spazi liberi sul coperchio servono a garantire che possa essere utilizzato correttamente soltanto in una posizione Far ruotare il coperchio del contenitore fin quando non risulta fissato saldamente sul contenitore in plast...

Page 96: ...aniglia sul coperchio del contenitore Ruotare leggermente la maniglia finché non si adatta saldamente al contenitore Fissare ulteriormente la maniglia 6 Tenere ben fermo il contenitore in plastica con una mano 7 Accendere l apparecchio toccando due volte ...

Page 97: ... fase di ricarica Le lame o l inserto utilizzato non girano o hanno difficoltà a farlo oppure tutte le spie lampeggiano sul pannello di controllo 1 rosa 2 5 blu Spegnere immediatamente il tritatutto e verificare i seguenti punti Sono presenti ostacoli nel contenitore in plastica Le lame gli inserti sono bloccati Il contenitore con coperchio è montato correttamente Gli alimenti sono troppo solidi o...

Page 98: ...apparecchio e attendere che non ci siano più parti in movimento 2 Estrarre l inserto utilizzato dall apparecchio e tirare fuori con attenzione il gruppo lame dal contenitore in plastica Maniglia Ripulire la maniglia con un panno morbido leggermente inumidito Accessori 1 Sciacquare l inserto utilizzato o il gruppo lame con acqua calda per rimuovere anche lo sporco ostinato 2 Pulire la frusta l agit...

Page 99: ...n caso di inutilizzo prolungato caricare la batteria completamente onde evitare che si scarichi eccessivamente pratica necessaria ogni 3 mesi circa Dati tecnici Modello Mini tritatutto senza filo con miscelatore a mano KG 2156 Batteria ricaricabile 3 7 V 1300 mAh Typo polimeri di litio Porta USB Tensione di carica 5 V 1 0 A Potenza 45 W Distributore GRENDS GmbH Stahltwiete 23 22761 Hamburg Germani...

Page 100: ... GRENDS GmbH garantisce la riparazione o la sostituzione gratuita dell unità per un periodo di 2 anni a partire dalla data di acquisto nel caso di difetti di materiale o fabbricazione del prodotto A tale scopo consegnare al rivenditore il prodotto e la prova di acquisto citando i motivi del reclamo Smaltimento Smaltimento dell imballaggio Provvedere allo smaltimento dell imballaggio in base al tip...

Page 101: ...tori non devono essere smaltiti con i rifiuti domestici Le batterie e gli accumulatori devono essere consegnati presso un centro di raccolta comunale o di quartiere oppure presso il proprio rivenditore al fine di garantire il loro smaltimento in modo rispettoso dell ambiente Attenzione Questo dispositivo contiene una batteria installata in modo permanente per motivi di sicurezza e non può essere r...

Page 102: ...ą stylistyką Długoletnie doświadczenie marki ADE gwarantuje wysoki techniczny standard i sprawdzoną jakość dla łatwej obróbki świeżych produktów w Państwa kuchni Życzymy Państwu wiele radości i przyjemności z użytkowania Zespół ADE Zakres dostawy Akumulatorowy minirozdrabniacz z mikserem ręcznym i akcesoriami Kabel do ładowania USB Instrukcja obsługi ...

Page 103: ...zeństwo 105 Użycie zgodne z przeznaczeniem 108 W skrócie 109 Uruchomienie 110 Włączanie wyłączanie 111 Użytkowanie 112 Wkładanie wymiana trzepaczki mieszadła 112 Miksowanie 113 Rozdrabnianie 114 Usterka środek zaradczy 117 Czyszczenie 117 Dane techniczne 119 Deklaracja zgodności 120 Gwarancja 120 Utylizacja 120 ...

Page 104: ... należy przekazać również tę instrukcję Nieprzestrzeganie instrukcji obsługi może spowodować obrażenia ciała lub uszkodzenie produktu Objaśnienie znaków Ten symbol w połączeniu ze słowem NIEBEZPIECZEŃSTWO ostrzega przed poważnymi obrażeniami ciała Ten symbol w połączeniu ze słowem OSTRZEŻENIE ostrzega przed obrażeniami ciała średniego i lekkiego stopnia Ten symbol w połączeniu ze słowem WSKAZÓWKA ...

Page 105: ...olno bawić się urządzeniem Montaż i czyszczenie nie mogą być wykonywane przez dzieci Przechowywać folie i opakowanie z daleka od dzieci Istnieje ryzyko uduszenia Zwracać uwagę na to aby torby opakowaniowej nie nakładano na głowę Urządzenie zawiera baterię litowo polimerową Nie wolno jej rozkładać na części wrzucać do ognia ani zwierać Niebezpieczeństwo wybuchu Chronić zamontowaną baterię przed wys...

Page 106: ...ć a wylany płyn może negatywnie wpłynąć na bezpieczeństwo elektryczne OSTRZEŻENIE przed niebezpieczeństwem obrażeń ciała Zachować ostrożność podczas posługiwania się ostrą nasadką nożową lub podczas opróżniania albo czyszczenia pojemnika Nożyków nie wolno dotykać gołymi rękami Nie wolno używać urządzenia jeżeli noże są uszkodzone Nie dotykać ruchomych części urządzenia ani nie próbować przestawiać...

Page 107: ...ażenie oryginalne Nie rozdrabniać żadnych twardych składników ani nasion i usuwać wszystkie łodygi lub ogonki ze składników przed rozdrobnieniem Podczas siekania mięsa należy wcześniej usunąć kości i ścięgna Nigdy nie używać urządzenia bez składników rozdrabniacz może się przegrzać Natychmiast przerwać obróbkę żywności jeśli nóż lub używana nasadka przestanie się obracać lub obraca się bardzo woln...

Page 108: ...eniem Ten bezprzewodowy minirozdrabniacz rozdrabniacz służy do rozdrabniania żywności która jest do tego odpowiednia Pojemnik z tworzywa sztucznego z pokrywką służy do rozdrabniania warzyw owoców mięsa itp Trzepaczka służy do ubijania jajek i śmietany Mieszadło służy do ubijania kremów i dipów Urządzenie jest przeznaczone przede wszystkim do małych kuchni do używania na kempingu w podróży itp i ni...

Page 109: ...drabniacz KG 2156 Polski W skrócie 1 2 4 5 6 8 7 3 1 Panel sterowania 5 Jednostka tnąca 2 Część ręczna 6 Pojemnik z tworzywa sztucznego 3 Wejście USB 7 Trzepaczka 4 Pokrywka pojemnika 8 Mieszadło Bez Rysunku Kabel ładujący USB ...

Page 110: ...one W takim przypadku nie należy używać urządzenia Zwrócić się w takim przypadku do dystrybutora u którego zakupiono urządzenie 4 Przed pierwszym użyciem wyczyścić wszystkie części patrz rozdział Czyszczenie Ładowanie akumulatora 1 Odchylić gumową nakładkę 2 Podłącz dołączony kabel do ładowania USB do gniazda USB urządzenia i do gniazda USB ładowarki USB Lampka kontrolna na panelu sterowania wskaz...

Page 111: ...tarcza na ok 2 5 3 godz pracy Akumulator musi być naładowany gdy urządzenie przestanie działać lub gdy wskaźnik miga na czerwono Włączanie wyłączanie 1 Nacisnąć dwa razy na aby włączyć rozdrabniacz Urządzenie uruchamia się zawsze na poziomie prędkości 5 najwyższy poziom 2 Wybrać żądany poziom prędkości 5 4 3 2 1 naciskając kilkakrotnie Zwrócić uwagę na wyświetlacz 3 Przycisnąć przez kilka sekund p...

Page 112: ...y Mieszadło służy do ubijania kremów i dipów Urządzenie i nasadki nie nadają się do wyrabiania ciasta 1 Upewnić się że rozdrabniacz jest wyłączony 2 Włożyć żądaną nasadkę do uchwytu urządzenia Nasadka musi zatrzasnąć się w sposób słyszalny i wyczuwalny Aby zmienić nasadkę 1 Wyłączyć urządzenie i odczekać aż nasadki całkowicie się zatrzymają 2 Wyciągnąć włożoną nasadkę używając niewielkiej siły ...

Page 113: ... cyklu pracy zależy od wybranego poziomu prędkości Poziom 1 70 sekund Poziom 2 65 sekund Poziom 3 60 sekund Poziom 4 55 sekund Poziom 5 50 sekund Po trzech kolejnych cyklach pracy urządzenie musi stygnąć przez 30 minut 1 Upewnić się że używana miska do mieszania stoi na antypoślizgowej i równej powierzchni 2 Dodać wybrane składniki do miski do mieszania Dostarczony pojemnik z tworzywa sztucznego n...

Page 114: ...s obsługi zespołu tnącego Nożyki są ostre WSKAZÓWKA dotycząca strat materialnych Nie należy rozdrabniać za pomocą rozdrabniacza bardzo twardych produktów spożywczych takich jak ziarna kawy lub lód Może to doprowadzić do uszkodzenia urządzenia Pokrywa pojemnika z tworzywa sztucznego służy do rozdrabniania warzyw owoców mięsa itp Przygotowanie artykułów spożywczych Przed włożeniem do pojemnika pokro...

Page 115: ... Upewnić się że oś zespołu tnącego jest pewnie osadzona w uchwycie osi Otwór z profilem sześciokątnym musi być skierowany ku górze 4 Umieścić pokrywkę na pojemniku z tworzywa sztucznego przy czym nacięcia w pokrywce pojemnika zapewniają że można ją prawidłowo umieścić tylko w jednej pozycji W razie potrzeby obrócić pokrywkę pojemnika tak aby dokładnie przylegała do pojemnika ...

Page 116: ...ócić lekko uchwyt aby dokładnie pasował do pokrywki pojemnika Nadal trzymać uchwyt 6 Trzymać pojemnik z tworzywa sztucznego jedną ręką 7 Włączyć urządzenie poprzez dwukrotne naciśnięcie Pojemnik z tworzywa sztucznego nie nadaje się do przechowywania żywności Zawartość usunąć natychmiast po przetworzeniu ...

Page 117: ...braca się lub obraca się tylko z wielkim trudem lub na panelu sterowania migają wszystkie lampki 1 czerwona 2 5 niebieska Natychmiast wyłączyć rozdrabniacz i sprawdzić następujące punkty Przeszkoda w pojemniku Nóż nasadka zablokowane Czy pojemnik z pokrywką jest prawidłowo umieszczony Jedzenie zbyt stałe lub zbyt twarde Czyszczenie OSTRZEŻENIE przed obrażeniami ciała Zachować ostrożność podczas ob...

Page 118: ...hnię 1 Wyłączyć urządzenie i odczekać aż żadne części nie będą się obracać 2 W razie potrzeby wyciągnąć używaną nasadkę z urządzenia lub ostrożnie wyjąć zespół tnący z pojemnika Część ręczna Wytrzeć uchwyt do czysta lekko wilgotną miękką ściereczką Akcesoria 1 Opłukać używaną nasadkę lub zespół tnący pod ciepłą wodą aby usunąć większe zabrudzenia 2 Trzepaczkę mieszadło pokrywkę pojemnika zespół tn...

Page 119: ...d kurzem i rozbryzgami wody Gdy urządzenie nie jest używane przez dłuższy czas całkowicie naładować akumulator aby zapobiec głębokiemu rozładowaniu wymagane co około 3 miesiące Dane techniczne Model Akumulatorowy minirozdrabniacz z mikserem ręcznym KG 2156 Akumulator 3 7 V 1300 mAh Typ Litowo polimerowy Slot USB Napięcie ładowania 5 V 1 0 A Moc 45 W Dystrybutor GRENDS GmbH Stahltwiete 23 22761 Ham...

Page 120: ...mbH udziela 2 letniej gwarancji obowiązującej od daty zakupu na bezpłatne usuwanie usterek spowodowanych błędami materiałowymi lub produkcyjnymi poprzez naprawę lub wymianę W przypadku korzystania z gwarancji prosimy o zwrócenie sprzedawcy artykułu wraz z dowodem zakupu podając również powód reklamacji Utylizacja Utylizacja opakowania Opakowanie należy utylizować zgodnie z jego rodzajem Tektura i ...

Page 121: ...b administracji gminy Baterii i akumulatorów nie wolno wyrzucać razem z odpadami domowymi Wszystkie baterie i akumulatory należy oddawać do punktu zbiórki w gminie dzielnicy lub sklepie W ten sposób baterie i akumulatory mogą trafić do ekologicznej utylizacji Uwaga to urządzenie zawiera baterię która ze względów bezpieczeństwa jest zamontowana na stałe i nie można jej wyjąć bez zniszczenia obudowy...

Page 122: ...обычный дизайн Многолетний опыт марки ADE обеспечивает достижение высокого технического стандарта и проверенного качества что позволяет получать больше свежих продуктов на кухне Желаем Вам радости и удовольствия при работе с этим устройством Ваша команда ADE Объем поставки Беспроводной мини измельчитель с ручным миксером включая принадлежности Зарядный кабель USB Руководство по эксплуатации ...

Page 123: ...спользование по назначению 128 Краткий обзор 129 Первое использование 130 Включение выключение 131 Использование 132 Установка смена насадки венчика насадки взбивателя 132 Смешивание 133 Измельчение 134 Неисправность устранение 137 Чистка 137 Технические данные 139 Заявление о соответствии 140 Гарантия 140 Утилизация 140 ...

Page 124: ...же данное руководство Несоблюдение указаний приведенных в данном руководстве по эксплуатации может привести к повреждению изделия или травмированию Пояснение символов Данный символ в комбинации со словом ОПАСНОСТЬ предупреждает об опасности получения тяжелых травм Данный символ в комбинации со словом ПРЕДУПРЕЖДЕНИЕ предупреждает об опасности получения травм легкой и средней тяжести Данный символ в...

Page 125: ...ойством Детям запрещено производить сборку или очистку устройства Храните пленку и упаковочный материал вдали от детей Существует опасность удушения Следите также за тем чтобы дети не надевали упаковочный пакет на голову Устройство оснащено литий полимерным аккумулятором Его нельзя извлекать бросать в огонь или подвергать короткому замыканию Опасность взрыва Защищайте встроенный аккумулятор от воз...

Page 126: ...на электробезопасность ПРЕДУПРЕЖДЕНИЕ об опасности травмирования Будьте осторожны при манипуляциях с насадкой с ножами или при опустошении или очистке чаши Не прикасайтесь к ножам голыми руками Не используйте устройство если ножи повреждены На прикасайтесь к движущимся деталям устройства и никогда не пытайтесь остановить движущиеся части устройства рукой или другими предметами После выключения нас...

Page 127: ...рна перед измельчением отделяйте стебли и черешки При измельчении мяса заранее удаляйте кости и сухожилия которые могут в нем быть Ни в коем случае не используйте устройство без ингредиентов иначе оно может перегреться Сразу же прекратите переработку продуктов если нож или используемая насадка больше не крутится или крутится очень тяжело Проверьте нет ли в чаше посторонних предметов не являются ли...

Page 128: ...ль измельчитель предназначен для переработки определенных продуктов Пластиковая чаша с крышкой предназначена для измельчения овощей фруктов мяса и других продуктов Насадка венчик служит для взбивания яиц и сливок Насадка взбиватель служит для взбивания кремов и соусов Устройство разработано в первую очередь для маленьких кухонь для кемпинга для поездок и т д и не подходит для коммерческого использ...

Page 129: ...мельчитель KG 2156 Русский Краткий обзор 1 2 4 5 6 8 7 3 1 Панель управления 5 Ножевой блок 2 Рукоятка 6 Пластиковая чаша 3 USB разъем 7 Насадка венчик 4 Крышка емкости 8 Насадка взбиватель Без изображения зарядный кабель USB ...

Page 130: ...стройстве или его компонентах Если есть не используйте устройство В этом случае обратитесь к продавцу у которого вы приобрели устройство 4 Очистите все детали перед первым использованием см главу Очистка Зарядка аккумулятора 1 Откройте резиновую заглушку 2 Подсоедините входящий в комплект зарядный кабель USB к USB разъему измельчителя и к USB разъему зарядного устройства USB Контрольная лампа на п...

Page 131: ...ого аккумулятора хватает примерно на 2 5 3 часа Аккумулятор необходимо зарядить снова если устройство больше не работает или если контрольная лампа мигает красным Включение выключение 1 Нажмите 2 раза на символ чтобы включить измельчитель Устройство всегда запускается на скорости 5 максимальный уровень 2 Повторным нажатием на символ выберите нужную скорость 5 4 3 2 1 Обращайте внимание на индикато...

Page 132: ...ок Насадка взбиватель служит для взбивания кремов и соусов Устройство и насадки не предназначены для замешивания теста 1 Проследите чтобы измельчитель был выключен 2 Вставьте нужную насадку в крепление на устройстве Насадка должна ощутимо зафиксироваться с характерным звуком Для смены насадки 1 Выключите устройство и дождитесь полной остановки насадок 2 Вытащите вставленную насадку с небольшим уси...

Page 133: ... зависимости от выбранного уровня скорости составляет Уровень 1 70 секунд Уровень 2 65 секунд Уровень 3 60 секунд Уровень 4 55 секунд Уровень 5 50 секунд После трех рабочих циклов подряд устройство должно остывать в течение 30 минут 1 Убедитесь что используемая миска для взбивания стоит на нескользкой и ровной подложке 2 Положите нужные ингредиенты в миску для взбивания Входящая в комплект пластик...

Page 134: ... ее из емкости Измельчение ПРЕДУПРЕЖДЕНИЕ о травмировании Будьте осторожны при манипуляциях с ножевым блоком Ножи острые УКАЗАНИЕ по предотвращению материального ущерба Не перерабатывайте с помощью измельчителя очень твердые продукты такие как кофейные зерна или лед Это может повредить устройство Пластиковая чаша с крышкой служит для измельчения овощей фруктов мяса и других продуктов Подготовка пр...

Page 135: ...чашу Заполняйте чашу только до отметки MAX Следите за тем чтобы ось ножевого блока была зафиксирована в соответствующем пазу Отверстие с шестигранным профилем должно быть направлено вверх 4 Установите крышку на пластиковую чашу при этом пазы на крышке обеспечивают правильную установку только в одном положении При необходимости поворачивайте крышку до тех пор пока она не зафиксируется на пластиково...

Page 136: ...сти немного поверните рукоятку чтобы она зафиксировалась в крышке чаши Продолжайте удерживать рукоятку 6 Удерживайте пластиковую чашу рукой 7 Включите устройство два раза нажав на символ Пластиковая чаша не предназначена для хранения продуктов Извлеките содержимое из чаши сразу после переработки ...

Page 137: ... не крутится или крутится очень тяжело или на панели управления мигают все лампы 1 красным цветом 2 5 синим Сразу же выключите измельчитель и проверьте следующее Не мешает ли что то в пластиковой чаше Не заблокированы ли нож насадка Правильно ли установлена крышка чаши Не слишком ли твердый или вязкий продукт Чистка ПРЕДУПРЕЖДЕНИЕ о травмировании Будьте осторожны при манипуляциях с ножевым блоком ...

Page 138: ...ерхность 1 Выключите устройство и дождитесь полной остановки всех деталей 2 Извлеките используемую насадку из устройства или осторожно выньте ножевой блок из пластиковой чаши Рукоятка Очистите рукоятку слегка влажной мягкой тряпкой Принадлежности 1 Сполосните используемую насадку или ножевой блок под струей теплой воды чтобы удалить крупные загрязнения 2 Очищайте насадку венчик насадку взбиватель ...

Page 139: ...овании полностью зарядите аккумулятор чтобы избежать его глубокой разрядки необходимо делать это примерно каждые 3 месяца Технические данные Модель Беспроводной мини измельчитель с ручным миксером KG 2156 Аккумулятор 3 7 В 1300 мА ч Тип литий полимерный USB разъем Напряжение зарядки 5 В пост тока 1 0 А Мощность 45 Вт Поставщик GRENDS GmbH Stahltwiete 23 22761 Hamburg Германия Наши изделия постоянн...

Page 140: ... Schmitt GmbH гарантирует в течение 2 лет с момента покупки бесплатное исправление дефектов путем ремонта или обмена В случае возникновения претензии по гарантии пожалуйста верните продукт с доказательством покупки чек вашему дилеру с указанием причины претензии Эксклюзивный дистрибьютор в РФ ООО Премиум Кофе Солюшнз 7 499 341 19 95 Официальный сервисный центр ООО ДС Сервис 7 495 971 75 32 https d...

Page 141: ...мации обратитесь на местное предприятие по утилизации отходов или в коммунальное управление Батарейкииаккумуляторынельзя утилизироватьвместесбытовымиотходами Всебатарейкииаккумуляторынеобходимо сдаватьвпунктсборавсоответствующем районе городскомокругеиливторговомцентре Это позволяет обеспечить их экологичную утилизацию Внимание Данное устройство оснащено аккумулятором который из соображений безопа...

Page 142: ...e functies met een buitengewoon ontwerp verenigt De jarenlange ervaring van het merk ADE verzekert een hoge technische standaard en bewezen kwaliteit voor meer versheid in uw keuken We wensen u hiermee veel plezier en genot Uw ADE team Inhoud van de bestelling Snoerloze mini hakmolen met handmixer inclusief accessoires USB oplaadkabel Gebruiksaanwijzing ...

Page 143: ...Algemeen 144 Veiligheid 145 Beoogd gebruik 148 In een oogopslag 149 Ingebruikname 150 In uitschakelen 151 Gebruik 152 klopper roerder plaatsen wisselen 152 Mengen 153 Hakken 154 Storing oplossingen 157 Reiniging 157 Technische gegevens 159 Conformiteitsverklaring 160 Garantie 160 Afvoer 160 ...

Page 144: ...g er dan ook deze gebruiksaanwijzing bij Het niet naleven van deze gebruiksaanwijzing kan leiden tot letsel of schade aan het artikel Verklaring van de symbolen Dit symbool in combinatie met het woord GEVAAR waarschuwt voor ernstig letsel Dit symbool in combinatie met het woord WAARSCHUWING waarschuwt voor matig en licht letsel Dit symbool in combinatie met het woord AANWIJZING waarschuwt voor mat...

Page 145: ...amheden mogen niet door kinderen worden uitgevoerd Houd folie en verpakkingsmateriaal uit de buurt van kinderen Er bestaat verstikkingsgevaar Zorg er ook voor dat de verpakkingszak niet over het hoofd wordt getrokken Het apparaat bevat een lithium polymeerbatterij Deze mag niet uit elkaar worden gehaald in het vuur worden gegooid of worden kortgesloten Explosiegevaar Bescherm de ingebouwde batteri...

Page 146: ... het hanteren van het scherpe mesinzetstuk of bij het legen of schoonmaken van de kom Raak de messen niet met blote handen aan Gebruik het apparaat niet als de messen beschadigd zijn Raak geen bewegende delen van het apparaat aan en probeer nooit bewegende delen van het apparaat met de hand of met andere voorwerpen tegen te houden Na het uitschakelen blijven de inzetstukken nog een korte tijd draa...

Page 147: ... kan raken Stop onmiddellijk met het verwerken van voedsel als het mes of het gebruikte inzetstuk stopt met draaien of zeer traag draait Controleer of er een vreemd voorwerp in de kom zit of het voedsel te taai of te vast is of het mes of het inzetstuk geblokkeerd is en ook of de hakmolen echt goed gemonteerd is Plaats het apparaat nooit op of in de buurt van hete oppervlakken bijv kookplaten enz ...

Page 148: ... klopper wordt gebruikt voor het opkloppen van eieren en room De roerder wordt gebruikt voor het opkloppen van crèmes en dipsauzen Het apparaat is voornamelijk ontworpen voor kleine keukens kamperen reizen enz en is niet geschikt voor commercieel gebruik Kokende of hete vloeistoffen mogen niet met het apparaat worden gemengd Het apparaat is niet geschikt voor het kneden van deeg Merk op dat de mes...

Page 149: ...mini hakmolen KG 2156 Nederlands In een oogopslag 1 2 4 5 6 8 7 3 1 Bedieningspaneel 5 Meseenheid 2 Handstuk 6 Kunststoftank 3 USB aansluiting 7 Klopper 4 Deksel van de kom 8 Roerder Zonder afbeelding USB oplaadkabel ...

Page 150: ...n beschadigd zijn Gebruik het apparaat dan niet Neem in dat geval contact op met de dealer waar u het apparaat hebt gekocht 4 Reinig alle onderdelen voor het eerste gebruik zie hoofdstuk Reiniging Accu opladen 1 Vouw de rubberen flap open 2 Sluit de meegeleverde USB oplaadkabel aan op de USB aansluiting van het apparaat en op de USB bus van een USB lader Het controlelampje op het bedieningspaneel ...

Page 151: ...een gebruiksduur van ca 2 5 3 uur De batterij moet worden opgeladen als het apparaat niet meer werkt of als het indicatielampje rood knippert In uitschakelen 1 Tik twee keer op om de hakmolen in te schakelen Het apparaat start altijd op snelheidsniveau 5 hoogste niveau 2 Selecteer het gewenste snelheidsniveau 5 4 3 2 1 door herhaaldelijk op te drukken Let op het scherm 3 Druk een paar seconden op ...

Page 152: ...et opkloppen van crèmes en dipsauzen Het apparaat en de inzetstukken zijn niet geschikt voor het kneden van deeg 1 Zorg ervoor dat de hakmolen is uitgeschakeld 2 Plaats het gewenste inzetstuk in de apparaathouder Het inzetstuk moet hoorbaar en voelbaar vastklikken Om het inzetstuk te wisselen 1 Schakel het apparaat uit en wacht tot de opzetstukken volledig tot stilstand zijn gekomen 2 Trek het gep...

Page 153: ...waarbij de duur van een werkcyclus afhankelijk is van het gekozen snelheidsniveau Niveau 1 70 seconden Niveau 2 65 seconden Niveau 3 60 seconden Niveau 4 55 seconden Niveau 5 50 seconden Na drie opeenvolgende werkcycli moet het apparaat 30 minuten afkoelen 1 Zorg ervoor dat de mengkom die u gebruikt op een stroeve en vlakke ondergrond staat 2 Voeg de gewenste ingrediënten toe aan de mengkom De mee...

Page 154: ...gekomen voordat deze uit de kom te nemen Hakken WAARSCHUWING voor letsel Wees voorzichtig bij het hanteren van de meseenheid De messen zijn scherp KENNISGEVING van materiële schade Verwerk geen zeer hard voedsel zoals koffiebonen of ijs met de hakmolen Dit kan het apparaat beschadigen De deksel met het plastic bakje wordt gebruikt voor het hakken van groenten fruit vlees enz Voedsel voorbereiden S...

Page 155: ...iet overvullen let op de MAX markering Zorg ervoor dat de as van de meseenheid stevig in de ashouder is geplaatst De opening met het zeshoekige profiel moet naar boven wijzen 4 Plaats de deksel op de plastic kom waarbij de uitsparingen in de deksel ervoor zorgen dat deze slechts in één positie correct kan worden geplaatst Draai indien nodig de deksel van de kom totdat deze goed op de plastic kom p...

Page 156: ...dig draai het handstuk lichtjes tot het goed in het dekselcompartiment past Blijf het handstuk vasthouden 6 Houd de plastic kom met één hand vast 7 Zet het apparaat aan door 2x op te drukken De plastic kom is niet geschikt voor het bewaren van voedsel Verwijder de inhoud direct na verwerking ...

Page 157: ... slechts met grote moeite of alle lampjes op het bedieningspaneel knipperen 1 rood 2 5 blauw Schakel de hakmolen direct uit en controleer de volgende punten Is er een obstakel in de plastic container Is het mes inzetstuk geblokkeerd De deksel van de kom is correct geplaatst Het voedsel is te hard of te taai Reiniging WAARSCHUWING voor letsel Wees voorzichtig bij het hanteren van de meseenheid De m...

Page 158: ...rast 1 Schakel het apparaat uit en wacht tot de onderdelen niet meer draaien 2 Trek indien nodig het gebruikte inzetstuk uit het apparaat of trek de meseenheid voorzichtig uit de kunststof houder Handstuk Veeg het handstuk schoon met een licht vochtige zachte doek Accessoires 1 Spoel het gebruikte inzetstuk of de meseenheid onder warm water om het grove vuil te verwijderen 2 Maak de klopper roerde...

Page 159: ...stof en spatwater Indien niet in gebruik voor een lange tijd Laad de accu volledig op om diepe ontlading te voorkomen ca elke 3 maanden nodig Technische gegevens Model Snoerloze mini hakmolen met handmixer KG 2156 Accu 3 7 V 1300 mAh Type Lithium polymeer USB aansluiting Laadspanning 5 V 1 0 A Vermogen 45 W Distributeur GRENDS GmbH Stahltwiete 23 22761 Hamburg Duitsland Onze producten worden doorl...

Page 160: ...mbH garandeert dat defecten als gevolg van materiële of fabricagefouten gedurende 2 jaar vanaf de datum van aankoop kosteloos door reparatie of vervanging worden verholpen Retourneer het artikel in geval van aanspraak op de garantie met het aankoopbewijs en vermeld hierop de reden voor de aanspraak aan uw detailhandelaar Afvoer Het afvoeren van de verpakking Voer het verpakkingsmateriaal af volgen...

Page 161: ...Batterijen en accu s horen niet in het huishoudelijk afval Alle batterijen en accu s moeten bij een verzamelpunt van de gemeente het stadsdeel of bij een detailhandelaar worden ingeleverd Daardoor kunnen batterijen en accu s op milieuvriendelijke wijze worden afgevoerd Let op Dit apparaat bevat een batterij die om veiligheidsredenen permanent is geïnstalleerd en niet kan worden verwijderd zonder d...

Page 162: ......

Reviews: