background image

8250A Optical Power Meter Operation Manual

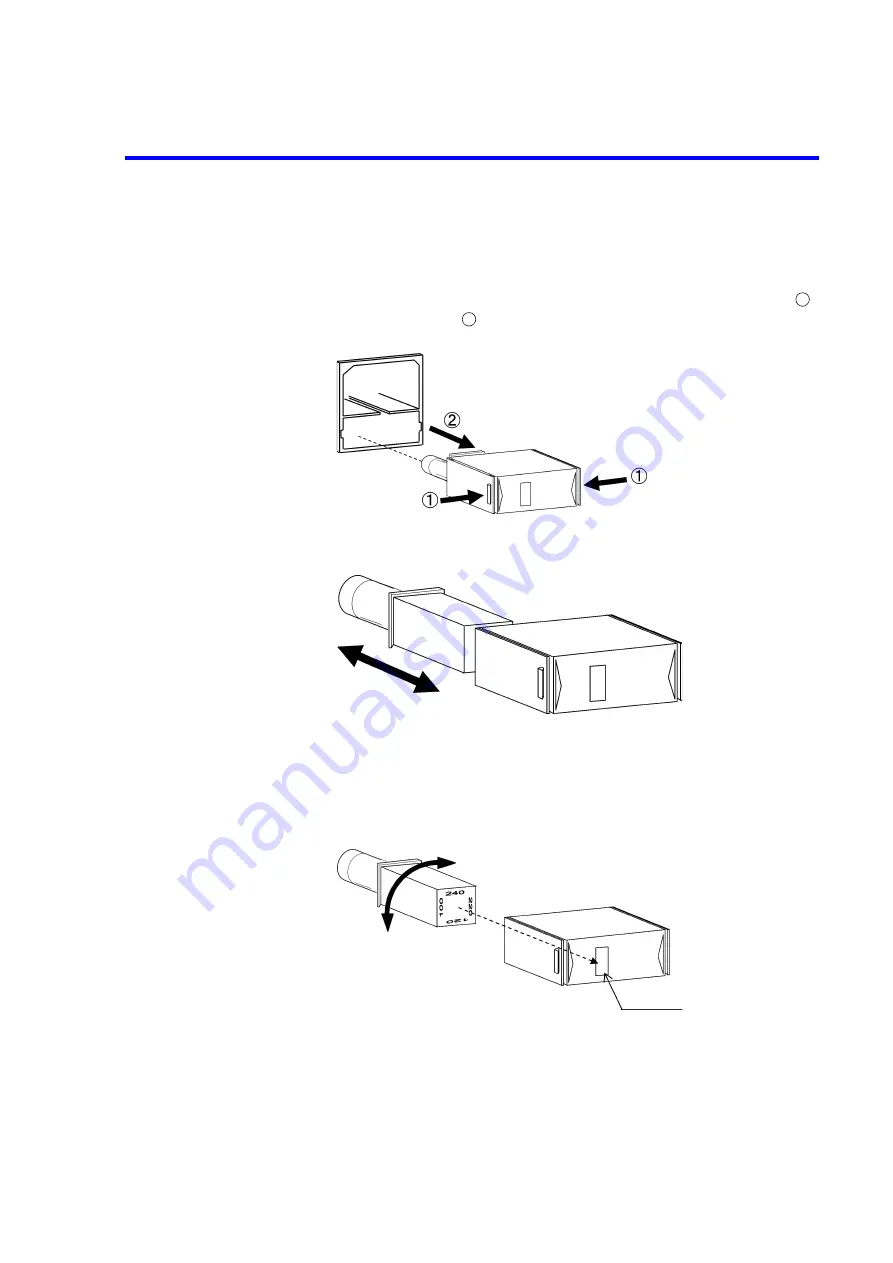
1.7.2 Changing the Power Supply Voltage

1-9

1.7.2

Changing the Power Supply Voltage

1. Remove the fuse holder assembly from the rear panel.

Push both sides of the fuse holder assembly by using flathead screwdrivers (

)

and then pull it out (

).

2. Remove the power supply voltage selector from the fuse holder assembly.

3. Rotate the power supply voltage selector until the correct voltage can be seen

from the window.

4. Replace a fuse that is compliant with the specification of the power supply volt-

age (see Table 1-1).

5. Replace the fuse holder assembly into the rear panel.

1

2

100 VAC or 120 VAC: T250 mA fuse
220 VAC or 240 VAC: T160 mA fuse

Rated voltage

Summary of Contents for 8250A

Page 1: ...MANUAL NUMBER C Printed in Japan ADC CORPORATION All rights reserved 8250A Optical Power Meter Operation Manual FOE 8440218D01 First printing March 30 2007 2007 Cover...

Page 2: ......

Page 3: ...hazardous situation which will result in personal injury or a damage to property including the product Basic Precautions Please observe the following precautions to prevent fire burn electric shock a...

Page 4: ...ing to a restriction on operation Safety Marks on the Product The following safety marks can be found on ADC products ATTENTION Refer to manual Protective ground earth terminal DANGER High voltage CAU...

Page 5: ...f important data The data stored in the disk may become damaged if the product is mishandled The hard disc has a limited life span which depends on the operational conditions Note that there is no gua...

Page 6: ...degree is defined by IEC61010 1 and described below Impulse withstand voltage over voltage category II defined by IEC60364 4 443 Pollution Degree 2 Vibration Direct sunlight Corrosive gas Dust Front...

Page 7: ...Canada 125 V at 7 A Black 2 m 6 ft Straight A01403 Option 95 Angled A01413 CEE Europe DEMKO Denmark NEMKO Norway VDE Germany KEMA The Netherlands CEBEC Belgium OVE Austria FIMKO Finland SEMKO Sweden...

Page 8: ......

Page 9: ...iption Measurement Procedure Backing Up and Initializing Parameters Wavelength Preset Describes how to use this instrument 4 REMOTE CONTROL Describes how to control this instrument by remote Example p...

Page 10: ...Panel key In bold type Example ZERO RATIO dBr 3 Trademarks and Registered Trademarks Microsoft and Windows are trademarks or registered trademarks of Microsoft Corporation in the United States and ot...

Page 11: ...g the Incident Surface of the Sensor 1 14 1 11 How to Store and Transport This Instrument 1 15 1 11 1 Storage 1 15 1 11 2 Transportation 1 15 1 12 Warm up 1 15 1 13 Calibration 1 15 1 14 Replacing Par...

Page 12: ...2 Remote Command List 4 18 4 6 3 TQ8215 Compatibility 4 26 4 6 4 8230 Compatibility 4 37 4 7 Sample Programs 4 39 4 7 1 GPIB Sample Programs 4 39 4 7 2 USB Sample Programs 4 42 5 TECHNICAL NOTES 5 1...

Page 13: ...ations 8 2 8 1 3 Standard Accessories 8 3 8 2 Optical Sensor Specifications 8 4 8 2 1 Sensor Specifications Sold Separately 8 4 8 2 2 Wavelength Sensitivity Correction Option and Additional Calibratio...

Page 14: ......

Page 15: ...Register Structure in the TQ8215 Compatible Mode 4 36 4 3 Measurement Image 1 GPIB 4 39 4 4 Measurement Image 2 GPIB 4 40 4 5 Measurement Image 1 USB 4 42 4 6 Measurement Image 2 USB 4 44 5 1 Block Di...

Page 16: ......

Page 17: ...e TQ8215 but Cannot Be Used in this Instrument 4 27 4 9 Commands Specific to the TQ8215 Compatible Mode 4 29 4 10 Commands that Cannot Be Used in the TQ8215 Compatible Mode 4 32 4 11 Differences with...

Page 18: ......

Page 19: ...asurements can be performed easily in an R D or production line by using the supplied USB digital interface This instrument can be used with a measurement system which is developed on DOS by using the...

Page 20: ...2312B thin type optical sensor is available for measurement in optical disk equipment or narrow spaces The 82312B is available for blue ray optical disks and has a flat sensitivity characteristic for...

Page 21: ...red without replacing the sensor these sensors are ideal for evaluating pickups and drives used for the 3 wavelength type Blu ray disc or HD DVD The actual measurement value for wavelength sensitivity...

Page 22: ...outline drawing for each sensor in the appendix For more information on option specifications refer to Table 1 4 Sensor Option The existing optical sensors 82311 82321 82312 82322 82313 82323 82314A...

Page 23: ...E The 823x series sensors cannot be used for the optical power meter TQ8210 or TQ8215 Thin type large area three wavelength optical sensor Wavelength 390 to 900 nm 82314BW 82314W Table 1 2 Old and New...

Page 24: ...software revision of the optical power meter 8250A is not applied Err 2 or Err 3 is displayed Table 1 3 List of Software Revisions Required for Optical Sensor Operations Model name Software revision...

Page 25: ...velength sensitivity correction Additional calibration wavelength 405 nm 650 nm 780 nm 82311 82311B OPT82311 20 OPT82311B 20 OPT82311 21 OPT82311B 21 OPT82311 22 OPT82311B 22 Standard specification 82...

Page 26: ...ply voltage setting on the rear panel of this instrument accords with the AC power supply voltage to be used Figure 1 1 Indication of the Set Power Supply Voltage Table 1 5 Relation Table between AC P...

Page 27: ...screwdrivers and then pull it out 2 Remove the power supply voltage selector from the fuse holder assembly 3 Rotate the power supply voltage selector until the correct voltage can be seen from the wi...

Page 28: ...8250A Optical Power Meter Operation Manual 1 7 2 Changing the Power Supply Voltage 1 10 6 Check that the correct power supply voltage is indicated in the window...

Page 29: ...a damaged power cable Doing so may cause an electrical shock 2 Connect the AC power connector on the rear panel of this instrument and a three pin power outlet that is connected to a ground terminal b...

Page 30: ...IEC60825 1 and FDA21CFR1040 10 in which the dangerousness and precautions when mea suring are described in relative laser classification Use the laser product according to its warning labels and opera...

Page 31: ...measurement value display area the software revision is displayed in the wavelength display area and the con nected sensor type for example 2314B when 82314B is connected is dis played in the measurem...

Page 32: ...e an organic solvent such as benzene toluene xylene acetone or thinner for cleaning because they deform the plastic 1 10 2 Cleaning the Incident Surface of the Sensor If the incident surface is contam...

Page 33: ...ent should be stored at room temperature and in a low humidity envi ronment 1 11 2 Transportation Use the original packing materials or equivalent materials when transporting and avoid excessive vibra...

Page 34: ...ith limited life that are not listed in Safety Summary Replace the parts listed below after their expected lifespan has expired For more information on how to replace parts contact ADC CORPORATION or...

Page 35: ...Location Unit Component Quantity if full configuration Polychlorinated biphenyls PCB contained in capaci tors Not used Mercury contained in com ponents Not used Batteries Not used Printed circuit boar...

Page 36: ...nickel com pounds Used Main frame BPL 033316 BLC 031485 Electronic compo nents mechanical parts Nickel plated parts Lead and lead compounds Used Main frame BPL 033316 BLC 031485 Lead solder used to a...

Page 37: ...fset which depends on the optical sensor Press ZERO for 2 seconds after completely covering the optical sensor The 8250A acquires the offset value while ZERO is displayed for approximately 4 seconds a...

Page 38: ...as follows C Sensor sensitivity at an arbitrary wavelength n Sensor sensitivity at the reference wavelength c 5 W dBm Switches the measurement unit setting between W and dBm 6 HOLD Stops the measurem...

Page 39: ...e wave length display unit CF value or calibration wavelength is changed or the calculation ON or OFF or ZERO is executed 14 SM Performs the moving average calculation smoothing of the mea sured value...

Page 40: ...tely 2 seconds and all keys are unlocked If any key except for this key is pressed while all keys are locked Err 13 which indicates that all keys are locked is displayed 19 When setting the wavelength...

Page 41: ...t value display section 4 Wavelength display section 5 Unit of wavelength 6 Sampling indicator 9 Calibration wavelength indicator Lights when the set wavelength corresponds with the calibration wavele...

Page 42: ...GPIB connector which is used for the data communications and used to remotely control this instrument 26 ANALOG OUTPUT Outputs the voltage which is proportional to the optical power The full scale va...

Page 43: ...rameter load Preset wavelength Parameters loaded when the power turns on Calibration mode Interface Only when GPIB is selected in I F Only when USB is selected in I F Note Each displayed value is an e...

Page 44: ...is saved only when the ENTER key is pressed 2 The menu items when CAL ON is set are as shown in Figure 3 2 Legend Italic character Entry UP DOWN item Under line Cursor blinks Item in which the cursor...

Page 45: ...f display digits Sets the number of display digits of the measured value to 3 4 or 5 If the display digit is set to 3 or 4 an under bar is displayed in place of each unused digit Parameter save Saves...

Page 46: ...selected parameters that are saved in the USER 0 area are loaded For more information refer to 3 4 Backing Up and Initializing Parameters Calibration mode Sets the calibration mode to ON or OFF In the...

Page 47: ...recommended when using the analog output or to prevent the unit prefix from changing 3 3 5 Reading the Display Reads the displayed value of the 8250A The measured value is calculated by the following...

Page 48: ...ers that are loaded when the power turns on can be selected by key operation in the menu item For more information on key operation refer to 3 1 Menu Map For more information on remote commands refer...

Page 49: ...CRLF EOI Status SRE ESE DSE 0 dBr calculation OFF RATIO calculation OFF Display OFF ON ON Calibration mode OFF Table 3 1 Initial Values of the Parameters and Backup 2 of 2 Parameter Value when shippin...

Page 50: ...ions Select the menu item P LD parameter load by pressing MENU and then PREV or NEXT Select dFLt by pressing UP or DOWN Press ENTER DONE is displayed and all parameters except for common parameters ar...

Page 51: ...NT The first item of the menu is displayed 2 PREV 5 times 0 0780 P SET The current setting of the No 0 preset wavelength is displayed The least significant digit blinks Cursor 3 0 0780 P SET The most...

Page 52: ...avelength of 780 nm in No 0 is called correctly 1 000 0780 The display does not change because the same wavelength as the previous wavelength is called 3 RECALL 1 SEt 0405 This display indicates that...

Page 53: ...en the instrument is shipped from the factory How to select the remote interface Press CE to cancel the setting For more information on how to set other functions of the remote interface refer to 4 2...

Page 54: ...e response is changed to the new model name 6 When the response is set to the new model name the decimal point next to the last digit in the wavelength display is turned off Note1 Changing the respons...

Page 55: ...V or more Logic 1 Low state 0 4 V or less Table 4 1 Interface Functions Code Function SH1 Source handshake function AH1 Acceptor handshake function T5 Basic talker function Listener specified talker c...

Page 56: ...es on the bus are turned on If any device on the bus is not turned on the system may not operate correctly 4 Connecting or disconnecting cables Turn off all devices on the bus before connecting or dis...

Page 57: ...lecting a Remote Interface select GPIB To cancel the setting press CE Setting item Factory setting Header ON OFF ON Addressable Talk Only Addressable Address 1 Key operation Display 1 MENU 010 SM CNT...

Page 58: ...liance with USB2 0 Full Speed Connector USB B type female ID Any number from 1 to 127 can be set as USB ID Remote Local Function is available Input command ASCII strings command which sets functions a...

Page 59: ...out the terminators such as CR or LF at the end of the command strings 4 3 4 USB Setting 1 The USB setting item and its initial setting when the instrument is shipped are shown below 2 USB ID setting...

Page 60: ...scription Priority Number of characters Main header W Measurement unit W 2 WR Measured value after RATIO calculation DB Measurement unit dBm DR Measured value after dBr calculation DI Measurement unit...

Page 61: ...9 4 200 nW ddd ddd E 09 2000 nW dddd dd E 09 20 W dd dddd E 06 200 W ddd ddd E 06 2000 W dddd dd E 06 20 mW dd dddd E 03 200 mW ddd ddd E 03 RATIO W 00d ddd E 00 to 09 dBm dBr 2 000 counts or more whe...

Page 62: ...is displayed 00ddd d Between 50 and 499 counts when W is displayed 000ddd Less than 50 counts when W is dis played 4 1 2 ddd dd 2 000 counts or more when W is displayed 7 ddd dd Between 500 and 1 999...

Page 63: ...etting command Number of characters Initial value CR LF EOI DL0 2 GPIB LF DL1 1 USB EOI DL2 0 LF EOI DL3 1 EOI is output only in GPIB DL2 and DL3 cannot be set in USB Number of displayed digits Mantis...

Page 64: ...Table 4 3 to Table 4 6 Figure 4 1 Status Register Structure ZERO execution error No sensor connection Sensor data sum check error Self test error ADC execution error USB communication error Calibratio...

Page 65: ...event of DESR occurs and DESR is set to 1 this bit is set to 1 if the corresponding bit of DESER is set to 1 OFF This bit is set to 0 when DESR is cleared by being read DSR 4 MAV Message Available ON...

Page 66: ...o 1 when ZERO is complete OFF This bit is set to 0 when ZERO starts 2 EOC End Of Cal ON This bit is set to 1 when the calibration is complete XPC XIVC XWR and XSWR OFF This bit is set to 0 when the ca...

Page 67: ...escription 0 OPC Operation Complete ON This bit is set to 1 if all operations are complete after receiving the OPC command 1 Not used Fixed to 0 2 Not used Fixed to 0 3 DDE Device Dependent Error ON T...

Page 68: ...OM sum check error RAM read write error Calibration data sum check error Setting parameter sum check error 4 ON This bit is set to 1 if an error occurs during the AD conversion 5 ON This bit is set to...

Page 69: ...The following two methods can be used to link a header with its argument the rest cause an error Inserting no space between the header and the argument Example DW0 Setting the unit display to dBm Inse...

Page 70: ...is instrument cannot be returned to the local mode if the local lockout is set When using GPIB transmit the GTL command When using USB transmit ausb_local close USB and remove the USB connector 4 6 2...

Page 71: ...000 W R10 20 mW R11 200 mW R Query reply R0 or R4 to R11 RX Sets the measurement range to the cur rent measurement range RX Reply to the current measurement range query Rdd Trigger mode M0 AUTO M1 HOL...

Page 72: ...Reply WLCFn wwww c ccc n Calibration wavelength point 1 character wwww Wavelength 4 characters c ccc Correction coefficient 5 char acters Number of mea surement dis played digits RES3 3 1 2 digit dis...

Page 73: ...eply SM0 to SM1 Smoothing count ST data data Setting range 0 to 100 If set to ST0 or ST1 smoothing is set to OFF 10 ST Query reply ST000 to ST100 Remote Header H0 Sets the header output to OFF H1 Sets...

Page 74: ...gister 0 to 65535 0 0 1 DSE Query reply ddddd ERR Reply to the error register query ddddd CLS Clears the status Operation complete OPC After all operations are complete sets LSB of the standard event...

Page 75: ...number 5 char acters The new model name response is applied to software revision B00 or later Old model name response ADC Corp ADCE8250A XXXXXXXXX YYYYY ADC Corp Manufacturer 9 characters ADCE8250A In...

Page 76: ...h are saved in area 1 of the nonvolatile memory as the setting parameters RLC2 Loads the values which are saved in area 2 of the nonvolatile memory as the setting parameters RLC3 Loads the values whic...

Page 77: ...rng data rng Range Setting range 4 to 11 data Gain data Setting range 0 50000 to 1 50000 6 Gain data read ing on RAM XGN rng rng Range Setting range 4 to 11 Reply XGNr d ddddd 6 Offset data direct set...

Page 78: ...sing the NEXT key After all displays are lit MODE 8215 is displayed to the right of the display and the TQ8215 compatible mode is set is displayed to the lower right of the display while the TQ8215 co...

Page 79: ...ical peak power AP1 Source output OFF SC0 ON SC1 Buzzer OFF B0 ON B1 Constant Y setting Scaling and comparator constants PY Constant Z setting Scaling and comparator constants PZ Substitutes the measu...

Page 80: ...ion mode TEMP P3 range unit reference temperature contact and calculation mode DCI P4 and calculation mode Analog output P6 output data output digits and output mode Buzzer P7 buzzer when the value is...

Page 81: ...ode AP0 Optical average power mode 1 3 Range R0 Auto range R2 20 nW 2 In the normal mode R4 R3 200 nW R5 R4 2 W R6 R5 20 W R7 R6 200 W R8 R7 2 mW R9 R8 20 mW R10 R9 200 mW R11 Sampling inter val PR0 F...

Page 82: ...alcula tion to ON or OFF In the 8250A a calculation which can be set by the P command is only MAX Therefore if the P com mand sets MAX to ON 4 MAX can be set to ON or OFF Initialization Z Conditions w...

Page 83: ...2 to 9 mode 0 only unit dBm or W 0 1 calc Calculation selection 0 OFF 4 MAX 1 This command exists to allow compatibility but nothing is performed internally 2 The header is the same as the normal mod...

Page 84: ...annot Be Used in the TQ8215 Compatible Mode Function Command Status Queries the status byte register Reply ddd STB Sets the service request enable register 0 to 255 Query reply ddd SRE nnn SRE Queries...

Page 85: ...ce 3 characters String Description Numberof characters Main header DB Measurement unit dBm 2 DR Measured value after the dBr calculation W Measurement unit W WR Measured value after the RATIO calcula...

Page 86: ...nW dd ddd 7 E 9 3 200 nW ddd dd E 9 2000 nW d dddd E 6 20 W dd ddd E 6 200 W ddd dd E 6 2000 W d dddd E 3 20 mW dd ddd E 3 200 mW ddd dd E 3 RATIO W 00d dd E 0 to 9 dBm dBr 2 000 counts or more in the...

Page 87: ...ommand Numberof characters Initial value CR LF EOI DL0 2 GPIB LF DL1 1 USB EOI DL2 0 LF EOI DL3 1 EOI is output only in GPIB DL2 and DL3 cannot be set in USB Number of display digits Mantissa Exponent...

Page 88: ...ed 4 Not used 3 Not used 2 Not used 1 When a SYNTAX error occurs 0 When a measurement ends Initial value bit Status byte clear condition 0 When measured data is read When a trigger is received 1 When...

Page 89: ...ient at the set calibration wavelength None MAX calculation OFF ON None Backed up when the power turns off None Cannot be backed up when the power turns off Automati cally set to OFF when the power is...

Page 90: ...etersloaded when the power is turned on Setting by key opera tion Parameters backed up when the power is turned off Initial value Parameters saved in USER 0 None Parameters backed up when the power is...

Page 91: ...d data from the 8250A Set the GPIB address of the 8250A to 1 Figure 4 3 Measurement Image 1 GPIB Program list Option Explicit All variables are clearly declared Sub Sample1_Click Registers the subrout...

Page 92: ...ption Explicit All variables are clearly declared Sub Sample2_Click Registers the subroutine for the command button on the sheet Dim GP_ADR As Integer Declares the variable of the GPIB address of the...

Page 93: ...ers Do Call ibwrt opm STB vbCrLf Inquires the status byte Call ibrd opm dt Reads the status byte dt dt And 16 Performs the AND operation in bit4 MAV Loop While dt 16 Call ibrd opm dt Reads the measure...

Page 94: ...of times after pressing START Set USB ID of the 8250A to 1 Figure 4 5 Measurement Image 1 USB Program list Option Explicit All variables are clearly declared Private Const OK As Integer 0 Definition o...

Page 95: ...terF 0 Sets the input flag of the ENTER button to OFF Do While 1 Waits for pressing the ENTER button If enterF 1 Then Exit Do Exits if the ENTER button is pressed DoEvents Loop ret ausb_write OPM1 TRG...

Page 96: ...l_Start Registers the subroutine for the START button on the sheet Dim OPM1 As Long USB handle Dim OPM2 As Long USB handle Dim USB_ID1 As Long USB_ID which is set in OPM1 Dim USB_ID2 As Long USB_ID wh...

Page 97: ...2 transmission error vbExclamation GoTo err_exit End If ret ausb_read OPM1 rstr 50 siz Reads the measured data Up to 50 characters If ret OK Then If the command is received correctly rstr Left rstr si...

Page 98: ...8250A Optical Power Meter Operation Manual 4 7 2 USB Sample Programs 4 46 If ret OK Then If the USB terminates incorrectly MsgBox USB end error vbExclamation End If End Sub...

Page 99: ...eries sensor is used and the 821 series sensor is used When the 823 series sensor is connected ZERO offset cancel power calibration wavelength sensitivity correction and CF correction coefficient calc...

Page 100: ...Figure 5 1 Block Diagram of the 8250A 823 series sensor Nonvolatile memory Wavelength sensitivity data Power calibration data Sensor ID 821 series sensor VR for the power calibration Sensor ID Photodi...

Page 101: ...This instrument guarantees accuracy over a wide range of wavelengths by using both the power calibration at the calibration wavelength and the wavelength sensitivity correction over a wide range of w...

Page 102: ...vity correc tion function Also when correcting the wavelength sensitivity the accuracy which is much higher than the accuracy obtained by using both the wavelength sensitivity correction and the stand...

Page 103: ...wn below Table 6 1 Cable and Others Required for Performance Test Cable and others Remarks TRIAX 12pin conversion adapter A For the 823 series sensor path TRIAX 12pin conversion adapter B For the 821...

Page 104: ...t path sensor series path according to the sensor series 823 or 821 series connected to this instrument Because the specifications are different between each sensor series switch the path and perform...

Page 105: ...pin conversion adapter B 8 Enter into the CAL mode by using the same operation as step 2 9 Open the input and measure the current at ZERO in all ranges Use the UP and DOWN keys to select a range Ensur...

Page 106: ...ON to calibrate or repair it 200 A ZERO 0 A Open 70 0 nA 70 0 nA FULL 190 A 355 nA 2 920 nA 2 mA ZERO 0 A Open 0 70 A 0 70 A FULL 1 9 mA 3 55 A 29 20 A 20 mA ZERO 0 A Open 7 00 A 7 00 A FULL 19 mA 35...

Page 107: ...on prepare the relevant light source and fibers Table 6 4 Equipment Required for Evaluating Optical Sensors Product Light source Fiber Sensor adapter Wavelength Output Stability 82311B 780 nm 1 mW 0 2...

Page 108: ...5 Judgment Criteria for the Optical Sensor Product Light source Wavelength Light source output Set value Judgment criteria 82311B 82312B 780 nm 1 mW Must be 1 6 or less of the read value of the standa...

Page 109: ...meter and the power meter to be tested to cancel the offset of the sensor 4 In reference to Figure 6 2 connect the light source to the standard optical power meter by using the optical fiber 5 Record...

Page 110: ......

Page 111: ...Calibration The following tables show the accuracy of an instrument cables and the recommended instrument required for the calibration in each range Table 7 1 Cable Adapter and Others Required for Cal...

Page 112: ...s instrument requires a warm up time of 5 minutes or more Sufficient warm up time is also required for instruments to be used before starting the calibration The 6245 requires a warm up time of one ho...

Page 113: ...instruments for the current measurement calibration Figure 7 2 Connection Diagram for the Current Measurement Calibration Input open TRIAX 12pin conversion adapter A TRIAX 12pin conversion adapter A R...

Page 114: ...cribed in Section 7 1 Instrument Cable and Others Required for Calibration and adjust the current at the calibration point to within the allowable range shown in the table below Table 7 3 Calibration...

Page 115: ...ommands refer to calibration items in Section 4 4 Measured Data Output Format There are two types of calibration The IV offset calibration and the current measurement calibration The IV offset calibra...

Page 116: ...AL1 Input open Zero calibration XIVC0 Connect the 1 k resistor Full scale calibration XIVC1 Calibration data saving XWR End of calibration mode CAL0 Enters the calibration mode Terminates the calibrat...

Page 117: ...00 nA 200 nA XR5 OPEN 190 000 nA 2000 nA XR6 OPEN 1900 00 nA 20 A XR7 OPEN 19 0000 A 200 A XR8 OPEN 190 000 A 2000 A XR9 OPEN 1900 00 A 20 mA XR10 OPEN 19 0000 mA 50 mA XR11 OPEN 050 000 mA The calibr...

Page 118: ...ion of all instruments can be performed first and then the current measurement calibration can be performed later 7 6 1 IV Offset Calibration 1 Connect the instruments according to Figure 7 1 Connecti...

Page 119: ...put the current of the calibration point value from the VIG according to Table 7 2 10 Input the current which is generated in the VIG the current value is traced to the national standards to this inst...

Page 120: ......

Page 121: ...second FAST 5 times second MED 2 times second SLOW 10 times second In the remote measurement by using USB or GPIB and Hold Trigger Compatible optical sensor 823 series 82311B 82312B 82313B 82321B 8232...

Page 122: ...he full scale value changes depending on the sensitivity calibration value of the sensor wavelength setting correction value CF and the range setting When using an 821 series sensor The full scale val...

Page 123: ...s 2 9 kg or less 8 1 3 Standard Accessories Accessory name Model name Remarks Power cable A01402 For PSE Japan Operation manual E8250A Standard English Power fuse DFT AAR25A 1 T250 mA 250 V For 100 12...

Page 124: ...section mm 18 180 3 2 18 180 3 7 18 180 5 Model 82321 82321B General purpose 82322 82322B For blue violet light 82323 82323B For high power light Wavelength range 390 to 1100 nm 390 to 450 nm 390 to 1...

Page 125: ...Wavelength range 390 to 900 nm Wavelength 405 nm 650 nm 780 nm Power range Display in dBm 50 to 20 dBm Display in W 10 nW to 100 mW Beam spot 2 mm or more 3 mm or more Light receiving element Si photo...

Page 126: ...sensitivity to the center is within the 10 range 2 Can be added by using options A calibration wavelength other than the standard specification can be selected by using the calibration wavelength sele...

Page 127: ...780 nm 82311 82311B OPT82311 20 OPT82311B 20 OPT82311 21 OPT82311B 21 OPT82311 22 OPT82311B 22 Standard specification 82312 82312B Standard specification Standard specification 82313 82313B Standard...

Page 128: ......

Page 129: ...e cause Solution 1 Key operation is disabled The key lock is set to ON Set the key lock to OFF by refer ring to 1 in 2 1 1 Function Description 2 The display remains unchanged The HOLD function is ena...

Page 130: ...1 Visual check 2 Sensor connection check 2 Constant monitoring Err 2 3 Sensor calibration data sum check 3 When re connecting the sensor Err 3 4 ROM sum check 4 Err 4 5 RAM read write check 5 Err 5 6...

Page 131: ...ntact ADC Corp Short sound 7 Err 7 Parameter sum check error Unlimited Contact ADC Corp Short sound 8 Err 8 AD operation check error When measuring Approx 1 second Contact ADC Corp Short sound 9 Err 9...

Page 132: ...d the measured value exceeds 50 of the full scale XPC Err 10 ERR Bit7 ON The value measured when calibrat ing exceeds a value allowed in the measurement range 3 The full scale calibration is per forme...

Page 133: ...easurement QueryPerformanceCounter Unit msec Command GPIB USB Obtaining one measured data when free running FAST 98 8 98 6 MED 197 3 196 1 SLOW 494 4 492 6 Obtaining one measured data when setting tri...

Page 134: ......

Page 135: ...ONAL OUTLINE DRAWING Unit mm NOTE This drawing shows external dimensions of this instrument The difference in products and options used can cause a change in the appearance of the instrument DIMENSION...

Page 136: ...rface 0 3 mm Distance to the light receiving element surface 1 4 mm Distance to the light receiving element surface 0 5 mm Distance to the cover glass surface 0 1 mm Distance to the light receiving el...

Page 137: ...ptions used can cause a change in the appearance of the instrument The maximum screw length is 6 mm Distance to the cover glass surface a Distance to the light receiving element surface b A securing s...

Page 138: ...TE This drawing shows external dimensions of this instrument The difference in products and options used can cause a change in the appearance of the instrument Distance to the cover glass surface Dist...

Page 139: ...iption 2 1 G General Specifications 8 2 GPIB 4 3 GPIB Sample Programs 4 39 GPIB Setting 4 5 H How to Connect Instruments 6 2 6 6 7 3 How to Initialize 3 8 HOW TO PERFORM MEASUREMENTS 3 1 How to Set th...

Page 140: ...or Specifications Sold Separately 8 4 Setting the Preset Wavelength 3 9 Setting the Range 3 5 Setting the Wavelength 3 5 SPECIFICATIONS 8 1 Standard Accessories 8 3 Status Register 4 12 Storage 1 15 T...

Page 141: ...ill be a period of one year commencing on the delivery date of the Product 3 If the Product is found to be defective during the Warranty Period ADC CORPORATION will at its option and in its sole and a...

Page 142: ...ANTICIPATED PROFITS OR REVENUES IN ANY AND ALL CIRCUMSTANCES EVEN IF ADC CORPORATION HAS BEEN ADVISED OF THE POSSIBILITY OF SUCH DAMAGES AND WHETHER ARISING OUT OF BREACH OF CONTRACT WARRANTY TORT INC...

Reviews: