background image

6240B DC Voltage Current Source/Monitor Operation Manual

6.7.2 Data Format

6-23

6.7.2

Data Format

The 6240B uses the following data types for data input and output.

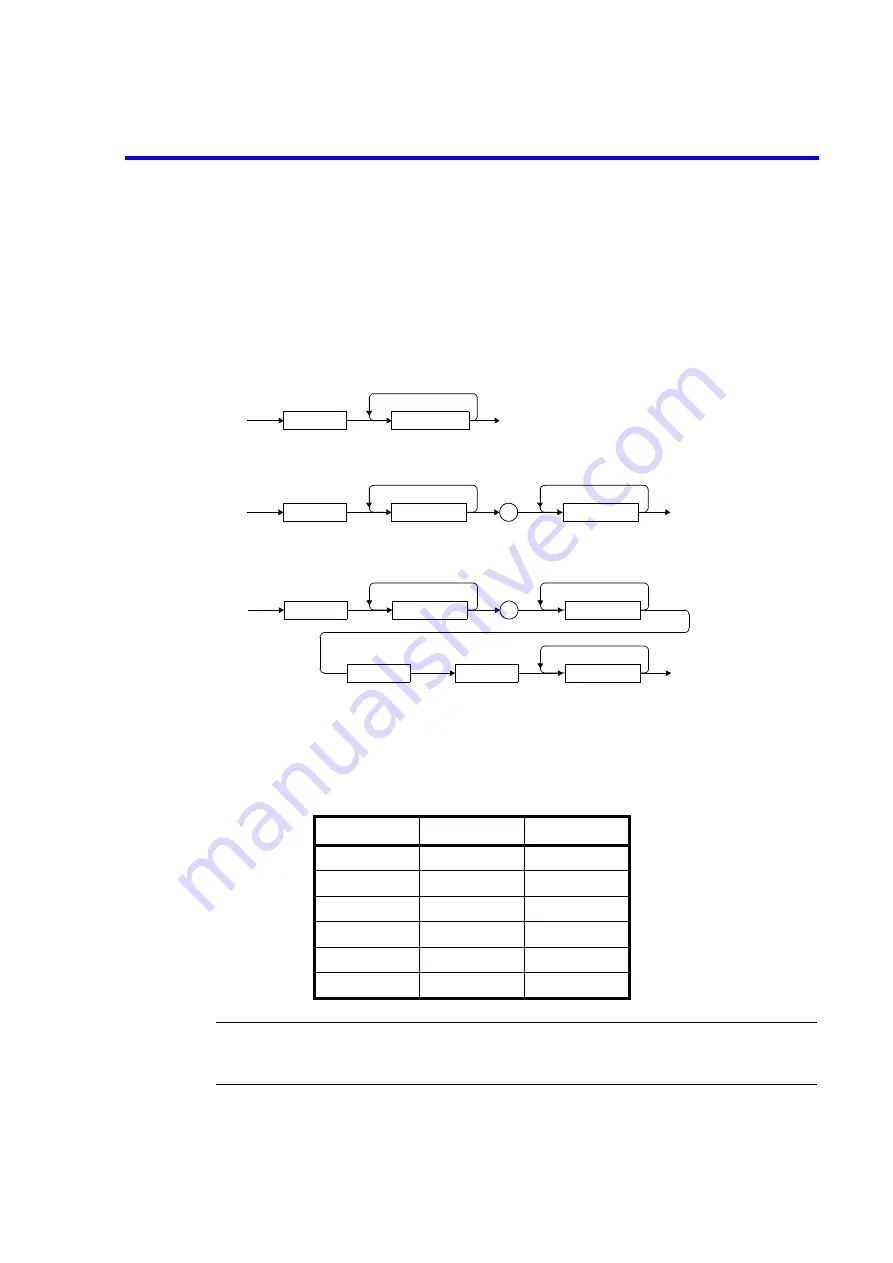
1. Numeric data

There are three numeric data formats, any of which can be used for input.
Some commands can add units to the data when the data is input.

Integer type: NR1 format

Fixed-point type: NR2 format

Floating-point type: NR3 format

2. Units

The table below lists the units that can be used for the D command.

NOTE:

When numeric data is expressed in an exponent format in the 6240B, the number conversion time
becomes too long if the exponent is set to ±31 or higher (xx.xxxE±31). The exponent setting should
not exceed ±30.

Unit

Exponent

Meaning

V

10

0

Voltage

MV

10

-3

 Voltage

UV

10

-6

Voltage

A

10

0

 Current

MA

10

-3

 Current

UA

10

-6

Current

[Sign]

Numeric

[Sign]

Numeric

.

Numeric

[Sign]

.

E/e

[Sign]

Numeric

Numeric

Numeric

Summary of Contents for 6240B

Page 1: ...MANUAL NUMBER C Printed in Japan ADC CORPORATION All rights reserved 6240B DC Voltage Current Source Monitor Operation Manual FOE 00000115B00 First printing April 23 2015 2015 Cover ...

Page 2: ......

Page 3: ...tentially hazardous situation which will result in personal injury or a damage to property including the product Basic Precautions Please observe the following precautions to prevent fire burn electric shock and personal inju ry Use a power cable rated for the voltage in question Be sure however to use a power cable conforming to safety standards of your nation when using a product overseas When i...

Page 4: ... CAUTION Indicates an item relating to possible damage to the product or instrument or relat ing to a restriction on operation Safety Marks on the Product The following safety marks can be found on ADC products ATTENTION Refer to manual Protective ground earth terminal DANGER High voltage CAUTION Risk of electric shock Replacing Parts with Limited Life The following parts used in the instrument ar...

Page 5: ...ake back ups of important data The data stored in the disk may become damaged if the product is mishandled The hard disc has a limited life span which depends on the operational conditions Note that there is no guarantee for any loss of data Precautions when Disposing of this Instrument When disposing of harmful substances be sure dispose of them properly with abiding by the state provided law Har...

Page 6: ...tion degree is defined by IEC61010 1 and described below Impulse withstand voltage over voltage category II defined by IEC60364 4 443 Pollution Degree 2 Vibration Direct sunlight Corrosive gas Dust Front The instrument must be used in a hor izontal position To prevent the internal temperature from rising cooling fans are installed in some instruments The air vents on the case must be un blocked A ...

Page 7: ...A Canada 125 V at 7 A Black 2 m 6 ft Straight A01403 Option 95 Angled A01413 CEE Europe DEMKO Denmark NEMKO Norway VDE Germany KEMA The Netherlands CEBEC Belgium OVE Austria FIMKO Finland SEMKO Sweden 250 V at 6 A Gray 2 m 6 ft Straight A01404 Option 96 Angled A01414 SEV Switzerland 250 V at 6 A Gray 2 m 6 ft Straight A01405 Option 97 Angled A01415 SAA Australia New Zealand 250 V at 6 A Gray 2 m 6...

Page 8: ......

Page 9: ......

Page 10: ......

Page 11: ...1 Front Panel 2 1 2 1 1 1 Display Section 2 2 2 1 1 2 SOURCE Section 2 2 2 1 1 3 SOURCE RANGE Section 2 3 2 1 1 4 MEASURE Section 2 3 2 1 1 5 OUTPUT CONTROL Section 2 4 2 1 1 6 TRIGGER Section 2 4 2 1 1 7 Other Keys 2 5 2 1 1 8 Output Section 2 6 2 1 1 9 POWER Switch 2 6 2 1 2 Screen Display Annotations 2 7 2 1 3 Rear Panel 2 10 2 2 Basic Operation 2 12 2 2 1 Setting Source Value 2 12 2 2 1 1 Rela...

Page 12: ...Setting 4 4 4 2 7 MODE Key Source Mode 4 15 4 2 8 MON Key Measurement Mode 4 15 4 2 9 NULL SEL Key 4 16 4 2 10 OPR SUSPEND Key Operate Suspend 4 16 4 2 11 SHIFT LOCAL Key Shift Mode Local 4 17 4 2 12 STBY Key Output Standby 4 17 4 2 13 TRIG SWP STOP Key Trigger Sweep Stop 4 18 4 2 14 UP Key Source Range 4 18 4 2 15 VS IS Key Source Function 4 19 4 2 16 123 Key Direct Input Mode 4 19 4 2 17 4W 2W K...

Page 13: ...43 5 2 7 1 Limiter Setting Ranges 5 43 5 2 7 2 Setting Limiters 5 44 5 2 7 3 Displaying and Outputting of Limiter Detection 5 45 5 2 8 Alarm Detection 5 45 5 2 9 Source and Measurement Timing 5 46 5 2 9 1 Restrictions on Time Parameters 5 47 5 2 9 2 Measurement Delay and Settling Time 5 49 5 2 9 3 Integration Time and Measurement Time 5 52 5 2 9 4 Auto Range Delay 5 52 5 2 10 Calculation Functions...

Page 14: ...6 18 6 7 Remote Commands 6 22 6 7 1 Command Syntax 6 22 6 7 2 Data Format 6 23 6 7 3 Remote Command List 6 24 6 7 4 TER Command 6 40 6 8 Sample Programs 6 41 6 8 1 Program Example for GPIB 6 41 6 8 2 Program Example for USB 6 41 7 PERFORMANCE TEST 7 1 7 1 Measuring Instrument Necessary for Performance Test 7 1 7 2 Connections 7 1 7 3 Test Method 7 1 8 CALIBRATION 8 1 8 1 Measuring Instrument and C...

Page 15: ... Accuracy for Current Source Current Measurement and Current Limiter 9 13 9 5 2 How to Calculate Accuracy for Resistance Measurement 9 14 9 5 3 How to Calculate Accuracy for Low Resistance Measurement 9 16 APPENDIX A 1 A 1 When Problems Occur Before Requesting Repairs A 1 A 2 Error Message List A 3 A 3 Execution Time A 6 A 3 1 GPIB USB Remote Execution Time Typical Value A 6 A 3 2 Internal Process...

Page 16: ......

Page 17: ... 2 6 OUTPUT CONTROL Section 2 4 2 7 TRIGGER Section 2 4 2 8 Other Keys 2 5 2 9 Output Section 2 6 2 10 POWER Switch 2 6 2 11 Screen Display Annotations 2 7 2 12 Rear Panel 2 10 2 13 Relation between Keys 2 12 2 14 Menu Operation Overview 2 25 2 15 DC Measurement 2 34 2 16 Pulse Measurement 2 38 2 17 Sweep Measurement 2 42 2 18 Random Sweep Source 2 47 2 19 Low Resistance Measurement 2 52 3 1 Diode...

Page 18: ...Diagram of Output Status 5 31 5 12 Measurement in Sample Hold 5 40 5 13 Rechargeable Battery Charge and Discharge Operations 5 44 5 14 NULL Calculation Timing 5 54 5 15 Serial Connection 5 65 5 16 Parallel Connection 5 66 5 17 Conceptual Diagram of Memory Store 5 67 5 18 Self Test Operation 5 72 6 1 Status Register Structure 6 11 6 2 Status Byte Register Structure 6 12 8 1 Connections for Calibrat...

Page 19: ...1 5 9 Operations in Low Resistance Measurement Pulse Source Mode 5 23 5 10 Restrictions on Setting Source Value 5 28 5 11 Relation between Prefixes and Exponents 5 42 5 12 Alarm Detection Contents 5 45 5 13 Source Mode and Time Parameters to be Considered 5 46 5 14 External Control Signal Functions 5 58 5 15 Restrictions on Tp Tp ext Th and Th ext 5 59 5 16 TA Value 5 60 5 17 Restrictions on Top 5...

Page 20: ......

Page 21: ...racteristics are described below Source and measurement Up to 15 V 1 A DC Up to 15 V 4 A pulse Pulse maximum pulse width of 20 ms duty factor 20 Voltage range 300 mV to 15 V Current range 30 A to 1 A DC or 4 A pulse Display digits Source 41 2 Measurement 51 2 Voltage resolution Source 10 V Measurement 1 V Current resolution Source 1 nA Measurement 100 pA Voltage source current measurement VSIM Cur...

Page 22: ...oduct Overview 1 2 Figure 1 1 Voltage and Current Output Range Voltage DC Pulse Current Pulse with conditions For the conditions of pulse output refer to Section 5 2 5 3 Restrictions on Output Range Ip Pulse source value Ib Base value Tw Pulse width Tp Pulse period ...

Page 23: ...mber Quantity Remarks Power cable 1 A01402 1 3 pin plug Input and output cable A01044 1 Red and black one each Alligator clip adapter A08532 1 Red and black one each Banana tip adapter A08531 1 Red and black one each Power fuse DFT AA1R25A 1 1 2 100 V 120 V slow blow DFT AAR63A 1 220 V 240 V slow blow Operation Manual E6240B 1 This manual 1 The power cable can be changed by specifying the option a...

Page 24: ...ut cable safety plug A08531 Banana tip adapter for A01044 A08532 Alligator clip adapter for A01044 A01047 01 Input and output cable high current 0 5 m A01047 02 Input and output cable high current 1 m A01047 03 Input and output cable high current 1 5 m A01047 04 Input and output cable high current 2 m A01036 1500 BNC BNC cable 1 5 m Rack mount set A02263 Rack mount set JIS 2U half A02264 Rack moun...

Page 25: ...consideration given to the noise contained in the AC power line Nevertheless it is recommended that the 6240B be used in an environment with as little line noise as possible If line noise is unavoidable use a noise filter Positioning of the 6240B A cooling fan is located on the rear panel and vents are located on the side panels Do not block the fan and vents Leave at least 10 cm of free space bet...

Page 26: ... after turning on the power to ensure the specified accuracy of the 6240B Vibration Direct sunlight Corrosive gas Front Avoid operation in these areas Use a noise cut filter when there is a large amount of noise riding on the power line Dust Keep the rear panel more than 10 centimeters away from the wall Front Do not position the 6240B in a position with the rear panel facing down Line Filter ...

Page 27: ...cified range Ensure that the power voltage setting on the instrument rear panel matches the voltage of the commercial power supply Figure 1 3 Setting Power Voltage Indicator Table 1 3 Power Supply Specification Standard Optional 32 42 44 100 VAC 120 VAC 220 VAC 240 VAC Input voltage range 90 V to 110 V 108 V to 132 V 198 V to 242 V 216 V to 250 V Frequency range 48 Hz to 66 Hz Power consumption 85...

Page 28: ...o prevent fire Changing the power voltage 1 Turn OFF the POWER switch on the front panel 2 Remove the power cable from the AC power outlet 3 Remove the cover of the fuse holder with a flathead screwdriver 4 Rotate the voltage selector to set the voltage with your fingers The selectable voltage values 100 VAC 120 VAC 220 VAC and 240 VAC are printed on the voltage selector 5 Rotate the voltage selec...

Page 29: ... a power cable approved for the respective country 2 To prevent electric shock connect the power cable to an outlet with a ground terminal If an extension cable without a ground terminal is used the protective ground feature will be rendered ineffective 3 Be sure to set the POWER switch on the front panel to OFF before connecting the power cabl Figure 1 4 Power Cable Into AC power outlet Ground pi...

Page 30: ...r Connector on the rear panel CAUTION To prevent damage to the 6240B do not apply a voltage or frequency that exceeds the specified range Figure 1 5 Connecting Power Cable 3 Plug the power cable into an AC wall outlet 4 Set the POWER switch on the front panel to ON After all the indicators turn on a self test is performed Duration approx 15 s See Figure 1 6 Figure 1 6 Self Test in Progress When th...

Page 31: ...e previous conditions the screen display may be different from Figure 1 8 2 If a problem occurs an error message appears on the screen Refer to the error message list to solve the problem Refer to Section A 2 Error Message List 5 Press MON twice The voltage measurement function starts See Figure 1 9 Figure 1 9 VSVM Measurement Output OFF Standby Software revision ...

Page 32: ...r goes ON and the VSVM measurement starts See Figure 1 10 Figure 1 10 VSVM 0 V Measurement in 300 mV Range 7 Verify that the VM measured value is within 150 V of 0 V in the VS 300 mV range 8 Press STBY The OPR indicator goes OFF and the 6240B enters the Standby output OFF sta tus The operation check is complete ...

Page 33: ...he 6240B in a location where there is a lot of dust or where it will be subjected to direct sunlight 1 6 3 Transport To transport the 6240B use the original box that it came in If the box is not available any longer pack the 6240B in accordance with the following guidelines Packing procedure 1 Prepare a corrugated cardboard box with dimensions that are larger than the external dimensions of the 62...

Page 34: ... ADC CORPORATION sales representative for replacement CAUTION The 6240B internally counts the number of Operate Standby relay operations It can be checked from the menu or by using the remote commands For relay replacement contact an ADC CORPORATION sales representative Recommended calibration interval 1 year Part name Expected life cycle Remarks Operate Standby relay 1 000 000 operations Replace ...

Page 35: ...Printed circuit boards Yes Unit Main Printed circuit boards Toner cartridge No Plastic containing brominated flame retar dants Yes Unit BPL 034287X04 BPF 034288 BPF 012009 BPB 034291 Connectors diodes Zener diodes photocouplers FET analog ICs logic ICs FLASH memories transistors Parts containing asbestos No Cathode ray tubes No Chloroflourocarbon CFC hydrochlorofluorocarbon HCFC hydrofluorocarbon ...

Page 36: ...ronic components mechanical components Lead or its compounds Yes Unit BPL 034287X04 BPF 034288 BPF 012009 BPB 03429 Lead solder used for assembling electronic components on printed circuit boards PVC Yes Unit PVC components Antimony or its compounds Yes Unit Electronic components Name of substance or removed part Used Location Unit Part ...

Page 37: ...names and functions on the front and rear panels and the screen display anno tation elements Fore more information on the operation refer to Chapter 4 REFERENCE 2 1 1 Front Panel The following describes the panel keys and connectors for each front panel sections Figure 2 1 Front Panel The front panel is divided into the following nine sections 1 Display Section 2 SOURCE Section 3 SOURCE RANGE Sect...

Page 38: ...he source value the measurement value and the unit operational status It functions as setting screen when changing the setting parame ters 2 1 1 2 SOURCE Section Figure 2 3 SOURCE Section 1 MODE key Selects the source mode DC pulse DC sweep pulse sweep or low resistance measurement pulse 2 VS IS key Selects the source function voltage source or current source 3 LIMIT key Sets the limit value 1 1 2...

Page 39: ...s the optimum fitting range FIT or the currently setting range to input the source values 2 DOWN key Lowers the source range 3 UP key Raises the source range 2 1 1 4 MEASURE Section Figure 2 5 MEASURE Section 1 MON key Selects the measurement function voltage current or resistance measurement 2 AUTO key Selects the measurement range Auto or Fixed 1 2 3 1 2 ...

Page 40: ... OFF the output relays OPR indicator blinks 3 SUSPEND SHIFT OPR key Sets Suspend regardless of Operate or Standby status 4 STBY key Sets the output status to Standby 2 1 1 6 TRIGGER Section Figure 2 7 TRIGGER Section 1 HOLD key Selects the trigger mode AUTO or HOLD 2 TRIG key When the trigger mode is set to HOLD triggers measurement and pulse source in the DC source or pulse source mode and starts...

Page 41: ...se the source value or limit value at the cursor position Move up and down the hierarchy on the menu screen 6 key Rotary knob Increases or decreases the parameter value at the cursor position flashing figure Selects a parameter flashing character or item on the menu screen 7 SHIFT key Selects the key shift mode ON or OFF 8 EXIT key on Menu screen Exits the menu screen and returns to the normal scr...

Page 42: ...utput and input termi nals for voltage measurement in the remote sense mode 4 wire connection 3 OUTPUT Indicator Lights up when the output relay is ON Operate or Suspend sta tus WARNING Electric shock danger A hazardous voltage is output if an external hazardous voltage is applied to the case causing a potential difference between the case and the LO 2 1 1 9 POWER Switch Figure 2 10 POWER Switch 1...

Page 43: ...source IS value with a unit 2 Measurement value In Operate Displays a measurement value In Standby or Suspend Displays the suspend voltage Displays the output impedance in Suspend status HZ High impedance status LZ Low impedance status For more information refer to Section 5 2 Functions in Detail 3 Measurement function Displays the measurement function I Current measurement IM V Voltage measuremen...

Page 44: ...status Rotates during sweep Stops rotation at hold Goes OFF when sweep stops AZ The measurement auto zero function is ON NULL NULL calculation is ON ST The measurement data memory is ON Buzzer setting is ON 5 Auxiliary indicator for menu Blinks if a lower hierarchy exists key enabled at parameter setting on the menu screen 6 FIT indicator The source range is set to FIT 7 4 A indicator The current ...

Page 45: ... Use ERR An error log is generated CAL The calibration mode is ON OPR Illuminates or extinguishes depending on the output status Operate ON Suspend Blinks Standby OFF When the comparator calculation is ON either one of these three indicators goes ON depending on the results LMT The measured value is in the limit status OSC Not in use RVS Not in use BUSY Not in use SHIFT The shift mode is ON 12 m i...

Page 46: ...TRIGGER IN Functions as a DC or pulse measurement trigger and a sweep start or step up trigger The input resistance is about 4 7 k and is TTL negative pulse input Pulse width 2 s or over 4 COMPLETE OUT SYNC OUT The output signal is a negative pulse Select either 10 s or 100 s pulse width The output circuit is TTL level open drain output and pulled up to 5 V with 10 k COMPLETE OUT Signal indicating...

Page 47: ...nction Switches between Operate and Standby or between Operate and Suspend by a level signal input in the OPR STBY In or OPR SUS In function The input resistance is approximately 10 k OPERATE OUT Sends Operate status with a level signal The output circuit is TTL level open drain output and pulled up to 5 V with 10 k 6 GP IB Port for connecting the GPIB cable to the external controller 7 USB Port f...

Page 48: ...differs from the one shown repeat the procedure from the beginning 2 2 1 Setting Source Value 2 2 1 1 Relation between Keys The following figure shows the relation between keys Figure 2 13 Relation between Keys Cursor digit value up and down HOME screen or Range up and down Source and measurement screen Limit setting screen Moves the cursor Note HOME screen refers to the screen displaying a source...

Page 49: ... and the UP DOWN keys or the rotary knob and keys move the cursor blinking position left and right keys or rotary knob can change the value indicated by the cursor The following figures show the setting procedure Setting numeric values 1 Press The cursor moves to the left 2 Press or rotate one click clockwise The figure indicated by the cursor increases by one increment Cursor blinking Cursor blin...

Page 50: ...ntally while the key is being pressed The figure stops increasing when the key is released 5 When is rotated the figure increased by one for each clockwise click or decreases by one for each counterclockwise Setting the polarity 1 Pressing or moves the cursor position to the polarity display 2 Press or rotate one click The polarity display changes to negative mark However if the figure is 0 it is ...

Page 51: ...ange Change the source range by using the DOWN or UP key The range change adjusts to synchronize the source value before and after the change If the set value is below the lowest digit it is rounded off 3 V range 15 V range UP Cursor blinking Cursor blinking 3 V range 15 V range UP Cursor blinking Cursor blinking ...

Page 52: ... 1 Setting Source Value 2 16 When changing 1A range to 4 A range the smallest digit is rounded off to an even number If the final value would exceed the valid range change is not possible 4 A range 1 A range UP An error is generated and changes do not occur DOWN ...

Page 53: ...n the FIT indicator turns ON the range is automatically adjusted so that the source value is generated in the optimum range The following figures show the setting procedure 1 Press to move the cursor to the left 2 Press or rotate on click clockwise to change the 3 V setting to 4 V The source range is automatically set to 15 V Cursor blinking Cursor blinking Cursor blinking ...

Page 54: ...ing Source Value Using Direct Input Mode Press 123 key to turn to the direct input mode and set the source value by using the numeric keys and the unit key which are printed in green on the panel The following figures show the setting procedure Setting numeric values 1 Press 123 The screen is half brightness and indicates the direct input mode Cursor blinking Cursor blinking Half brightness ...

Page 55: ...Press ENTER The numeric value has been applied and the direct input mode is released 4 Press 123 1 0 and ENTER keys in order to set 10 V When the FIT indicator turns OFF the value exceeds the 3 V setting range and an error occurs The value cannot be set When the FIT indicator turns ON the optimum 15 V range is set Blinking Cursor blinking Blinking Cursor blinking ...

Page 56: ...Setting Source Value How ever the range cannot be set The optimum range is always displayed The HI and LO limit values have two settings This section describes the difference between them HL value refers to HI limit value and LL value refers to LO limit value The setting function is changed using MENU SOURCE and LMT Input Balance setting 1 Press LIMIT The cursor appears on the HL value 2 Move the ...

Page 57: ...ases by one and the LL value also changes at the same time The LL value cannot be changed directly Separate setting 1 Press LIMIT The cursor positions on the HL value and the LL value is displayed at half brightness 2 Press or rotate one click clockwise Only the HL value changes Cursor blinking Half brightness Cursor blinking Half brightness ...

Page 58: ...L value changes and the ranges for both the HL and LL values increase by one at the same time Same polarity limit setting If the Separate setting is selected the HL and LL values for the voltage limiter can be set to the same polarity However the HL and LL values have the following restriction 60 digits HL value LL value 1 Press MENU to select Separate 2 Press VS IS to select the current function ...

Page 59: ...ss LIMIT to display the limit value setting screen 4 Press NULL SEL to select LL and move the cursor to 3 5 Press twice and press once 6 Press to set the same polarity Half brightness Cursor blinking Half brightness Cursor blinking Half brightness Cursor blinking Half brightness Cursor blinking ...

Page 60: ... 2 14 shows an overview of the menu operations 2 2 3 1 How to Operate Menu Operate the menu in accordance with the following procedure 1 Press MENU The selection screen for the Category level A SOURCE to M SYSTEM appears 2 Select a category with or 3 Press to enter the Select level 4 Select a parameter with or 5 Press to enter the Input Run level 6 Parameter setting and execution operations differ...

Page 61: ...meter to return from the Input Run level to the Category level 3 Press EXIT to discard the input data and revert to the directly set value 4 Enabled for two parameter settings 5 Enabled when Push ENTER is displayed HOME screen Level 1 Category level Select level Input Run level Level 2 Level 3 Cursor flashes on numeric parameter Select parameter blinks Direct input Numeric value Unit ...

Page 62: ...Move cursor to left Change selection Go to right category Go to right parameter Move cursor to right Change selection Go to right or left category Go to right or left parameter Increase decrease figure at cursor Change selection 123 Go to direct input screen ENTER Run and go to Input Run level Run and go to Select level 2 MENU Exit menu Exit menu Exit menu Exit menu Exit menu EXIT Exit menu Exit m...

Page 63: ...tput impedance in Suspend HiZ LoZ Select 4 LMT Input How to set the limiter Balance Separate Select 5 Response Output response Fast Slow Select MENU A SOURCE a Category level Select level Input Run level B SWEEP Parameter type 1 SweepType Sweep source mode Linear Fixed Random Linear 2 Select 2 SWP Range Source range for sweep Auto Fix Select 3 Reverse Sweep reverse mode Off On Select 4 Repeat Cnt ...

Page 64: ...L to switch between Start and Stop 1 First Val 2 slope linear sweep first value In Linear 2 mode Numeric VS 000 00 mV to 15 000 V IS 00 000 A to 4 0000 A 2 Middle Val 2 slope linear sweep middle value In Linear 2 mode Numeric VS 000 00 mV to 15 000 V IS 00 000 A to 4 0000 A 3 Last Val 2 slope linear sweep last value In Linear 2 mode Numeric VS 000 00 mV to 15 000 V IS 00 000 A to 4 0000 A 4 Step1 ...

Page 65: ...t auto zero On Off Select 2 Integ Time Integration time 100 s 500 s 1 ms 5 ms 10 ms 1 PLC 100 ms 200 ms S H S H is available only when the output mode is set to the pulse mode the pulse sweep mode or low resistance meas urement pulse mode Select 3 Mesure SW Measurement ON OFF On Off Select 4 Disp Digit Number of measurement digits 5 digits 4 digits 3 digits Select 5 Disp Unit Switching the unit di...

Page 66: ... calculation results a Sample Number of measurement data b Maximum Maximum measurement value c Minimum Minimum measurement value d Average Measurement average value e Total Total measurement value Use or to select a to e Select c I CONST 1 High Value Comparator calculation upper limit value 0 to 999 999E 24 Numeric 2 Low Value Comparator calculation lower limit value 0 to 999 999E 24 Numeric 3 SCL...

Page 67: ...Select level Input Run level K PARAMETER Parameter type 1 Parm Load Loads the saved parameters SLoad0 Load1 Load2 Load3 Ld Dflt Select the parameter above and press ENTER to run Run 2 Parm Save Saves the setting parameters Save0 Save1 Save2 Save3 Sv Dflt Select the parameter above and press ENTER to run Run 3 PON Load Parameter load at power on P OFF Load0 Select d L I F 1 I F BUS Interface GPIB U...

Page 68: ... HI or LO Select 3 Notice Buz Process completion notice buzzer On Off Select 4 Self Test Runs the selected self test Use or to select Press ENTER to run a Self Test Self test b Dsp KeyTst Display key test Select Run 5 Error Log Reads out the error log a NoXXXX YYY Use the rotary knob to change XXX YYY is the error number The lower line displays the error description Run 6 Relay Cnt Operate Standby...

Page 69: ...face GPIB address Talk Only Addressable Header output USB ID Parameter load at power ON Operation Character display area 1 Press MENU and select K PARAMETER with or K PARAMETER 2 Press to enter the Select level 1 Parm Load Load0 3 Press to enter the Input Run level 1 Parm Load Ent Load0 4 Select Ld Dflt with 1 Parm Load Ent Ld Dflt 5 Press ENTER 6 When loading is complete Done is displayed and the...

Page 70: ...e 6240B in accordance with the procedure described in Section 2 2 4 Initializing Setting Conditions 2 Connect the DUT with the supplied input and output cables and alligator clips Connect the A08532 alligator clips to the A01044 input and output cables Connect the input and output cables to the HI OUTPUT and LO OUTPUT terminals of the 6240B Clip the DUT 1 k resistor with the alligator clips A Im V...

Page 71: ... Press LIMIT 5 Press 123 3 UNIT and ENTER in order 6 Press LIMIT NOTE The following example operation uses ideal values assuming that the 1 k resistor the cables the 6240B and other properties have no errors in both source and measurement In the actual operation some error factors do exist and the measured values will be different from the example Cursor blinking Cursor blinking ...

Page 72: ...s displayed when 1 V is applied to the 1 k resistor See Point A in Figure 2 15 8 Press to move the cursor to 1 and change the source value to 2 V with or The measured current value is displayed when 2 V is applied to the 1 k resistor See Point B in Figure 2 15 9 Press to move the cursor to and change the source value to 2 V with or See Point C in Figure 2 15 Cursor blinking Cursor blinking Cursor ...

Page 73: ...voltage source value is set to 4 V in the 15 V range As the source current is limited by the current limiter the limiter indicator goes ON See Point D in Figure 2 15 Current source ISVM 11 Press VS IS The measurement changes to current source and the 6240B goes into Suspend status 12 Press 123 2 UNIT ENTER and OPR in order Cursor blinking Blinking Cursor blinking ...

Page 74: ...he pulse source mode In this example voltage source current measurement VSIM is performed as changing the measurement points A and B in accordance with the following figure Figure 2 16 Pulse Measurement Cursor blinking Tds Source delay time 1 ms Tw Pulse width 50 ms Td1 Measurement delay time at A 3 ms Td2 Measurement delay time at B 60 ms Tp Period time 130 ms IT Integration time 1 PLC default Vp...

Page 75: ...NTER in order The current limit value is set to 3 mA 4 Press LIMIT The HOME screen is displayed Setting the base value 5 Press MENU 6 Press or to select A SOURCE Press to enter the Select level 7 After confirming the parameter is 1 PLS Base press to enter the Input Run level and press 123 1 UNIT and ENTER in order The base value is set to 1 V Setting the pulse time 8 Press and in this order to sel...

Page 76: ...23 5 0 and ENTER in order Tw is set to 50 ms 15 Press and to select 5 Period Press to enter the Input Run level 16 Press 123 1 3 0 and ENTER in order Tp is set to 130 ms 17 Press MENU The HOME screen is displayed 18 Press MODE 19 Rotate or press or to select PLS Current measurement with the pulse value 20 Press ENTER The HOME screen is displayed 21 Press OPR The Operate status is set The measured ...

Page 77: ...ent with the base value 23 Follow step 11 to set the measurement delay time to 60 ms and press MENU The HOME screen is displayed Td2 The measured current value with the base value of 1 V is displayed See Point B in Figure 2 16 24 Follow step 7 to set the base value to 0 5 V and press MENU The HOME screen is displayed The measured current value with the base value of 0 5 V is displayed Cursor blink...

Page 78: ...eep is performed with steps of 0 5 V from 0 5 V to 5 V as shown in Figure 2 17 below Figure 2 17 Sweep Measurement Source mode DC sweep Sweep type Linear sweep default Bias value 0 V default Start value 0 5 V Stop value 5 V Step value 0 5 V Integration time 1 PLC default Hold time 3 ms default Source delay time Tds 1 ms Measurement delay time Td 4 ms Period time Tp 100 ms Current limit value 30 mA...

Page 79: ...p source mode 4 Press MODE Rotate or press or to select DC SWP and press ENTER The DC indicator and the SWP indicator go ON showing the DC sweep has been set 5 Press MENU 6 Press or to select B SWEEP Press to enter the Select level 7 Verify that Linear is selected in 1 Sweep Type Setting the sweep source voltage 8 Press and in this order to select 1 Start Value Press to enter the Input Run level 9...

Page 80: ... 17 Press 123 1 and ENTER in order The source delay time is set to 1 ms 18 Press and to select 3 Meas Delay Press to enter the Input Run level 19 Press 123 4 and ENTER in order The measurement delay time is set to 4 ms 20 Press and to select 5 Period Press to enter the Input Run level 21 Press 123 1 0 0 and ENTER in order The period time is set to 100 ms Setting the measurement data memory 22 Pres...

Page 81: ...ess OPR The Operate status is set The source value indicates the bias value 29 Press TRIG The sweep measurement starts while displaying the source and measurement val ues When the sweep measurement is complete the final measurement value is displayed Reading out the measurement results 30 Press STBY The Standby status is set 31 Press MENU 32 Press or to select F MEMORY Press to enter the Select le...

Page 82: ...n level The data stored in the measurement data memory is read out The final stored data is displayed 34 Rotating changes the memory address and then reads out the stored data one by one Pressing 123 enters the direct input mode and any memory number to be read can be directly specified 35 Press MENU The HOME screen is displayed Cursor blinking ...

Page 83: ...eed sweep Figure 2 18 Random Sweep Source Source mode DC sweep Sweep type Random sweep Bias value 0 V default Start address 0 Stop address 2 Sweep range Fixed 3 V range Random memory 1 V 2 V 3 V in order from address 0 Measurement OFF Hold time Th 1 ms Source delay time Tds 0 03 ms default Measurement delay time Td 0 05 ms Period time Tp 2 ms Current limit value 1 A default Press TRIG Value at add...

Page 84: ...as been set 3 Press MENU 4 Press or to select B SWEEP Press to enter the Select level 5 Rotate or press or to select Random Setting the sweep source range 6 Press and to select 2 SWP Range Press to enter the Input Run level 7 Press to select Fix Single range sweep is set Setting the start and stop addresses 8 Press and in order to select C SWEEP VAL 9 Press to select 1 Sweep Adr Press to enter the...

Page 85: ...r to select D TIME 13 Press to select 1 Hold Time Press to enter the Input Run level 14 Press 123 0 0 1 and ENTER in order The hold time is set to 1 ms 15 Press and in order to select 3 Meas Delay Press to enter the Input Run level 16 Press 123 0 0 5 and ENTER in order The measurement delay time is set to 0 05 ms 17 Press and in order to select 5 Period Press to enter the Input Run level ...

Page 86: ...tting the random memory 22 Press and in this order to select G RANDOM MEM 23 Press to select 1 Data Set Press to enter the Input Run level 24 Press 123 1 0 0 0 and ENTER in order 1 V is set at address 0 and address 1 is displayed 25 25 Press 123 2 0 0 0 and ENTER in order 2 V is set at address 1 and address 2 is displayed 26 Press 123 3 0 0 0 and ENTER in order 3 V is set at address 2 and address ...

Page 87: ...urce 2 51 Starting random sweep 28 Press OPR The Operate status is set The source value indicates the bias value 29 Press TRIG Random sweep starts while displaying the source value When the sweep is com plete the initial screen is returned 30 Press STBY The Standby status is set ...

Page 88: ... in Section 2 2 5 DC Measurement 2 Connect the DUT in 4 wires with the supplied input and output cables and alli gator clips For more information on the 4 wire connection refer to Section 5 1 2 Remote Sensing 2 Wire 4 Wire Connection Source mode Low resistance measurement pulse source Pulse value 10 mA Source delay time Tds 0 03 ms default Measurement delay time Td 5 ms Pulse width Tw 20 ms Period...

Page 89: ...NIT and ENTER in order The pulse source value is set to 10 mA Setting the current limit value 5 Press 123 3 0 0 UNIT and ENTER in order The voltage limit value is set to 300 mV 6 Press LIMIT The HOME screen is displayed Setting the 4 wire connection 7 Press 4W 2W The 4W indicator goes ON showing that the 4 wire connection has been set Setting the pulse time 8 Press MENU 9 Press or to select D TIME...

Page 90: ...ss 123 4 0 and ENTER in order The period time is set to 40 ms Setting the integration time 16 Press and to select E MEASURE Press to enter the Input Run level 17 Press to select 2 Integ Time Press to enter the Input Run level 18 Rotate to select 10 ms The integration time is set to 10 ms 19 Press MENU The HOME screen is displayed Low resistance measurement 20 Press OPR The Operate status is set Pu...

Page 91: ...y loading the parameters saved in Area 0 Select which parameters to be loaded at power ON by selecting K PARAMETER and then 3 PON Load on the menu screen NOTE 1 At power ON the random memory data saved in the non volatile memory is loaded 2 The GPIB address USB ID and power on loading conditions are always saved in a different area and are loaded when the power is switched on PON Load Parameters t...

Page 92: ...2 Parm Save Ent Save2 6 Press ENTER 7 When saving is complete Done is displayed and the menu reverts to the Select level 2 Parm Save Done 8 Press EXIT to exit the menu Operation Character display area 1 Press MENU and select K PARAMETER with or K PARAMETER 2 Enter the Select level with 1 Parm Load Load0 3 Select 1 Parm Load with or 1 Parm Load Load0 4 Enter the Input Run level with 1 Parm Load Ent...

Page 93: ...urate measurement of the forward voltage The measurement conditions are described below VF measurement Use pulse current to measure the forward voltage VF at 100 mA to avoid the influence of the heat Also use NULL calculation to compensate for the error in cable voltage drop in 2 wire connection VF measurement condition example Source mode Pulse current Base current Limit value Pulse width Period ...

Page 94: ... Diode Measurement Connection Measuring the diode forward voltage 2 Set the perameters for VF measurement 3 Short circuit the HI OUTPUT cable red and the LO OUTPUT cable black to obtain the NULL value 4 Set the output status to Operate 5 Press NULL 6 Set the output status to Standby or Suspend 7 Connect the HI OUTPUT cable red to the anode of the diode and the LO output cable black to the cathode ...

Page 95: ...discharging when the battery voltage reaches the specified voltage or blow The voltage limit values are set to the same polarity and the HL value is set as upper charge limit and the LL value as lower discharge limit to avoid overcharge or overdischarge Setting the suspend voltage to the same voltage as the battery HiZ can reduce transient current during Oper ate status The discharged voltage is s...

Page 96: ... below so that the cables do not cause a voltage drop 2 Connect the COMPLETE OUT terminal with the OPERATE IN terminal on the rear panel by using the BNC BNC cables A01036 This connection is made to set the instrument Standby automatically after com pleting the charge or discharge Figure 3 2 Battery Charge Discharge Test Connection Battery Front Rear ...

Page 97: ...tant voltage When the current reaches 100 mA or below stop charging Charge test condition example Source mode Source current Limit value Suspend voltage Period Integration time Measurement range Memory Comparator External control signal Remote sensing DC 500 mA HL value 1 45 V LL value 0 95 V HiZ 1 20 V 1 s 200 ms 3 V range fixed NORMAL STORE ON ON Lower limit value 100 mA OPERATE OUT STBY IN COMP...

Page 98: ...onds from the discharge start by the memory capacity Figure 3 3 Battery Discharge Test Waveforms Discharge test condition example Source mode Pulse current Base current Limit value Suspend voltage Pulse width Period Integration time Measurement delay Measurement range Memory Comparator External control signal Remote sensing Pulse 500 mA 10 mA HL value 1 45 V LL value 0 95 V HiZ 1 20 V 20 ms 1 s 1 ...

Page 99: ...4 9 Disp Digit 4 9 Disp Unit 4 9 Error Log 4 14 EXT SIGNAL 4 11 First Val 4 7 GPIB Adr 4 13 Header 4 14 High Value 4 10 Hold Time 4 7 I F 4 13 I F BUS 4 13 Integ Time 4 8 Last Val 4 7 Level Value 4 6 Limit Buz 4 14 LMT Input 4 5 Low Value 4 10 Max Min SW 4 10 Maximum 4 10 Meas Delay 4 7 MEASURE 4 8 Measure SW 4 9 Mem Clear 4 9 Mem Recall 4 9 MEMORY 4 9 Mfunc Link 4 9 Middle Val 4 7 Minimum 4 10 Mo...

Page 100: ...l 4 1 Menu Index 4 2 Step1 Val 4 7 Step2 Val 4 7 Stop Value 4 6 Store Mode 4 9 Suspend V 4 4 Suspend Z 4 4 SWEEP 4 5 Sweep Adr 4 7 Sweep Type 4 5 SWEEP VAL 4 5 4 6 4 7 SWP Range 4 5 SYSTEM 4 14 Talk Only 4 14 TIME 4 7 Total 4 10 USB Id 4 13 View Mx Mn 4 10 ...

Page 101: ...easurement function and the source function are the same the range is fixed at the source range For more information on the measurement auto range refer to Section 5 2 6 2 Measurement Ranging 4 2 2 DOWN Key Source Range Decreases the source range by one step However it is impossible to decrease to the range that cannot out put the currently set source value In this case the source range setting mo...

Page 102: ...uspend Suspend Z Sets the output impedance in Suspend HiZ The output current limit is set to 300 nA so the output impedance increases LoZ The output current limit is set to the current limit value at voltage source or 300 digits in the current range 100 digits in the 3 uArange at current source so the output impedance decreases Source mode AUTO HOLD DC Pulse Repeats source and measurement within t...

Page 103: ...nge at every step from the start value to the stop value Fix Sweeps in the lowest range which can output any source values from the start value to the stop value Reverse Switches reverse mode round sweep ON or OFF On Round sweep from the start value to the stop value and back to the start value Off One way sweep from the start value and to the stop value Repeat Cnt Sets the number of times sweep r...

Page 104: ...bias value source value before sweep start PSW Base Sets the pulse sweep base value Figure 4 1 Linear Sweep Fixed SWEEP VAL Level Value Sets the fixed level value for fixed sweep Sample Cnt Sets the sample count number of measurement in every Tp period for fixed sweep Bias Value Sets the bias value source value before sweep start PSW Base Sets the pulse sweep base value Figure 4 2 Fixed Sweep Oper...

Page 105: ...s the step 1 value between the first value and the middle value for 2 slope linear sweep Step2 Val Sets the step 2 value between the middle value and the last value for 2 slope linear sweep Bias Value Sets the bias value source value before sweep start PSW Base Sets the pulse sweep base value Figure 4 3 2 Slope Linear Sweep TIME Sets the time related parameters for source and measurement Hold Time...

Page 106: ... turns ON Off Turns OFF the auto zero function The AZ indicator turns OFF Integ Time Sets the measurement integration time Select the integration time from 100 s 500 s 1 ms 5 ms 10 ms 1 PLC 100 ms 200 ms and S H S H is sample hold The integration time is 100 s The sample hold can be set only when the source mode is set to the pulse mode the low resistance measurement pulse mode or the pulse sweep ...

Page 107: ... unaffected by the source function MEMORY Sets the measurement data memory related parameters Store Mode Selects the measurement data memory functions The data in the measurement data memory are cleared when the Store Mode is changed Normal Stores data in the measurement data memory in the normal mode Burst Stores data in the measurement data memory in the burst mode Used for high speed measuremen...

Page 108: ...tches the MAX MIN calculation ON or OFF On Executes the MAX MIN calculation The MAX MIN AVE and indicators go ON Off Turns OFF the MAX MIN calculation View Mx Mn Displays the MAX MIN calculation data Sample Number of measurement data Maximum Maximum measurement data value Minimum Minimum measurement data value Average Measurement data average value Total Total measurement data value CONST Sets cal...

Page 109: ...gnal level changes from LO to HI While the input signal is HI Operate and Suspend are disabled Figure 4 5 InterLock In Operate Out Outputs LO when the 6240B is in Operate status and HI in Standby or Suspended status Figure 4 6 Operate Out OPR SUS In Sets Suspend when the signal level changes from LO to HI Sets Operate when the signal level changes from HI to LO Figure 4 7 OPR SUS In STBY In signal...

Page 110: ...puts a negative pulse when the measurement is completed and the period time ends Comp HI Outputs a negative pulse when the comparator calculation result is HI Comp GO Outputs a negative pulse when the comparator calculation result is GO Comp LO Outputs a negative pulse when the comparator calculation result is LO Comp HIorLO Outputs a negative pulse when the comparator calculation result is HI or ...

Page 111: ...mory Save0 Saves the current setting parameters to area 0 of the non volatile memory Save1 Saves the current setting parameters to area 1 of the non volatile memory Save2 Saves the current setting parameters to area 2 of the non volatile memory Save3 Saves the current setting parameters to area 3 of the non volatile memory Sv Dflt Saves the factory default parameters to all the areas 0 to 3 PON Lo...

Page 112: ...he comparator calculation result is HI GO Sounds when the comparator calculation result is GO LO Sounds when the comparator calculation result is LO HI or LO Sounds when the comparator calculation result is HI or LO Notice Buz Buzzes when operations such as memory full saving or loading parameters are complete On Turns ON the notice buzzer Off Turns OFF the notice buzzer Self Test Executes the sel...

Page 113: ...SWP Sets the pulse sweep source mode which generates waveforms for pulse voltage or pulse current sweep The PLS and SWP indicators go ON PLS RM Sets the low resistance measurement pulse source mode which generates pulse current with different polarities The PLS and m indicators go ON 4 2 8 MON Key Measurement Mode Selects the measurement mode Monitor Switches measurement functions IM Sets current ...

Page 114: ...ys the measurement value PLS Generates a pulse and displays the measurement value DC SWP or PLS SWP Generates a bias value and waits for measurement Produces sweep data and waits for trigger input The trigger input starts the sweep and displays a measurement value PLC RM Generates pulse current with different polarities and displays the low resistance measurement value Suspend Outputs the suspend ...

Page 115: ... LOCAL key in remote control Releases remote control Turns OFF the RMT indicator and switches from remote control to panel operation NOTE Remote control is not released if the LLO Local Lock Out command is set through the GPIB or USB interface 4 2 12 STBY Key Output Standby Turns off the output relays to set Standby status The OPR indicator goes OFF NOTE Whenever switching between Operate and Stan...

Page 116: ...mation on the LOCK status refer to Section 4 2 3 FIT Key Source Range Source mode Trigger mode AUTO HOLD DC source mode pulse source mode low resistance measurement pulse source mode Triggers measurement and pulse source Sweep source mode pulse sweep source mode Before sweep start Starts sweep Starts sweep During sweep Moves to the next step Source mode Trigger mode AUTO HOLD DC source mode pulse ...

Page 117: ... in the low resistance measurement pulse source mode 4 2 16 123 Key Direct Input Mode Switches into the direct input mode that enables numeral data input and displays the setting value at half brightness In this status green colored functions on the panel are enabled However the EXP key is only enabled when Disp Unit is set to Exponent Pressing ENTER applies the input data and releases the direct ...

Page 118: ......

Page 119: ...ccurate measurement 5 1 DUT Connection 5 1 1 Note for Output Terminals Figure 5 1 below shows the internal wire connection of the 6240B The output terminals are cut off from the internal circuits by the Operate Standby relays in Standby status Figure 5 1 Internal Wire Connection HI SENSE HI OUTPUT LO SENSE LO OUTPUT OPR SUS STBY IM VS IS VM A V 2 Wire 4 Wire STBY ...

Page 120: ...resistance of the supplied cable A01044 is approximately 100 m Thus when the output current is 100 A or higher use the 4 wire connection When allowing the error voltage ev Line resistance output current ev 2 wire connection Line resistance output current ev 4 wire connection When the supplied cable A01044 is used and the error voltage of 10 mV is allowed the 2 wire con nection is used up to 100 mA...

Page 121: ...ote sensing voltage tolerable voltage difference between OUTPUT and SENSE is 1 V at both HI and LO sides To satisfy the specified accuracy maintain the following restriction for r1 to r4 r1 r2 1 V Io Io Output current r3 r4 220 k Vos r1Io r2Io Example If Io 0 5 A r1 r2 1 V 0 5 A 2 r1 r2 2 then r3 r4 220 k 2 2 10 V Vos 10 V 1 V ...

Page 122: ...ion according to the following procedure 1 Verify if the load capacitance or load inductance does not exceed the maximum load capacitance or load inductance specified in Chapter 9 SPECIFICA TIONS 2 Check if the 6240B still oscillates when cables of the shortest lengths are con nected 3 If the shorter cables stop the oscillation then connect the 6240B and the DUT as shown in Figure 5 3 to reduce th...

Page 123: ...gate To minimize a current leak be careful that the ferrite bead does not touch other terminals the DUT case lead wires or other ferrite beads Figure 5 4 Preventing DUT Oscillation For a high frequency device such as a GaAS FET take the following measures Separate the ground line of the gate power supply from that of the drain power supply Insert ferrite beads and by pass capacitors both at the ga...

Page 124: ...tance Use twisted pair shielded cables for OUTPUT and SENSE as in Figure 5 6 to prevent induction noise Especially be sure to use shielded cables when measuring current of 1 A or less The cables for OUTPUT must satisfy the thickness requirement below and the voltage difference between OUTPUT and SENSE must be 1 0 V or less for both HI and LO Be sure to set the voltage between the HI SENSE and LO S...

Page 125: ...he device connection inside the 12701A refer to 12701A Operation Manual Figure 5 7 Connection with 12701A CAUTION Follow the procedure below to prevent electric shock 1 Be sure to ground the 12701A protective grounding terminal 2 Connect the 12701A LID SIGNAL to the INTERLOCK terminal on the 6240B rear panel and set the param eter OPR Signal to InterLock In This enables the interlock function When...

Page 126: ...ime Measurement data processing time Tcn Operate processing time HOLD Executes mea surement after trigger input Changing the source value AUTO Source value changing does not induce range changing HOLD Standby COMPLETE OUT FRONT COMPLETE OUT END COMPLETE OUT HI GO LO Operate Tcn Tp Td Tp Tm Td Tm Tcn Td Tm Standby Operate Measurement trigger COMPLETE OUT FRONT COMPLETE OUT END COMPLETE OUT HI GO LO...

Page 127: ...ger input Trigger input during measurement is ignored c In Standby or Suspended status The measurement is not executed in Standby or Suspend status Changing the source value AUTO Source value changing induces range changing Tp Period time Td Measurement delay time Tm Measurement time Integration time Measurement data processing time Tcn Operate processing time Trc Range change processing time HOLD...

Page 128: ...rocessing time HOLD Executes mea surement after trigger input Changing the source value AUTO Source value changing does not induce range changing HOLD Standby Operate Tp Tp Tw Tw Td Tm Td Tm Tcn Tds Tds COMPLETE OUT FRONT COMPLETE OUT END COMPLETE OUT HI GO LO SYNC OUT Standby Tp COMPLETE OUT FRONT TRIGGER IN Operate Tcn Tw Td Tm Tds Measurement trigger SYNC OUT COMPLETE OUT HI GO LO COMPLETE OUT ...

Page 129: ...n setting to Operate or changing the range Pulse generation starts when the Operate processing time has passed after setting to Operate If the source change entails the range change the base value and pulse value are set in the same range d In Standby or Suspended status The measurement is not executed in Standby or Suspend status Changing the source value AUTO Source value changing induces range ...

Page 130: ...ase waveforms of the step value between the first value and the last value Fixed sweep Sweeps with waveforms of the specified constant value the speci fied number of sample count Random sweep Sweeps with waveforms of the source values stored in the memory from the start address to the stop address 2 slope linear sweep Sweeps with staircase waveforms of the 1st step value between the first value an...

Page 131: ... pulse wave forms of the step value between the first value and the last value Fixed sweep Sweeps with pulse waveforms of the specified constant value the specified number of sample count Random sweep Sweeps with pulse waveforms of the source values stored in the memory from the start address to the stop address 2 slope linear sweep Sweeps with staircase pulse wave forms of the 1st step value betw...

Page 132: ...iod time Start address and stop address for random sweep These are changeable in the start address to stop address range when switching from Standby status to Operate or Suspend Sweep function parameter Repeat count Reverse mode ON or OFF RTB ON or OFF Measurement auto range ON or OFF Measurement ON or OFF Measurement integration time Selecting COMPLETE OUT or SYNC OUT external control signal outp...

Page 133: ...rc Range change processing time HOLD Executes mea surement after trigger input Changing the source range AUTO Changes the source range dur ing sweep HOLD Th Tp Tp Td Tm Td Tm Tds Tds Tds 3 2 1 Bias Operate Start trigger COMPLETE OUT HI GO LO SYNC OUT COMPLETE OUT END COMPLETE OUT FRONT TRIGGER IN 2 Operate Th Td Tm Tm Td Tp Tds 1 Start trigger Bias Trigger SYNC OUT COMPLETE OUT FRONT TRIGGER IN CO...

Page 134: ...ut Changing the measure ment range AUTO Changes the mea surement range during sweep Th Hold time Tp Period time Td Measurement delay time Tds Source delay time Tm Measurement time Integration time Measurement data processing time Tcn Operate processing time Trc Range change processing time HOLD Table 5 5 Operations in DC Sweep Source Mode 2 2 Operational condition Trigger mode Description Operatio...

Page 135: ... Td Measurement delay time Tds Source delay time Tm Measurement time Integration time Measurement data processing time Tcn Operate processing time Trc Range change processing time HOLD Executes mea surement after trigger input Changing the source range AUTO Source range changed while sweeping HOLD Tp Th Tp Tm Tds Tw Td Td Tm Tw Tds 1 2 Bias value Base value Operate Start trigger COMPLETE OUT HI GO...

Page 136: ...ms is selectable Figure 5 8 below shows this relation The source values are stored for the voltage and current functions each from address 0 to address 7999 in the random memory Figure 5 8 Random Sweep and Random Pulse Sweep 電圧 電流ファンク ション各々別にス 発生値ストア 番地 電流 発生値 0 2 3 10mA 20mA 3V 番地 電圧 発生値 0 2 3 1V 3V 2V 60V 50V ランダム パルス スイープ ランダム スイープ ストップ番地 スタート番地 出力波形 14V 15V 7999 30mA Stored for the volta...

Page 137: ...he designated first value and middle value Next it sweeps staircase waveforms staircase pulse waveforms of the 2nd step value between the designated middle value and last value Figure 5 9 2 Slope Linear Sweep Figure 5 10 2 Slope Linear Pulse Sweep 1st slope 2nd slope 2nd step 1st step Last value Middle value First value Bias value Start trigger 1st slope 2nd slope 2nd step Last value Middle value ...

Page 138: ... Integrationtime Measurement data processing time Tcn Operate processing time Trc Range change processing time HOLD Th Start trigger Tp Tp Tp Tp Tp Tp Td Tds Td Forward Reverse Bias value Operate COMPLETE OUT HI GO LO TRIGGER IN COMPLETE OUT END COMPLETE OUT FRONT SYNC OUT RTB ON returns to the bias value RTB OFF stays at the present value Th Td Tds Td Bias value Operate Start trigger Measurement ...

Page 139: ...o the bias value when sweep stops OFF Stays at the stop value when sweep stops Bias value Th Tp Tp Tp Tp Tp Tp Td Tds Td Base value Operate Start trigger Forward Reverse RTB ON returns to the bias value RTB OFF stays at the present value COMPLETE OUT HI GO LO COMPLETE OUT FRONT COMPLETE OUT END SYNC OUT TRIGGER IN Bias value Th Tp Tp Tp Tp Tp Tp Td Tds Td Base value Operate Start trigger Measureme...

Page 140: ...Vo Is RL Vmb Vo Vd1 Vd2 Vd1 Vd2 Thermal electromotive force Measured value Vo Vd1 Vd2 Vo Vd1 Vd2 Is 2 2Vo 2Is Vo Is The low resistance measurement pulse source mode requires consideration of the measurement delay time Td because it executes voltage measurement by current pulse generation If Td is not set appropriately the measurement points Vma Vmb will be on the way to the rising edge so that pre...

Page 141: ...time Tp Tp Period time Tw Pulse width Td Measurement delay time Tds Source delay time Tm Measurement time Integrationtime Measurement data processing time Tcn Operate processing time Trc Range change processing time Ts Polarity switching time HOLD Executes measure ment after trigger input Standby Low resistance calculation SYNC OUT COMPLETE OUT FRONT COMPLETE OUT END COMPLETE OUT HI GO LO Operate ...

Page 142: ...time Trc Range change processing time Ts Polarity switching time HOLD Table 5 9 Operations in Low Resistance Measurement Pulse Source Mode 2 3 Operational condition Trigger mode Description Operation Remarks Low resistance calculation SYNC OUT COMPLETE OUT FRONT COMPLETE OUT END COMPLETE OUT HI GO LO Source value change processing Not change the range 0 A 0 A Low resistance calculation TRIGGER IN ...

Page 143: ...arts when the range change processing is completed c When setting to Operate Pulse generation starts when the Operate processing time has passed after setting to Operate d In Standby or Suspended status The measurement is not executed in Standby or Suspend status Changing the source value AUTO Source value changing induces range changing Tp Period time Tw Pulse width Td Measurement delay time Tds ...

Page 144: ...he following restrictions 1 The source function and the measurement function cannot be changed and are fixed to ISRM 2 The polarity of the source value is disabled 3 The base value is fixed to 0 A regardless of the setting pulse base value 4 The measurement data memory cannot be set to Burst 5 The measurement auto range operation and the measurement function link mode are disabled ...

Page 145: ...000 data Current pulse sweep base value Voltage pulse sweep base value Voltage stop address Voltage start address Voltage sampling count Voltage level value Voltage step value Voltage stop value Current stop value Current step value Current level value Current sampling count Current start address Current stop address Current start value Current bias value Voltage LO limit value 2 Voltage HI limit ...

Page 146: ...n setting source value The setting range of the source value is restricted as follows 1 The pulse width and the duty are restricted as follows 1 Restriction on the pulse width 2 Restriction on the pulse duty ratio When the pulse duty ratio exceeds the following range a duty over error occurs and the setting is invalid Tw Pulse width Tp Period time Ip Pulse source current Ib Base current NOTE Calcu...

Page 147: ...ty ratio of load current pulse Range is the same as the pulse duty ratio restriction described in 1 Step 2 NOTE If the load current beyond the restrictions is applied the unit will detect overload and set Standby status To prevent damage to the 6240B do not apply a load current that exceeds the above restrictions Tw Ip 1 15 Vo 12 ms However Tw Ip 1 120 ms Restriction on load current pulse width in...

Page 148: ...ping For more information on the sweep operation in this case see Table 5 5 Operations in DC Sweep Source Mode or Table 5 6 Operations in Pulse Sweep Source Mode If the period time is extended the TpALM indicator illuminates Sweep range setting Range Fix Fixes to the range that can output the maximum value of all setting values The range is not changed while sweeping Auto Sets every setting value ...

Page 149: ...f the relays Therefore using the suspend function is recommended whenever turning OFF the output to change the source conditions Figure 5 11 below shows a conceptual diagram of output status Figure 5 11 Conceptual Diagram of Output Status 6240B OPR STBY LoZ HiZ Semicond uctor relay image Vsus DUT Vsus Output voltage in Suspend status LoZ HiZ Output resistance switching in Suspend status OPR STBY O...

Page 150: ...w impedance status when the output is set to OFF The output response speed is faster because the limiter range does not change in Operate status 4 Current limiter in Suspend Suspend status always sets Vs status and the current limiter setting changes to the values shown in Figure 5 11 Conceptual Diagram of Output Status Therefore the HL or LL indicator might illuminate depending on the DUT status ...

Page 151: ...ues are set to 300 digits in the Is range 3 Shifting between Operate Standby and Suspend NOTE The source data during sweep is generated with the following timing 1 Standby Operate 2 Standby Suspend 3 When Operate is set after changing the sweep parameters in Suspend status Standby status DC source Pulse source Low resistance measurement pulse source Operate status Suspend status Power ON OPR STBY ...

Page 152: ...ction is set according to the source function Use E MEASURE and 6 Mfunc Link to switch the mode When the link mode is selected the measurement function is set as follows by changing the source func tion Voltage source function current measurement function VsIm Current source function voltage measurement function IsVm Also immediately after the link mode is set the measurement function changes acco...

Page 153: ... are within 20 digits of the values shown in the table below Source function Measurement auto range OFF Measurement auto range ON Voltage measurement Current measurement Voltage measurement Current measurement Voltage source Fixed to the source range Fixed to the limiter range Fixed to the source range Current Source Fixed to the limiter range Fixed to the source range Fixed to the source range Au...

Page 154: ...and the limit value changes to 3 219 mA For 3 measuring with the 3 mA range outputs 1 mA measurement data The output current is supposed to change to 100 mA at Point y However as the limit value is 3 219 mA the output current is limited to 3 219 mA For 5 the measurement result with the 3 mA range is 3 219 mA This is over range over 3 2 mA The auto range changes the range to the 30 mA range and the...

Page 155: ...uto range by following the procedure below overload OVL is detected and the output status is set to Standby 1 Set the current source to 0 A and the limit voltage to 15 V The voltage measurement range with ISVM is set to the same as the voltage limiter range 2 Connect the external power supply of 2 V 3 mA range 30 mA range 300 mA range Output V Step 1 Operation Range Time Step 3 Step 2 Time Delay D...

Page 156: ...ge overload and sets the output status to Standby The operation above is unavoidable in principle For using the 6240B under the above condition do not use the measurement auto range NOTE 1 In the current source function apply an external VB voltage within the voltage limiter range LO limit value VB HI limit value If the voltage exceeds the limiter range an overload OVL is detected and the output s...

Page 157: ...easurement at the base timing 3 Measuring at the timing overlapping with the pulse value and the base value The measurement value changes depending on the time ratio of the pulse value to the base value in the measured time Pulse source Tp Base value Pulse value Base value Td Measurement Tp Base value Pulse value Base value Measurement Tp Base value Pulse value Base value Measurement ...

Page 158: ...low Figure 5 12 Measurement in Sample Hold Beware of the following points when setting the sample hold When the source mode is changed to DC mode or DC sweep mode the sample hold is released and the integration time parameter becomes 100 s When the period time is set beyond 600 ms an error message appears at the following timing In this case verify the setting range When the output status is switc...

Page 159: ...he following conditions More than 10 seconds have elapsed since the previous auto zero operation and measurement has been completed However auto zero operation is not performed when the memory store mode is set to Burst The integration time is changed NOTE When the auto zero function is enabled in the pulse source mode or pulse sweep mode the base value continues to be output until the auto zero o...

Page 160: ...t data in an exponential form 1 When displaying 10 mA with Prefix The following table shows the relation between prefixes of exponents 2 When displaying 10 mA with Exponent A decimal point is always after the first digit Table 5 11 Relation between Prefixes and Exponents Prefix Text Exponent Y yotta 1024 Z zetta 1021 E exa 1018 P peta 1015 T tera 1012 G giga 109 M mega 106 k kilo 103 m milli 10 3 ...

Page 161: ...B such as a battery is connected in the current source function set the voltage limit values in the following range against VB LO limit value VB HI limit value If these values are set outside the above range the 6240B detects overload OVL and then sets Standby 5 2 7 1 Limiter Setting Ranges The limit values can be set with the following conditions 60 digits HL value LL value NOTE 1 Set the current...

Page 162: ...h the HI limit and LO limit values to positive voltage can be used for rechargeable bat tery charge and discharge testing Figure 5 13 Rechargeable Battery Charge and Discharge Operations Setting the HI limit value as voltage for charging constant voltage and the LO limit value as voltage for discharging termination provides CV CC operation as shown in the above figure NOTE Applying higher voltage ...

Page 163: ...scriptions and causes When Source Unit or Fan Stop occurs the output is set to Standby and operation is not possible until the power is turned on again When Over Heat occurs the output is set to Standby and operation is not possible until the cause of the error is removed When Over Load occurs the output is set to Standby Display Remote output Buzzer Sub header Status LMT Yes No No HL LL No Yes Ye...

Page 164: ...red parameters Table 5 13 Source Mode and Time Parameters to be Considered Source mode Th Tds Td Tw Tp Tm Timing diagram DC Table 5 2 Pulse Table 5 3 DC Sweep Table 5 5 Pulse Sweep Table 5 6 Low resistance measurement pulse Table 5 9 Item Description Category level Select level Input Run level Th Hold time MENU key D TIME 1 Hold Time Tds Source delay time 2 Src Delay Td Measurement delay time 3 Me...

Page 165: ...s If the time parameters are set to exceed any of these restrictions an error message is displayed when the output is set to Operate or when sweep starts and measurement does not start 1 Restrictions Source delay time Tds 300 s period time Tp Measurement delay time Td 300 period time Tp Source delay time Tds Measurement delay time Td Tp Tds 300 s or more Tp Td 300 s or more Measurement Tp Tds Td 0...

Page 166: ...nship between the restrictions described above and the source mode 3 Source delay time measurement delay time and pulse width The setting resolutions of the source delay time the measurement delay time and the pulse width are determined by the period time resolution Values rounded off to the resolution are set Restrictions Source mode DC PLS DC SWP PLS SWP PLS RM Tds 300 s Tp Td 300 s Tp Tds Td Td...

Page 167: ... then starts mea surement This section describes the settling time of the 6240B and the measurement delay to be set 1 Switching the settling time Setting the settling time enhances the system throughput or reduces output noise to ensure stability with respect to loads L and C Set the settling time by selecting A SOURCE 5 Response on the menu screen Fast Fast mode Slow Slow mode high stability to a...

Page 168: ... 300 A to 4 A Ts 70 Vs 30000 DIL s Current limiter range is 30 A Ts 70 Vs 30000 DIL 3 s Slow mode Current limiter range is 300 A to 4 A Ts 200 Vs 100000 DIL s Current limiter range is 30 A Ts 200 Vs 100000 DIL 2 s Example Ts values when current limiter range is 300 A to 4 A Unit s Vs V Current limiter setting value DIL digit 500 1000 2000 3000 Fast Slow Fast Slow Fast Slow Fast Slow 1 130 400 100 ...

Page 169: ...etting Fast Slow as shown below Set the measurement delay Td to Ts or over Unit s Example 3 mA range slow mode 1 mA current with 1 k resistance Is 1 mA VRL 1 mA 1 k 1 V Ts 26 VRL Is Rs 100 Ts 26 1 V 1 mA 220 100 218 Set as Td 218 s Range Fast Slow 30 A Ts 60 VRL Is Rs 200 Ts 80 VRL Is Rs 300 300 A to 1 A Ts 16 VRL Is Rs 50 Ts 26 VRL Is Rs 100 4 A Ts 32 VRL Is Rs 100 Ts 50 VRL Is Rs 200 Rs value Ra...

Page 170: ...omparator calculation ON Approx 15 ms In measuring resistance Approx 1 ms Example DC source mode integration time 1 PLC 50 Hz memory store Normal ON NULL calculation ON scaling calculation ON Max Min calculation ON comparator calculation ON In these conditions the measurement time is calculated as follows Tit 20 ms Tk 4 0 2 1 1 15 21 2 ms Tm Tit Tk 41 2 ms 5 2 9 4 Auto Range Delay The auto range d...

Page 171: ...respect to the 30 A range For other ranges the values in 1 10 multiples are set as shown in the table below Tar measure Calculate the Tar setting using the expression below Tar 1667 CL s Example If CL 1 F Tar 1667 1 1 667 ms Set Tar 2 ms Measurement range Setting value Example 30 A Tar 500 ms 300 A Tar 10 50 ms 3 mA Tar 100 5 ms 30 mA Tar 1000 1 ms 300 mA or higher 0 0 ms Vs Io 32 A Time Time Tar ...

Page 172: ... calculation is ON The NULL value is rewritten when the NULL calculation switches from OFF to ON or when the NULL calculation is initialized If the measured value is over range data and the NULL calculation is turned ON the display shows Over Range The first data item after the Over Range is released becomes the NULL value If the NULL calculation result is over the full scale of the present measur...

Page 173: ...s ON the MATH indicator goes ON The setting ranges of Constant A Constant B and Constant C are 0 to 999 999E 24 however Constant A 0 If the calculation result exceeds 9 99999E 24 it is scaling over and the error message SCL Over is displayed The scaling calculation is turned OFF by executing the RST command Changing the measurement function does not turn OFF this calculation Scaling calculation Co...

Page 174: ...n X DL or X Du respectively 2 Calculation result output The calculation result is output to the output data header and the device event register in the status register Also HI GO and LO signals selected with negative pulses are output to the COMPLETE OUT output terminal on the rear panel 3 Operation All the indicators go ON when the comparator calculation is ON HI GO or LO indicator goes ON depend...

Page 175: ...d error data is calculated When the maximum or minimum value is updated with the notice buzzer set to ON the buzzer sounds However the buzzer may also sound when the displayed data does not change This is because the measurement resolution is smaller than the display resolution The Max Min calculation is turned OFF by changing the measurement function or executing the RST command When the total va...

Page 176: ...omparator calculation result signal HI GO LO SYNC OUT 1 Output Pulse output signal in the pulse source mode Step up signal in the sweep source mode Pulse output signal in the low resistance measurement pulse source mode INTERLOCK IN 2 Input TTL negative level Approx 10 k Sets Standby when the signal level changes from LO to HI When the signal is HI or Open the output cannot be changed to Operate S...

Page 177: ...e hold time Th See Table 5 15 and Table 5 16 4 Restrictions on the time Thp ext from sweep start to the next trigger signal input For the sweep source mode there are restrictions on setting the time Thp ext from the trigger signal input for sweep start to the trigger signal input for the next step See Table 5 15 and Table 5 16 5 Restrictions on the required time Top from specifying Operate to inpu...

Page 178: ...e delay 30 s pulse width 500 s at high speed burst operational status in the BURST mode 2 2 High speed burst operational status The High speed burst operational status starts when the TRIGGER IN signal is input with the conditions measurement range fixed SWP range fixed trigger mode HOLD and memory mode BURST And it is as follows The indicator is always displayed rotating Pressing the TRG key or e...

Page 179: ...tor Operation Manual 5 2 11 External Control Signals 5 61 When the source mode is PLS Minimum value with the memory mode BURST and measurement ON When the source mode is PLS SWP Minimum value with the memory mode BURST and measure ment ON ...

Page 180: ... both source and measurement in the pulse source mode and the sweep source mode The timing control for the synchronization is performed by the external control signals TRIGGER IN SYNC OUT and OPERATE OUT and the time parameter settings such as measurement delay and source delay 1 Three unit synchronous operation using SYNC OUT Setting Connection Parameter No 1 No 2 No 3 SYNC OUT control signal SYN...

Page 181: ...lse source mode Consider this time delay when using two or more 6240B units in synchronous operation For all three units set the measurement range to Fixed and auto zero to OFF Using the external trigger has restrictions on setting Tp and Th for slaves Refer to Section 5 2 11 1 The first synchronous sweep step has a gap within the Th accurate range OPERATE OUT SYNC OUT Source and measurement Tds1 ...

Page 182: ...ollows 1 Tds2 Tds1 Tsync 2 Td2 Td1 Tsync 3 Tw2 Tw1 4 Tp2 Tp1 TA Measurement trigger Source SYNC OUT 6240B Master SYNC OUT TRIGGER IN 6240B Master 6240B Slave Set to HOLD Measurement Tp1 Tds1 Tw1 Td1 Tsync Tp2 Tds2 Tw2 Td2 TRIGGER IN Source SYNC OUT 6240B Slave Measurement Internal measurement trigger Tsync Measure ment Measure ment Measure ment Measure ment ...

Page 183: ...reverse polarity voltage to each other Depending on the settings an overload may be generated when a short circuit occurs 2 Only two units can be connected serially Do not connect three or more units serially If the load is short cir cuited the maximum applicable voltage will be exceeded and the 6240B may be damaged 3 When using constant current the smaller setting current of No 1 and No 2 becomes...

Page 184: ...t of a battery Figure 5 16 Parallel Connection CAUTION 1 If the load is opened the current flows from the higher to the lower of the set voltage Depending on the set tings an overload may be generated 2 If the load is opened when three or more units are connected in parallel which one to be used as source and the other to be used as sink are decided by the setting voltage and the voltage control i...

Page 185: ... Burst mode Figure 5 17 Conceptual Diagram of Memory Store Scaling calculation Scaling calculation OFF Scaling calculation OFF Max Min calculation Max Min calculation OFF Max Min calculation OFF Normal mode Measurement task Memory full Trigger Burst mode Trigger Comparator calculation OFF GRIB USB Output buffer Measurement buffer memory Memory full Comparator calculation OFF AD data buffer True va...

Page 186: ...ular measurement such as DC or pulse mea surement High speed measurement When reading the measured data after measuring a certain number of times such as sweep measurement Minimum repeat time 10 ms 2 ms Measurement data display Displayed in real time Displayed in idle time of measurement tasks or when measurement is not per formed Data output Reads the latest data by the ENTER key Available Not av...

Page 187: ...the menu screen When the ERR or CLS command is executed The error logs are not cleared by executing RST 3 Reading out error logs Select the parameters M SYSTEM and 5 Error Log on the menu screen The number of errors is displayed Press to display the error contents Turn to change the error log number An error message such as the one below appears if the entered value is set out of range A maximum f...

Page 188: ...t 64 11 130 SCI communication error No resp SCI 128 12 101 AD operation IR1 IR2 ratio AD Ratio 1 2 b 1 13 102 AD operation IR2 IR3 ratio AD Ratio 2 3 2 14 103 AD operation IR3 IR4 ratio AD Ratio 3 4 4 15 104 AD operation IR4 IR5 ratio AD Ratio 4 5 8 16 111 Analog section SRT line test ADRST Sig 16 17 112 Analog section TRIG line test ADTRG Sig 32 18 151 AD operation ZERO X10 ADx10 Zero 64 19 152 A...

Page 189: ...FS IS 300 A FS 4 68 244 ISIM 300 A FS IS 300 A FS 8 69 245 ISIM 3 mA FS IS 3mA FS 16 70 246 ISIM 3 mA FS IS 3mA FS 32 71 247 ISIM 30 mA FS IS 30mA FS 64 72 248 ISIM 30 mA FS IS 30mA FS 128 73 249 ISIM 300 mA FS IS 300mA FS 256 74 250 ISIM 300 mA FS IS 300mA FS 512 79 251 ISIM 1 A FS IS 1A FS 1024 80 252 ISIM 1A FS IS 1A FS 2048 83 253 ISIM 4 A FS IS 4A FS 4096 84 254 ISIM 4A FS IS 4A FS 8192 85 30...

Page 190: ...that order on the menu screen and press ENTER Press and then press or to select the parameters Self Test and Dsp Key Tst Figure 5 18 Self Test Operation Verify the error detected Revision display PASS FAIL PASS no error Displayed in accordance with the key pressed All the panels light up including indicators Buzzing approx 1 second Self test in progress Power ON INC Rotate the rotary knob clockwis...

Page 191: ...he 6243 6244 but does not have command compatibility For more information on the remote operation refer to Section 6 7 3 Remote Command List The following commands have compatibility V command I command D command H command E command N command 5 3 2 Difference in Period Parameter for Pulse Source and Sweep Source Note that the definition of the period parameter Tp is different from that of the 6243...

Page 192: ...onous Operation The 6243 6244 does not have a delay time from the external trigger input to the measurement start but the 6240B has Tsync delay time Therefore consider the Tsync delay time when using the 6240B with the 6243 6244 in synchronous oper ation For more information refer to Section 5 2 12 1 Synchronous Operation ...

Page 193: ... current limiter on the HI side and the HiLmt error amplifier A2 becomes an error amplifier for current limiter on the HI side Likewise the LoLimitDAC and the LoLmt error amplifier A3 work as current limiter on the LO side At this time 0 is ON for SW1 in the feedback circuit and 1 is ON for SW2 For current source the uses of each DAC and error amplifier are switched for SW1 1 is ON and for SW2 0 i...

Page 194: ...easurement voltage source and voltage lim iter always take place in the same range The A5 and A6 amplifiers have high input impedance to minimize leakage The A7 amplifier also has high input impedance to reduce error for 4 wire connection The AD converter employs an integral type AD and the integration time can be set between 100 s and 200 ms ...

Page 195: ...ace can only be selected from the front panel menu 1 The selected interface is saved in the non volatile memory The selected interface does not change even if the unit is turned off or the interface is reset 2 A unique unit address needs to be set on the interface When selecting the USB interface and connecting multiple instruments set individual identifying ad dresses USB ID The following table s...

Page 196: ...6 35 BZ1 6 35 BZ2 6 35 BZ3 6 35 BZ4 6 35 C 6 34 CAL 6 38 CAL0 6 38 CAL1 6 38 CO 6 33 CO0 6 33 CO1 6 33 CP 6 36 CP0 6 36 CP1 6 36 CP2 6 36 CP3 6 36 CP4 6 36 CP5 6 36 CP6 6 36 CW 6 36 CW0 6 36 CW1 6 36 D 6 39 DBI 6 26 DBV 6 26 DL 6 36 DL0 6 36 DL1 6 36 DL2 6 36 DL3 6 36 DM 6 31 DM0 6 31 DM1 6 31 DSE 6 37 DSR 6 37 E 6 40 ERC 6 35 ERL 6 35 ERR 6 37 F 6 30 F0 6 30 F1 6 30 F2 6 30 F3 6 30 FL 6 27 FL0 6 ...

Page 197: ...6 OP 6 35 OP0 6 35 OP1 6 35 OP2 6 35 OP3 6 35 OP4 6 35 OPR 6 26 P 6 29 6 40 R 6 30 R0 6 30 R1 6 30 RB 6 29 RB0 6 29 RB1 6 29 RCLP0 6 34 RCLP1 6 34 RCLP2 6 34 RCLP3 6 34 RCLR 6 29 RD 6 31 RDN 6 32 RDT 6 32 RE 6 31 RE3 6 31 RE4 6 31 RE5 6 31 RINI 6 34 RL 6 31 RLOD 6 29 RLY 6 35 RN 6 32 RNM 6 32 RS 6 26 RS0 6 26 RS1 6 26 RSAV 6 29 S 6 37 S0 6 37 S1 6 37 SB 6 29 SBY 6 26 SC 6 27 SCL 6 33 SCL0 6 33 SCL...

Page 198: ...26 SV 6 30 SV0 6 30 SV1 6 30 SVR 6 24 SVR3 6 24 SVR4 6 24 SVR5 6 24 SVRX 6 24 SWSP 6 30 SX 6 28 SZ 6 32 TER 6 35 TOT 6 33 UZ 6 35 UZ0 6 35 UZ1 6 35 V 6 24 6 39 V3 6 39 V4 6 39 V5 6 39 VF 6 24 XADJ 6 38 XD 6 38 XDAT 6 38 XDN 6 38 XILH 6 38 XILL 6 38 XIM 6 38 XINI 6 38 XIS 6 38 XNXT 6 38 XR0 6 38 XR 1 6 38 XR1 6 38 XR2 6 38 XR3 6 38 XR4 6 38 XR5 6 38 XUP 6 38 XVLH 6 38 XVLL 6 38 XVM 6 38 XVS 6 38 XW...

Page 199: ...asured values The remote commands are the same as with USB General specifications Standard IEEE 488 2 Code ASCII code Logic level Logical 0 High 2 4 V min Logical 1 Low 0 4 V max Table 6 1 Interface Function Code Function SH1 Source Handshake capability AH1 Acceptor handshake capability T5 Basic Talker unaddressed if MLA Talk Only serial poll L4 Basic Listener unaddressed if MTA SR1 Service Reques...

Page 200: ...sure to turn ON all the devices connected to the bus The overall system operation cannot be guar anteed if any of the devices is not turned ON 4 Connecting and disconnecting cables Turn OFF all the devices before connecting or disconnecting the GPIB cables Check that the chassis of the devices on the bus are connected to each other and to the ground before connecting or discon necting any GPIB cab...

Page 201: ...ss 2 GPIB Adr 01 4 Enter the Input Run level with 2 GPIB Adr 01 5 To set the address press or to select the digit to be changed and use to increase or decrease the figure Alternatively directly enter the address pressing the 123 key 2 GPIB Adr 17 6 Press Exit to exit the menu Operation Character display area 1 Press MENU and select L I F with or L I F 2 Enter the Select level with 1 I F BUS GPIB 3...

Page 202: ...be always guaranteed 6 4 2 USB Specifications Standard Complies with USB2 0 Full Speed Connectors USB type B female ID USB ID settable from 1 to 127 Remote Local Available Input commands Function setting and query with ASCII character string commands Output format Measurement data and query response with ASCII character strings Driver ADC measuring instrument USB driver 6 4 3 Setting Up USB 6 4 3 ...

Page 203: ...ait time after the previous command Operation Character display area 1 Press MENU and select L I F with or L I F 2 Enter the Select level with 1 I F BUS USB 3 Select 2 USB Id with or Currently set ID 2 USB Id 001 4 Enter the Input Run level with 2 USB Id 002 5 To set the ID press or to select the digit to be changed and use to increase or decrease the figure Alternatively directly enter the ID pre...

Page 204: ... maintains the status for each event It may also hold changes Once the register is set it remains set until it is read out by a query or cleared by CLS Data cannot be written into the event register Enable register The enable register specifies for which bits in the event register a valid status summary should be generated The logical AND operation is executed between the enable register and the e...

Page 205: ...easurement data Query data Standard Event Status Register OPC Operation Complete Power ON Output buffer Standard Event Status Enable Register Status Byte Register Service Request Enable Register Parameter Lost means save parameter data lost or backup parameter data lost Ext Trigger In Memory Full Operate Calibration End Sweep End Sweep Step Complete End Of Measure Self Test Error at Power ON Self ...

Page 206: ...ted as a service request to the controller Consequently the Status Byte Register is slightly different from other status registers in structure The Status Byte Register is explained in the following The following figure shows the structure of the Status Byte Register Figure 6 2 Status Byte Register Structure The Status Byte Register conforms to other status registers except the following three poi...

Page 207: ...n use Always set to 0 3 DSB Device Event Status ON Set to 1 when any of the DESR incidents occurs and the bit is set to 1 if the corresponding DESER bit is also 1 OFF Set to 0 when DESR is cleared by reading DSR 4 MAV Message Available ON Set to 1 when output data is entered in the output buffer OFF Set to 0 when the output buffer is read and becomes empty 5 ESB Standard Event Status ON Set to 1 w...

Page 208: ...urned ON Cleared when the ESE0 command is executed Table 6 4 Standard Event Status Register SESR bit Name Description 0 OPC Operation Complete ON Set to 1 when all operations are complete after receiving the OPC com mand 1 Not in use Always set to 0 2 Not in use Always set to 0 3 DDE Device Dependent Error ON Set to 1 when a device dependent error occurs 4 EXE Execution Error ON Set to 1 when a re...

Page 209: ...iter High ON Set to 1 when the high limit value is detected 8 EOP Ext Operate Off In ON Set to 1 when an external operating interruption signal input is detected 9 ETG Ext Trigger In ON Set to 1 when an external trigger signal input is detected 10 MFL Memory Full ON Set to 1 when the measurement buffer memory is full OFF Set to 0 when the measurement buffer memory becomes not full 11 OPR Operate O...

Page 210: ...conditions in which the Device Event Status Register is cleared All cleared when the power is turned ON All cleared by CLS All cleared when read by DSR Conditions in which the Device Event Status Enable Register is cleared Cleared when the power is turned ON Cleared when the DSE0 command is executed ...

Page 211: ...eset after recalibration 3 ON Set to 1 when an overload is detected Not set to 0 even if the overload is cleared 4 ON Se to 1 when fan stopped is detected Not set to 0 even if the fan stopped is cleared 5 ON Set to 1 when overheat is detected Not set to 0 even if the overheat is cleared 6 ON Set to 1 when the source unit malfunctions 7 ON Set to 1 when the saved parameters are lost in the self tes...

Page 212: ...nt data and the measurement data memory RECALL are read in the following format H Header main header characters sub header of 1 character D Mantissa part polarity decimal point 6 digit figures E Exponent part E polarity 2 digit figures S String delimiter B Block delimiter E CRLF H D E B Single data reading E H D E S E E CRLF B Multiple data reading ...

Page 213: ... header Main header U High limit detected B Low limit detected O Range over Z For resistance measurement the voltage source value is set to 0 zero F For resistance measurement the current source value is below 20 digits or the current measurement value is below 200 digits E Calculation error scaling function or total function H The comparator calculation result is HI G The comparator calculation r...

Page 214: ...dddddd E 01 3 V d ddddd E 00 E 00 15 V dd dddd E 00 E 01 DC current measurement 30 A dd dddd E 06 E 05 300 A ddd ddd E 06 E 04 3 mA d ddddd E 03 E 03 30 mA dd dddd E 03 E 02 300 mA ddd ddd E 03 E 01 1 A d ddddd E 00 E 00 4 A d ddddd E 00 E 00 Resistance measurement Signif icant digits 1 digit 0000 0d E dd 00000d E dd 00000 d d 2 digits 0000 dd 0000d d d d dd 3 digits d dd 000d dd dd d ddd 4 digits...

Page 215: ... 35 9 99999 E 35 IS is below 20 digits or IM is below 200 digits 1 9 99999 E 34 9 99999 E 34 VS is set to 0 zero 1 9 99999 E 33 9 99999 E 33 Scaling error 9 99999 E 32 9 99999 E 32 TOTAL error 9 99999 E 31 9 99999 E 31 No data exists at recall 2 8 88888 E 30 8 88888 E 30 1 This may occur in resistance measurement 2 Data does not exist when the measurement buffer memory data is read out Block delim...

Page 216: ...hical structure Placing a question mark right after the header forms a query command 2 Space blank character One or more spaces can be inserted and spaces also may be omitted 3 Data When a command requires multiple data sets data sets are separated by comma A space may be used directly before or after comma For more information on the data types refer to Section 6 7 2 Data Format 4 Describing mult...

Page 217: ...format Fixed point type NR2 format Floating point type NR3 format 2 Units The table below lists the units that can be used for the D command NOTE When numeric data is expressed in an exponent format in the 6240B the number conversion time becomes too long if the exponent is set to 31 or higher xx xxxE 31 The exponent setting should not exceed 30 Unit Exponent Meaning V 100 Voltage MV 10 3 Voltage ...

Page 218: ... Not acceptable in DC pulse OPR SUS column Acceptable only in the HOLD trigger mode or in Suspend status in Sweep OPR SUS column Acceptable only when sweep stops or in Suspend status Acceptable in the Suspend status Item Command Description Default Operation Power ON Factory shipment DC pulse OPR SUS Sweep OPR SUS Source Source mode MD0 DC mode MD1 Pulse modem MD2 DC sweep mode MD3 Pulse sweep mod...

Page 219: ... A Both the HI and LO limit values can be set In comparison between data1 and data 1 the larger value is the HI limit value and the smaller one is the LO limit value data 2 can be omitted In this case data1 and data 1 are assumed as HI and LO limit values respec tively regardless of the data1 polarity LMV Response LMV hl ll 1 LMI LMI hl ll 1 hl d dddE d High limit value ll d dddE d Low limit value...

Page 220: ...ddE d 1 DBI DBI d ddddE d Trigger mode M0 AUTO M1 HOLD M Response M0 or M1 Operate Standby SBY Sets the output to OFF Standby OPR Sets the output to ON Operate SUS Sets the output to Suspend SBY OPR SUS The present output status is returned Response Remote sensing RS0 2W RS1 4W RS Response RS0 or RS1 1 The decimal point position in response varies depending on the setting value For the source valu...

Page 221: ...p step 1 st sp step d ddddE d Fixed level sweep SF lvl cnt lvl Level source value 0 V 0 A cnt Sampling count 1 to 8000 1 If all the settings are omitted set the sweep type only However it is not allowed to omit each value sepa rately SF Response SF lvl cnt 1 lvl d ddddE d cnt dddd Random sweep SC st sp st Start address 0 to 7999 0 3 sp Stop address 0 to 7999 0 If all the settings are omitted set t...

Page 222: ... sepa rately SM Response SM fd md ld st1 st2 1 fd md ld st1 st2 d ddddE d Sweep type SX The sweep type of the present source function is returned Response Linear sweep Same as the SN response Fixed level sweep Same as the SF response Random sweep Same as the SC response 2 slope linear sweep Same as the SM response 1 The decimal point position in response varies depending on the setting value For t...

Page 223: ... set 0 RSAV Saves the random sweep data RLOD Loads the random sweep data RCLR Initializes the random sweep data Data saved in the memory is not initialized Pulse sweep base value BS data data Pulse sweep base value 0 BS Response BS d ddddE d 1 Bias value SB data data Bias value 0 SB Response SB d ddddE d 1 RTB Return To Bias RB0 OFF Stays at the final value when sweep stops RB1 ON Returns to the b...

Page 224: ...F F1 DC voltage measurement DCV F2 DC current measurement DCI F3 Resistance measurement OHM F Response F0 to F3 Measurement range R0 AUTO range R1 Fixed to the limit value range However if the measurement function and the source function are same the measurement range conforms to the source range R Response R0 or R1 Measurement function link mode FX0 OFF FX1 ON VSIM ISVM However if measurement is ...

Page 225: ... 1 2 digits RE4 4 1 2 digits RE5 5 1 2 digits RE Response RE3 to RE5 Measurement auto range delay RD Ard Ard Measurement auto range delay time Units ms 1 0 RD Response RDddddd Measurement buffer memory ST0 Store OFF 7 ST1 Normal ON ST2 Burst ON ST Response ST0 to ST2 RL Initializes the stored data 1 The decimal point position in response varies depending on the setting value For the source value l...

Page 226: ...mber 0 to 7999 adr2 Last recall data number 0 to 7999 0 0 0 0 RDN Response RDN adr1 adr2 GPIB only adr1 adr2 dddd RDT Reads out data from the specified memory range GPIB only Response Data is read out from the specified range in the format described in Section 6 6 Data Output For mat Talker Format using delimiters When data does not exist in the specified number EE 8 88888E 30 is output Executing ...

Page 227: ...LO d dddddE dd Scaling calcula tion SCL0 OFF SCL1 ON SCL Response SCL0 or SCL1 KA a a Constant A 0 zero is invalid 1 KB b b Constant B 0 KC c c Constant C 4 1 KA Response KA d dddddE dd KB KB d dddddE dd KC KC d dddddE dd MAX MIN calculation MN0 OFF MN1 ON MN Response MN0 or MN1 AVE Reads out the average value 0 MAX Reads out the maximum value 9 99999E 26 MIN Reads out the minimum value 9 99999E 2...

Page 228: ...ry as setting parameters RCLP2 Loads the data from area 2 of the non volatile memory as setting parameters RCLP3 Loads the data from area 3 of the non volatile memory as setting parameters RINI Loads the factory default settings as setting parameters Initialization RST Initializes parameters The parameters except marked by 6 in this list are the factory default values C Device clear Instrument inf...

Page 229: ...register is returned Response a b c d e a b c d e 0 to 65535 Error log ERL Reads out error logs The number of errors and the error descriptions are all cleared Response ddd ddd ddd ddd ddd is shown as a space ERC Reads out the number of errors Response ddd 000 No error 001 to 999 error count 006 to 999 to be overwritten Relay counter RLY Reads out the relay counter data Response ddddddddd up to 99...

Page 230: ...P5 COMPLETE signal output Comp HI or LO Comparator calculation result HI or LO CP6 Sync Out signal output CP Response CP0 to CP6 CW0 Specifies the synchronous control signal output width 10 µs CW1 Specifies the synchronous control signal output width 100 µs CW Response CW0 or CW1 GPIB Block delimiter DL0 CRLF EOI 5 8 DL1 LF DL2 EOI DL3 LF EOI DL Response DL0 to DL3 Header OH0 OFF OH1 ON 6 OH Respo...

Page 231: ...se ddd DSR Query of the Device Event Status Register DSR Response ddddd DSE Sets the Device Event Status Enable Register 0 to 65535 0 6 DSE Response ddddd ERR Query of the Error Register ERR Response ddddd CLS Status clear Operation Complete OPC After all operations are complete sets LSB of the Stan dard Event Status Register OPC Response 1 after all operations completed WAI Waits until all operat...

Page 232: ...cts the current limiter High calibration XILL Selects the current limiter Low calibration XVM Selects the voltage measurement function calibration XIM Selects the current measurement function calibration Calibration range XR 1 XR0 XR1 XR2 XR3 XR4 XR5 Sets the calibration range Calibration data XDAT Changes to the DMM data input mode XD data Inputs DMM read data XADJ Changes to the calibration data...

Page 233: ...r I 1 to I5 I Source value pulse value and limit value D data UNIT The source value setting is different depending on whether UNIT is specified or not With UNIT Automatically sets the optical range Available unit mV V µA mA A Without UNIT Sets the present function and range When a unit that is different from that of the present source function is set the input data is set as limit value as follows...

Page 234: ...eturns the present output status Response Random sweep memory data using D com mand N adr Random sweep memory data setting starts from the N command and completes at the P command 0 6 P N adr D data1 UNIT D data2 UNIT P adr Memory address 0 to 7999 data1 Voltage or current source value at adr data2 Voltage or current source value at adr 1 6 Not initialized by the RINI or RST command Item Command D...

Page 235: ...c for Application VBA Program example 1 Example of DC measurement introduced in Section 2 2 5 Program example 2 Example of pulse measurement introduced in Section 2 2 6 Program example 3 Example of sweep measurement introduced in Section 2 2 7 Program example 4 Example of reading out measurement data from the measurement buffer memory as fast as possible 6 8 2 Program Example for USB Operating env...

Page 236: ......

Page 237: ...nce value of 100 m and accuracy of 150 ppm 7 2 Connections The connections required for the performance test are the same as shown in Figure 8 1 Connections for Cal ibration or Figure 8 2 Connection for Checking 4 A Current Source Measurement 7 3 Test Method Execute the performance test under the following conditions in a location free of dust vibration noise or other adverse conditions Temperatur...

Page 238: ...ns cali brate the 6240B as outlined in Chapter 8 CALIBRATION or contact an ADC CORPORATION sales representative for the calibration or servicing Current source and measurement test 30 µA to 1 A range 1 Connect the 6240B and a DMM as shown in Figure 8 1 b 2 Set the DMM to DCI auto range and integration time of 10 PLC or longer 3 Set the 6240B to DC source mode AUTO trigger and integration time of 2...

Page 239: ...time of 10 ms 4 Set the pulse width Tw to 20 ms period time Tp to 310 ms and measurement delay Td to 9 ms 5 Set Comple Sync of EXT SIGNAL to MeasFront 6 Set the pulse value to 4 A and base value to 0 A and set the output status to Operate 7 Verify that the difference between the source value and the DMM measured value or standard resistance value is within the accuracy described in Chapter 9 SPECI...

Page 240: ......

Page 241: ...g Instrument and Cables Necessary for Calibration The following table shows the required accuracies of a DMM and cables used for calibration Range ZERO FS Cable Calibration point Required accuracy Calibration point Required accuracy 300 mV 0 V 1 5 V 300 mV 15 ppm A01044 supplied accessory 1 3 V 5 V 3 V 10 ppm 15 V 50 V 15 V 20 ppm 30 A 0 A 50 pA 30 A 120 ppm 300 A 500 pA 300 A 120 ppm 3 mA 5 nA 3 ...

Page 242: ...emperature 23 C 3 C Relative humidity 70 or lower 3 Allow the 6240B to warm up for 2 hours or longer before calibration Allow other measuring instruments to be used in calibration to warm up for the period of time spec ified before the calibration 4 After calibration note the dates of the calibration and the next scheduled calibration on a card or sticker etc for convenience 5 Calibration by key o...

Page 243: ...calibrating the 6240B using a DMM Figure 8 1 Connections for Calibration Figure 8 2 Connection for Checking 4 A Current Source Measurement a Checking and calibrating voltage source measurement b Checking and calibrating current source measurement DMM DMM 6240B 6240B DMM 6240B Standard resistor 100 m TRIGGER IN COMPLETE OUT BNC BNC cable ...

Page 244: ...00 mV 0 V 300 00 mV 10 V 3 V 3 0000 V 100 V 15 V 15 000 V 600 V Current source 30 A 0 A 30 000 A 1 nA 300 A 300 00 A 10 nA 3 mA 3 0000 mA 100 nA 30 mA 30 000 mA 1 A 300 mA 300 00 mA 10 A 1 A 1 0000 A 100 A 4 A 1 0000 A 200 A Voltage measurement 300 mV 0 V 300 000 mV 2 V 3 V 3 00000 V 20 V 15 V 15 0000 V 200 V Current measurement 30 A 0 A 30 0000 A 300 pA 300 A 300 000 A 3 nA 3 mA 3 00000 mA 30 nA ...

Page 245: ...A 5 nA 300 A 300 0 A 50 nA 3 mA 3 000 mA 500 nA 30 mA 30 00 mA 5 A 300 mA 300 0 mA 50 A 1 A 1 000 A 500 A 4 A 1 000 A 1 mA Current LO limiter 30 A 0 A 30 00 A 5 nA 300 A 300 0 A 50 nA 3 mA 3 000 mA 500 nA 30 mA 30 00 mA 5 A 300 mA 300 0 mA 50 A 1 A 1 000 A 500 A 4 A 1 000 A 1 mA Item Range Calibration point Tolerance range Zero Full Scale ...

Page 246: ...INI Enters the calibration mode Calibration data initialization Default to Ram Initialize calibration data DMM preparation Cable DCV setting Calibration mode Operate Refer to Calibration Procedure 2 Refer to Calibration Procedure 3 Voltage source limiter calibration Voltage measurement calibration DMM preparation Cable DCI setting Current source limiter calibration Current measurement calibration ...

Page 247: ... DMM data input mode VS Hi mode VS Lo mode DMM data acquisition Within tolerance range XD DMM data DMM data input Out of range setting results in a parameter error XD DMM data DMM data input Out of range setting results in a parameter error DMM data acquisition Checks the calibration result DMM data acquisition Calibration result data save and display DMM data acquisition Calibration result data s...

Page 248: ... data acquisition XD DMM data DMM data input Out of range setting results in a parameter error Enters the DMM data input mode Measurement data read out DMM data acquisition Calibration result data save and display Calibration result data save and display XD DMM data DMM data input Out of range setting results in a parameter error Measurement data read out Within tolerance range ...

Page 249: ...error Current source limiter calibration Calibration mode setting Range setting Enters the DMM data input mode Within tolerance range DMM data acquisition XD DMM data DMM data input Out of range setting results in a parameter error DMM data acquisition Checks the calibration result Calibration result data save and display DMM data acquisition Calibration result data save and display IS mode IL Hi ...

Page 250: ...mode Range setting Enters the DMM data input mode XD DMM data DMM data input Out of range setting results in a parameter error Calibration result data save and display Measurement data read out DMM data acquisition XD DMM data DMM data input Out of range setting results in a parameter error Calibration result data save and display Measurement data read out Within tolerance range ...

Page 251: ...bration Procedure 3 or execute current calibration accord ing to Figure 8 6 Calibration Procedure 4 and Figure 8 7 Calibration Procedure 5 6 Press SBY to set the output status to Standby 7 Store the calibration data to the non volatile memory by XWR 8 Finish the calibration mode by CAL0 8 5 2 Voltage Source Voltage Limiter Calibration 1 Select the voltage calibration mode Voltage source XVS Voltag...

Page 252: ...age Measurement Calibration 1 Move to the voltage measurement calibration mode by XVM 2 Select the range 300 mV range XR3 3 V range XR4 15 V range XR5 3 Enter the DMM data input mode by XDAT 4 Set the DMM read value by XD data 5 Read out and check the measurement data 6 Move to the full scale calibration mode by XNXT 7 Set the DMM read value by XD data 8 Read out and check the measurement data 9 M...

Page 253: ...ection 8 5 2 Volt age Source Voltage Limiter Calibration 4 Move to the next step When changing the current calibration mode XNXT When moving to current measurement calibration XNXT XIM 8 5 5 Current Measurement Calibration 1 Move to the current measurement calibration mode by XIM 2 Select the range 30 A rang XR 1 300 A rang XR0 3 mA rang XR1 30 mA rang XR2 300 mA rang XR3 1 A range XR4 4 A range X...

Page 254: ......

Page 255: ...urement range Measurement resolution Voltage source measurement range 300 mV 0 to 320 00 mV 10 V 0 to 320 999 mV 1 V 3 V 0 to 3 2000 V 100 V 0 to 3 20999 V 10 V 15 V 0 to 15 000 V 1 mV 0 to 15 1999 V 100 V Current source measurement range 30 A 0 to 32 000 A 1 nA 0 to 32 0999 A 100 pA 300 A 0 to 320 00 A 10 nA 0 to 320 999 A 1 nA 3 mA 0 to 3 2000 mA 100 nA 0 to 3 20999 mA 10 nA 30 mA 0 to 32 000 mA...

Page 256: ...mA 1 A 3 201 mA to 32 mA 10 A 32 01 mA to 320 mA 100 A 320 1 mA to 1 A 1 mA 1 001 A to 4 A 1 mA 1 Where Hi limit value Lo limit value 60 digits Range Accuracy 1 day stability Temperature coefficient of setting V ppm of setting V C Voltage source 300 mV 0 02 150 V 0 01 70 V 15 15 V 3 V 0 02 350 V 0 01 200 V 15 30 V 15 V 0 02 3 mV 2 0 01 2 mV 15 300 V Voltage limiter 300 mV 0 10 1 mV 3 0 05 200 V 10...

Page 257: ...5 100 A 2 A Current limiter 30 A 0 045 70 nA 300 pA 0 01 10 nA 100 pA 20 8 nA 10 pA 300 A 0 045 700 nA 3 nA 0 01 100 nA 1 nA 20 20 nA 100 pA 3 mA 0 045 7 0 A 30 nA 0 01 1 A 10 nA 20 200 nA 1 nA 30 mA 0 045 70 A 300 nA 0 01 10 A 100 nA 20 2 A 10 nA 300 mA 0 055 700 A 3 A 0 01 100 A 1 A 20 20 A 100 nA 1 A 0 1 7 0 mA 30 A 0 02 1 mA 10 A 40 200 A 1 A 4 A 0 25 12 mA 55 A 0 08 1 mA 10 A 40 200 A 2 A Vo ...

Page 258: ...Voltage source Reading item Voltage source setting item Current measurement reading item Full scale item Voltage source full scale item digit value current measurement full scale item digit value CMV item digit value 3 Current source Reading item Current source setting item Voltage measurement reading item Full scale item Current source full scale item digit value Voltage measurement full scale it...

Page 259: ...compliance voltage Up to 1 A DC 0 to 15 V Up to 4 A pulse 0 to 10 V Voltage source range Voltage limiter range A Rm B Is Tolerance 30 mA 300 mV 10 V 10 m 3 A 10 mA 1 m 300 mA 300 mV 10 V 30 A 100 mA 103 1 A 300 mV 10 V 300 A 1 A 13 30 mA 300 mV 10 V 100 m 3 A 10 mA 1 m 300 mA 300 mV 10 V 30 A 100 mA 130 1 A 300 mV 10 V 300 A 1 A 40 30 mA 300 mV 10 V 1 3 A 10 mA 1 3 m 300 mA 300 mV 10 V 30 A 100 mA...

Page 260: ...00 nA 3 mA 1 k 200 nA 2 A 6 A 30 mA 1 k 2 A 15 A 20 A 300 mA 1 k 20 A 100 A 150 A 1 A 10 500 A 1 mA 10 mA 4 A 10 500 A 1 mA 10 mA Typical value p p Load resistance Output ON OFF noise Voltage source 600 mV At 100 k Current source 600 mV At 100 k Range switching noise Voltage source 50 mV Current source fast 100 digits 50 mV 5 slow 300 digits 50 mV 5 Voltage measurement limiter 50 mV 6 Current meas...

Page 261: ...s 1 ms or less 3 V 100 s or less 300 s or less 15 V 300 s or less 700 s or less Current source Output voltage 15 V 10 V in the 4 A range 30 A 15 V 1 5 ms or less 2 ms or less 300 A 400 s or less 700 s or less 3 mA 30 mA 300 mA 1 A 1 ms or less 2 ms or less 4 A 450 s or less 700 s or less Typical value Source range Limiter range Settling time Output response FAST SLOW Voltage source Output current ...

Page 262: ...illation in current source or current limiter status Effective CMRR With unbalanced impedance of 1 k At DC and AC 50 60 Hz 0 08 NMRR At AC 50 60 Hz 0 08 Current range Output resistance Maximumload capacitance Voltage source Current source 30 A 500 m or less 1000 M or higher 1 F 300 A 100 m or less 1000 M or higher 1 F 3 mA 10 m or less 100 M or higher 100 F 30 mA 10 m or less 10 M or higher 100 F ...

Page 263: ...rce modes PLC Power Line Cycle 50 Hz 20 ms 60 Hz 16 66 ms Sweep mode Reverse ON round OFF one way Sweep repeat count 1 to 1000 times or infinite Maximum number of sweep steps 8000 steps Maximum random sweep memory 8000 data Measurement data memory 8000 data Measurement auto range Available only in VSIM or ISVM Measurement function link mode Links the source function to the measurement function VSI...

Page 264: ...Minimum pulse width 50 s Minimum step repeat time Under fixed source measurement range integration time of 100 s the minimum measurement or source delay time calculation function OFF and voltage current measurement Source delay time Period pulse cycle Measurement Memory mode Minimum step time OFF 0 5 ms BURST 2 ms ON NORMAL 10 ms OFF Setting range Resolution 7 Setting accuracy 0 030 ms to 60 000 m...

Page 265: ...ms 10 s 0 1 10 s 600 1 ms to 6000 0 ms 100 s 6001 ms to 59998 ms 1 ms Setting range Resolution 7 Setting accuracy 0 050 ms to 60 000 ms 1 s 60 01 ms to 600 00 ms 10 s 0 1 10 s 600 1 ms to 6000 0 ms 100 s 6001 ms to 59998 ms 1 ms 7 The setting resolution is determined by the period time resolution Setting range Resolution Setting accuracy 1 ms to 60000 ms 1 ms 2 3 ms Setting range Resolution Settin...

Page 266: ...curacies Display 16 segments 12 digits vacuum fluorescent display Power supply AC power 100 V 120 V 220 V and 240 V User selectable Line frequency 50 Hz 60 Hz Power consumption 85 VA or less Dimensions Approx 212 width 88 height 400 depth mm Mass 5 kg or less Safety Compliant with IEC61010 1 Ed 3 EMC Compliant with EN61326 1 classA Vibration proof Compliant with IEC60068 2 6 2G Option No Standard ...

Page 267: ... k connected The accuracy formula in the current source range of 3 mA is as follows The output voltage Vo is 3V Therefore Accuracy of setting A A Vo 1 V 3 mA 0 03 800 nA 30 nA 3 V 1 V 1 79 A Thus the accuracy in current source of 3 mA 3 mA range is specified between 2 9982 mA to 3 0018 mA NOTE Vo in the 1 day stability current limiter and temperature coefficient for voltage source all indicates vo...

Page 268: ... item for current source Current source full scale item digit value Voltage measurement full scale item digit value CMV item digit value Current source full scale item digit value The source resolution in the 3 mA range for current source is 100 nA according to the specification The offset item accuracy is 800 nA Thus the current source full scale item digit value is 8 digits Voltage measurement f...

Page 269: ...ts From and Full scale FS item for current source 8 digits 12 digits 0 9 digits 20 9 digits From the above results Accuracy 0 05 20 9 digits Next the accuracy in current source of 3 mA and voltage measurement of 3 V is calculated Measurement resistance value R V I 3 V 3 mA 1 k Display 1 0000 k Accuracy 1 k 0 05 20 9 digits 0 5 20 9 digits Thus the accuracy is specified between 0 9974 k to 1 0026 k...

Page 270: ...urce setting item Voltage measurement reading item Full scale item 2 Voltage limiter range A 300 mV 10 V 3 V 50 V 15 V 1 mV Rm Resistance measured value B Current value tolerance due to current source linearity 3 digits worth 5 digits worth in the 4 A range Is Current source setting value Voltage source range Voltage limiter range A Rm B Is Tolerance 30 mA 300 mV 10 V 10 m 3 A 10 mA 1 m 300 mA 300...

Page 271: ...ing item Voltage measurement reading item 0 05 0 02 0 07 Setting item in the current source 1 A range 0 05 Reading item in the voltage measurement 300 mV 0 02 2 Full scale item calculation Full sale item A Rm B Is 10 V 10 m 300 A 1 A 13 From 2 A 10 V Current limiter range 300 mV Rm 10 m Resistance measured value B 300 A The current source resolution in the 1A range is 100 A Thus 3 digits 100 A 300...

Page 272: ......

Page 273: ... is Standby or Suspend Set the output status to Operate and check that the OPR indicator on the front panel is ON Cause Solution Incorrect remote sensing setting Check the 4W 2W indicator on the front panel to see if the remote sens ing is set as desired Cause Solution The source value is set to 0 V or 0 A Verify the source value Cause Solution Detection of an overload voltage Over Load has set it...

Page 274: ...rify the TRIG INPUT connection cable and the signal 4 A source value indica tion is unstable or is in error Cause Solution Function or range settings have an error Check the settings again Cause Solution Incorrect cable connection Check cable connections again Cause Solution Disconnected cable Verify the cables with a tester If in error replace it Cause Solution Some cable is connected to a wrong ...

Page 275: ...eration IR3 IR4 ratio test error 104 AD Ratio 4 5 AD operation IR4 IR5 ratio test error 111 ADRST Sig Analog section RST line test error 112 ADTRG Sig Analog section TRIG line test error 151 ADx10 Zero AD operation X10 ZERO test error 152 ADx1 Zero AD operation X1 ZERO test error 201 VSVM 0 3V Z VSVM 300 mV ZERO test error 202 VSVM 0 3V FS VSVM 300 mV FS test error 203 VSVM 0 3V FS VSVM 300 mV FS ...

Page 276: ...A FS test error 242 IS 30 A FS ISIM 30 A FS test error 243 IS 300 A FS ISIM 300 A FS test error 244 IS 300 A FS ISIM 300 A FS test error 245 IS 3mA FS ISIM 3 mA FS test error 246 IS 3mA FS ISIM 3 mA FS test error 247 IS 30mA FS ISIM 30 mA FS test error 248 IS 30mA FS ISIM 30 mA FS test error 249 IS 300mA FS ISIM 300 mA FS test error 250 IS 300mA FS ISIM 300 mA FS test error 251 IS 1A FS ISIM 1 A F...

Page 277: ...oo Long Tw value over against pulse 822 Tp Tds Timer condition error Not Tp Tds 300 s 823 Tp Td Timer condition error Not Tp Td 300 s 824 Tp Tds Tw Timer condition error Not Tp Tds Tw 300 s 825 Td Tds Timer condition error Not Td Tds 828 600ms Tp S H timer condition error Not Tp 600 ms 831 Interlock Disabled by interlock 855 CAL data Calibration data error Remote command error 102 Cmd Syntax Comma...

Page 278: ... IT 1 PLC 20 ms Other default 165 179 In Suspend HiZ 67 82 In Suspend LoZ 8 23 Suspend SUS OPR SUS LoZ Source mode DC pulse IT 1 PLC 20 ms Source function VS IS Other default 6 12 22 27 OPR SUS HiZ 70 52 86 68 SBY SUS LoZ 139 142 156 153 SBY SUS HiZ 82 82 97 97 Standby SBY In Operate Source mode DC pulse IT 1 PLC 20 ms Source function VS IS Other default 111 93 126 108 In Suspend HiZ 48 48 62 62 I...

Page 279: ...ata Range not changed 5 to 6 21 to 24 Range changed 24 to 67 42 to 83 Measurement function F0 to F3 Source mode DC pulse Operate and HOLD status 5 20 Integration time IT0 9 24 IT1 8 24 IT2 11 25 IT3 17 33 IT4 29 43 IT5 47 63 IT6 209 223 IT7 407 423 Time parameter Th Td Tp Tw SP data data data data 7 to 9 26 to 28 Tds SD data 5 22 Sweep type Linear SN data Standby status 5 to 10 22 to 26 Fixed SF d...

Page 280: ...DC or pulse source mode The time from measurement by spot command reception measurement trigger after setting the source value for the setting source function to completion of data output to GPIB USB In the DC or pulse source mode Source value condition GPIB execution time USB execution time In DC or pulse source 5 ms 18 ms When the sweep start value is output 9 ms 19 ms When the sweep step value ...

Page 281: ... ms Header OFF Block delimiter EOI DL2 Item Number of data GPIB execution time USB execution time Source value data read by query 1 3 ms 18 ms Measurement buffer memory read after RN1 command Condition Number of measurement digits 51 2 digits Header OFF Block delimiter EOI DL2 1 3 ms 20 ms 100 130 ms 1 31 s 1000 1 3 s 12 5 s Measurement buffer memory read after RDT command collective read out Cond...

Page 282: ... change time 5 ms Source range change time Voltage source function 8 ms Current source function 24 ms Measurement range change time Voltage measurement function 8 ms Current measurement function 35 ms Measurement auto range processing time Voltage measurement function Integration time 8 ms Current measurement function Integration time 35 ms Source mode Source value Execution time Pulse Pulse value...

Page 283: ...DIMENSIONAL OUTLINE DRAWING Unit mm NOTE This drawing shows external dimensions of this instrument The difference in products and options used can cause a change in the appearance DIMENSIONAL OUTLINE DRAWING ...

Page 284: ......

Page 285: ...ions 7 1 8 3 CONST 4 10 Current Measurement Calibration 8 13 Current Source Current Limiter Calibration 8 13 D Data Output Format Talker Format 6 18 Data Set 4 9 DC Measurement 2 34 Difference in Period Parameter for Pulse Source and Sweep Source 5 73 Diode Measurement 3 1 Disp Digit 4 9 Disp Unit 4 9 Display Section 2 2 Displaying and Outputting of Limiter Detection 5 45 DOWN Key Source Range 4 3...

Page 286: ...4 Menu Operation 2 24 Menu Structure and Parameter Setting 2 27 Mfunc Link 4 9 Middle Val 4 7 Minimum 4 10 MODE Key Source Mode 4 15 MON Key Measurement Mode 4 15 Monitor 4 15 N Note for Output Terminals 5 1 Notes for Synchronous Operation 5 74 Notice Buz 4 14 NULL Calculation 5 54 Null Value 4 10 NULL SEL Key 4 16 O Operating Check 1 10 Operating Environment 1 5 Operating Multiple 6240B 5 62 OPER...

Page 287: ...arameters 2 56 Scaling Calculation 5 55 Scaling SW 4 10 SCL Val_A 4 10 SCL Val_B 4 10 SCL Val_C 4 10 Screen Display Annotations 2 7 Selecting Interface 6 1 Self Test 4 14 5 70 Serial Connection 5 65 Setting GPIB 6 7 Setting Limit Values 2 20 Setting Limiters 5 44 Setting Source Value Using Direct Input Mode 2 18 Setting the source value 2 12 Setting the Source Value Using the Cursor Keys Rotary Kn...

Page 288: ...ethod 7 1 TIME 4 7 Total 4 10 TRIG SWP STOP Key Trigger Sweep Stop 4 18 TRIGGER Section 2 4 U UP Key Source Range 4 18 USB 6 8 USB Id 4 13 USB Specifications 6 8 Using Interface 6 1 V View Mx Mn 4 10 Voltage Measurement Calibration 8 12 Voltage Source Voltage Limiter Calibration 8 11 VS IS Key Source Function 4 19 W Warm up Time 1 14 When Problems Occur Before Requesting Repairs A 1 ...

Page 289: ...will be a period of one year commencing on the delivery date of the Product 3 If the Product is found to be defective during the Warranty Period ADC CORPORATION will at its option and in its sole and absolute discretion either a repair the defective Product or part or component thereof or b replace the defective Product or part or component thereof in either case at ADC CORPORATION s sole cost and...

Page 290: ...AMAGES AND WHETHER ARISING OUT OF BREACH OF CONTRACT WARRANTY TORT INCLUDING WITHOUT LIMITATION NEGLIGENCE STRICT LIABILITY INDEMNITY CONTRIBUTION OR OTHERWISE CLAIM FOR DAMAGE IN SHIPMENT TO ORIGINAL BUYER The product should be thoroughly inspected immediately upon original delivery to buyer If the product is damaged in any way a claim should be filed by the buyer with carrier immediately CUSTOME...

Reviews: