5
If the switch is ON, that means the power is on and the compensator is working.
If the switch (5) is in intermediate position, that means the power is opened,the
compensation is still locked, but it will not warn if you issue the slope. It’s
the hand-mode. If the switch (5) is OFF, that means that the instrument is
off, the compensator is also locked.
3. Press button (1) to switch the vertical and horizontal beams on. Press
button (1) once again to switch 2 vertical beam son. Press button (1) to switch
the horizontal and vertical beams on. Switch on only necessary laser lines
in order to save battery life
.
4. Press button (2). The mode “outside” is activated. Press button (2) once
again. The tool begins to operate in “inside” mode. Use the detector of laser
beam for this mode. See the operating manual for the operation with detector.
TO CHECK THE ACCURACY
TO CHECK THE ACCURACY OF LINE LASER LEVEL (SLOPE OF PLANE)
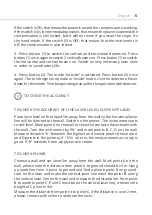
Place laser level on the tripod 5m away from the wall so the horizontal laser
line will be directed to the wall. Switch on the power. The instrument starts
to self-level. Mark point A on the wall to show the contact of laser beam with
the wall. Turn the instrument by 90° and mark points В, С, D on the wall.
Measure distance “h” between the highest and lowest points (these are A
and D points in the picture). If “h”is ≤ 6 mm, the measurement accuracy is
good. If “h” exceeds 6 mm, apply service center.
TO CHECK PLUMB
Choose a wall and set laser 5m away from the wall. Mark point A on the
wall, please note the distance from point A to ground should be 3m. Hang
a plumb line from A point to ground and find a plumb point B on ground.
turn on the laser and make the vertical laser line meet the point B, along
the vertical laser line on the wall and measure the distance 3m from point
B to another point C. Point C must be on the vertical laser line, it means the
height of C point is 3m.
Measure the distance from point A to point C, if the distance is over 2 mm,
please, contact with seller to calibrate the laser.
English
3
Summary of Contents for CUBE 3-360
Page 2: ...2 English 1 2 3 4 6 6 7 5 3 4 8 2 1 360 eVer cal Line 360 eVer cal Line 360 eHorizontal Line...
Page 10: ...10 Russian 2 1 V 2 3 4 1 4 5 ON X OFF 6 7 8 1 2...
Page 11: ...11 Russian CUBE 3 360 1 5 2 5 ON ON 5 5 OFF 3 1 1 2 1...
Page 12: ...12 4 2 2 5 90 D h D h 6 h 6 5 2 5 3 10 3 Russian...
Page 13: ...13 50 20 50 Russian...
Page 14: ...14 2 2 DIN IEC 60825 1 2007 2 4 Russian...
Page 15: ...15 1 2 3 Russian...
Page 16: ...16 4 5 6 7 8 9 Russian...


