


Acuity Brands | One Lithonia Way Conyers, GA 30012 | Phone: 800.535.2465 | www.acuitycontrols.com | © 2019 Acuity Brands Lighting, Inc. | All rights reserved. | Rev. 11/14/2019
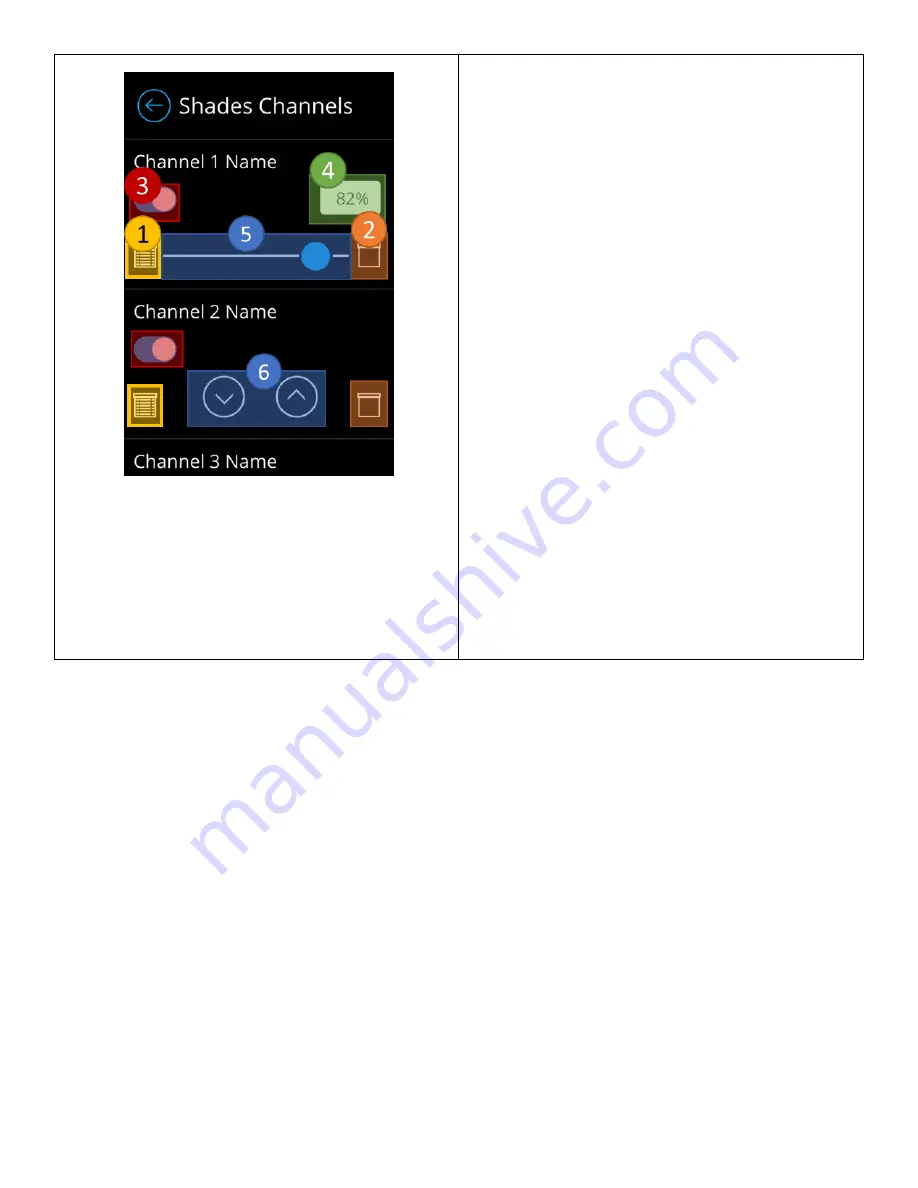
Figure 15 - Shade channel configuration screen for scenes
The shade channel configuration screen for scenes
enables administrators to choose which channels will be
controlled by the scene and configure the channel’s state.
Only channels marked as enabled by administrators,
through the technician mode screen will be affected
(Note that configuration is live
–
adjusting the control
elements will be reflected in real-time.)
1.
Close preset button
–
Used to send command to
fully close devices tracking the channel.
2.
Open preset button
–
Used to send command to
fully open devices tracking the channel.
3.
Channel assignment button
–
Used to assign and
unassign channels to the scene. Only assigned
channels will be controlled when the channel is
activated.
4.
Shade level positioning field
–
Reflects the shade
position of the slider. When tapped, allows
administrators to enter a precise position value.
5.
Position slider control
–
Used to align the shade
channel’s position based on slide value.
6.
Raise/Lower control
–
Individual buttons used to
raise and lower light levels
a.
Exact light/shade levels are not sent
when tapping these control elements,
devices tracking these channels only
receive the commands to raise/lower by
a rate of 5%.
b.
Available only for light channels of
control type “Raise/Lower”
Creating a New Scene
Scenes are created by administrators through the scene control dashboard.
Figure 17
depicts the workflow for
creation of a new scene. Note: You must be logged in as an administrator to gain access to create scenes. Refer to the
section labeled “
Logging in as Administrator
”
for assistance in log in.