Acuity Brands nLight UNITOUCH User Manual Download Page 14

Acuity Brands | One Lithonia Way Conyers, GA 30012 | Phone: 800.535.2465 | www.acuitycontrols.com | © 2019 Acuity Brands Lighting, Inc. | All rights reserved. | Rev. 11/14/2019 

Viewing a Scene 

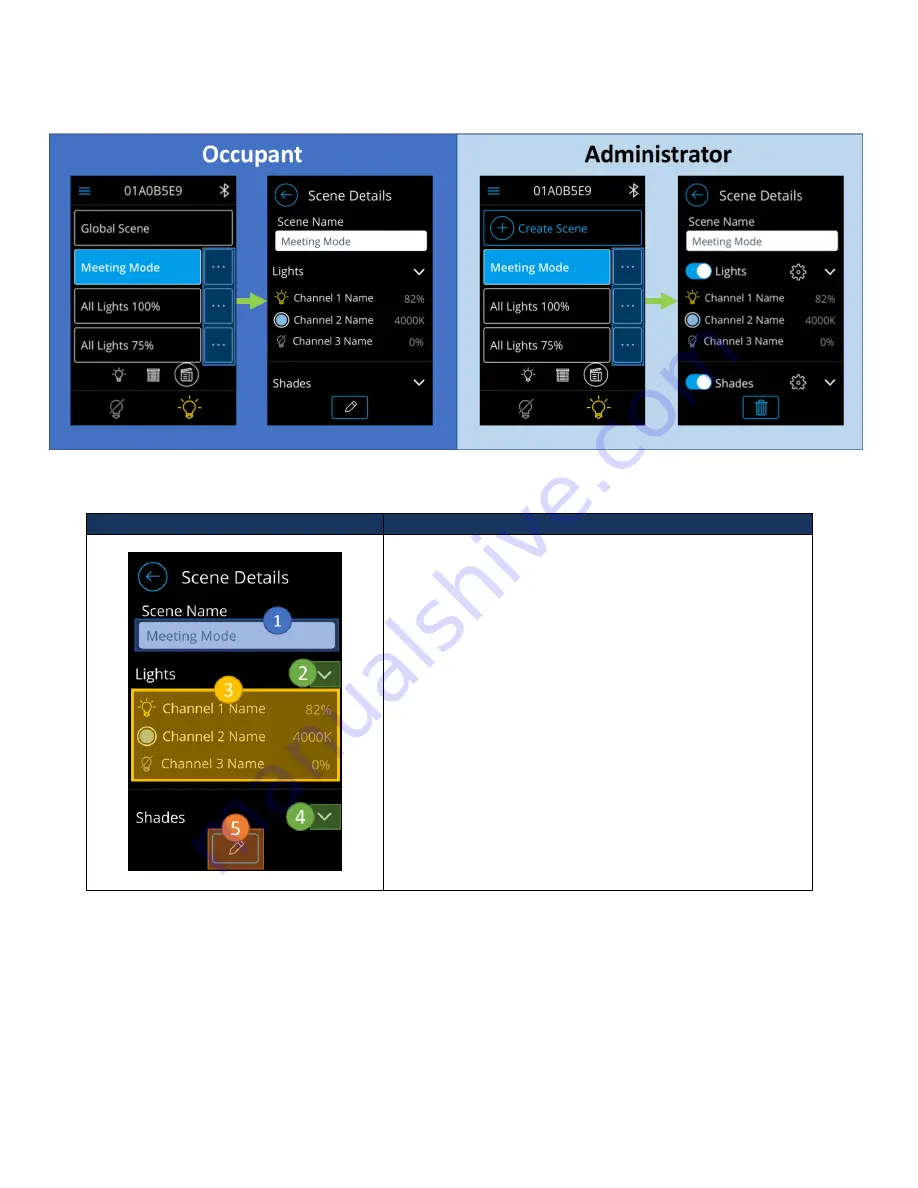
Details of a local preset scene can be viewed by clicking on the buttons highlighted in blue. This action should transition 
users to the scene detail screen. Note: Details of global scenes cannot be viewed on the nLight UNITOUCH. 


Screen 

Description 


The detail view of a scene displays light and shade channels 
that have been assigned to the scene and their designated 
states.  

1.


Scene Name 

 Section designated to display the 

name of the current scene. 

2.


Light channel expand/collapse button 

 Used to 

expand and collapse the list of light and CCT channels 
configured to be controlled in this scene. 

3.


Configured light/CCT channel list 

 Displays light/CCT 

channels assigned to this scene and the state 
activating the scene will set the lights to.  

4.


Shade channel expand/collapse button 

 Used to 

expand and collapse the list of shade channels 
configured to this scene. 

5.


Scene Edit button 

 Button to initiate editing of 

current scene. Upon tapping, users will be prompted 
to login and edit the scene as administrators.  


Editing a Scene 

To edit a scene, one must be logged in as an administrator. Refer 

to the section labeled “Logging in as 

Administrator

” for login information. 

From the screen edit screen, Figure 13, administrators can modify the name of a 

Figure 12 - Transition from scene list screen into a screen detail


Summary of Contents for nLight UNITOUCH

Page 1: ...NLIGHT UNITOUCH USER MANUAL 2 0...

Page 2: ...Administrator 9 Logging out of Administrator 10 Main Dashboard Screens 10 Light Control Dashboard 11 Light Channel Control List 12 Scene Control Dashboard 13 Activating a Scene 13 Viewing a Scene 14...

Page 3: ...Acuity Brands One Lithonia Way Conyers GA 30012 Phone 800 535 2465 www acuitycontrols com 2019 Acuity Brands Lighting Inc All rights reserved Rev 11 14 2019 Enabling a channel 38...

Page 4: ...NITOUCH is an easy to install wall switch that enables control of nLight enabled devices scenes shades and channels behind a multi user access level architecture The nLight UNITOUCH allows wireless co...

Page 5: ...icing to avoid electric shock Comply with all network and power supply guidelines outlined in the Network Guide Use the screws wall anchors and wire nuts included for wall mounting and wiring All wiri...

Page 6: ...g or during operation Discharge accumulated static electricity by touching one s hand to a well grounded object before working with the device For proper installation and subsequent operation of the d...

Page 7: ...Lights On 50 o Lights On 25 o Lights Off User Levels The nLight UNITOUCH supports two primary user types User Type Description Administrator Administrator can access all the features in the device Th...

Page 8: ...nfigurable through the settings menu as an administrator or through SensorView Initial Configuration Users are greeted with a welcome followed by admin PIN creation and confirmation screens As a stand...

Page 9: ...11 14 2019 Figure 5 Initial Bluetooth PIN setup process Logging in as Administrator The login interface can be accessed through the hamburger menu and the selection to either navigate to the Settings...

Page 10: ...ors can log out of the unit by tapping on the Log out button in the hamburger menu See Figure 7 Figure 7 Log out of Administrator mode Administrators are also logged out when the unit times out and tr...

Page 11: ...more details about the individual scenes This screen also allows administrators the ability to create new scenes The shade control dashboard allows users the ability to control devices tracking the fi...

Page 12: ...nnel setting 4 Slider control Used to slide the dim the channel s light level a Available only for channels of control type Slider 5 CCT slider control Used to slide the kelvin temperature levels of d...

Page 13: ...local preset scenes and global scenes Only local preset scenes can show more details and are editable Figure 8 Scene Dashboard Figure 9 Main Scene Screen logged in as an administrator Activating a Sce...

Page 14: ...expand collapse button Used to expand and collapse the list of light and CCT channels configured to be controlled in this scene 3 Configured light CCT channel list Displays light CCT channels assigned...

Page 15: ...list of light CCT channels configured to this scene 3 Configured light channel list Displays light CCT channels assigned to this scene and the state activating the scene will set the levels to 4 Shade...

Page 16: ...Acuity Brands One Lithonia Way Conyers GA 30012 Phone 800 535 2465 www acuitycontrols com 2019 Acuity Brands Lighting Inc All rights reserved Rev 11 14 2019...

Page 17: ...e Only assigned channels will be controlled when the channel is activated 4 Light level intensity field Reflects the light level of the slider When tapped allows administrators to enter precise light...

Page 18: ...Used to assign and unassign channels to the scene Only assigned channels will be controlled when the channel is activated 4 Shade level positioning field Reflects the shade position of the slider When...

Page 19: ...5 www acuitycontrols com 2019 Acuity Brands Lighting Inc All rights reserved Rev 11 14 2019 Deleting a Scene Scenes can be deleted through accessing their detail views as an administrator Figure 16 Wo...

Page 20: ...irst enabled shade channel s control type and only allows control of the first enabled shade channel Figure 18 Shade channel home screen Control Type Home Screen Description Slider From this view user...

Page 21: ...ly control shade channels Only channels that have been enabled by the administrator will appear on this screen for control To enable a channel to appear on this screen refer to Screen Description The...

Page 22: ...ian mode configurations The hamburger menu can be accessed by clicking on the hamburger sign in the dashboard screens Figure 20 Hamburger menu About The About Figure 17 can be accessed through the ham...

Page 23: ...by the following workflow From the main dashboard 1 Press the hamburger button on the top left a Sidebar should appear 2 Press the About button Settings The Settings screen Figure 18 can be accessed t...

Page 24: ...he administrator PIN Screen Description The following element blocks allow configuration of the UNITOUCH 5 Display Enables device display configurations from inactivity timeout behaviors screen savers...

Page 25: ...ensaver will appear when the screensaver time out is reached a Note Custom screensavers must be uploaded through SensorView If no custom screensaver is uploaded to the device a blank screen will appea...

Page 26: ...ge Admin PIN Initiating this control kicks off the Administrator PIN changing process 2 Require on wake up Enables and disables the lockout PIN entry requirement By enabling screen lockout users will...

Page 27: ...nge workflow Factory Reset The UNITOUCH allows on screen factory reset through the Settings screen as well as reset through SensorView The on screen factory reset can be triggered using the following...

Page 28: ...ode screen The Technician Mode screen can be accessed through the hamburger menu by the following workflow From the main dashboard 1 Press the hamburger button on the top left a Sidebar should appear...

Page 29: ...from being viewable in the main dashboard screens 1 Channel display toggle Used to enable disable a channel from appearing in main dashboard screens and configurations These screens include the Light...

Page 30: ...n the Shades Dashboard CCT When channel of this type is enabled it appears in the Lights Dashboard Administrators are also required to enter minimum and maximum Kelvin temperature None Channels of thi...

Page 31: ...ggle button associates the device to track the channel 3 Curtsy Identify button Signals the device to enter curtsy identify mode Channel Inputs The channel inputs screen is used for association of inp...

Page 32: ...ited on screen configuration of switch input devices connected to the same lighting control zone Through the unit administrators can program input devices to modify the device names and the channels t...

Page 33: ...identify mode 2 Device Detail button Transitions the to the device detail screen Device Detail From the Device Detail screen users can configure an individual device to the extent below 1 Name Field...

Page 34: ...l 1 Channel Selection button Radio button to select the channel the device will be broadcasting to Outputs The nLight UNITOUCH allows limited on screen configuration of output devices connected to the...

Page 35: ...s the device to enter curtsy identify mode 2 Device Detail button Transitions the to the device detail screen Device Detail From the Device Detail screen users can configure an individual device to th...

Page 36: ...n be configured through SensorView on an ECLYPSE controller or through an nCOMKIT From SensorView users can modify the device s settings screensaver scenes channels and more Firmware updates to the nL...

Page 37: ...omply with the following requirements Must be a supported file format JPG PNG GIF BMP TIF Must be maintain a resolution of 320x480 pixels Custom image upload process is as follows 1 Open the SensorVie...

Page 38: ...like to have enabled while ensuring that the channel s type is not set to None The process is as follows 1 Navigate to the Channels screen 2 Enable the relevant channel s 3 Navigate to the relevant ch...

Page 39: ...Settings tab See Figure 32 b Press the Visible button under the relevant WallPod s c Press the Apply Settings button to save changes 5 Ensure that the wallpods are enabled in in the Wallpods tab a Nav...

Reviews: