background image

www.acti.com

www.acti.com

User

’s Manual


89 

Advanced Configuration 

PPPoE 

The NVR allows access through Point-to-Point over Ethernet (PPPoE). 

1. 

Click 

Network 

>

 Advanced 

>

 PPPoE

2. 

Enable PPPoE by selecting the check box. 

3. 

Enter the username and password provided by your Internet Service Provider (ISP). 
Network information including IP address appears when dial-up


succeeds. 

NOTE:

 If your NVR has multiple NICs, PPPoE dial-up will be implemented through the NIC 

specified as the default route. 


4. 

Click 

Apply 

to save the settings. 


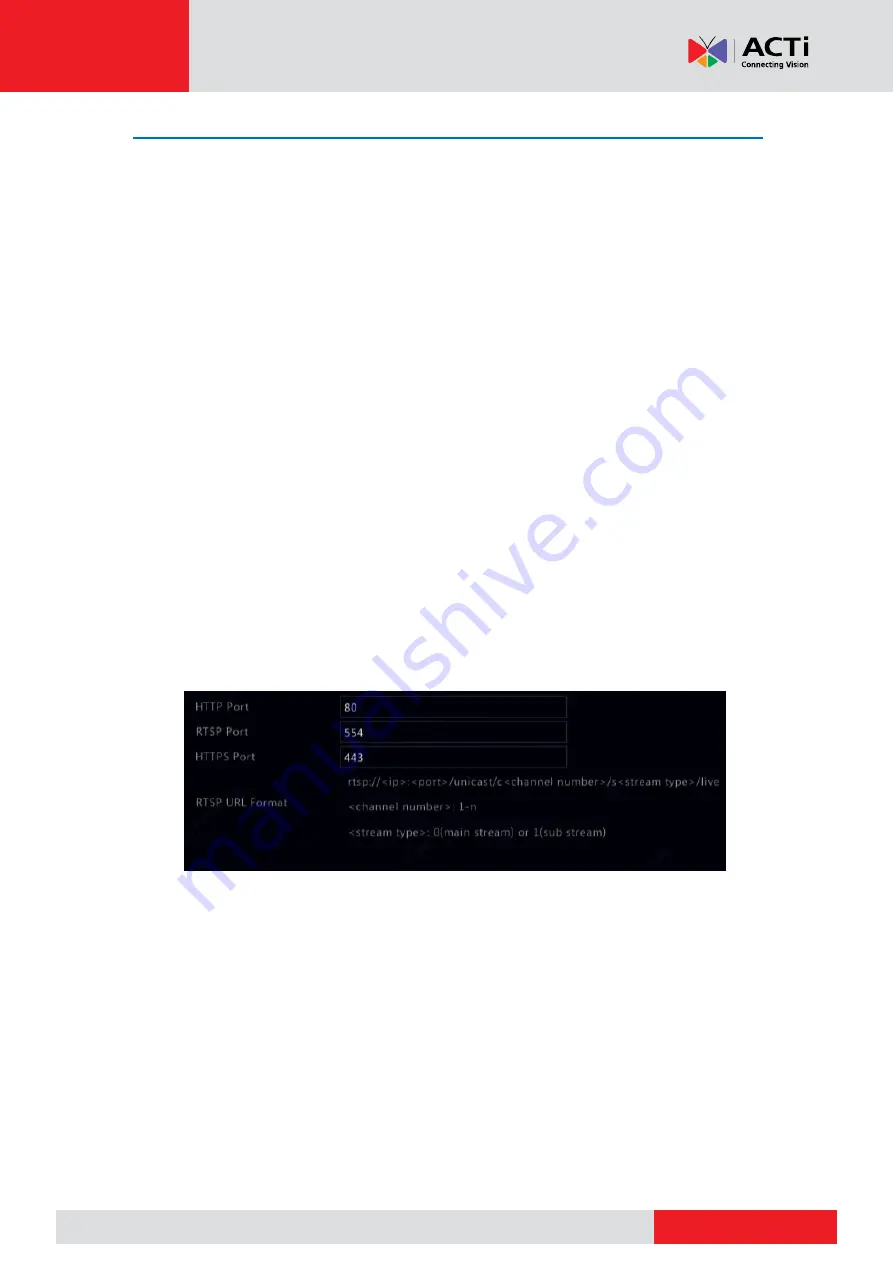
Port 

Normally the default port numbers need no modification. This function is mainly used together 
with the port mapping function. See 

Adding an IP Device

 for more details. 


1. 

Click 

Network

 >

 Advanced 

>

 Port

2. 

Configure ports as planned. Each port number must be unique. 


NOTE: 


A valid port number ranges from 1 to 65535, among which 21, 23, 2000, 3702 and 
60000 are reserved. 


An RTSP URL can be used to view live video of a channel of the current NVR from 
another NVR. See Option 5 i

Adding an IP Device

 for more information. 


3. 

Click 

Apply

 to save the settings. 


Summary of Contents for ZNR Series

Page 1: ...User s Manual ZNR Series ZNR 126 ZNR 127 ZNR 423 2021 07 20...

Page 2: ...orts and LEDs 12 Login 13 Local Operations 13 Initial Configuration 16 Preparation 16 Device Login 16 Wizard 18 Live View 20 Live View Status 20 Window Toolbar 20 Screen Toolbar 21 Shortcut Menu 21 Se...

Page 3: ...52 Holiday Recording and Snapshot 53 Other Recording and Snapshot Types 54 Playback 55 Instant Playback 55 Playback Toolbar 55 Playback by Camera and Date 56 Playback in Corridor Mode 58 Playback by T...

Page 4: ...Allocation 95 Advanced Configuration 96 System Configuration 97 Basic Configuration 97 Time Configuration 97 User Configuration 99 Security Configuration 100 System Maintenance 102 System Information...

Page 5: ...www acti com www acti com User s Manual 4 Appendix A Typical Applications 116 Typical Application 1 116 Typical Application 2 116 Appendix B Acronyms 117 Appendix C FAQs 118...

Page 6: ...ions carefully before starting installation and operation Installation and maintenance must be performed by qualified personnel This device is a class A product and may cause radio interference Take m...

Page 7: ...h case the user will be required to correct the interference at his own expense This product complies with Part 15 of the FCC Rules Operation is subject to the following two conditions This device may...

Page 8: ...the NVR and is installed with a web browser You just need to navigate to the NVR s IP address and log in to the Web interface like you log in to the system locally This section describes local operat...

Page 9: ...not install across the lines An 8 HDD device has two 2 mounting plates Take out the mounting plates secure all disks on the mounting plates and then fix the mounting plates in the device The dotted l...

Page 10: ...Loosen the screws on the rear and side panels Remove the cover 2 Connect the data and power cables to the disk 3 Loosen the screws on the disk halfway 4 Slide the disk in the screw holes and then tigh...

Page 11: ...tighten the screws Four or Eight Hard Disk Installation 1 Loosen the screws on the rear panel Then press with both thumbs and slide open the cover 2 Loosen the screws on both sides and take out the m...

Page 12: ...the mounting plate back in place 5 Tighten screws on both sides to secure the mounting plate 6 Connect the power and data cables to the disk Connect the cable to the mother board 7 Put the cover back...

Page 13: ...cating device code ALM Alarm Steady on Device alarm occurred CLOUD Steady on Connected to cloud HD Hard disk One HD LED only Steady on No disk or disk is abnormal Blinks Reading or writing data One HD...

Page 14: ...our password and then click Login Local Operations You can refer to Initial Configuration and complete a quick configuration NOTE Unless otherwise specified all operations described in this manual are...

Page 15: ...button to start up or shut down the NVR To shut down press this button and hold for at least 3 seconds till a message appears on your monitor Click Yes NOTE This shutdown operation can be performed on...

Page 16: ...or Z Enter 0 or a space Delete Switch the input method Auxiliary function button Exit the current window Switch to the next tab Switch windows or menu items or control rotation directions of a PTZ ca...

Page 17: ...HDMI interface on the rear panel of the NVR Verify that the hard disk s are correctly installed For detailed steps to install a hard disk please refer to the quick guide shipped with your NVR Device...

Page 18: ...cti com www acti com User s Manual 17 2 Change the password into a strong one then click OK 3 Set the unlock pattern NOTE To disable the unlock pattern click System User See User Configuration for det...

Page 19: ...te the most basic setup The wizard may vary with device model and other factors The following shows an example 1 Enable or disable the wizard as needed and then click Next You may also click Number 2...

Page 20: ...device list click Add and then click Yes to complete the configuration NOTE The devices added can get online and start live only if the device password is default If not you need to modify the device...

Page 21: ...g Click to play video recorded during the past 5 minutes and 30 seconds Zoom in on an area of interest Click to edit image settings Click to set OSD Click to take a snapshot The window borders will fl...

Page 22: ...camera status Rest the mouse pointer on it to view NIC card information Or click this icon to edit basic network settings Rest the mouse pointer on it to view the date Or click this icon to edit time...

Page 23: ...n list under System Preview To display images in corridor mode the camera must be installed correctly rotated 90 clockwise or counterclockwise and then use the Image Rotation parameter under Camera Im...

Page 24: ...n a 4 window screen layout 1 Click 4 Windows on the screen toolbar NOTE The number of windows that can be displayed may vary with NVR model 2 Click Start Sequence on the screen toolbar Sequence starts...

Page 25: ...oll wheel to zoom in and out 3 Right click to exit zoom Image Configuration Adjust image settings to get optimal images from a camera 1 Click the window and then click on the window toolbar 2 Select a...

Page 26: ...Preview Configuration Each preview window window for short links to a camera By default window 1 links to camera D1 window 2 links to camera D2 and so on You may want to change the link to display liv...

Page 27: ...User s Manual 26 Advanced Configuration Click the Advanced tab and then select Sub Stream First so the NVR uses the sub stream to establish live video from multiple cameras simultaneously This functi...

Page 28: ...o one NVR only An IP device managed by multiple NVRs may cause unwanted issues Adding an IP Device This section provides multiple options to add an IP device Some options are only applicable to certai...

Page 29: ...xample when the NVR and the IP device are connected across the Internet NOTE First you need to enable port mapping at Setup Port Port Mapping on the IP device web interface 1 Click Camera Camera click...

Page 30: ...e current channel links to and you may change the address so the channel links to another device The username and password must be consistent with that of the IP camera 2 Click to delete an IP device...

Page 31: ...k whether password is changed successfully in Status window NOTE The cameras can be added to NVR successfully only when authentication password is correct 5 Click OK Fisheye Configuration Only certain...

Page 32: ...ing and desktop mounting modes use the same dewarping method Mounting Mode Display Mode Description Ceiling Mount Desktop Mount Original Image 360 Panoramic 1PTZ 180 Panoramic Fisheye 3PTZ Fisheye 4PT...

Page 33: ...an example On a PTZ image drag the mouse to rotate the image or use the scroll wheel to zoom in or out A box appears on the fisheye image as the image rotates and as you drag the box or move the scro...

Page 34: ...elect the target camera and click enter the new password then click Confirm To change the password of cameras in batch select the target cameras and click Enter the new password then click Confirm NOT...

Page 35: ...needed If the camera name is less than 20 characters and camera name and OSD Camera Name i e the camera name you want to overlay on video image are same i Select Sync OSD Camera Name then then the OSD...

Page 36: ...save the settings Image Configuration 1 Click Camera Image 2 Select the desired camera and scene 3 Adjust settings on the tabs as needed to achieve optimal images See the following sections for detail...

Page 37: ...to improve image quality Image Rotation Normal Displays images without rotation Flip Vertical Displays images flipped vertically Flip Horizontal Displays images flipped horizontally 180 Displays image...

Page 38: ...ng to the ambient lighting condition to output optimum images Night The camera outputs high quality black and white images according to the ambient lighting condition Day The camera outputs high quali...

Page 39: ...nce Adjust the red or blue offset of the image Auto The camera adjusts the red or blue offset automatically according to the lighting condition the color tends to be blue Finetune Allow you to adjust...

Page 40: ...viewed and recorded Multiple mask areas are allowed 1 Click Camera Privacy Mask 2 Select the desired camera select Enable Privacy Mask click Add Area and then use the mouse to specify areas to mask Up...

Page 41: ...PTZ camera NOTE You can also zoom in or out using the scroll wheel on your mouse Control the rotation speed of the camera 1 means the slowest and 9 means the fastest Click to display the PTZ Managemen...

Page 42: ...Management window For the detailed steps see PTZ Control Window and PTZ Management Window 2 Add presets a Click the directional buttons to steer the PTZ camera to the desired position b Adjust the zo...

Page 43: ...as follows 2 Select a preset from the drop down list set the duration time the camera stays at the preset unit second and then set the rotation speed 1 slowest 9 fastest Click OK to save the settings...

Page 44: ...m focus iris as needed during the process 2 Click to stop recording All the patrol actions have been recorded 3 To start the recorded patrol click Click to stop Setting Auto Guard Use auto guard so th...

Page 45: ...e camera first Click Camera Encoding Select the camera and then edit settings as needed Some parameters are described in the table below Encoding Settings Parameter Description Storage Mode Main Strea...

Page 46: ...less of whether or not there is motion in the image VBR is ideal when high quality is a requirement especially when there is motion in the picture Bit Rate Kbps Number of bits transferred per second S...

Page 47: ...mage Quality High Medium or Low resolution Snapshot Interval The time interval between two snapshots 3 Click Apply to save the settings Draw or Edit a Schedule Make a recording or snapshot schedule by...

Page 48: ...cameras Scheduled Recording and Snapshot Scheduled Recording Scheduled recording records video according to the set schedule and it is different from manual recording and alarm triggered recording A 2...

Page 49: ...tion and then enable it An alarm icon appears in the upper right corner when motion is detected 3 In the preview window on the left side click and drag your mouse to specify a motion detection area re...

Page 50: ...ps 1 to 3 in Motion Detection Recording for details and then proceed with the following steps 1 Set motion detection snapshot under Alarm Motion click right to Trigger Actions In the window displayed...

Page 51: ...y open or N C normally closed trigger mode and then click OK NOTE To apply the same settings to other camera s click Copy and then select the desired camera s 3 Set alarm triggered recording click und...

Page 52: ...ee steps 1 to 2 in Alarm Triggered Recording for details and then proceed with the following steps 1 Set alarm triggered snapshot Click under Trigger Actions In the window displayed click the Snapshot...

Page 53: ...in the shortcut menu Click the Manual Recording tab select the desired camera and then click Start To stop manual recording select the camera and then click Stop Manual Snapshot Manual snapshot is si...

Page 54: ...ay name start and end dates By default a holiday is enabled when added and does not repeat 3 Click OK The holiday appears in the list 4 Click Storage Recording and then set a recording schedule as des...

Page 55: ...triggered only when a motion detection alarm AND an input alarm occur simultaneously Motion detection OR alarm triggered M or A for short recording or snapshot is triggered when a motion detection ala...

Page 56: ...ith the current timeline Exit the Playback screen first and then go back and continue with the Live Playback Playback Toolbar Playback Toolbar Buttons Button Description Show playback progress NOTE A...

Page 57: ...era and date 1 Click on the preview window then right click the mouse and then choose Playback to start playback NOTE In the playback window you can select multiple cameras for synchronous playback Cl...

Page 58: ...www acti com www acti com User s Manual 57 In the drop down list right click to playback mode HD means video recorded with the main or sub stream SD means video recorded with the third stream...

Page 59: ...d during playback Adding a Tag 1 Right click and then click choose Playback 2 Click on the windown toolbar and then set the tag name 3 To manage the added tags click and then rename or delete tags as...

Page 60: ...nabled and alarm triggered recording has been configured before you use this function See Video Loss and Alarm Triggered Actions for details 1 In the playback window click Video Retrieval select Video...

Page 61: ...ve 1 In the playback window click on the screen toolbar 2 Click Refresh and then wait for the NVR to read the external storage device 3 Select the desired recording file and then click to start playba...

Page 62: ...ick Backup to save them to the storage device NOTE The image resolution depends on the resolution from the output interface and the number of windows displayed when the snapshot is taken 2 Lock files...

Page 63: ...lay recording files in this window 3 Select the desired recording s and then click Backup 4 Select a destination in the USB storage device and then click Backup The recording s will be saved to the sp...

Page 64: ...ination in the USB storage device and then click Backup The selected video clips are saved to the specified directory Image Backup The default format of image backup is JPG 1 Click Backup Image 2 Set...

Page 65: ...C trigger mode and then click OK 4 Click under Trigger Actions and then set action s to trigger For more details see Alarm Triggered Actions NOTE The default schedule is 24x7 You may change it as need...

Page 66: ...under Edit for the desired camera and then set the default status and duration After you have completed the settings click OK 3 Click under Arming Schedule and then set the time when actions will be...

Page 67: ...slider to set detection sensitivity target object size and duration The higher the sensitivity the more likely a moving object will be detected 4 Click right to Trigger Actions and set action s to tr...

Page 68: ...t to Trigger Actions and set action s to trigger For more details see Alarm Triggered Actions 4 Optional Click right to Arming Schedule and then set the time when actions will be triggered 5 Optional...

Page 69: ...rm occurs when the NVR loses video signals from a camera Video loss alarm is enabled by default 1 Click Alarm Video Loss To disable video loss alarm for a channel click which then changes to 2 Click u...

Page 70: ...llegal Access A failed login attempt for a username that does not exist or a password that is incorrect Network Disconnected Network connection is lost IP Conflict Devices on the network use the same...

Page 71: ...tion type and adjust the settings as needed Detection Type Description Sudden Rise An alarm occurs when the rise of volume exceeds the set value Sudden Fall An alarm occurs when the fall of volume exc...

Page 72: ...dow pops up when an alarm occurs Alarm Triggered Recording The NVR records video from a specified camera when an alarm occurs Alarm Triggered Snapshot The NVR takes a snapshot when an alarm occurs Ala...

Page 73: ...www acti com www acti com User s Manual 72 Manual Buzzer Follow the steps to stop the buzzer manually 1 Click Manual Alarm Buzzer 2 Select the buzzer in Started status and then click Stop...

Page 74: ...The checkbox of a function that is grayed out means that the function is not supported by the camera or the NVR NVR Side Analysis depends on the device capability Click VCA Config Intelligence Usage t...

Page 75: ...o pupils The face with pupillary distance smaller than the value will not be captured Number of Snapshots the total number of snapshots to take for a face during the detection Up to 30 snapshots are a...

Page 76: ...also use the default list 3 Import face pictures You may choose to add a single piece of face data or import a file containing face data a Import a file containing face data i Click Export Template t...

Page 77: ...n select the face image and enter the required information in Add Face Info window 4 Configure monitoring task for face recognition a Click Add Monitoring Task and complete the settings of monitoring...

Page 78: ...ions for details 5 View face comparison results In preview window click on the screen toolbar Click Preview Mode Smart then face recognition results are displayed on the right side NOTE In Smart mode...

Page 79: ...sensitivity threshold and percentage Up to four areas are allowed The threshold means the minimum length of time an object stays in the detection area s The percentage means the proportion of target...

Page 80: ...tion 2 Select the camera and then select Enable to enable cross line detection 3 Draw detection line s Up to four are allowed Set detection rules including entrance direction sensitivity 4 Click right...

Page 81: ...rection and sensitivity as needed 3 By selecting Enable Clear by Schedule you can have people counting OSD reset at a specificied time every day You may also click Clear Counting Result to clear the O...

Page 82: ...Arming Schedule and then set the time when actions will be triggered 3 Set detection sensitivity and then click Apply to save the settings Auto Tracking Auto tracking detects moving objects in the sce...

Page 83: ...king and thus attends to the whole scene 4 Click Apply to save the settings Object Left Behind Detect object left behind in specified areas and trigger an alarm 1 Click to draw the detection area NOTE...

Page 84: ...ed 2 Set the sensitivity and time threshold Sensitivity The higher the sensitivity the more likely an object removed will de detected Time Threshold An alarm will be triggered when the length of time...

Page 85: ...ted around 10 seconds before and after click the play button The following shows an example Behavior Search Use behavioir search to search for line crossing intrusion enter area and leave area detecti...

Page 86: ...ou can choose a working mode if your NVR has two NICs Multi address mode The two NICs work independently and can be configured separately Either NIC can be chosen as the default route and data will be...

Page 87: ...ects to the ISP server without your awareness This is inconvenient when you remotely access your NVR with an IP address To avoid this issue you can register with an DDNS server to obtain a domain name...

Page 88: ...to the Internet may be required Only certain NVR models support this function 1 Click Network Basic Email 2 Configure the related parameters If server authentication is required you need to enter the...

Page 89: ...orm to access the NVR and encryption password for encrypting data sent from the NVR to the platform 3 Click Apply Alarm Service Use this function to send alarm signals to an external alarm device for...

Page 90: ...ed through the NIC specified as the default route 4 Click Apply to save the settings Port Normally the default port numbers need no modification This function is mainly used together with the port map...

Page 91: ...the NVR can be mapped automatically to the router and computers can access your NVR from outside the LAN 1 Click Network Advanced Port Mapping 2 UPnP is enabled by default Select the desired mapping...

Page 92: ...e the same internal and external ports for the NVR and the router 1 Click Network Advanced Port Mapping 2 Select Manual for Mapping Mode and then set external ports manually 3 Click Apply to save the...

Page 93: ...reate the directory first and then create folders by IP time and camera 4 Select the desired camera and then click right to Upload Schedule In the Upload Schedule window select the desired image type...

Page 94: ...ive View Protocol to Multicast under Setup Client NOTE Set the multicast IP correctly Multicast address is class D address with the range 224 0 0 0 through 239 255 255 255 some are for special use 224...

Page 95: ...Up to eight NAS disks are allowed 3 To edit disk property click and then modify disk usage recording snapshot or backup and disk property Read Write Read Only or Redundant as needed NOTE Disk property...

Page 96: ...Allocate Space 2 Select the desired camera and then set the maximum recording space and maximum image space You can select a disk group only when disk group is enabled under Storage Disk Group For mor...

Page 97: ...and its oldest recordings snapshots will be overwritten when the space is used up Other values The camera s oldest recordings snapshots will be overwritten when its allocated space is used up Stop 0 T...

Page 98: ...word If Enable Password is not selected no password is required for local login at system startup However a username and password are still required when you log in after a logout You may also set sta...

Page 99: ...ctly 3 Click Apply to save the settings Time Synchronization Use this function to synchronize camera time with the NVR Time sync is enabled by default and cameras will synchronize time with the NVR af...

Page 100: ...initial password is 123456 Default Default user reserved in the system cannot be created or deleted and only has access to live view and two way audio If the default user is denied access the corresp...

Page 101: ...IP addresses and then click Add NOTE If Blacklist is selected the NVR denies remote access from the IP address es on the list If Whitelist is selected the NVR only allows remote access from the IP ad...

Page 102: ...hanging the NIC working mode will disable ARP protection automatically 1 Click System Security ARP Protection 2 Select the desired NIC and then select Enable ARP Protection 3 Obtain the gateway s MAC...

Page 103: ...e System Info View the basic information such as the device model serial number firmware version build date and operation time Camera status Click the Camera tab to view camera status online or offlin...

Page 104: ...nd stream settings NOTE Due to automatic rounding of numbers the frame rate value may have 1 2 fps difference on what is shown on the OSD Online user Click the Online User tab for information about us...

Page 105: ...port number and IP address and then click right to the desired NIC The captured packets are saved as a backup file in the root directory of the USB storage device You may click Open to view the file N...

Page 106: ...ew playback or download may fail on the NVR Log Query Logs contain information about user performed operations and device status By analyzing logs you can keep track of device operation status and vie...

Page 107: ...ice configurations specify the destination directory and then click Export A xml file will be created in the specified directory when export is completed 3 To export maintenance information specify th...

Page 108: ...rdings and snapshots as needed Only admin can perform this operation 1 Click Maintain Auto Function 2 Set an auto restart time and choose a way to delete files automatically CAUTION Files deleted auto...

Page 109: ...he system provides three test types Short Extended and Conveyance Extended tests detect more thoroughly and thus take longer time than Short tests Conveyance tests mainly detect data transmission prob...

Page 110: ...as needed To shut down the NVR click the Home icon from the Live view and then click Shutdown Click Yes to confirm CAUTION Unsaved settings will be lost if the NVR is shut down unexpectedly for examp...

Page 111: ...a network connection to the NVR The PC uses the Windows XP Windows 7 or Windows 8 operating system A Web browser has been installed on the PC Microsoft Internet Explorer 8 0 or higher is recommended F...

Page 112: ...assword 123456 for admin and then click Login CAUTION The default password is intended only for the first login and should be changed to a strong one containing at least eight characters including upp...

Page 113: ...ows the current frame rate bit rate resolution and packet loss rate Take a snapshot Start zoom Local recording Turn on or off audio adjust sound volume Adjust MIC volume 3D positioning Open or close t...

Page 114: ...The system date is in yyyy mm dd format A local recording is named in this format IP_camera ID_S recording start time E recording end time The recording start and end times are in hh mm ss format By d...

Page 115: ...owing figure shows an example Playback Control Buttons Button Description Button Description Play Pause Stop Reverse Slow down or speed up Rewind or forward 30 seconds Rewind or forward by frame Previ...

Page 116: ...www acti com www acti com User s Manual 115 Configuration Click Setup on the top and then click the menus on the left to configure parameters...

Page 117: ...ch And you manage the NVR and the connected IP cameras through the monitor or using a web browser on the PC Typical Application 2 The NVR IP cameras and PC are connected on a private network or LAN Th...

Page 118: ...int Photographic Experts Group MTU Maximum Transfer Unit NAT Network Address Translation NIC Network Interface Card NTP Network Time Protocol NVR Network Video Recorder ONVIF Open Network Video Interf...

Page 119: ...ewer versions of the stored pages every time you visit the webpage Tools Internet Options General Settings Add your NVR s IP address to the trusted sites in your IE Tools Internet Options Security Add...

Page 120: ...and the NVR Contact your dealer for the latest versions Live view is normal but the recording cannot be found Check that a recording schedule has been properly configured Check if the time and time zo...

Page 121: ...Copyright 2021 ACTi Corporation All Rights Reserved 7F No 1 Alley 20 Lane 407 Sec 2 Ti Ding Blvd Neihu District Taipei Taiwan 114 R O C TEL 886 2 2656 2588 FAX 886 2 2656 2599 Email sales acti com...

Reviews: