background image

www.acti.com

ENR-

100 Series System Administrator’s Manual 


        65 

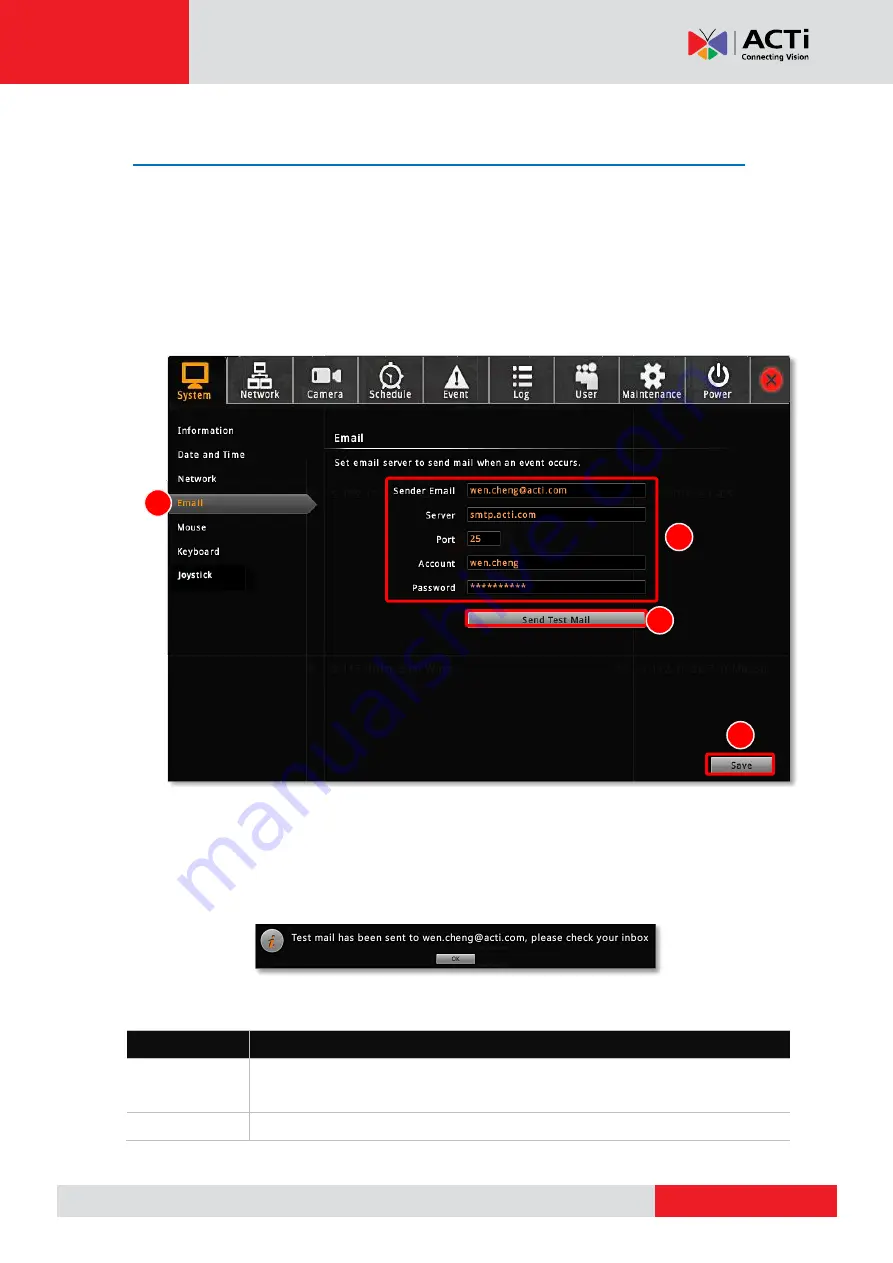
E-mail Settings 


ENR supports e-mail notification for 

Event Handling

 sent through an SMTP server. To 

enable this service, you will have to configure the SMTP mail settings in advance. For SMTP 

service, please go to 

Setup

 page 


System

 tab


Network 

and make sure the 

Default 

Gateway

 adopts the setting of the LAN connection has access to the SMTP server. 


1.


On 

Live 

screen, click 

Setup 

 Select 

System

 tab 


click “

Email

”.   


2.


Fill in 

every field

 according to the detailed instructions in the table below. 

3.


Click “

Send Test Mail

” to send a test mail to this e-mail account. If the test mail is 

sent successfully, the dialog box below will pop up, which means your ENR server is 

ready to send out e-mail notifications when being triggered by an event.   


4.


Click “

Save

” to save these properties. 


Field Name 

Description 

Sender Email 

Input the sender’s e-mail address, should the same account you set for SMTP 

server. 

Server 

Input the sender’s SMTP server address. Only alphabets, numbers, and the 

Summary of Contents for ENR-110

Page 1: ...ENR 100 Series System Administrator s Manual 2015 10 08 For V4 04 36 Firmware ENR 110 ENR 120 ENR 130 ENR 140 ENR 190...

Page 2: ...otice The English version of this document is the official one for all purpose All the translated versions are provided as a convenience Any discrepancies or differences created in the translations of...

Page 3: ...ption which can be determined by turning the equipment off and on the user is encouraged to try to correct the interference by one or more of the following measures Reorient or relocate the receiving...

Page 4: ...r is expected to know the fundamentals of IP surveillance system integration and to own the administrative privileges to install and configure all the devices You may also visit ACTi Download Center f...

Page 5: ...Audience 4 Technical Support 4 3 Table of Contents 5 4 Introduction 11 Product Overview 11 ENR Server Client Architecture 11 Remote Client PC Requirements 12 Supported Video Format 13 5 Get Started 14...

Page 6: ...ork Connection Architecture 31 LAN 1 Port 31 Connection Setting Example 1 31 LAN 2 Port 33 Connection Setting Example 2 33 Connect the Devices 35 ENR 110 120 130 35 ENR 140 36 ENR 190 37 Quick Setup 3...

Page 7: ...n PTZ Panel 55 Manipulate PTZ Movements 55 Go to Preset Points 56 Edit PTZ Preset Tour 57 Device Information 58 Network Settings 59 IP Settings 60 Change Port Setting 61 Enable DHCP Server 62 Enable D...

Page 8: ...s 86 Backup 86 Restore 87 Customize Live Screen Layout 88 Change Channel Position 88 Change Layout 88 Execute Sequence Patrol 90 Save a Customized View 90 Set a Default View 90 Customize System Langua...

Page 9: ...Live Screen Event List Setting 107 Live Page UI Overview 108 Set Cameras 110 Add Cameras 110 Copy Camera Settings 114 Delete Cameras 115 Change Camera Settings 115 A Video Format and Transmission Pro...

Page 10: ...mware 138 Backup Restore Settings 139 Backup 139 Restore 140 User Group Management 141 Add a Group 141 Edit Delete a Group 142 Add a User 143 Account Password Rules 143 Edit Delete a User 143 Joystick...

Page 11: ...m simultaneously and experience user friendly web interface customized for browser based operations ENR Server Client Architecture In a video surveillance system architecture ENR serves as service pro...

Page 12: ...eference source not found on page Error Bookmark not defined for instructions on how to achieve ideal video performance 2 PC spec requirements are the same for 32 bit and 64 bit systems 3 Microsoft Wi...

Page 13: ...n megapixel video resolution from web client interface in the meantime the video stream is recorded at your desired format regardless of the displayed quality Camera Management Export Recording Local...

Page 14: ...1 3 AC power adapter x 1 4 Hard disk screws 5 Adapter converter set x 1 For ENR 110 ENR 120 ENR 130 ENR 190 This unit contains three types of adapter plugs UK type US type and Europe type These adapte...

Page 15: ...acti com ENR 100 Series System Administrator s Manual 15 At A Glance ENR 110 120 130 Front Panel Rear Panel LED Indicators USB 2 0 Ports Reset Button Power Button HDMI Output LAN 1 LAN 2 Power Connec...

Page 16: ...www acti com ENR 100 Series System Administrator s Manual 16 ENR 140 Front Panel Rear Panel...

Page 17: ...www acti com ENR 100 Series System Administrator s Manual 17 ENR 190 Front Panel Rear Panel...

Page 18: ...the device with Power Button Turn On the Device Press down the Power Button and release the Power LED will light up and turn solid blue Turn Off the Device As this unit is powered on the Power LED an...

Page 19: ...een click Setup Power tab and click Shutdown 2 The local display screen will turn black with an information dialogue box showing up Please observe the System LED on the front panel when its orange lig...

Page 20: ...ings with Backup function and export the system logs before resetting to factory default 1 To begin turn off the device first 2 Press down the Power Button to boot up the device and immediately press...

Page 21: ...Item Indicator Status Light Color Description Power LED Solid Blue ENR 110 120 130 140 Green ENR 190 The device power is on System Status LED Lights up for three seconds after Reset Button is pressed...

Page 22: ...ystem Cameras ENR is able to automatically add the connected cameras then immediately displays their live streams without your further configurations Please fulfill the conditions below to make sure y...

Page 23: ...all FAT FAT32 EXT2 EXT3 EXT4 NTFS file systems Hard Disks For video recordings you should install at least ONE certified 3 5 inch SATA hard disk Please always use the hard disks ACTi tested to be comp...

Page 24: ...space 1 Allow a minimum of 5 cm clearance at the front and the rear for front to back airflow of the unit 2 Prepare a rack shelf or a rail kit rated for the device s weight and install that to suppor...

Page 25: ...e the physical disk locations accord with the Disk ID shown in ENR server s Storage Device List ENR 110 120 130 Step 1 Remove the Case Cover Remove the four front panel screws and then remove the thre...

Page 26: ...p1 Step3 to install Disk SATA 1 to the upper bay Remember to connect Disk SATA 1 with SATA data cable 1 shown in the illustration in Step 2 Step 4 Install the Case Cover Back Install the case in rever...

Page 27: ...er repeat the following steps to install the hard disks into the disk bays Step 1 Remove the Tray Slide the Lock Tab to the right the Hinge Tab will pop out by itself Remove the four front panel screw...

Page 28: ...inistrator s Manual 28 Step 2 Mount the Disk Mount the disk by locking it with supplied disk screws to the bottom of the tray Step 3 Install the Tray Press on Lock Tab push the tray into the bay until...

Page 29: ...ep 1 Remove the Tray Slide the Key Lock aside the Latch Lever will pop out by itself Hold the Latch Lever to pull out the tray Step 2 Mount the Disk Loosen the two screws on the tray to remove the dum...

Page 30: ...stops Press on the Latch Lever until it clicks into place Step 4 Attach the Disk Cover Lock the disk trays using provided keys and attach the dust cover to the unit s front panel Align the left end ho...

Page 31: ...bother arranging the camera IP addresses on your own By default this DHCP server is enabled so please avoid connecting ENR to a network where exits another DHCP server via this port Connection Setting...

Page 32: ...www acti com ENR 100 Series System Administrator s Manual 32 ENR 110 120 130 ENR 140 ENR 190 192 168 0 101 192 168 0 104 LAN 1 192 168 0 10 192 168 0 101 192 168 0 104 LAN 1 192 168 0 10...

Page 33: ...d by your network router from DHCP server If your network does not assign IP address automatically then LAN2 port will assume IP address 192 168 1 10 Connection Setting Example 2 The diagram below dis...

Page 34: ...heck and modify the network configurations by going to Live screen select Setup click Network tab For detailed configuration instructions please refer to Network Settings on page 59 e g 172 16 26 101...

Page 35: ...0 130 1 Connect the HDMI monitor 2 Connect the USB devices 3 Attach the network cable to LAN1 port 4 Attach the network cable to LAN2 port Optional required for remote client connection 5 Plug the pow...

Page 36: ...Connect the HDMI monitor 3 Connect the USB devices 4 Press down Power Button The power status LED will turn solid blue 5 Attach the network cables to LAN1 Port 6 Connect the network cameras to the sw...

Page 37: ...e electricity outlet 4 Press down Power Button and the power status LED will turn solid green 5 Attach the network cables to LAN1 port 6 Connect the network cameras to the switch ENR will automaticall...

Page 38: ...u through the initial setup process By finishing the quick setup you will enter live screen immediately Step 1 Log in to ENR After the device starts you will first see ACTi splash screen then system i...

Page 39: ...cessfully formatted a hard disk a message will pop out to notify you After a successful formatting the file system of the disk will show ENR FS and this disk will immediately become ready for recordin...

Page 40: ...nd streams from multi streaming devices including other brand cameras 1 Select the camera manufacturer 2 Input the Account and Password to access the cameras this user account must be the camera s roo...

Page 41: ...ur different devices and so forth to a multi channel video encoder F Stream Displays the camera s dual streaming status If this camera is in dual streaming mode this status will shows 1 2 ENR will tak...

Page 42: ...desired language from Language dropdown list Remember Login Information To have the server remember your Account Password and language setting for future check Remember me Set Auto Login Check Rememb...

Page 43: ...Control Panel Provides live onscreen PTZ controls This panel is only enabled when a PTZ camera channel is selected on live view display area E System Message Displays import messages to inform you of...

Page 44: ...u connect them to ENR via USB ports Onscreen Keyboard The onscreen keyboards allow you to input characters without using a physical one By clicking in a character field e g Account or Server name or n...

Page 45: ...e mouse s cursor speed via the path below On Live screen click Setup select System tab click Mouse Onscreen Keyboard Settings To disable the virtual keyboard if a physical one is already in use on Liv...

Page 46: ...Setup Camera tab All Cameras display all the added cameras click Add to start adding cameras Note ENR will synchronize with devices upon connecting to them To make sure the settings on ENR side are p...

Page 47: ...ns B Click Search to scan through the available video sources and select desired cameras to add by yourself This is the same quick method provided by Camera Setup Wizard please refer to Search Cameras...

Page 48: ...Administrator s Manual 48 2 Fill in the connection properties such as properties IP Address Port Username and Password and click Get Camera Settings 3 The camera settings will appear Click Save to sa...

Page 49: ...anually add a camera through RTSP protocol without to the camera brand 1 Select a Camera ID from the Camera List on the left and click Add Camera Manually RTSP 2 Fill in the properties make sure you s...

Page 50: ...ay copy an added camera s settings to another empty channel In this way it is easier to manually add more than one camera of the same models On Camera tab enter All Camera list select the cameras you...

Page 51: ...eras You may delete one channel at a time or delete more all at once On Camera tab enter All Camera list select the cameras you want to delete and click Delete To deletae multiple cameras at once you...

Page 52: ...s including Channel ID Resolution Frame Rate Protocol and Bitrate you will have to click first to sync with the camera first After configuration click Save to save this setting to camera A V B V C V N...

Page 53: ...ht values and dark values As the value increases the separation between light and dark becomes more obvious Saturation 1 100 Defines the level of the actual color intensity As it increases colors appe...

Page 54: ...tive the camera reacts to the movement The higher the sensitivity level is the smaller motion will trigger the alarm but may give false alarms Default is 70 Timer 0 300 secs The interval before the ne...

Page 55: ...screen select a PTZ channel the PTZ panel will become enabled Manipulate PTZ Movements Click the tab to enter PTZ operation mode and make make use of the device s PTZ capabilities to define a view No...

Page 56: ...d ID button Create a Presset Point 1 Go to PTZ Operation mode use onscreen buttons to define a view 2 Click the tab to enter Preset Points Operation mode 3 Click 4 Click the desired preset point ID an...

Page 57: ...k and then to enter Tour edit window 2 On Tour Setting window select a Tour from drop down list 3 Select a Preset Point from drop down list 4 Set the Dwell Time default is 10 seconds 5 Click to save t...

Page 58: ...tem Administrator s Manual 58 Device Information To change the device name check firmware version information or Mac address please go to Setup page System tab Network After modifying the System Name...

Page 59: ...ver feature which enables ENR to assign IP addresses to cameras via LAN1 or LAN2 port without another DHCP on router Go to Setup page Network tab The current settings of both LANs will be displayed he...

Page 60: ...network information Manual Please obtain a static IP address and other network information including Subnet Mask Gateway and DNS server from your network administrator DHCP Use this connection type if...

Page 61: ...to DNS Setting Primary DNS Server Secondary DNS Server The DNS server that translates domain names to actual IP addresses If this LAN is Manual mode and you will set an SMTP server for event notificat...

Page 62: ...k tab click DHCP Server 1 Check Enable and select a LAN this LAN has to be in Manual mode 2 Set the Beginning IP Address and Ending Address and click Save ENR will assign IP addresses within this rang...

Page 63: ...ts ip address to the DDNS provider s server 1 Visit the dynamic DNS service provider s website and register the domain name for your ENR ENR supports the following service providers DynDNS http www dy...

Page 64: ...hows date and time information on it On the popped out calendar select the correct date and time then click OK Synchronize with Time Zone In Time Zone section select your zone from the Time Zone drop...

Page 65: ...ve screen click Setup Select System tab click Email 2 Fill in every field according to the detailed instructions in the table below 3 Click Send Test Mail to send a test mail to this e mail account If...

Page 66: ...Gmail SMTP smtp gmail com Port 25 or 465 for SSL protocol 587 for TLS protocol Port Set the SMTP port allowed value is from 1 65535 default is 25 Account Input the name of the SMTP server account The...

Page 67: ...nel to record for another 10 minutes You may observe the disk memory and recording status on Storage page On Live screen click Setup click System tab click Storage The connected storage devices will b...

Page 68: ...etween 1 999 and click Apply 2 Default Automatic Disk Deletion This is the default file deletion rule When the total recordable disk space is full an amount of disk space for approximate ten minute lo...

Page 69: ...ck on 24 hour basis since last check This technology enables a system to monitor the disk status and anticipate disk failures helping the system administrator to prevent from unexpected outage and dat...

Page 70: ...stem log FAILED A number of errors have been found on this disk UNKNOWN Unable to get the disk information Manage Abnormal Disks A disk that is not recognized as PASSED by S M A R T check may have une...

Page 71: ...stem does not waste disk space storing meaningless parts and you save lots of effort browsing playback for specific events For the recording schedule ENR supports Schedule recording Event recording an...

Page 72: ...tself Post event Recording Buffer sec This will determine how long after the event is triggered should be included in the event recording file Set the Recording Schedule On the time table 1 Click on t...

Page 73: ...isable it during certain time period 1 Click on the recording mode No Event Handling 2 Click and drag over the Time Track to set time period 3 Click Save Copy Schedule You may copy a camera s schedule...

Page 74: ...mera site is detected Trigger during the event handing active period Schedule Each device can be involved in several event rules As different camera models possess various capabilities the supported r...

Page 75: ...ure such as Motion 1 Motion 2 Motion 3 DI 1 DI 2 Network Loss and Network Recovery Select the Event Type then click Set 2 Select the trigger type Trigger DO Set the DO to become ON or OFF upon trigger...

Page 76: ...t handing period in this way ENR can take the snapshots for motion events To enable this service you have to configure the e mail setting please refer to E mail Settings on page 65 before this trigger...

Page 77: ...he Enable to enable this function Select the camera whose live view will be enlarged on Live screen and the duration time Click OK to confirm 3 After configuring the event handling rules on Event tab...

Page 78: ...mera s event rules to other multiple cameras This saves much your time on setting up rules one by one 1 On Event tab select a source camera from camera list its rules will be copied to others 2 Click...

Page 79: ...H Products Extreme 3D Pro manufactured by Logitech 1 Connect the joystick to this unit 2 Go to Setup page System tab Joystick 3 There are 12 buttons available on each controller you may assign a funct...

Page 80: ...R will erase the earliest 100 logs On Live screen click Setup click Log tab 1 Define the time range You may choose All Days to show all the logs or choose Day Range to specify a range 2 Select Log Typ...

Page 81: ...ries System Administrator s Manual 81 Export System Log To export the logs insert a USB disk into ENR click Export and save the xml file to your local computer You may view this file on a computer wit...

Page 82: ...in ENR while a standard normal user may only be permitted to do Live monitoring On Live screen click Setup click User tab to enter Group and User management page Add a Group By default the Administra...

Page 83: ...lt the Administrator User already exists which you may not delete 1 Select User click Add to bring up Add New User window enter the Name Password Email and select its User Group from dropdown list Cli...

Page 84: ...m ENR 100 Series System Administrator s Manual 84 Edit Delete a User You may edit an existing user or delete it Select the user on User List click Edit or Delete Please always click Save before leavin...

Page 85: ...n click Setup click Maintenance tab select Firmware Upgrade 2 Click Browse find the target upg file and click Open 3 Click Upgrade During upgrading the system will stop every other activity including...

Page 86: ...ttings include the following properties 1 System Settings including System Name Date Time Network Email Mouse and Keyboard 2 Camera Settings 3 Schedule Settings and 4 Event Management The recordings w...

Page 87: ...it and the backup file is saved in the root directory 1 On Live screen click Setup click Maintenance tab click Setting Backup Restore 2 All the nvr file detected from your USB disk root directory wil...

Page 88: ...ou change it You may move a camera view to any position by dragging it to the target channel In the example below the green numbers represent the order of channels Dragged by the mouse Camera 1 will b...

Page 89: ...Camera 4 into Channel 2 Camera 6 into Channel 3 and Camera 8 into Channel 4 3 Select the 2x2 layout on Live Menu 1 2 3 4 5 6 7 8 9 Camera 2 Camera 8 Camera 4 Camera 6 Camera 2 Camera 4 Camera 6 Camera...

Page 90: ...click again Save a Customized View You may save up to five customized view on local View List A saved view will remember 1 the layout style 2 camera arrangement 3 view size stretched un stretched ful...

Page 91: ...uage file for editing Modify the Wording After the USB disk is connected 1 On Live screen click Setup click Maintenance tab click Language Adjustment 2 On Language Adjustment page below Export Languag...

Page 92: ...will pop up a window as the file is successfully imported into ENR server 6 Log in to ENR again On Login window select the UI language before you click Login 7 Check the UI to see if the modified ter...

Page 93: ...the IP address and port number of the ENR you may type in the IP address and port number directly into Internet Explorer Sample IP will look like this http 220 228 146 21 1000 or domain name http enr...

Page 94: ...s UPnP connection or ACti IP Utility Via UPnP Connection ENR supports UPnP connection This means that once the device has an IP address you will be able to find it in the local network in Windows Expl...

Page 95: ...nd all ACTi products including cameras and ENR servers Download the latest IP Utility from the link below and install it on your computer http www acti com product detail Video_Management_System ACTi_...

Page 96: ...n the password in Login window Log In Enter Account Password Account non case sensitive Admin default Password case sensitive 123456 default Change UI language To change UI language select the desired...

Page 97: ...nstallation ENR interface requires the add on ActiveX Control components please allow ActiveX controls to be downloaded and installed It is strongly recommended that 1 you add this ENR server into Int...

Page 98: ...R Setup Wizard will lead you through three essential installation steps in order that you could quickly get camera live view For video recording please remember to install hard disks and format them i...

Page 99: ...handling it is essential to configure certain system wise settings on Setup page Set System Name Go to Setup page System tab Information Modify the name of this ENR server and click Save The maximum...

Page 100: ...Daylight Saving If the device is located in an area where daylight saving time is used click the check box to enable daylight saving The time will be automatically adjusted When the daylight saving ti...

Page 101: ...ti com ENR 100 Series System Administrator s Manual 101 Synchronize with Client Computer s Time Click to synchronize the device time with the time on the computer you are using now please click this b...

Page 102: ...port without another DHCP on router By default LAN1 card uses a fixed IP address 192 168 0 10 while LAN2 is in DHCP client mode It is suggested that you connect LAN1 to LAN and connect LAN2 to WAN Cur...

Page 103: ...ill assign an IP Address to ENR and there is no need for you to define other network information Manual Please obtain a static IP address and other network information including Subnet Mask Gateway an...

Page 104: ...DDNS Service ENR has built in the DDNS update client feature which saves ENR domain name address information and actively update its ip address to the DDNS provider s server 1 Visit the dynamic DNS s...

Page 105: ...www acti com ENR 100 Series System Administrator s Manual 105 3 Check Enable select the service provider and input the Host Name User Name and Password 4 Click Save to save the settings...

Page 106: ...nder s e mail address should the same account you set for SMTP server Server Input the sender s SMTP server address Only alphabets numbers and the symbols _ are valid ENR server supports the SMTP serv...

Page 107: ...validate this configuration if this configuration is correct a test e mail will be sent to Sender Email please login your SMTP server to check incoming e mails Live Screen Event List Setting The max...

Page 108: ...isplays alerts of detected motion digital inputs and connection status D PTZ Control Panel Provides onscreen PTZ controls This panel is only enabled when a PTZ camera channel is selected on live view...

Page 109: ...s Manual 109 J Share Current View to Local Click to start sharing your current view to local screen K Screen Switch Switch to the Setup or Playback page by clicking the tags L Current System Time M To...

Page 110: ...interface also allows you to easily configure add or delete cameras without individually opening the cameras web configurator Add Cameras Go to Setup page Camera tab 1 As there is currently no camera...

Page 111: ...n Search Cameras windows input the Account and Password to access the cameras select the manufacturer and click Search After all the connected cameras are found click the cameras and then Submit to ad...

Page 112: ...ally 1 Fill in the connection properties such as properties IP Address Username and Password HTTP Port and click Get Camera Settings 2 The camera properties including Firmware version and Serial Numbe...

Page 113: ...roperties IP Address URI type RTSP Port Protocol type User name Password and click Save Note ENR will synchronize with devices upon connecting to them To make sure the settings on ENR side are prior t...

Page 114: ...tings another channel In this way it is easier to manually add more than one camera of the same models 1 On All Cameras list select an existing channel 2 Click Duplicate the selected cameras will be d...

Page 115: ...select a camera on All Cameras list to configure its individual properties A Video Format and Transmission Properties To modify the video format and transmission properties including Stream Mode Chan...

Page 116: ...is yellow frame on the view Simply use your mouse to move and resize the frame Click Apply to save the settings Adjustment Attributes Field Name Description Sensitivity 1 100 Determines how sensitive...

Page 117: ...ch is more easily to be triggered but may give more false alarms C Fine tune the Image Brightness Contrast Saturation Hue Not only details but also brightness contrast saturation and hue are essential...

Page 118: ...it decreases colors appear more gray out Hue 1 100 It is the term used to refer to the pure spectrum colors Adjust this value to find the color closest to the real scene Line Frequency 50Hz 60 Hz The...

Page 119: ...select a PTZ camera from All Cameras list and click Preset Point 1 Define a view On mini live window use the mouse to do the following PTZ operations To execute optical Panning and Tilting click anywh...

Page 120: ...With this preset tour your PTZ device can perform an automatic patrol to scan through your cared areas Before setting up Preset Tours please make sure you have configured PTZ settings and set PTZ Pres...

Page 121: ...able for a system with limited bandwidth for NVR server processes and responds to User s ePTZ manipulation or demands for changing view modes immediately without waiting for camera side to deliver a n...

Page 122: ...ion PTZ Navigation Original View The very raw fisheye view Digital PTZ Dewarping One large user defined cropped area ePTZ Panorama 360 degree panorama view for ceiling mount 180 degree panorama view f...

Page 123: ...After the configuration is done remember to click Save to save the settings 1 2 1 2 3 4 Note 1 Local Live and Playback can only display the original video stream output from a fisheye camera 2 Whiche...

Page 124: ...The schedule is split into segments of one hour length By default once a device is added to the system its schedule is automatically set to full time schedule recording and event handling You should...

Page 125: ...delete the recording configuration select and drag on the desired section on time table Set the Event Handling Schedule The Event Schedule defines when the event handling is activated To set the even...

Page 126: ...ce 3 Click Save Copy Schedule You may copy a camera s schedule setting to other multiple cameras This saves much your time on configuring the schedules camera by camera On the bottom of this page clic...

Page 127: ...page Event tab and select a camera or System to set Event rules Set System Event rule Whenever any hard disk goes into abnormal status ENR will trigger a response based on the rule you set 1 Click Se...

Page 128: ...et Camera Event rule Whenever any encounter certain events including detected motions detected DI triggers network loss and network recovery ENR will trigger a response based on the rule you set 1 Sel...

Page 129: ...l 129 2 Select your desired response type set the details and click OK to save the rules To delete a certain response simply de select it from the response window and then click OK 3 After all the rul...

Page 130: ...igure the preset points refer to Configure PTZ Preset Points on page 119 before you set the event rule You have to select which PTZ camera to make the movement then the preset points and duration time...

Page 131: ...ody in Body field then choose a camera whose snapshot will be attached from Attach a Snapshot dropdown list To enable this service you have to configure the SMTP settings please refer to Set E mail No...

Page 132: ...ent Rules You may copy a camera s event rules to other multiple cameras This saves much your time on setting up rules one by one On Event tab click Copy Select one camera as the source of schedule and...

Page 133: ...nt tab you may select an event rule under certain camera and click Clear to delete it To directly clear all event rules set under a certain camera click Clear This You may also clear all the rules in...

Page 134: ...b Storage The connected storage devices will be shown in the Storage Device list Format Hard Disks Select a disk and click Format You may execute disk formatting toward a newly installed disk You shou...

Page 135: ...www acti com ENR 100 Series System Administrator s Manual 135...

Page 136: ...em start carrying out the surveillance task for a disk that is not in ENR file system format is not ready for recording Please note that the system will stop recording during the disk formation If you...

Page 137: ...n be predicable thus it is important to detect these signs long before they really cause disk failures ENR performs S M A R T Disk check on 24 hour basis since last check This technology enables a sys...

Page 138: ...hard disk installed in ENR or a USB disk with at least 200MB space connected to ENR 2 Go to Setup page Maintenance tab Firmware Upgrade Click Browse find the target upg file and click Open 3 Click Up...

Page 139: ...ymmdd nvr file and save it to your client computer within one click The backed up settings include the following properties 1 System Settings including System Name Date Time Network Email Mouse and Ke...

Page 140: ...system make sure you have connected the USB disk with the desired nvr backup file in it and the backup file is saved in the root directory 1 Go to Setup page Maintenance tab Settings Backup Restore 2...

Page 141: ...llowed for all the operations in ENR while a standard normal user may only be permitted to do Live monitoring Go to Setup page User tab Add a Group By default the Administrator User Group with full pe...

Page 142: ...m Administrator s Manual 142 3 Click Save to save the group settings Edit Delete a Group You may edit an existing Group or delete it Select the user on Group List click Edit or Delete Please always cl...

Page 143: ...click OK to add it to the User List Account Password Rules 1 Account field allows alphabets numbers and symbols except the following The maximum length of characters is 15 2 Password field allows alph...

Page 144: ...3D Pro manufactured by Logitech 1 Connect the joystick to your client computer and install its driver 2 Log in to ENR and go to Setup page Joystick tab 3 There are 12 buttons available on each contro...

Page 145: ...shutdown system modify event settings upgrade firmware format storage backup restore system configuration modify schedule settings modify time modify e mail server settings modify system information m...

Page 146: ...acti com ENR 100 Series System Administrator s Manual 146 Export System Log To export the logs click Export and save the xml file to your local computer You may view this file with Notepad or XML Edi...

Page 147: ...move a camera view from a channel right click on the channel to bring up Channel Menu and click Disconnect E To remove all camera views at a time click Application on title bar and then Disconnect All...

Page 148: ...you click it again Save a Customized View You may save up to five customized view on local View List A saved view will remember 1 the layout style 2 camera arrangement 3 view size stretched un stretch...

Reviews: