background image

31

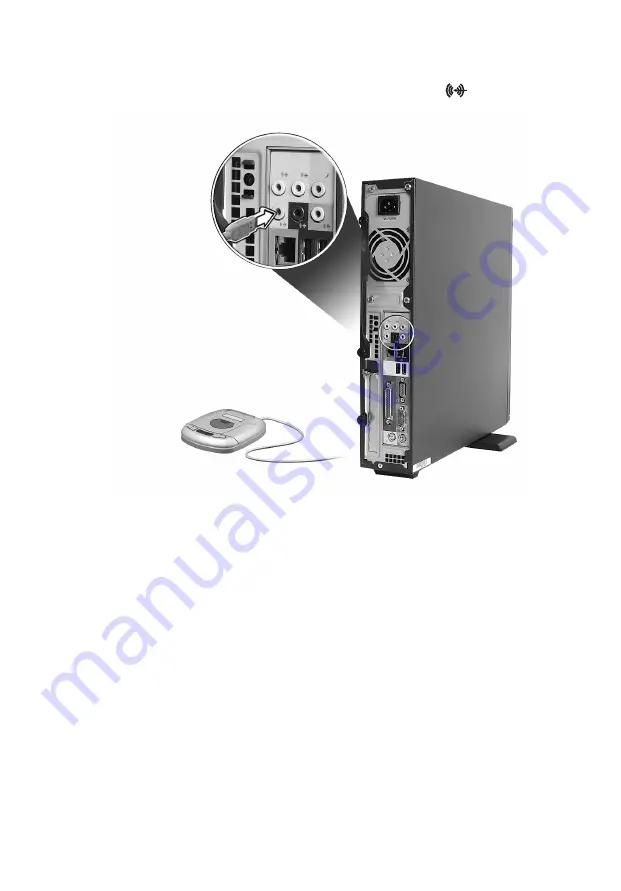
Audio line-in device: Connects to the audio-in/line-in jack 

 (light blue 

jack) located on the rear panel of your computer 

Connecting USB devices

Universal Serial Bus (USB) is a serial bus design capable of cascading peripherals 
such as a digital camera, keyboard, mouse, joystick, scanner, printer and 
modem. With USB, complex cable connections can be eliminated.

Your computer comes with eight external USB ports: four on the front and four 
on the rear panel. These ports support USB 2.0 high-performance external 
devices such as webcams and digital still cameras. They also allow you to 
connect additional USB devices to your computer without using up its resources.

Summary of Contents for Veriton 2800

Page 1: ...Veriton 2800 Series User s Guide...

Page 2: ...ce concerning your unit should include the serial number model number and purchase information No part of this publication may be reproduced stored in a retrieval system or transmitted in any form or...

Page 3: ...onment please recycle it USA For electronic products containing an LCD CRT monitor or display Lamp s inside this product contain mercury and must be recycled or disposed of according to local state or...

Page 4: ......

Page 5: ...care of your CDs and DVDs 18 Hard disk 18 3 Setting up your computer 19 Arranging a comfortable work area 21 Adjusting your chair 21 Positioning your PC 21 Positioning your monitor 22 Positioning your...

Page 6: ...ure your computer 41 Replacing the Veriton 2800 s hard disk 41 Installing an expansion card 41 5 System utilities 43 Adobe Reader 45 Norton AntiVirus 46 How do I check for viruses 46 NTI CD DVD Maker...

Page 7: ...battery statement 64 Laser compliance statement 65 Federal Communications Comission Declaration of Conformity 66 Declaration of Conformity for CE marking 67 Appendix B Taking care of your computer 69...

Page 8: ......

Page 9: ...1 First things first...

Page 10: ...This chapter describes the system specifications and contents of your computer package...

Page 11: ...Network interface Marvell 88E8052 with gigabit Ethernet Optional PCI modem I O interface Two PS 2 ports 9 pin serial port 25 pin parallel port Eight USB 2 0 ports Ethernet RJ 45 port VGA port Six aud...

Page 12: ...ration of your PC depends on the model purchased Management software Acer eManager Norton AntiVirus Industry standards PC2001 SMBIOS DMI 2 3 1 PCI 2 3 WFM 2 0 ACPI 2 0 Microsoft OnNow ENERGY STAR Macr...

Page 13: ...tained in the accessory box USB or PS 2 keyboard USB or PS 2 mouse User s Guide and installation poster Other user documentation and third party software Accessing the User s Guide This User s Guide i...

Page 14: ...1 First things first 6...

Page 15: ...7 2 System tour...

Page 16: ...This chapter discusses the features and components of your computer...

Page 17: ...y SATA hard disk Multimedia Intel high definition audio Supporting up to 7 1 surround sound audio CODEC support for 192 KHz quality multiple streams 3D quality audio system via onboard audio controlle...

Page 18: ...r panels Your computer s front and rear panels consist of the following Front panel No Icon Component 1 5 25 drive bay 2 3 5 drive bay 3 Microphone in jack front 4 Speaker out line out port 5 USB port...

Page 19: ...ord socket 3 PS 2 mouse port 4 PS 2 keyboard port 5 Serial port 6 Parallel printer port 7 CRT LCD monitor port 8 USB ports 9 Network port 10 Audio jack 11 Expansion slot 12 Chassis lock pad 13 Hardwar...

Page 20: ...ion keys For information on how to connect your keyboard see Connecting your mouse and keyboard on page 23 No Description No Description 1 Sleep button 2 Internet Email Search keys 3 Multimedia keys 4...

Page 21: ...ur current default browser Email Launches your email application Search Opens a search window Icon Key Description Backward Press to skip backward to the previous track or video file Play pause Press...

Page 22: ...ume down Press to decrease audio volume Mute Toggle sound on off Lock key Description Scroll Lock When activated the screen moves one line up or down when you press the up arrow or down arrow respecti...

Page 23: ...ne this key has the same effect as clicking on the Windows Start button it launches the Start menu It can also be used with other keys to provide a variety of functions Tab Activates the next Taskbar...

Page 24: ...ction keys The function keys F1 F12 let you perform specific functions depending on the application that uses them Palm rest The detachable palm rest provides you with a comfortable place to rest your...

Page 25: ...eo CDs but digital video disks DVDs as well DVD ROM is a type of disk media with enough storage space for a full length movie The CD RW DVD Dual and DVD super multi drive allow you to record or burn r...

Page 26: ...lens reader on the CD or DVD drive or stop the computer from successfully reading the disk When handling disks always hold them by the edges to avoid smudges or fingerprints When cleaning disks use a...

Page 27: ...3 Setting up your computer...

Page 28: ...This chapter contains step by step instructions on how to set up your computer and connect additional peripherals...

Page 29: ...ot necessarily mean you ll be properly supported It is necessary to adjust your chair to fit your body Proper body posture will make you more comfortable and productive Avoid tilting your chair If you...

Page 30: ...acing it too far away will make your body lean forward forcing you to sit in an unnatural position Placing it too high will add tension to your shoulder muscles The keyboard should be placed just abov...

Page 31: ...below are for your reference only Actual device models may vary in select countries Connecting your mouse and keyboard USB interface Plug your USB mouse or keyboard cable into any of the USB ports lo...

Page 32: ...ble into the monitor port blue port located on the rear panel of your computer Note When a VGA card is added to the PCI Express slot the monitor should be connected to the add on card and the onboard...

Page 33: ...25 Connecting the power cable Plug the power cable into the power cable socket located on the rear panel of your computer Then plug the other end of the power cable into a power outlet...

Page 34: ...the power cable is properly plugged into an electrical outlet If you are using a power strip or an AVR Auto Voltage Regulator make sure that it is plugged in and turned on Turning off your computer To...

Page 35: ...ed on the rear panel of your computer Note The printer shown below is for your reference only Actual device model may vary by country Note If you are using a serial printer connect the printer cable i...

Page 36: ...on the rear panel of your computer Connecting to the network You can connect your computer to a Local Area Network LAN using a network cable To do so simply plug the network cable into the network po...

Page 37: ...ur computer s multimedia features Note The multimedia devices shown below are for reference only Actual device models may vary in select countries Plug the devices in as follows Microphone Connects to...

Page 38: ...our computer Note To adjust the headphone volume use the volume control buttons on the keyboard You can also adjust the volume by using the volume icon on the taskbar at the bottom of your screen Exte...

Page 39: ...ch as a digital camera keyboard mouse joystick scanner printer and modem With USB complex cable connections can be eliminated Your computer comes with eight external USB ports four on the front and fo...

Page 40: ...nto any of the USB ports black located on the front and rear panels of your computer Note The USB devices shown below are for reference only Actual device models may vary by geographic region Note Som...

Page 41: ...4 Upgrading your computer...

Page 42: ...This chapter contains instructions on how to upgrade your computer and basic information about your system boards that you will find helpful when performing the upgrade process...

Page 43: ...in contact with the computer throughout any procedure requiring ESD protection Preinstallation instructions Always observe the following before you install any component 1 Turn off your computer and a...

Page 44: ...ng a computer component 1 See to it that the components are installed according to the step by step instructions in their respective sections 2 Replace any expansion boards or peripherals that you rem...

Page 45: ...structions To remove the computer cover 1 Turn off your computer and unplug all cables 2 Place your computer on a flat steady surface 3 Turn the thumbscrews counterclockwise with your fingers to relea...

Page 46: ...an connectors 3 CPU socket 4 Chassis intrusion connector 5 USB connectors 6 PCI Express x16 connector 7 PCI connector 8 CD audio connector 9 S PDIF audio connector 10 Hardware reset button connector 1...

Page 47: ...d in your computer Installing additional memory The two 240 pin sockets on the mainboard support Double Data Rate 2 DDR2 Synchronous Dynamic Random Access Memory SDRAM type DIMMs You may install 128 M...

Page 48: ...install a DDR2 DIMM 1 Locate the DDR2 DIMM socket on the mainboard 2 Align the DDR2 DIMM with the socket a Press the DDR2 DIMM into the socket until the clips lock onto the DDR2 DIMM b Note The DDR2...

Page 49: ...rd disk and reattach all cables to the new hard disk Note Make sure that the other ends of the disk cables are securely connected to their corresponding connectors on the mainboard 6 Reinstall the met...

Page 50: ...y seated 7 Remove the expansion card from its protective packaging 8 Align the expansion card with the slot on the riser card and firmly press it Make sure the expansion card is properly seated 9 Secu...

Page 51: ...5 System utilities...

Page 52: ...This chapter describes applications that are preinstalled on your computer...

Page 53: ...ry easy to use However if you need more help or information you may refer to the online help documentation provided in each software application Adobe Reader Adobe Reader is software that lets you vie...

Page 54: ...e Start menu in the Windows taskbar highlight Programs and select Norton AntiVirus 2 In the Norton AntiVirus main window click Scan for Viruses 3 In the Scan for Viruses panel click Scan My Computer 4...

Page 55: ...cal disks To copy an audio or data disk 1 Click the Quick Burning icon on the desktop 2 Insert the CD you would like to copy into the source drive and a blank disk into the target drive 3 Choose the s...

Page 56: ...ontrol It also has the i Power Internet Enabling feature which links to online DVD resources via the Power DVD Desktop Portal Page How do I open and watch a DVD In most cases when you insert a DVD int...

Page 57: ...ned on 2 Insert the System CD into the CD or DVD drive 3 Select the application that you want to reinstall 4 Follow all onscreen instructions until you finish the installation Recovering your system I...

Page 58: ...llow the steps below 1 Locate the hardware reset button See Front and rear panels on page 10 2 Press the button After a moment one of the following screens will appear on your display Please type in y...

Page 59: ...51 4 Select Factory Default Image...

Page 60: ...on your computer so make sure to back up your important files before starting the recovery process Note This feature occupies 2 GB in a hidden partition on your hard drive 6 If you attempt to restore...

Page 61: ...disk malfunction you can use the copy to restore your lost or damaged data How do I back up files from my hard drive To run the Backup utility 1 Click the Start button in the taskbar 2 Highlight All...

Page 62: ...the volume s free space making it less likely that new files will be fragmented How do I defragment my hard drive To run the Disk Defragmenter 1 Click the Start button in the taskbar 2 Highlight All P...

Page 63: ...7 Frequently asked questions...

Page 64: ...chapter tells you what to do in case your computer is not working properly However if a more serious problem arises contact your dealer or the technical support center www acersupport com for assista...

Page 65: ...r replace it with a system diskette and press Ctrl Alt Del to restart your computer The operating system files may be damaged or missing Insert the startup disk you created during Windows setup into t...

Page 66: ...knob on your USB keyboard to toggle from mute to sound on If headphones earphones or external speakers are connected to the line out jack of your computer the internal or built in speakers are automat...

Page 67: ...Appendix A Notices...

Page 68: ...ined by turning the device off and on the user is encouraged to try to correct the interference by one or more of the following measures Reorient or relocate the receiving antenna Increase the separat...

Page 69: ...bel that contains among other information the FCC Registration Number and Ringer Equivalence Number REN for this equipment Upon request you must provide this information to your telephone company If y...

Page 70: ...low all warnings and instructions marked on the product 2 Unplug this product from the wall outlet before cleaning Do not use liquid cleaners or aerosol cleaners Use a water moistened cloth for cleani...

Page 71: ...ayed b If liquid has been spilled onto the product c If the product has been exposed to rain or water d If the product does not operate normally when the operating instructions are followed Adjust onl...

Page 72: ...umbatteri Eksplosionsfare ved fejlagtig h ndtering Udskiftning m kun ske med batteri af samme fabrikat og type L ver det brugte batteri tilbage til leverand ren ADVARSEL Eksplosjonsfare ved feilaktig...

Page 73: ...TER TOUTE EXPOSITION AUX RAYONS LUOKAN 1 LASERLAITE LASER KLASSE 1 VORSICHT UNSICHTBARE LASERSTRAHLUNG WENN ABDECKUNG GE FFNET NICHT DEM STRAHLL AUSSETZEN PRODUCTO L SER DE LA CLASE I ADVERTENCIA RADI...

Page 74: ...nce and 2 This device must accept any interference received including interference that may cause undesired operation The following local manufacturer importer is responsible for this declaration Prod...

Page 75: ...nt This equipment has been approved to Council Decision 98 482 EC CTR21 for pan European single terminal connection to the Public Switched Telephone Network PSTN We Acer Inc hereby declare that the eq...

Page 76: ...Appendix A Notices 68...

Page 77: ...Appendix B Taking care of your computer...

Page 78: ...r place heavy objects on top of it Carefully route the power cord and any cables away from foot traffic When unplugging the power cord do not pull on the cord itself instead pull on the plug The total...

Page 79: ...monitor When to contact a service technician If you dropped and damaged the computer If liquid has been spilled onto the computer If the computer is not operating normally If a computer problem persis...

Page 80: ...Appendix B Taking care of your computer 72...

Page 81: ...ultimedia 9 performance 9 Frequently asked questions 57 blank screen 57 no audio 58 no sound 58 printer not working 58 system cannot read disk 58 system cannot write to disk 58 system did not boot up...

Page 82: ...PowerDVD 48 reinstalling programs 49 T turning off computer 26 software shutdown 26 suspend mode 26 turning on computer 26 power button 26 U upgrade add memory 39 install DDR DIMM 40 reconfigure compu...

Reviews: