Acer LCD Monitor Quick Start Guide (QSG)
Important safety instructions
Please read the following instructions carefully.
1. To clean the LCD monitor screen: Be sure that your monitor is electrically rated to operate with the adapter available in your
location.
• Turn off the LCD monitor and unplug the adapter.
• Spray a non-solvent cleaning solution ont
o a rag and clean the screen gently.
•
N
NEEV
VEER
R SSPPR
RA
AY
Y O
OR
R PPO
OU
UR
R A
AN
NY
Y LLIIQ
QU
UIID
D D
DIIR
REEC
CTTLLY
Y O
ON
NTTO
O TTH
HEE SSC
CR
REEEEN
N O
OR
R C
CA
ASSEE..
•
PPLLEEA
ASSEE D
DO
O N
NO
OTT U
USSEE A
AN
NY
Y A
AM
MM
MO
ON
NIIA
A O
OR
R A
ALLC
CO
OH
HO
OLL
--
B
BA
ASSEED
D C
CLLEEA
AN
NEER
RSS O
ON
N TTH
HEE LLC
CD
D D
DIISSPPLLA
AY
Y SSC
CR
REEEEN
N O
OR
R C
CA
ASSEE..
•
Acer will not be liable for dama ge resulting from use of any ammonia or alcohol
-
based cleaners.
2. Do not place the LCD monitor near a window. Exposing the monitor to rain, moisture or sunlight can severely damage it.
3. Do not apply pressure to the LCD screen. Excessive pressure may cause permanent damage to the display.
4. Do not remove the cover or attempt to service this unit yourself. An authorized technician should perform servicing of any
nature.
5. Store the LCD monitor in a room with a temperature of -20
° to
60° C (-4° to140° F). Storing the LCD monitor outside this ran
ge
may result in permanent damage.
6. Immediately unplug your monitor and call an authorized technician if any of the following circumstances occur:
•
Monitor
-
to
-
PC signal cable is frayed or damaged.
•
Liquid spills onto the LCD monitor or the monitor is exposed to rain.
• The LCD monitor or case is damaged.
A
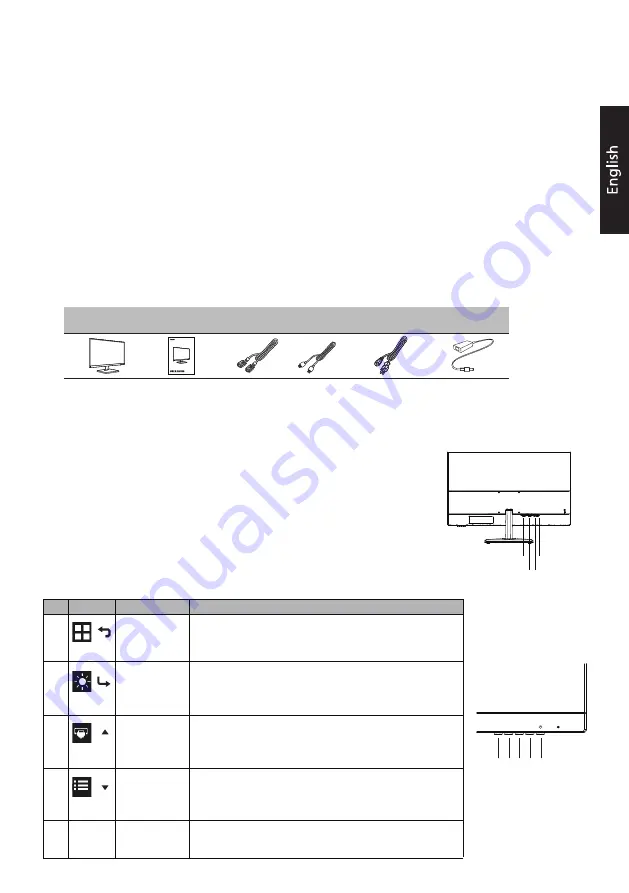
Package contents
ttaching the monitor to the base
1.
2.
3.
Connecting Your Monitor to a Computer
External Controls
LCD monitor
Quick start guide
VGA cable
HDMI cable
(Optional)
(Optional)
1. Turn off your monitor and unplug your computer’s power cord.
2. 2-1 Connect HDMI Cable (Only HDMI-input model)
a.Make sure both the monitor and computer are powered-OFF.
b.Connect the HDMI cable to the computer.
2-2 Connect VGA Cable (Only VGA-input model)
a.Make sure both the monitor and computer are powered-OFF.
b.Connect the VGA cable to the computer.
3. Connect the Audio Cable. (Only
Audio-out Model) (Optional)
4. Insert the monitor power cable into the power port at the back of the monitor.
5. Plug the power cords of your computer and your monitor into a nearby electrical outlet.
AC Power cord
AC Adapter
Remove the monitor
and base from the packaging.
Remove the two coin screws at the bottom of the stand.
Adjust the angle of the base, clip it into the stand, and tighten the two coin screws on the bottom of the base.
a. Press to view Main page. Press again to enter mode select
function.
b. When the Function Menu is active. Press to return previous
Menu or exit current Menu.
a. Press to view Main page. Press again to enter brightness
adjustment function.
b. When the Function Menu is active, this button will enter a
selection in the OSD.
a. Press to view Main page. Press again to enter Input select
function.
b. When the Function Menu is active, press this button selected
or move to the previous function.
a. Press to view Main page. Press again to enter next function
in the Function Menu.
b. When the Function Menu is active, press this key selected or
move to the next function.
Turns the monitor on/off.
Blue indicates power on. Orange indicates standby/power
saving mode.
No.
Icon
Item
Description
1
Mode/Exit
2
Brightness/
Enter
Input/-
3
4
Menu/+
5
POWER
Power button
/
/
/
/
LCD Monitor
EH3 series-EH273
HDMI
DC-19V
D-Sub
(VGA)
Audio Out
1 2 3 4 5


