


14
Chapter 1
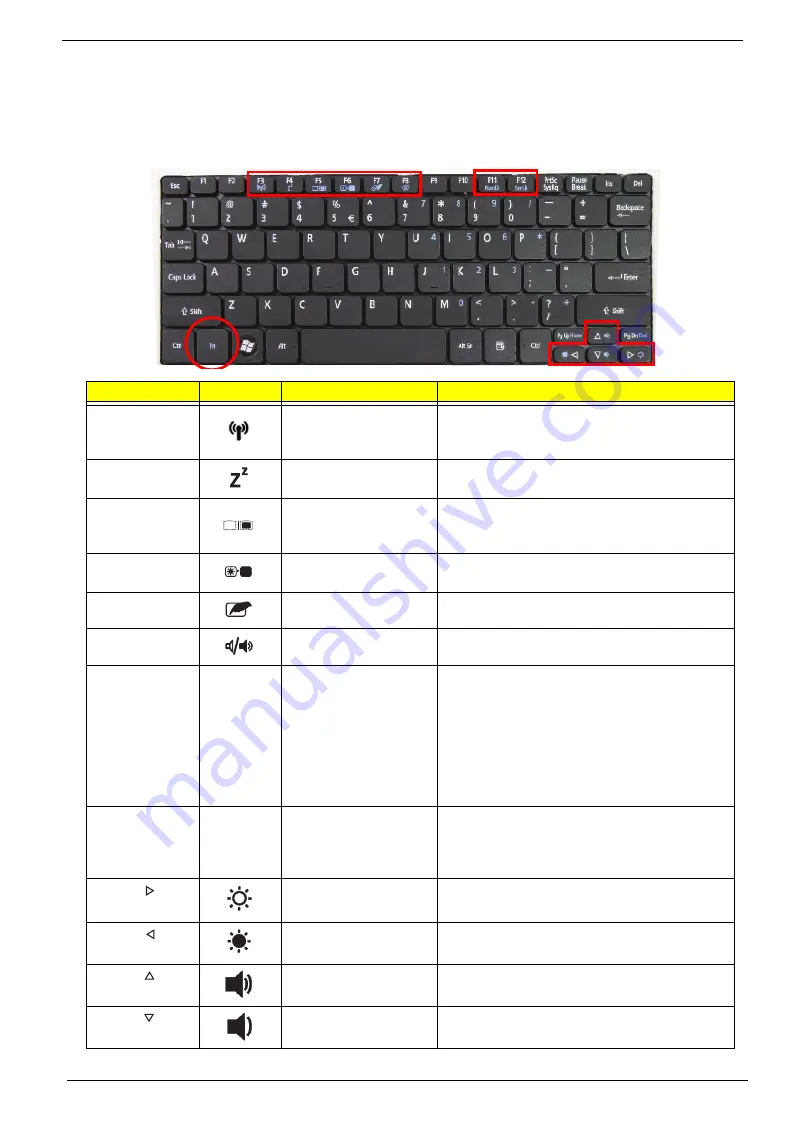
Hot Keys
The computer employs hotkeys or key combinations to access most of the computer's controls like screen
brightness and volume output.
To activate hotkeys, press and hold the
<Fn>
key before pressing the other key in the hotkey combination.
Hotkey
Icon
Function
Description
<Fn> + <F3>
Communication key
Enables/disables the computer’s
communication devices. (Communication
devices may vary by configuration.)
<Fn> + <F4>
Sleep
Puts the computer in Sleep mode.
<Fn> + <F5>
Display toggle
Switches display output between the display
screen, external monitor (if connected) and
both.
<Fn> + <F6>
Screen blank
Turns the display screen backlight off to save
power. Press any key to return.
<Fn> + <F7>
TouchPad toggle
Turns the internal TouchPad on and off.
<Fn> + <F8>
Speaker toggle
Turns the speakers on and off.
<Fn> + <F11>
Num Lock
When Num Lock is on, the embedded keypad is
in numeric mode. The keys function as a
calculator (complete with the arithmetic
ope, -, *, and /). Use this mode when
you need to do a lot of numeric data entry. A
better solution would be to connect an external
keypad.
<Fn> + <F11> only for certain models.
<Fn> + <F12>
Scroll Lock
When Scroll Lock is on, the screen moves one
line up or down when you press the up or down
arrow keys respectively. Scroll Lock does not
work with some applications.
<Fn> + < >
Brightness up
Increases the screen brightness.
<Fn> + < >
Brightness down
Decreases the screen brightness.
<Fn> + < >
Volume up
Increases the sound volume.
<Fn> + < >
Volume down
Decreases the sound volume.
Summary of Contents for Aspire One D255 Series
Page 6: ...VI ...
Page 10: ...X Table of Contents ...
Page 36: ...26 Chapter 1 ...
Page 53: ...Chapter 2 43 3 Execute MAC BAT to write MAC information to eeprom ...
Page 62: ...52 Chapter 3 5 Unlock the FPC 6 Remove the FPC and the keyboard ...
Page 90: ...80 Chapter 3 8 Remove the LCD module from the chassis ...
Page 133: ...Chapter 3 123 2 Push the battery lock latch in the direction shown to secure the battery ...
Page 134: ...124 Chapter 3 ...
Page 156: ...146 Chapter 4 ...
Page 264: ...254 Chapter 3 ...
Page 270: ...260 Appendix C ...