


14
Chapter 1
Hardware Specifications and Configurations
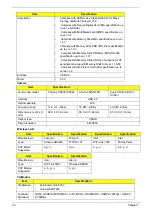
Processor
Processor Specifications
CPU Fan True Value Table
Throttling 50%: On = 88°C; Off = 85°C
EC shut down at 95°C; H/W shut down at 98°C
North Bridge Specifications
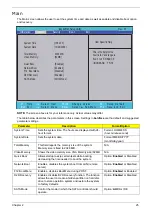
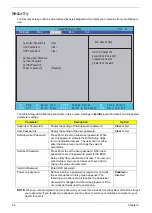
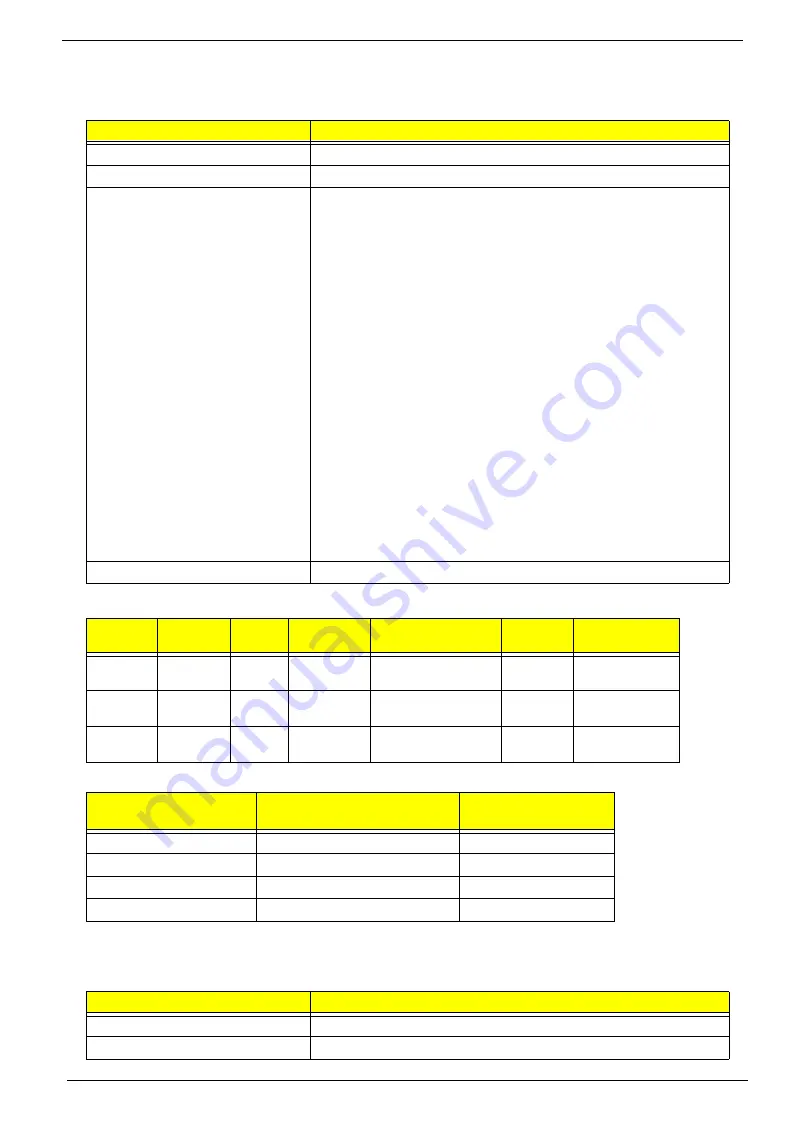
Item
Specification
CPU type
Intel Penryn SFF (ULV)
CPU package
Micro-FCBGA 956 balls
Features
•
Supports Intel architecture with Dynamic execution.
•
On-die, primary 32-kB instruction cache and 32-kB write-back
data cache.
•
On-die, up to 3MB second level shared cache with advanced
transfer cache architecture.
•
Streaming SIMD Extensions 2 (SSE2),Streaming SIMD
Extensions 3 (SSE3)
•
Supplemental streaming SIMD extensions 3 (SSSE3) and
SSE4.1 instruction sets.
•
800MHz source-synchronous front side bus (FSB)
•
Advanced power management features including Enhanced
Intel SpeedStep®
•
Technology and dynamic FSB frequency switching.
•
Digital thermal sensor (DTS).
•
Execute disable bit support for enhanced security.
•
Intel® Dynamic Acceleration Technology and Enhanced Multi
Threaded
•
Thermal Management (EmTTM).
•
Support enhanced Intel Virtualization Technology.
Core Logic
•
Mobile Intel® GS45 Express Chipset
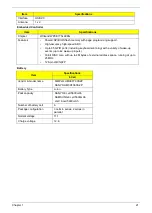
Item
CPU
Speed
Cores
Cache
Size
Package
Core
Voltage
Acer P/N
SU7300 1.4GHz
1
3MB
Micro-FCBGA
956
balls
1.050V-
1.150V
C2DSU7300B
SU4100
1.3GHz
2
2MB
Micro-FCBGA 956
balls
1.050V-
1.150V
PMDSU4100B
SU2300
1.2GHz
2
1MB
Micro-FCBGA 956
balls
1.050V-
1.150V
CMSU2300B
CPU Temperature
(Celsius)
Fan Speed (RPM)
SPL Spec (dBA)
38
2400
On
43
3300
26
49
4000
29
56
4500
31
Item
Specification
Chipset
Intel Crestline GS45 SFF
Package
FCBGA 1363 balls
Summary of Contents for Aspire 1420P Series
Page 6: ...vi...
Page 10: ...x Table of Contents...
Page 13: ...Chapter 1 3 System Block Diagram...
Page 32: ...22 Chapter 1...
Page 48: ...38 Chapter 2...
Page 64: ...54 Chapter 3 4 Unlock the FPC 5 Remove the FPC and keyboard...
Page 66: ...56 Chapter 3 4 Remove the hinge cap 5 Remove the hinge bezel...
Page 70: ...60 Chapter 3 10 Pull the upper cover away...
Page 94: ...84 Chapter 3 7 Pry up the bezel top edge and remove...
Page 119: ...Chapter 3 109 7 Insert the stylus...
Page 148: ...138 Chapter 3 2 Replace the HDD in the bay 3 Adhere the black tape 4 Replace the HDD FPC...
Page 202: ...192 Appendix A...
Page 212: ...202...
Page 215: ...205...
Page 216: ...206...


